2012 JEEP PATRIOT light
[x] Cancel search: lightPage 3 of 108

INTRODUCTION/WELCOMEWelcome From Chrysler Group LLC..2
CONTROLS AT A GLANCEDriver Cockpit..............4
Instrument Cluster............6
GETTING STARTEDKeyFob ..................8
Remote Start...............8
Theft Alarm................9
Seat Belt..................9
Supplemental Restraint
System (SRS) — Air Bags...... 10
Child Restraints.............11
FrontSeats ................13
RearSeats................ 14
HeatedSeats ...............15
Tilt Steering Column......... 16
OPERATING YOUR VEHICLEEngine Break-In
Recommendations............17
Turn Signal/Lights Lever........18
Wiper/Washer Lever......... 19
Speed Control.............20
Continuously Variable Automatic
Transmission (CVT)...........21
Manual Climate Controls.......22
Automatic Temperature
Controls (ATC).............23
Power Sunroof.............24
Wind Buffeting.............25
ELECTRONICSYour Vehicle's Sound System....26
Media Center 130
(Sales Code RES)...........28
Media Center 130 With Satellite
Radio (Sales Code RES + RSC) . . . 30
Media Center 230
(Sales Code REQ)...........32
Media Center 430/430N
(Sales Code RBZ/RHB)........35
Sirius XM™Satellite Radio/
Travel Link................44
Steering Wheel Audio Controls . . . 48
iPod®/USB/MP3 Control.......48
Uconnect™ Phone...........49
Uconnect™ Voice Command.....53
Bluetooth® Streaming Audio.....55
Electronic Vehicle Information
Center (EVIC).............55
Programmable Features.......56
Universal Garage Door Opener
(HomeLink®)..............57PowerInverter .............60
Power Outlet.............. 61
OFF-ROAD CAPABILITIESFour-Wheel Drive Operation.....62
UTILITYTrailer Towing Weights (Maximum
Trailer Weight Ratings)........64
Recreational Towing (Behind
Motorhome, Etc.)...........65
WHAT TO DO IN EMERGENCIES24-Hour Towing Assistance.....66
Instrument Cluster Warning
Lights..................66
If Your Engine Overheats.......70
Automatic Transmission
Overheating...............71
Jacking And Tire Changing......71
Jump-Starting Procedures......76
Shift Lever Override..........79
Towing A Disabled Vehicle......80
Freeing A Stuck Vehicle........81
Event Data Recorder (EDR).....82
MAINTAINING YOUR VEHICLEOpening The Hood..........83
Engine Compartment.........84
Fluids And Capacities.........86
Maintenance Chart..........88
Fuses................... 91
TirePressures..............93
Wheel And Wheel Trim Care.....94
Exterior Bulbs.............94
CONSUMER ASSISTANCEChrysler Group LLC Customer
Center ..................95
Chrysler Canada Inc. Custome
rCenter .................95
Assistance For The Hearing
Impaired.................95
Publications Ordering.........95
Reporting Safety Defects In
The 50 United States
And Washington, D.C..........96
MOPAR ACCESSORIESAuthentic Accessories
ByMOPAR®...............97
INDEX.................98
FAQ(HowTo?)Frequently Asked Questions.....101
TABLE OF CONTENTS
Page 7 of 108

A. Turn Signal/Lights Lever pg. 18
B. Electronic Vehicle Information
Center (EVIC) Controls pg. 55
C. Electronic Vehicle Information
Center (EVIC) Display pg. 55
D. Instrument Cluster pg. 6
E. Wiper/Washer Lever pg. 19
F. Audio System (non-touch-screen-
radio shown) pg. 26G. Climate Controls pg. 22
H. Power Outlet/Cigar Lighter pg. 61
I. Transmission Gear Selector
J. SWITCH PANEL
− Heated Seat Switches pg. 15
− Electronic Stability Control
pg. 66
− Hazard SwitchK. Speed Control pg. 20
L. Tilt Steering Column Lever pg. 16
M. Power Mirrors
N. Power Door Locks
O. Power Windows
CONTROLS AT A GLANCE
5
Page 8 of 108

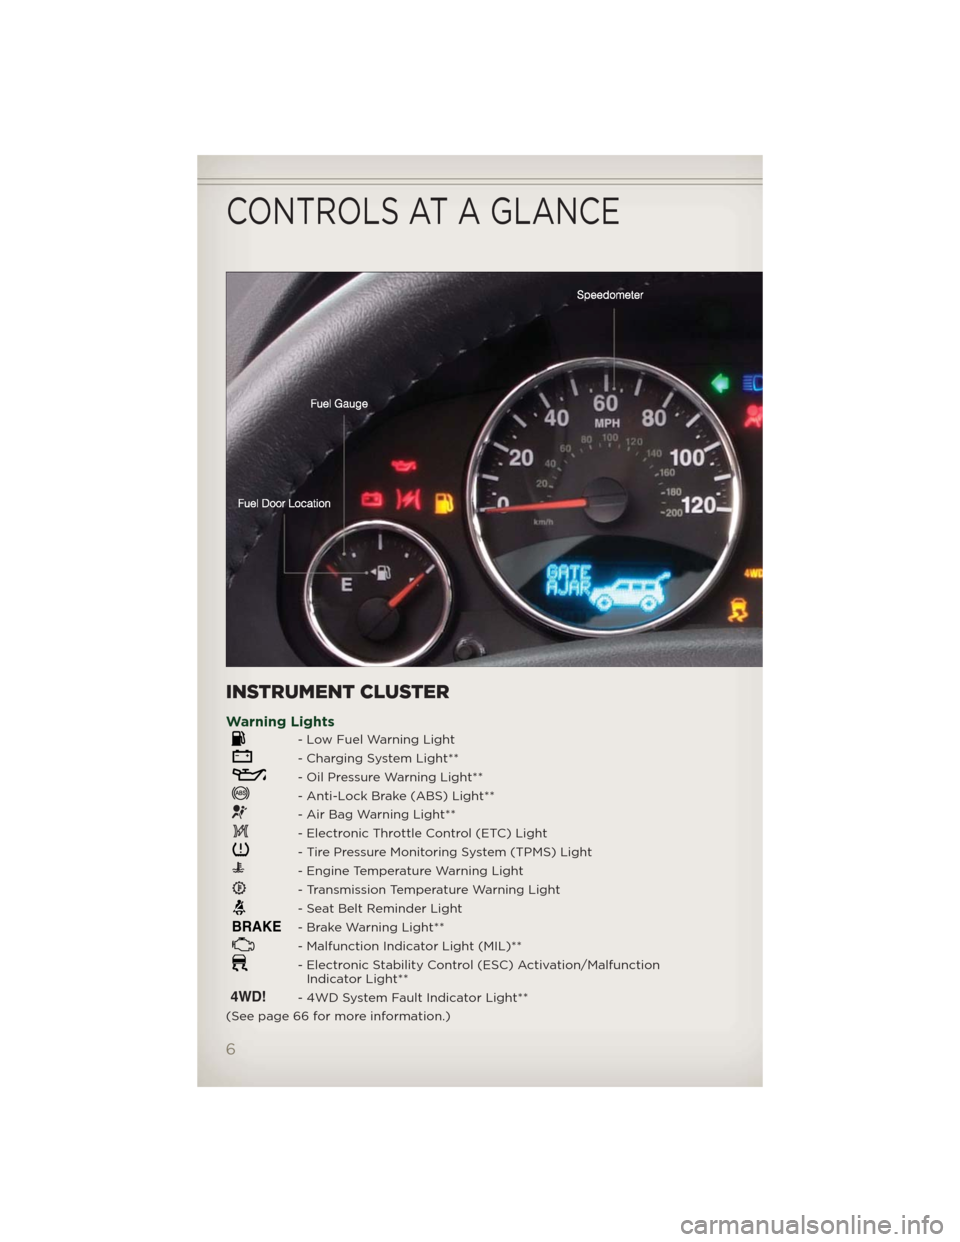
INSTRUMENT CLUSTER
Warning Lights
- Low Fuel Warning Light
- Charging System Light**
- Oil Pressure Warning Light**
- Anti-Lock Brake (ABS) Light**
- Air Bag Warning Light**
- Electronic Throttle Control (ETC) Light
- Tire Pressure Monitoring System (TPMS) Light
- Engine Temperature Warning Light
- Transmission Temperature Warning Light
- Seat Belt Reminder Light
BRAKE- Brake Warning Light**
- Malfunction Indicator Light (MIL)**
- Electronic Stability Control (ESC) Activation/Malfunction
Indicator Light**
4WD!- 4WD System Fault Indicator Light**
(See page 66 for more information.)
CONTROLS AT A GLANCE
6
Page 9 of 108

Indicators
- Turn Signal Indicators
- High Beam Indicator
- Front Fog Light Indicator
- Vehicle Security Indicator*
4WD- 4WD Indicator
- Electronic Stability Control (ESC) Off Indicator
CRUISE- Speed Control Indicator
- Hill Descent Control Indicator
OFF ROAD - OFF ROAD Indicator
Odometer Messages
door - Door Ajar LoW tirE - Low Tire Pressure
gATE - GateAjar CHANgE OIL* - Change Engine Oil
gASCAP - Fuel Cap Fault
* If equipped
** Bulb Check with Key On
CONTROLS AT A GLANCE
7
Page 12 of 108

WARNING!
In a collision, you and your passengers can suffer much greater
injuries if you are not buckled up properly. You can strike the interior
of your vehicle or other passengers, or you can be thrown out of the
vehicle. Always be sure you andothers in your vehicle are buckled up
properly.
SUPPLEMENTAL RESTRAINT SYSTEM (SRS) — AIR
BAGS
• This vehicle has Advanced Front Air Bags for both the driver and right
front passenger as a supplement to the seat belt restraint system. The
Advanced Front Air Bags will not deploy in every type of collision.
• Advanced Front Air Bags are designed to provide additional protection
by supplementing the seat belts in certain frontal collisions depending
on the severity and type of collision. Advanced Front Air Bags are not
expected to reduce the risk of injury in rear, side, or rollover collisions.
• This vehicle is equipped with Supplemental Side Air Bag Inflatable
Curtains to protect the driver, front and rear passengers sitting next to a
window.
• This vehicle may be equipped with Supplemental Seat-Mounted Side Air
Bags to provide enhanced protection to help protect an occupant during
a side impact.
• If the Air Bag Warning Light
is not on during starting, stays on, or
turns on while driving, have the vehicle serviced by an authorized service
center immediately.
• Refer to the Owner's Manual on the DVD for further details regarding the
Supplemental Restraint System (SRS).
WARNING!
• Relying on the air bags alone could lead to more severe injuries in a
collision. The air bags work with your seat belt to restrain you
properly. In some collisions, the air bags won't deploy at all. Always
wear your seat belts even though you have air bags.
• Being too close to the steering wheel or instrument panel during
Advanced Front Air Bag deployment could cause serious injury,
including death. Air bags need room to inflate. Sit back, comfortably
extending your arms to reach the steering wheel or instrument
panel.
• Supplemental Side Air Bag Inflatable Curtains and Supplemental
Seat-Mounted Side Air Bags need room to inflate. Do not lean
against the door or window. Sit upright in the center of the seat.
(Continued)
GETTING STARTED
10
Page 20 of 108

TURN SIGNAL/LIGHTS LEVER
Headlights/Parking Lights
• Rotate the end of the lever to the first detent for parking lightsand to the second detent for headlights.
Instrument Panel Dimmer
• Rotate the center portion of the lever to the extreme bottom position to
fully dim the instrument panel lights and prevent the interior lights from
illuminating when a door is opened.
• Rotate the center portion of the lever up to increase the brightness of
the instrument panel lights when the parking lights or headlights are on.
• Rotate the center portion of the lever upward to the next detent position
to brighten the odometer and radio controls when the parking lights or
headlights are on.
• Rotate the center portion of the lever upward to the last detent to turn
on the interior lighting.
Flash To Pass
• Pull the lever toward you to activate the high beams. The high beams will
remain on until the lever is released.
High Beam Operation
• Push the lever forward to activate the high beams.
NOTE:For safe driving, turn off the high beams when oncoming traffic is
present to prevent headlight glare and as a courtesy to other motorists.
Fog Lights
• Turn on the parking lights or low beam headlights and pull out the end of
the lever.
Turn Signals/Lane Change Assist
• Tap the lever up or down once and the turn signal (right or left) will flash
three times and automatically turn off.
OPERATING YOUR VEHICLE
18
Page 25 of 108

AUTOMATIC TEMPERATURE CONTROLS (ATC)
Automatic Operation
• Turn the Mode and Blower Controls to the AUTO position.
• Select the desired temperature by rotating the Temperature Control.
• The system will maintain the set temperature automatically.
Air Conditioning
• If the air conditioning button is pressed while in the AUTO mode, the
indicator light may flash three times to indicate the cabin air is being
controlled automatically.
Air Recirculation
• Use recirculation for maximum A/C operation.
• For window defogging, turn the air recirculation button off.
• If the recirculation button is pressed while in the AUTO mode, the
indicator light may flash three times to indicate the cabin air is being
controlled automatically.
Heated Mirrors
• The mirrors are heated to melt frost or ice. This feature is activated
whenever you turn on the rear window defroster.
OPERATING YOUR VEHICLE
23
Page 59 of 108

• Press the power door UNLOCK switch to unlock the doors. A single
chime will indicate that programming is complete.
Sound Horn With Lock
• To turn the horn chirp on or off when the doors are locked:
• Press the LOCK button for at least 4 seconds, but no longer than
10 seconds. Then, press the PANIC button while still holding the LOCK
button.
• Release both buttons at the same time.
Flashing Lights With Lock
• The turn signal lights flashing, when the doors are locked or unlocked,
feature can be turned on or off. To turn this feature on or off:
• Press and hold the UNLOCK button for at least 4 seconds, but no longer
than 10 seconds. Then, press and hold the LOCK button while still
holding the UNLOCK button.
• Release both buttons at the same time.
UNIVERSAL GARAGE DOOR OPENER (HomeLink®)
• HomeLink® replaces up to three hand-held transmitters that operate
devices such as garage door openers, motorized gates, lighting or home
security systems. The HomeLink® unit is powered by your vehicles 12 Volt
battery.
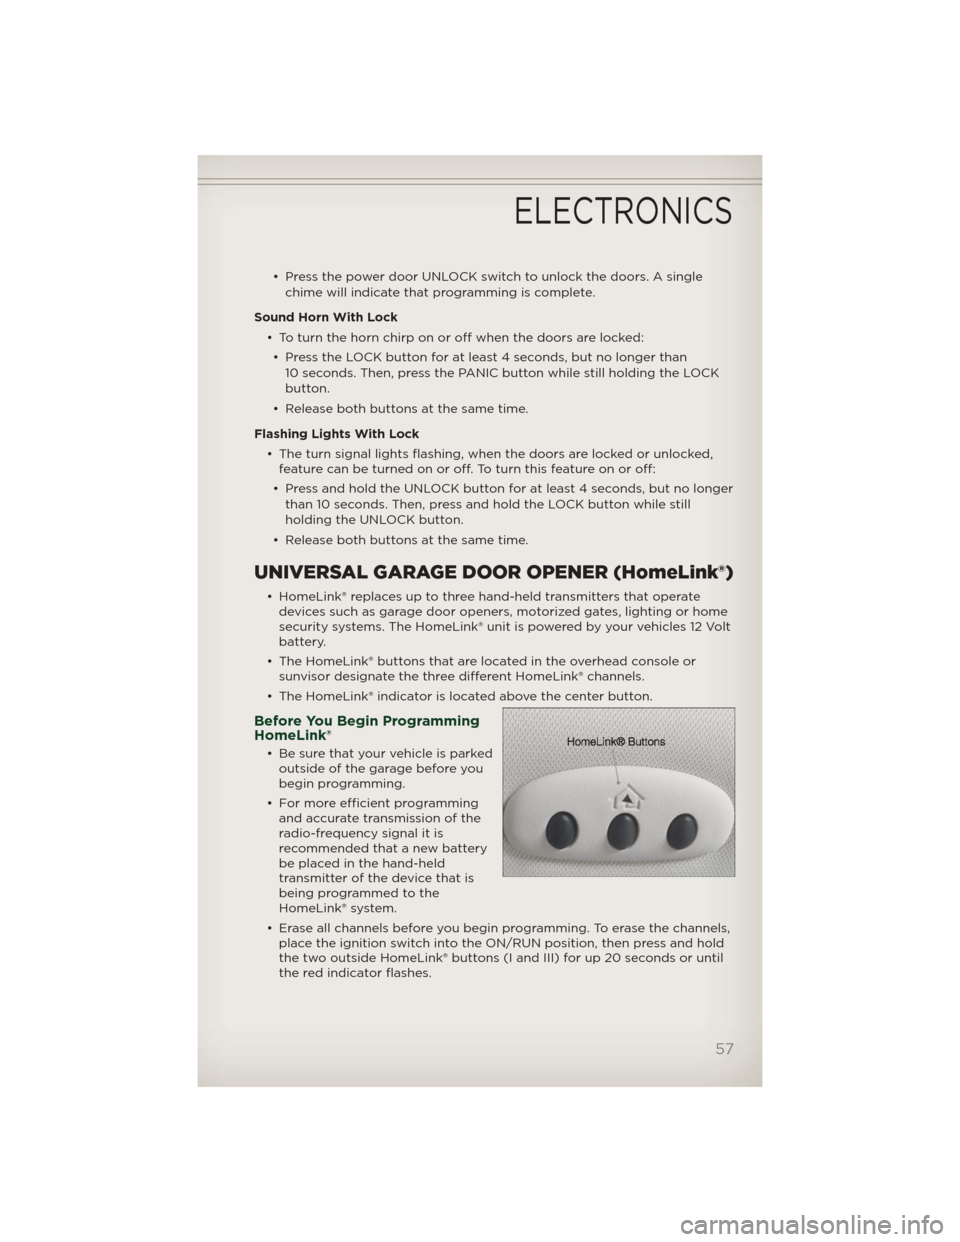
• The HomeLink® buttons that are located in the overhead console or
sunvisor designate the three different HomeLink® channels.
• The HomeLink® indicator is located above the center button.
Before You Begin Programming
HomeLink®
• Be sure that your vehicle is parked
outside of the garage before you
begin programming.
• For more efficient programming
and accurate transmission of the
radio-frequency signal it is
recommended that a new battery
be placed in the hand-held
transmitter of the device that is
being programmed to the
HomeLink® system.
• Erase all channels before you begin programming. To erase the channels,
place the ignition switch into the ON/RUN position, then press and hold
the two outside HomeLink® buttons (I and III) for up 20 seconds or until
the red indicator flashes.
ELECTRONICS
57