Page 448 of 558

3. If using another vehicle to jump-start the battery, park
the vehicle within the jumper cables reach, set the
parking brake and make sure the ignition is OFF.
WARNING!
Do not allow vehicles to touch each other as this
could establish a ground connection and personal
injury could result.
Jump-Starting Procedure
WARNING!
Failure to follow this procedure could result in per-
sonal injury or property damage due to battery ex-
plosion.
CAUTION!
Failure to follow these procedures could result in
damage to the charging system of the booster vehicle
or the discharged vehicle.
1. Connect the positive (+)end of the jumper cable to the
positive (+)post of the discharged vehicle.
2. Connect the opposite end of the positive (+)jumper
cable to the positive (+)post of the booster battery.
3. Connect the negative end (-)of the jumper cable to the
negative (-)post of the booster battery.
4. Connect the opposite end of the negative (-)jumper
cable to a good engine ground (exposed metal part of the
discharged vehicle’s engine) away from the battery and
the fuel injection system.
446 WHAT TO DO IN EMERGENCIES
Page 457 of 558
MAINTAINING YOUR VEHICLE
CONTENTS
�Engine Compartment — 3.7L ............. 457
� Onboard Diagnostic System — OBD II ...... 458
▫ Loose Fuel Filler Cap Message ........... 458
� Emissions Inspection And Maintenance
Programs ............................ 459
� Replacement Parts ..................... 461
� Dealer Service ........................ 461
� Maintenance Procedures ................. 461
▫ Engine Oil ......................... 462 ▫
Engine Oil Filter ..................... 465
▫ Engine Air Cleaner Filter ............... 465
▫ Maintenance-Free Battery .............. 466
▫ Air Conditioner Maintenance ............ 467
▫ A/C Air Filter – If Equipped ............ 468
▫ Body Lubrication .................... 468
▫ Windshield Wiper Blades ............... 469
▫ Adding Washer Fluid ................. 470
▫ Exhaust System ..................... 470
7
Page 460 of 558
ONBOARD DIAGNOSTIC SYSTEM — OBD II
Your vehicle is equipped with a sophisticated onboard
diagnostic system called OBD II. This system monitors
the performance of the emissions, engine, and automatic
transmission control systems. When these systems are
operating properly, your vehicle will provide excellent
performance and fuel economy, as well as engine emis-
sions well within current government regulations.
If any of these systems require service, the OBD II system
will turn on the “Malfunction Indicator Light (MIL).” It
will also store diagnostic codes and other information to
assist your service technician in making repairs. Al-
though your vehicle will usually be drivable and not
need towing, see your authorized dealer for service as
soon as possible.CAUTION!
•Prolonged driving with the MIL on could cause
further damage to the emission control system. It
could also affect fuel economy and drivability. The
vehicle must be serviced before any emissions
tests can be performed.
•If the MIL is flashing while the engine is running,
severe catalytic converter damage and power loss
will soon occur. Immediate service is required.
Loose Fuel Filler Cap Message
If the vehicle diagnostic system determines that the fuel
filler cap is loose, improperly installed, or damaged, a
“gASCAP” message will display in the odometer or a
“CHECK gASCAP” message will be displayed in the
Electronic Vehicle Information Center (EVIC). Refer to
458 MAINTAINING YOUR VEHICLE
Page 464 of 558
CAUTION!
•Failure to properly maintain your vehicle or per-
form repairs and service when necessary could
result in more costly repairs, damage to other
components or negatively impact vehicle perfor-
mance. Immediately have potential malfunctions
examined by an authorized Chrysler Group LLC
dealership or qualified repair center.
•Your vehicle has been built with improved fluids
that protect the performance and durability of
your vehicle and also allow extended maintenance
intervals. Do not use chemical flushes in these
components as the chemicals can damage your
engine, transmission, power steering or air condi-
tioning. Such damage is not covered by the New
Vehicle Limited Warranty. If a flush is needed
because of component malfunction, use only the
specified fluid for the flushing procedure.
Engine Oil
Checking Oil Level
To assure proper engine lubrication, the engine oil must
be maintained at the correct level. Check the oil level at
regular intervals, such as every fuel stop. The best time to
check the engine oil level is about five minutes after a
fully warmed up engine is shut off.
Checking the oil while the vehicle is on level ground will
improve the accuracy of the oil level readings. Always
maintain the oil level within the SAFE zone on the
dipstick. Adding 1 quart (0.9 L) of oil when the reading is
at the bottom of the SAFE zone will result in a reading at
the top of the safe zone on these engines.
462 MAINTAINING YOUR VEHICLE
Page 466 of 558
CAUTION!
Do not use chemical flushes in your engine oil as the
chemicals can damage your engine. Such damage is
not covered by the New Vehicle Limited Warranty.
Engine Oil Viscosity
SAE 5W-20 engine oil is recommended for all operating
temperatures. This engine oil improves low temperature
starting and vehicle fuel economy. The engine oil filler
cap also shows the recommended engine oil viscosity for
your engine. For information on engine oil filler cap
location, refer to “Engine Compartment” in “Maintaining
Your Vehicle” for further information.
Lubricants which do not have both the engine oil certi-
fication mark and the correct SAE viscosity grade num-
ber should not be used.
Synthetic Engine Oils
You may use synthetic engine oils provided the recom-
mended oil quality requirements are met, and the recom-
mended maintenance intervals for oil and filter changes
are followed.
Materials Added To Engine Oil
Do not add any supplemental additives, other than leak
detection dyes, to your engine oil. Engine oil is an
engineered product and its performance may be im-
paired by supplemental additives.
Disposing Of Used Engine Oil And Oil Filters
Care should be taken in disposing of used engine oil and
oil filters from your vehicle. Used oil and oil filters,
indiscriminately discarded, can present a problem to the
environment. Contact your authorized dealer, service
station, or governmental agency for advice on how and
where used oil and oil filters can be safely discarded in
your area.
464 MAINTAINING YOUR VEHICLE
Page 473 of 558
into the passenger compartment. In addition, inspect the
exhaust system each time the vehicle is raised for lubri-
cation or oil change. Replace as required.
WARNING!
•Exhaust gases can injure or kill. They contain
carbon monoxide (CO), which is colorless and
odorless. Breathing it can make you unconscious
and can eventually poison you. To avoid breathing
CO, refer to “Safety Tips/Exhaust Gas” in “Things
To Know Before Starting Your Vehicle” for further
information.
•A hot exhaust system can start a fire if you park
over materials that can burn. Such materials might
be grass or leaves coming into contact with your
exhaust system. Do not park or operate your ve-
hicle in areas where your exhaust system can
contact anything that can burn.
CAUTION!
•The catalytic converter requires the use of un-
leaded fuel only. Leaded gasoline will destroy the
effectiveness of the catalyst as an emissions con-
trol device and may seriously reduce engine per-
formance and cause serious damage to the engine.
•Damage to the catalytic converter can result if your
vehicle is not kept in proper operating condition.
In the event of engine malfunction, particularly
involving engine misfire or other apparent loss of
performance, have your vehicle serviced promptly.
Continued operation of your vehicle with a severe
malfunction could cause the converter to overheat,
resulting in possible damage to the converter and
vehicle.
7
MAINTAINING YOUR VEHICLE 471
Page 498 of 558
Cavity CartridgeFuseMini-
Fuse Description
M18 — 15 Amp BlueExterior Lighting –
Right Front Park and
Side Marker, Right
Tail and Running
Lights
M19 — 25 Amp NaturalAutomatic Shutdown
#1 and #2
M20 — 15 Amp BlueInterior Lighting/
Steering Wheel
Switches – If
Equipped/Switch
Bank/Steering Col-
umn Module – If
Equipped
M21 — 20 Amp YellowAutomatic Shutdown
#3Cavity Cartridge
FuseMini-
Fuse Description
M22 — 10 Amp RedRight Horn (Hi/Low)
M23 — 10 Amp RedLeft Horn (Hi/Low)
M24 — 25 Amp NaturalRear Wiper – If
Equipped
M25 — 20 Amp YellowFuel Pump, Diesel
Lift Pump – If
Equipped
M26 — 10 Amp RedPower Mirror Switch/
Driver Window
Switch
M27 — 10 Amp RedIgnition Switch/
Wireless Control
Module/Steering Col-
umn Lock – If
Equipped
496 MAINTAINING YOUR VEHICLE
Page 500 of 558
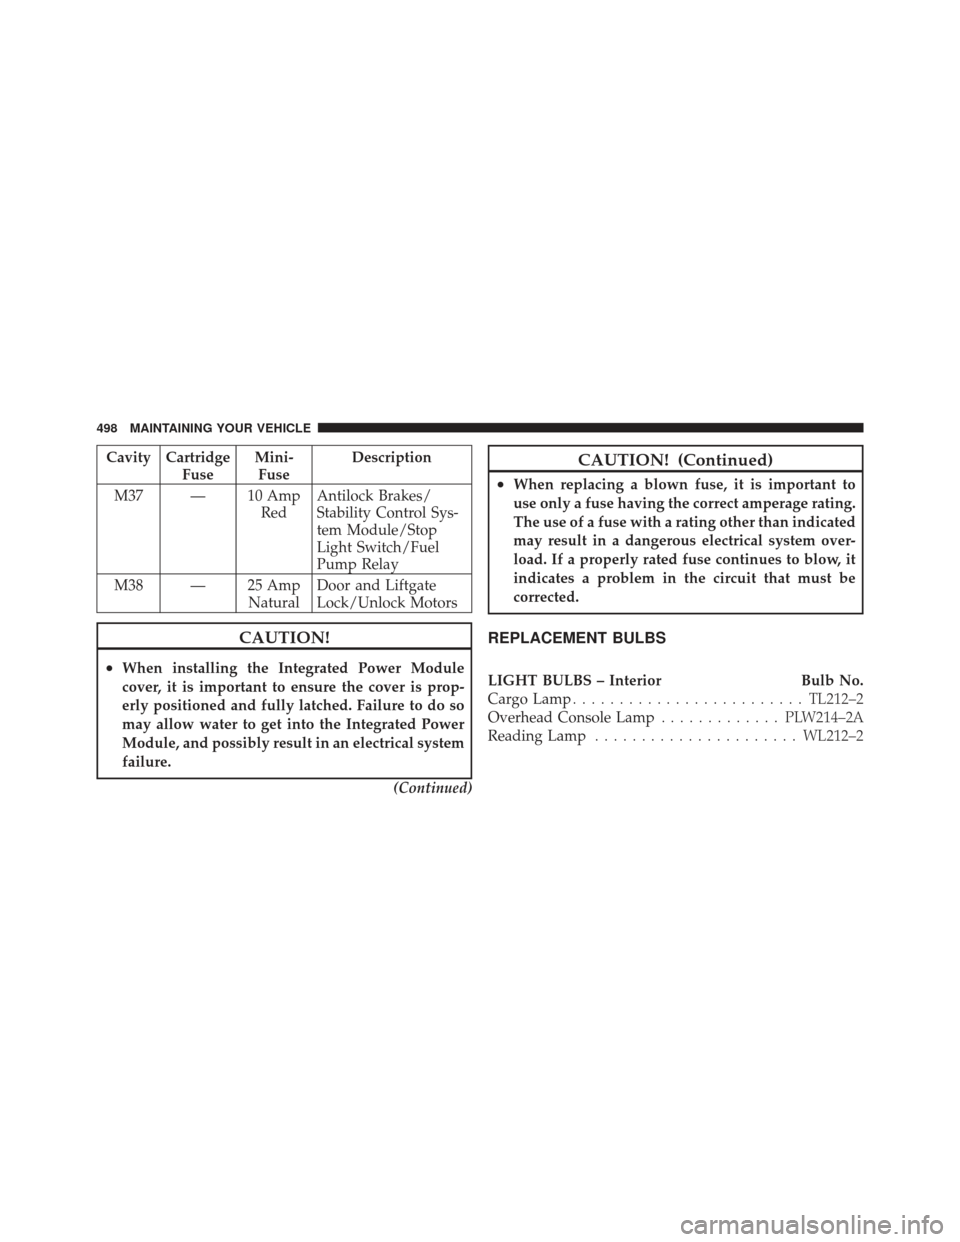
Cavity CartridgeFuseMini-
Fuse Description
M37 — 10 Amp RedAntilock Brakes/
Stability Control Sys-
tem Module/Stop
Light Switch/Fuel
Pump Relay
M38 — 25 Amp NaturalDoor and Liftgate
Lock/Unlock Motors
CAUTION!
•When installing the Integrated Power Module
cover, it is important to ensure the cover is prop-
erly positioned and fully latched. Failure to do so
may allow water to get into the Integrated Power
Module, and possibly result in an electrical system
failure.
(Continued)
CAUTION! (Continued)
•When replacing a blown fuse, it is important to
use only a fuse having the correct amperage rating.
The use of a fuse with a rating other than indicated
may result in a dangerous electrical system over-
load. If a properly rated fuse continues to blow, it
indicates a problem in the circuit that must be
corrected.
REPLACEMENT BULBS
LIGHT BULBS – Interior Bulb No.
Cargo Lamp ......................... TL212–2
Overhead Console Lamp ............. PLW214–2A
Reading Lamp ...................... WL212–2
498 MAINTAINING YOUR VEHICLE