Page 485 of 558
Adding Fluid
Fluid should be added only to fill hole until fluid begins
to run out of the hole.
Draining Fluid
First remove the fill plug (1), then the drain plug (2).
Recommended tightening torque for the drain and fill
plugs is 15–25 ft lbs (20–34 N·m).
CAUTION!
Do not over-tighten the plugs. You could damage
them and cause a leak.
Lubricant Selection
Use only manufacturer’s recommended fluid. Refer to
“Fluids, Lubricants, and Genuine Parts” in “Maintaining
Your Vehicle” for further information.
Frequency Of Fluid Change
Under normal operating conditions, the fluid installed at
the factory will give satisfactory lubrication for the life of
the vehicle. Fluid changes are not necessary unless the
fluid becomes contaminated with water. Change the fluid
immediately if contaminated with water.
Front/Rear Axle Fluid
For normal service, periodic fluid level checks are not
required. When the vehicle is serviced for other reasons
the exterior surfaces of the axle assembly should be
inspected. If gear oil leakage is suspected inspect the
fluid level. Refer to “Fluids, Lubricants, and Genuine
Parts” in “Maintaining Your Vehicle” for further informa-
tion.
Fluid Level Check
•
Front axle lubricant should be at the bottom edge of
the oil fill hole when the vehicle is in a level position.
7
MAINTAINING YOUR VEHICLE 483
Page 486 of 558
•Rear axle lubricant should be 0.5 in (11 mm) below the
bottom edge of the oil fill hole when the vehicle is in a
level position.
Adding Fluid
Add lubricant only at the fill hole and only to the level
specified above.
Lubricant Selection
Use only manufacturer’s recommended lubricant. Refer
to “Fluids, Lubricants, and Genuine Parts” in “Maintain-
ing Your Vehicle” for further information.
Frequency Of Fluid Change
Under normal operating conditions, the lubricant in-
stalled at the factory will give satisfactory lubrication for
the life of the vehicle. Lubricant changes are not neces-
sary unless the lubricant becomes contaminated with
water. Change the lubricant immediately if contaminated
with water.
Sky Slider™ Top Care
Immediate removal of any contaminant is recommended.
Regular washing of the top will enhance its life and
appearance, and make successive cleaning easier. Do not
subject the top to excessive heat. Frequently vacuum the
top and tracks. Periodically wipe dust and dirt from the
top and inside of the tracks by hand with an alcohol
dampened cloth.
Washing
Hand washing or an automatic car wash with a soft cloth
system is preferred.
CAUTION!
Avoid pointing a high-pressure hand held spray
wand directly at the sides of the top, as this can
damage the seal and force water past the weather
strips.
484 MAINTAINING YOUR VEHICLE
Page 491 of 558
Wheel And Wheel Trim Care
•
All wheels and wheel trim, especially aluminum and
chrome plated wheels, should be cleaned regularly
with a mild soap and water to prevent corrosion.
•To remove heavy soil and/or excessive brake dust, use
MOPAR�Wheel Cleaner or equivalent or select a
non-abrasive, non-acidic cleaner.
CAUTION!
Do not use scouring pads, steel wool, a bristle brush,
or metal polishes. Do not use oven cleaner. These
products may damage the wheel’s protective finish.
Avoid automatic car washes that use acidic solutions
or harsh brushes that may damage the wheel’s pro-
tective finish. Only MOPAR� Wheel Cleaner or
equivalent is recommended.
Stain Repel Fabric Cleaning Procedure – If
Equipped
Stain Repel seats may be cleaned in the following man-
ner:
•Remove as much of the stain as possible by blotting
with a clean, dry towel.
•Blot any remaining stain with a clean, damp towel.
•For tough stains, apply MOPAR� Total Clean or
equivalent, or a mild soap solution to a clean, damp
cloth and remove the stain. Use a fresh, damp towel to
remove soap residue.
•For grease stains, apply MOPAR� Multi-Purpose
Cleaner or equivalent to a clean, damp cloth and
remove the stain. Use a fresh, damp towel to remove
soap residue.
•Do not use any harsh solvents or any other form of
protectants on Stain Repel products.
7
MAINTAINING YOUR VEHICLE 489
Page 492 of 558
Interior Care
Instrument Panel Cover
The instrument panel cover has a low glare surface,
which minimizes reflections in the windshield. Do not
use protectants or other products, which may cause
undesirable reflections. Use soap and warm water to
restore the low glare surface.
Cleaning Interior Trim
Clean interior trim with a damp cloth and MOPAR�Total
Clean or equivalent, and if necessary, follow with
MOPAR� Spot & Stain Remover or equivalent. Do not
use harsh cleaners or Armor All�. Use MOPAR� Total
Clean or equivalent to clean vinyl upholstery.
Cleaning Leather Upholstery
MOPAR� Total Clean or equivalent is specifically recom-
mended for leather upholstery. Your leather upholstery can be best preserved by regular
cleaning with a damp soft cloth. Small particles of dirt
can act as an abrasive and damage the leather upholstery
and should be removed promptly with a damp cloth.
Stubborn soils can be removed easily with a soft cloth
and MOPAR�
Total Clean or equivalent. Care should be
taken to avoid soaking leather upholstery with any
liquid. Please do not use polishes, oils, cleaning fluids,
solvents, detergents, or ammonia-based cleaners to clean
leather upholstery. Application of a leather conditioner is
not required to maintain the original condition.
WARNING!
Do not use volatile solvents for cleaning purposes.
Many are potentially flammable, and if used in
closed areas they may cause respiratory harm.
490 MAINTAINING YOUR VEHICLE
Page 501 of 558
LIGHT BULBS – ExteriorBulb No.
Headlamp ......................... 9008 H13
Front Park/Turn Signal Lamp .............3757AK
Front Side Marker Lamp ................... 168
Back-Up Lamp ........................ 3157K
Center High Mounted Stop Lamp (CHMSL) ..... LED
(serviced at an authorized dealer)
Fog Lamp .......................... H10 9145
License Plate Lamp ....................... 168
Rear Tail/Stop ......................... 3157K
Rear Turn Signal Lamp .................3757AK
BULB REPLACEMENT
Headlamp
1. Open the hood.
2. Reach behind the headlamp housing to access the
headlamp bulb lock ring. 3. Firmly grasp the lock ring and rotate it counterclock-
wise to unlock it.
4. Remove the bulb and connector assembly from the
headlamp housing.
5. Disconnect the bulb from the electrical connector and
then connect the replacement bulb.
CAUTION!
Do not touch the new bulb with your fingers. Oil
contamination will severely shorten bulb life. If the
bulb comes in contact with any oily surface, clean the
bulb with rubbing alcohol.
6. Install the bulb and connector assembly into the
headlamp housing and rotate the lock ring clockwise to
lock it in place.
7. Close the hood.
7
MAINTAINING YOUR VEHICLE 499
Page 502 of 558
Front Turn Signal And Front Side Marker Lamp
1. Turn the steering wheel all the way to the right to
access the left front turn signal or side marker. Turn the
steering wheel all the way to the left to access the right
front turn signal or side marker.
2. Remove three push-pins from the wheel-well liner.
3. Gently flex the wheel-well liner forward to access the
bulb.
4. Rotate the bulb’s socket counterclockwise, and remove
the bulb and socket assembly from the housing.
5. Pull the bulb out of the socket and insert the replace-
ment bulb.
6. Install the bulb and socket assembly into the housing,
and rotate the socket clockwise to lock it in place.
7. Reposition the wheel-well liner and install the
push-pins.
Front Fog Lamp
1. Open the hood.
2. Reach behind the headlamp housing to access the
bulb.
3. Rotate the bulb’s socket counterclockwise, and remove
the bulb and socket assembly from the fog lamp housing.
4. Pull the bulb out of the socket and insert the replace-
ment bulb.
CAUTION!
Do not touch the new bulb with your fingers. Oil
contamination will severely shorten bulb life. If the
bulb comes in contact with any oily surface, clean the
bulb with rubbing alcohol.
500 MAINTAINING YOUR VEHICLE
Page 504 of 558
7. Pull the appropriate bulb(s) out of the back plate and
insert the replacement bulb(s).
8. Install the back plate and screws into the taillamp
housing.9. Connect the electrical connector.
10. Install the taillamp housing and screws.
11. Close the liftgate.
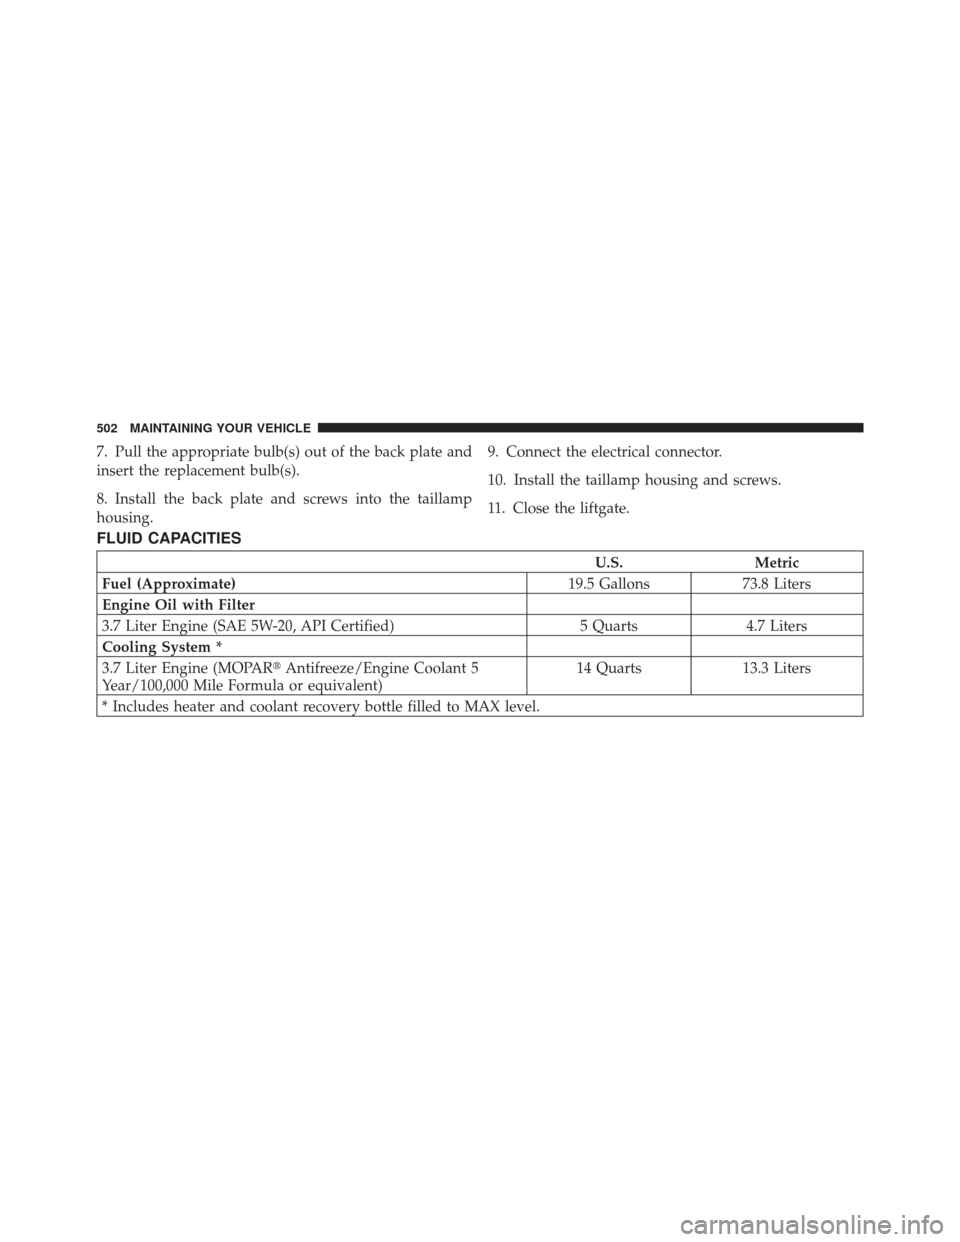
FLUID CAPACITIES
U.S.
Metric
Fuel (Approximate) 19.5 Gallons73.8 Liters
Engine Oil with Filter
3.7 Liter Engine (SAE 5W-20, API Certified) 5 Quarts4.7 Liters
Cooling System *
3.7 Liter Engine (MOPAR� Antifreeze/Engine Coolant 5
Year/100,000 Mile Formula or equivalent) 14 Quarts
13.3 Liters
* Includes heater and coolant recovery bottle filled to MAX level.
502 MAINTAINING YOUR VEHICLE
Page 505 of 558
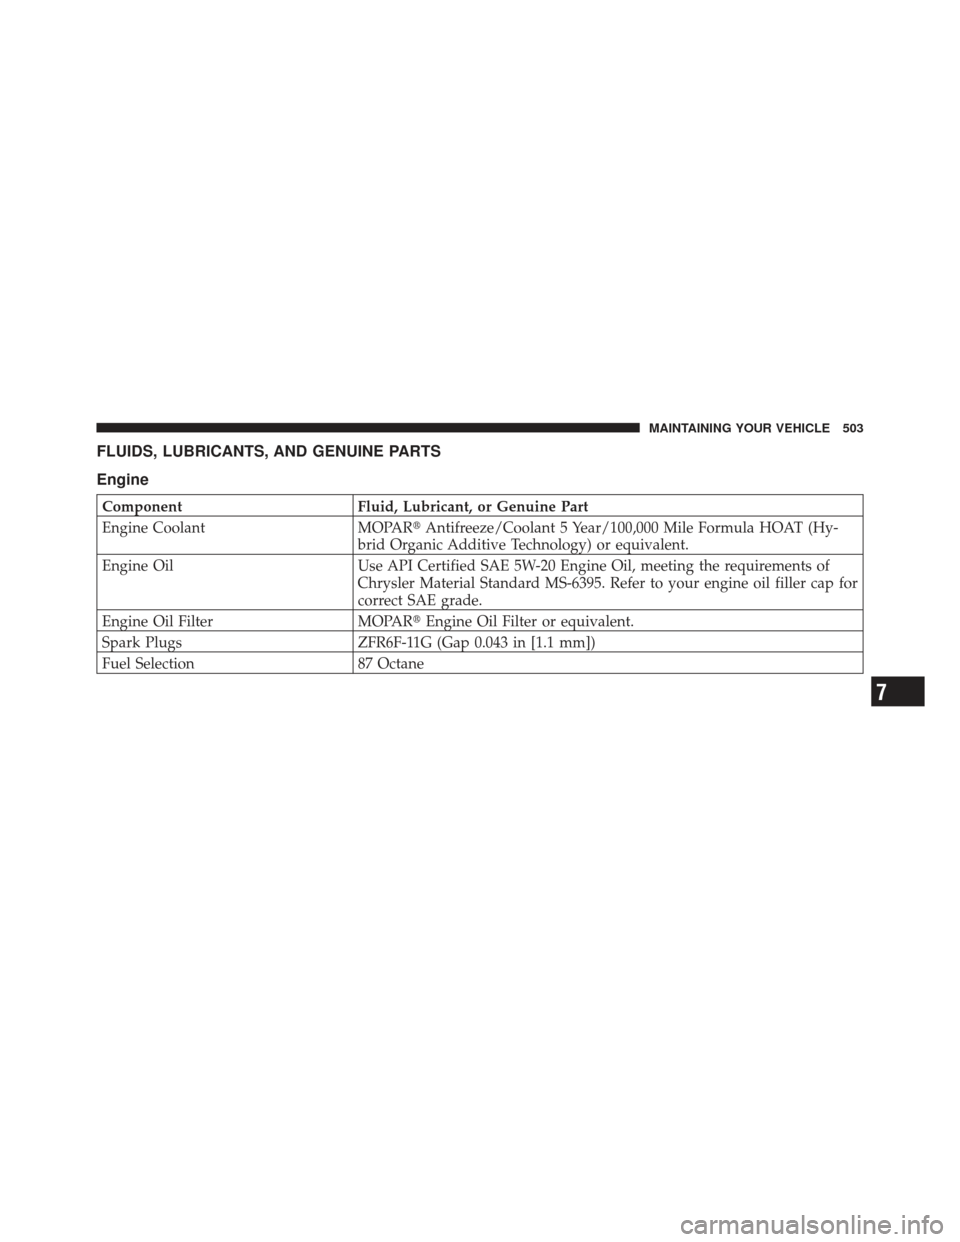
FLUIDS, LUBRICANTS, AND GENUINE PARTS
Engine
ComponentFluid, Lubricant, or Genuine Part
Engine Coolant MOPAR�Antifreeze/Coolant 5 Year/100,000 Mile Formula HOAT (Hy-
brid Organic Additive Technology) or equivalent.
Engine Oil Use API Certified SAE 5W-20 Engine Oil, meeting the requirements of
Chrysler Material Standard MS-6395. Refer to your engine oil filler cap for
correct SAE grade.
Engine Oil Filter MOPAR�Engine Oil Filter or equivalent.
Spark Plugs ZFR6F-11G (Gap 0.043 in [1.1 mm])
Fuel Selection 87 Octane
7
MAINTAINING YOUR VEHICLE 503