Page 369 of 558
Light” comes on continuously with the engine running, a
malfunction has been detected in the ESC system. If this
light remains on after several ignition cycles, and the
vehicle has been driven several miles (kilometers) at
speeds greater than 30 mph (48 km/h), see your autho-
rized dealer as soon as possible to have the problem
diagnosed and corrected.
The “ESC Activation/Malfunction Indicator Light” (lo-
cated in the instrument cluster) starts to flash as soon as
the tires lose traction and the ESC system becomes active.
The “ESC Activation/Malfunction Indicator Light” also
flashes when TCS is active. If the “ESC Activation/
Malfunction Indicator Light” begins to flash during ac-
celeration, ease up on the accelerator and apply as little
throttle as possible. Be sure to adapt your speed and
driving to the prevailing road conditions.NOTE:
•The “ESC Activation/Malfunction Indicator Light”
and the “ESC OFF Indicator Light” come on momen-
tarily each time the ignition switch is turned ON.
•Each time the ignition is turned ON, the ESC system
will be ON even if it was turned off previously.
•The ESC system will make buzzing or clicking sounds
when it is active. This is normal; the sounds will stop
when ESC becomes inactive following the maneuver
that caused the ESC activation.
The “ESC OFF Indicator Light” indicates the
Electronic Stability Control (ESC) is off.
5
STARTING AND OPERATING 367
Page 394 of 558
The TPMS consists of the following components:
•Receiver Module
•Four Tire Pressure Monitoring Sensors
•Tire Pressure Monitoring Telltale Light
The matching full-size spare wheel and tire assembly (if
equipped) has a tire pressure monitoring sensor. The
matching full-size spare can be used in place of any of the
four road tires. The TPMS will only monitor the pressure
in the full-size spare when it is used in place of a road
tire. Otherwise, a spare with a pressure below the low-
pressure limit will not cause the “Tire Pressure Monitor-
ing Telltale Light” to illuminate or the chime to sound.
Tire Pressure Monitoring Low Pressure Warnings
The “Tire Pressure Monitoring Telltale Light” will
illuminate in the instrument cluster, a “LOW TIRE
PRESSURE” message will display in the instru-
ment cluster, and a chime will sound when tire pressure
is low in one or more of the four active road tires. Should
this occur, you should stop as soon as possible, check the
inflation pressure of each tire on your vehicle, and inflate
each tire to the vehicle’s recommended cold placard
pressure value. Once the system receives the updated tire
pressures, the system will automatically update and the
“Tire Pressure Monitoring Telltale Light” will turn off.
The vehicle may need to be driven for up to 20 minutes
above 15 mph (24 km/h) in order for the TPMS to receive
this information.
392 STARTING AND OPERATING
Page 397 of 558
•Three Trigger Modules (mounted in three of the four
wheel-wells)
•Various Tire Pressure Monitoring System messages,
which display in the Electronic Vehicle Information
Center (EVIC)
•Tire Pressure Monitoring Telltale Light
The matching full size spare wheel and tire assembly (if
equipped) has a tire pressure monitoring sensor. The full
size spare can be used in place of any of the four road
tires. A spare with a pressure below the low-pressure
limit will not cause the “Tire Pressure Monitoring Telltale
Light” to illuminate or the chime to sound. However, it
will cause a “SPARE LOW PRESSURE” message to
display in the EVIC.
Tire Pressure Monitoring Low Pressure Warnings
The “Tire Pressure Monitoring Telltale Light” will
illuminate in the instrument cluster and a chime will sound when tire pressure is low in one or more of the
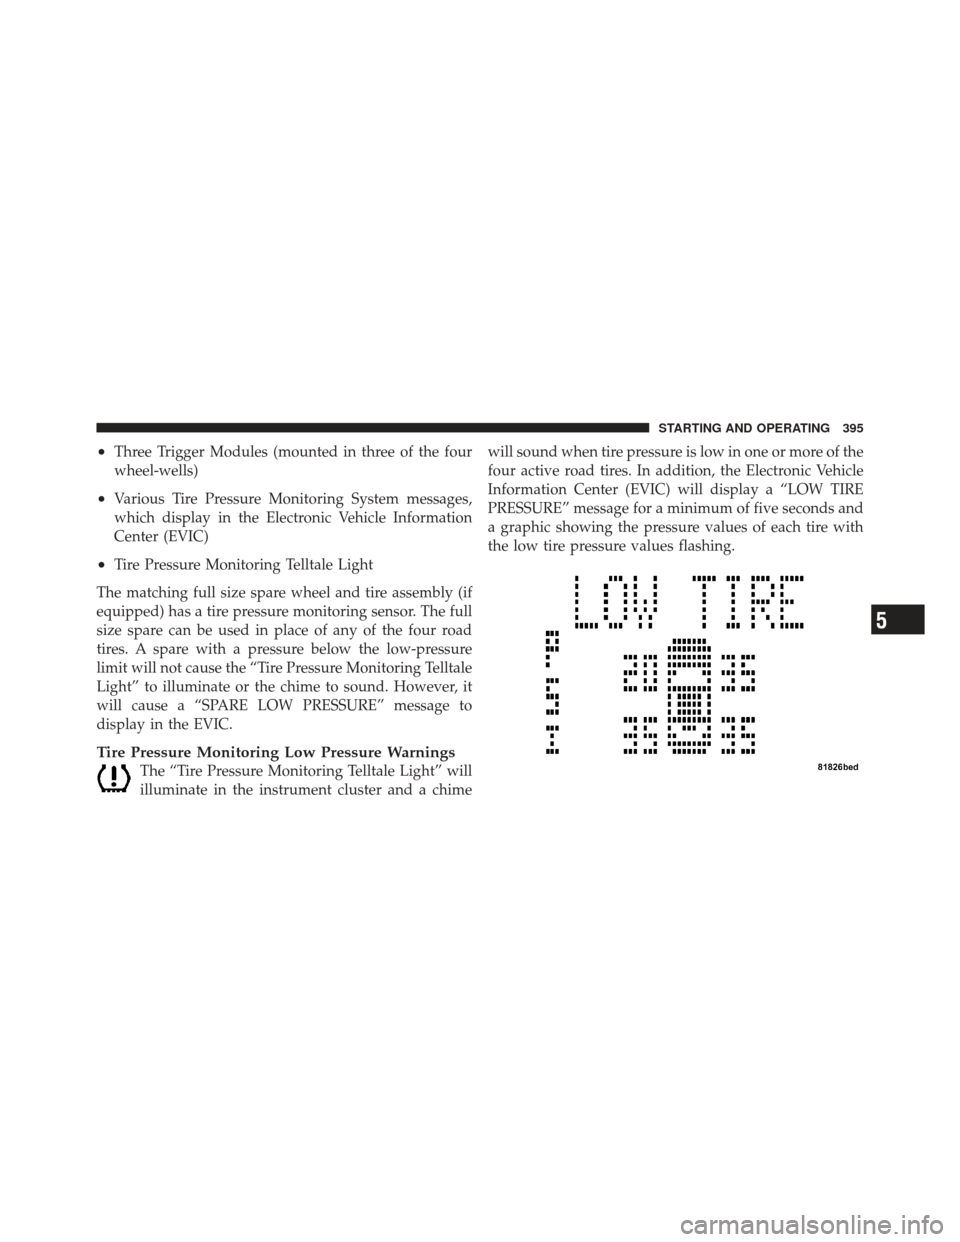
four active road tires. In addition, the Electronic Vehicle
Information Center (EVIC) will display a “LOW TIRE
PRESSURE” message for a minimum of five seconds and
a graphic showing the pressure values of each tire with
the low tire pressure values flashing.
5
STARTING AND OPERATING 395
Page 493 of 558

Cleaning Headlights
Your vehicle has plastic headlights that are lighter and
less susceptible to stone breakage than glass headlights.
Plastic is not as scratch resistant as glass and therefore
different lens cleaning procedures must be followed.
To minimize the possibility of scratching the lenses and
reducing light output, avoid wiping with a dry cloth. To
remove road dirt, wash with a mild soap solution fol-
lowed by rinsing.
Do not use abrasive cleaning components, solvents, steel
wool or other aggressive material to clean the lenses.
Glass Surfaces
All glass surfaces should be cleaned on a regular basis
with MOPAR�Glass Cleaner or any commercial
household-type glass cleaner. Never use an abrasive type
cleaner. Use caution when cleaning the inside rear win-
dow equipped with electric defrosters or the right rear quarter window equipped with the radio antenna. Do
not use scrapers or other sharp instruments, which may
scratch the elements.
When cleaning the rear view mirror, spray cleaner on the
towel or rag that you are using. Do not spray cleaner
directly on the mirror.
Cleaning Plastic Instrument Cluster Lenses
The lenses in front of the instruments in this vehicle are
molded in clear plastic. When cleaning the lenses, care
must be taken to avoid scratching the plastic.
1. Clean with a wet soft rag. A mild soap solution may be
used, but do not use high alcohol content or abrasive
cleaners. If soap is used, wipe clean with a clean damp
rag.
2. Dry with a soft cloth.
7
MAINTAINING YOUR VEHICLE 491
Page 497 of 558
Cavity CartridgeFuseMini-
Fuse Description
M11 — 10 Amp RedClimate Control Sys-
tem – If Equipped
M12 — 30 Amp GreenRadio/Amplifier – If
Equipped
M13 — 20 Amp YellowInstrument Cluster/
Wireless Control
Module/
Multifunction Control
Switch, Siren – If
Equipped
M14 — 20 Amp YellowTrailer Tow (Export
Only) – If EquippedCavity Cartridge
FuseMini-
Fuse Description
M15 — 20 Amp YellowInstrument Cluster/
Rear View Mirror/
Tire Pressure
Monitor/Transfer
Case Module – If
Equipped/Glow
Plugs – If Equipped
M16 — 10 Amp RedAirbag Module
M17 — 15 Amp BlueExterior Lighting –
Left Front Park and
Side Marker, Left Tail
and Running, License
Lights
7
MAINTAINING YOUR VEHICLE 495
Page 508 of 558
MAINTENANCE SCHEDULE
The Scheduled Maintenance services listed in this
manual must be done at the times or mileages specified
to protect your vehicle warranty and ensure the best
vehicle performance and reliability. More frequent main-
tenance may be needed for vehicles in severe operating
conditions, such as dusty areas and very short trip
driving. Inspection and service should also be done
anytime a malfunction is suspected.
Your vehicle is equipped with an automatic oil change
indicator system. The oil change indicator system will
remind you that it is time to take your vehicle in for
scheduled maintenance.
On Electronic Vehicle Information Center (EVIC)
equipped vehicles, “Oil Change Required” will be dis-
played in the EVIC and a single chime will sound,
indicating that an oil change is necessary.On Non-EVIC equipped vehicles, “Change Oil” will flash
in the instrument cluster odometer and a single chime
will sound, indicating that an oil change is necessary.
Based on engine operation conditions, the oil change
indicator message will illuminate. This means that ser-
vice is required for your vehicle. Operating conditions
such as frequent short-trips, trailer tow, extremely hot or
cold ambient temperatures, and E85 fuel usage will
influence when the “Change Oil” message is displayed.
Depending on operating conditions, the message may
appear as early as 3,500 miles (5 630 km) since last reset.
Have your vehicle serviced as soon as possible, within
the next 500 miles (805 km).
8
M
A I
N T
E
N A
N CE
S
C
H E
D
U L
E
S506 MAINTENANCE SCHEDULES
Page 509 of 558
NOTE:
•The oil change indicator message will not monitor the
time since the last oil change. Change your vehicle’s
oil if it has been six months since your last oil change,
even if the oil change indicator message is NOT
illuminated.
•Change your engine oil more often if you drive your
vehicle off-road for an extended period of time.
•Under no circumstances should oil change intervals
exceed 8,000 miles (13 000 km) or six months, which-
ever comes first.
Your authorized dealer will reset the oil change indicator
message after completing the scheduled oil change. If a
scheduled oil change is performed by someone other
than your authorized dealer, the message can be reset by referring to the steps described under “Electronic Vehicle
Information Center (EVIC)/Oil Change Required” in
“Understanding Your Instrument Panel” or under “In-
strument Cluster Description/Odometer/Trip Odom-
eter” in “Understanding Your Instrument Panel” for
further information.
At Each Stop For Fuel
•Check the engine oil level about five minutes after a
fully warmed engine is shut off. Checking the oil level
while the vehicle is on level ground will improve the
accuracy of the oil level reading. Add oil only when
the level is at or below the ADD or MIN mark.
•Check the windshield washer solvent and add if
required.
8
M
A I
N T
E
N A
N CE
S
C
H E
D
U L
E
SMAINTENANCE SCHEDULES 507
Page 544 of 558

Passing............................ 162
Replacing .......................... 499
Switch ............................ 158
Time Delay ......................... 160
Heated Mirrors ......................... 102
Heated Seats ........................... 140
Heater ............................... 301
Heater, Engine Block ..................... 321
High Beam Indicator ..................... 227
High Beam/Low Beam Select (Dimmer) Switch . . 162
Hill Descent Control ..................... 361
Hill Descent Control Indicator ............230,361
Hill Start Assist ......................... 358
Hitches Trailer Towing ....................... 414
Holder, Coin ........................... 207
Holder, Cup ........................... 205
HomeLink® (Garage Door Opener) Transmitter . . 184
Hood Release .......................... 156 Ignition
............................... 12
Key ............................... 12
Ignition Key Removal ..................... 12
Illuminated Entry ........................ 20
Immobilizer (Sentry Key) ................... 14
Infant Restraint ........................ 78,79
Inflation Pressure Tires .................... 378
Information Center, Vehicle ................. 239
Inside Rearview Mirror .................... 99
Instrument Cluster .................... 223,224
Instrument Panel and Controls .............. 222
Instrument Panel Cover ................... 490
Instrument Panel Lens Cleaning ............. 491
Integrated Power Module (Fuses) ............ 492
Interior Appearance Care .................. 490
Interior Lighting ........................ 158
Intermittent Wipers (Delay Wipers) ........... 166
Introduction ............................. 4
542 INDEX