2012 JEEP LIBERTY torque
[x] Cancel search: torquePage 444 of 558
CAUTION!
Be sure to mount the spare tire with the valve stem
facing outward. The vehicle could be damaged if the
spare tire is mounted incorrectly.
WARNING!
To avoid the risk of forcing the vehicle off the jack,
do not tighten the wheel nuts fully until the vehicle
has been lowered.
8. Lower the vehicle by turning the jack screw to the left,
and remove the jack.
9. Finish tightening the lug nuts. Push down on the
wrench while at the end of the handle for increased
leverage. Tighten the lug nuts in a star pattern until each
nut has been tightened twice. The correct wheel nut
tightness is 95 ft lb (130 N·m). If in doubt about the
correct tightness, have them checked with a torque
wrench by your authorized dealer or at a service station.
10. Lower the jack to it’s fully closed position.
11. Secure the tire, jack, and tools in their proper loca-
tions.
Mounting Spare Tire
442 WHAT TO DO IN EMERGENCIES
Page 445 of 558
WARNING!
A loose tire or jack, thrown forward in a collision or
hard stop, could endanger the occupants of the ve-
hicle. Always stow the jack parts and the spare tire in
the places provided.
12. Remove blocks from wheels.
Road Tire Installation
1. Mount the road tire on the axle.
2. Install the remaining lug nuts with the cone shaped
end of the nut toward the wheel. Lightly tighten the lug
nuts.
WARNING!
To avoid the risk of forcing the vehicle off the jack,
do not tighten the lug nuts fully until the vehicle is
lowered to the ground.
3. Lower the vehicle to the ground by turning the jack
handle counterclockwise.
4. Finish tightening the lug nuts. Push down on the
wrench while at the end of the handle for increased
leverage. Tighten the lug nuts in a star pattern until each
nut has been tightened twice. The correct tightness of
each lug nut is 95 ft/lbs (130 N·m). If in doubt about the
correct tightness, have them checked with a torque
wrench by your authorized dealer or service station.
5. After 25 miles (40 km) check the lug nut torque with a
torque wrench to ensure that all lug nuts are properly
seated against the wheel.
6
WHAT TO DO IN EMERGENCIES 443
Page 455 of 558
CAUTION!
Towing faster than 30 mph (48 km/h) or farther than
15 miles (24 km) with rear wheels on the ground can
cause severe damage to the transmission. Such dam-
age is not covered by the New Vehicle Limited
Warranty.
If the transmission is not operable, or the vehicle must be
towed faster than 30 mph (48 km/h) or farther than
15 miles (24 km), tow with the rear wheels OFFthe
ground (on a flatbed, or with the rear wheels raised using
a wheel lift or towing dolly), or remove the driveshaft.
WARNING!
If the driveshaft is removed, the vehicle can roll even
if the transmission is in PARK, which could cause
serious injury or death.
The parking brake mustbe firmly engaged and the
wheels chocked during driveshaft removal and installa-
tion. The parking brake must remainengaged unless the
vehicle is securely and properly connected to the tow
vehicle, or the driveshaft is completely reinstalled. See
your authorized dealer for proper driveshaft removal
and reinstallation procedures, including flange
orientation/alignment, use of thread-locking compound,
proper bolt torque specifications, etc.
6
WHAT TO DO IN EMERGENCIES 453
Page 483 of 558
CAUTION!
Using a transmission fluid other than the manufac-
turer’s recommended fluid may cause deterioration
in transmission shift quality and/or torque converter
shudder. Using a transmission fluid other than the
manufacturer’s recommended fluid will require
more frequent fluid and filter changes. Refer to
“Fluids, Lubricants, and Genuine Parts” in “Main-
taining Your Vehicle” for further information.
Special Additives
The manufacturer strongly recommends against the ad-
dition of any additives to the transmission. The only
exception to this policy is the use of special dyes to aid in
detecting fluid leaks. The use of transmission sealers
should be avoided as they may adversely affect seals.
CAUTION!
Do not use chemical flushes in your transmission as
the chemicals can damage your transmission compo-
nents. Such damage is not covered by the New
Vehicle Limited Warranty.
Fluid Level Check
Your vehicle is equipped with a capped transmission oil
fill tube that is sealed and it should not be tampered with.
Your authorized dealer has the proper tools to ensure that
the fluid level is set properly.
7
MAINTAINING YOUR VEHICLE 481
Page 484 of 558
CAUTION!
Using a transmission fluid other than the manufac-
turer’s recommended fluid may cause deterioration
in transmission shift quality and/or torque converter
shudder. Using a transmission fluid other than that
recommended by the manufacturer will require more
frequent fluid and filter changes. Refer to “Fluids,
Lubricants, and Genuine Parts” in “Maintaining
Your Vehicle” for further information.
Fluid And Filter Changes
Refer to the “Maintenance Schedule” for the proper
maintenance intervals.
In addition, change the fluid and filter if the transmission
is disassembled for any reason.
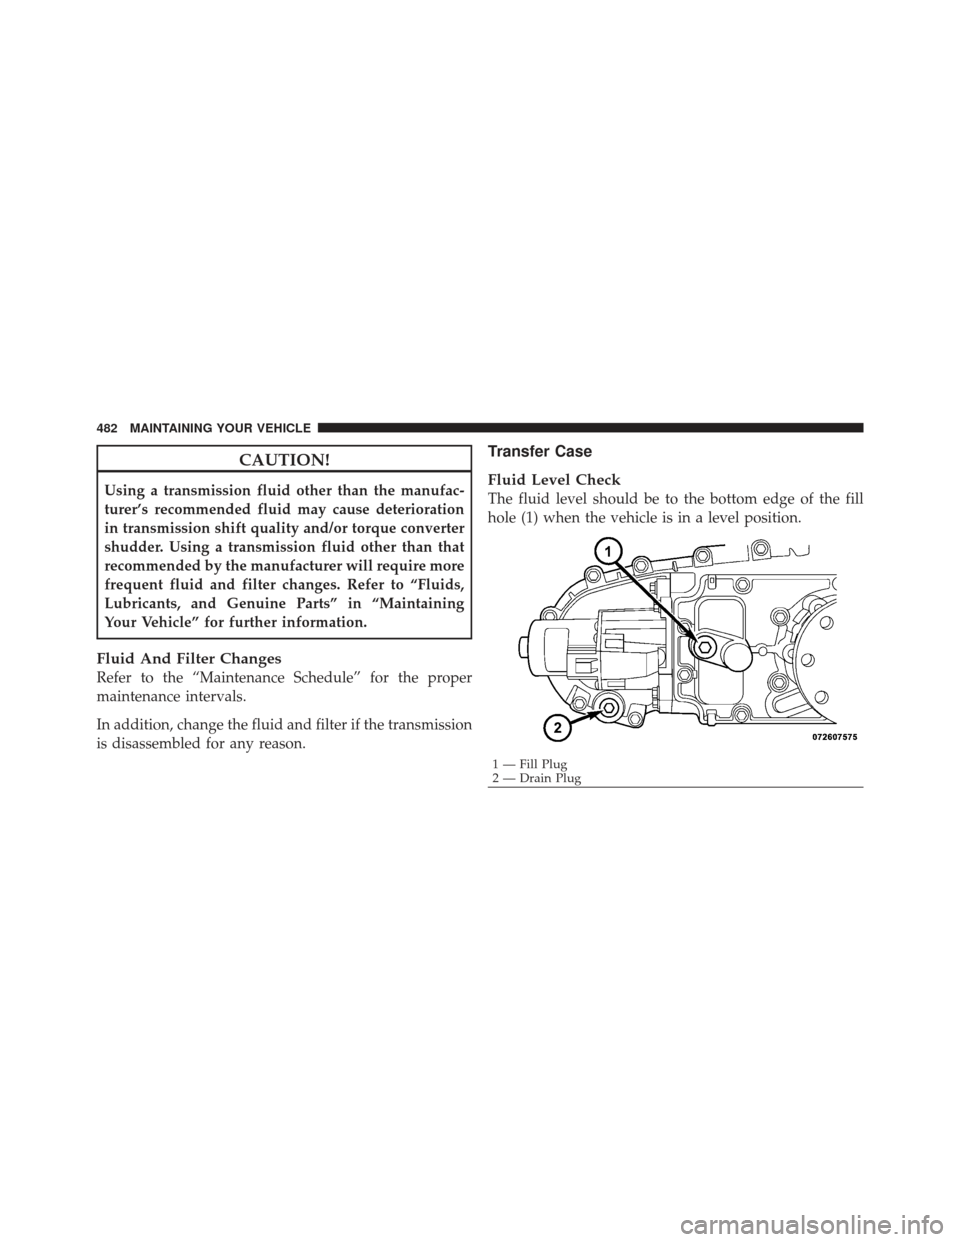
Transfer Case
Fluid Level Check
The fluid level should be to the bottom edge of the fill
hole (1) when the vehicle is in a level position.
1 — Fill Plug
2 — Drain Plug
482 MAINTAINING YOUR VEHICLE
Page 485 of 558
Adding Fluid
Fluid should be added only to fill hole until fluid begins
to run out of the hole.
Draining Fluid
First remove the fill plug (1), then the drain plug (2).
Recommended tightening torque for the drain and fill
plugs is 15–25 ft lbs (20–34 N·m).
CAUTION!
Do not over-tighten the plugs. You could damage
them and cause a leak.
Lubricant Selection
Use only manufacturer’s recommended fluid. Refer to
“Fluids, Lubricants, and Genuine Parts” in “Maintaining
Your Vehicle” for further information.
Frequency Of Fluid Change
Under normal operating conditions, the fluid installed at
the factory will give satisfactory lubrication for the life of
the vehicle. Fluid changes are not necessary unless the
fluid becomes contaminated with water. Change the fluid
immediately if contaminated with water.
Front/Rear Axle Fluid
For normal service, periodic fluid level checks are not
required. When the vehicle is serviced for other reasons
the exterior surfaces of the axle assembly should be
inspected. If gear oil leakage is suspected inspect the
fluid level. Refer to “Fluids, Lubricants, and Genuine
Parts” in “Maintaining Your Vehicle” for further informa-
tion.
Fluid Level Check
•
Front axle lubricant should be at the bottom edge of
the oil fill hole when the vehicle is in a level position.
7
MAINTAINING YOUR VEHICLE 483
Page 537 of 558
Automatic Door Locks..................... 32
Automatic Headlights .................... 159
Automatic Oil Change Indicator ..........236,243
Automatic Temperature Control (ATC) ......... 305
Automatic Transaxle ...................... 322
Special Additives ..................... 481
Automatic Transmission .............324,480,482
Adding Fluid .................... 482,504
Fluid and Filter Changes ............480,482
Fluid Change ....................... 482
Fluid Level Check .................... 481
Fluid Type ...................... 480,504
Gear Ranges ........................ 324
Special Additives ..................... 481
Torque Converter .................... 332
Auxiliary Electrical Outlet (Power Outlet) ...... 202
Auxiliary Power Outlet ................... 202
Axle Fluid ............................. 504
Axle Lubrication (Axle Fluid) ............... 504B-Pillar Location
........................ 373
Battery ............................... 466
Keyless Transmitter Replacement (RKE) ..... 25
Belts, Seat ............................ 45,90
Body Mechanism Lubrication ............... 468
Brake Assist System ...................... 357
Brake Control System, Electronic ............. 355
Brake Fluid ............................ 504
Brake System ........................... 478
Anti-Lock (ABS) .................. 353,356
Fluid Check ..................... 479,504
Master Cylinder ..................... 479
Parking ........................... 351
Warning Light ....................... 237
Brake, Parking .......................... 351
Brake/Transmission Interlock ............... 323
Brakes ............................... 478
Break-In Recommendations, New Vehicle ........ 88
Bulb Replacement ..................... 498,499
10
INDEX 535
Page 554 of 558
Compact Spare...................... 381
General Information .................. 377
High Speed ......................... 380
Inflation Pressures .................... 378
Jacking ............................ 435
Life of Tires ........................ 384
Load Capacity .................... 373,374
Pressure Monitor System (TPMS) ......... 389
Pressure Warning Light ................ 224
Quality Grading ..................... 531
Radial ............................ 380
Replacement ........................ 385
Rotation ........................... 388
Safety ............................. 368
Sizes ............................. 369
Spare Tire .......................... 436
Spinning ........................... 383
Tread Wear Indicators ................. 384
To Open Hood .......................... 156 Tongue Weight/Trailer Weight
.............. 417
Torque Converter Clutch .................. 332
Tow/Haul Indicator Light ................. 230
Towing ............................ 409,450
24-Hour Towing Assistance ............. 117
Disabled Vehicle ..................... 450
Guide ............................. 415
Recreational ........................ 424
Weight ............................ 415
Towing Assistance ....................... 117
Traction Control ......................... 356
Trailer Towing .......................... 409
Cooling System Tips .................. 424
Hitches ............................ 414
Minimum Requirements ................ 418
Trailer and Tongue Weight .............. 417
Wiring ............................ 421
Trailer Towing Guide ..................... 415
Trailer Weight .......................... 415
552 INDEX