Page 363 of 558
3. Apply the parking brake.
4. Start the engine.
5. Rotate the steering wheel one-half turn to the left.
6. Press the “ESC Off” button located in the lower switch
bank below the climate control four times within twenty
seconds. The “ESC Off Indicator Light” should turn on
and turn off two times.
7. Rotate the steering wheel back to center and then an
additional one-half turn to the right.
8. Turn the ignition switch to the OFF position and then
back to the ON position. If the sequence was completed
properly, the “ESC Off Indicator Light” will blink several
times to confirm HSA is disabled.
9. Repeat these steps if you want to return this feature to
its previous setting.Hill Descent Control (HDC) – If Equipped
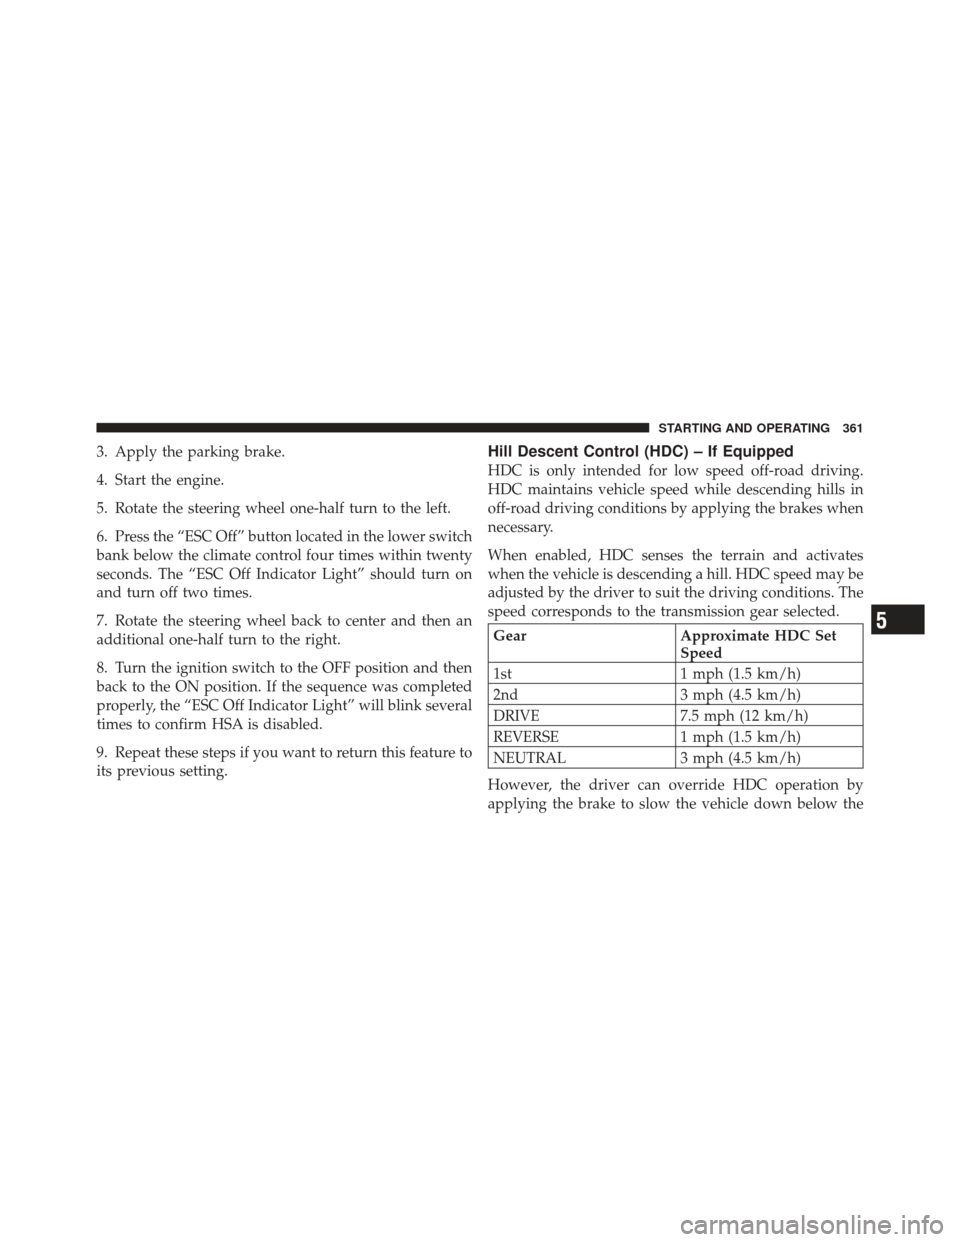
HDC is only intended for low speed off-road driving.
HDC maintains vehicle speed while descending hills in
off-road driving conditions by applying the brakes when
necessary.
When enabled, HDC senses the terrain and activates
when the vehicle is descending a hill. HDC speed may be
adjusted by the driver to suit the driving conditions. The
speed corresponds to the transmission gear selected.
GearApproximate HDC Set
Speed
1st 1 mph (1.5 km/h)
2nd 3 mph (4.5 km/h)
DRIVE 7.5 mph (12 km/h)
REVERSE 1 mph (1.5 km/h)
NEUTRAL 3 mph (4.5 km/h)
However, the driver can override HDC operation by
applying the brake to slow the vehicle down below the5
STARTING AND OPERATING 361
Page 416 of 558
Trailer Hitch Classification
Your vehicle is capable of towing trailers up to 2,000 lbs
(907 kg) without added equipment or alterations to the
standard equipment. Your vehicle may be factory
equipped for safe towing of trailers weighing over
2,000 lbs (907 kg) with the optional Trailer Tow Prep
Package. See your authorized dealer for package content.
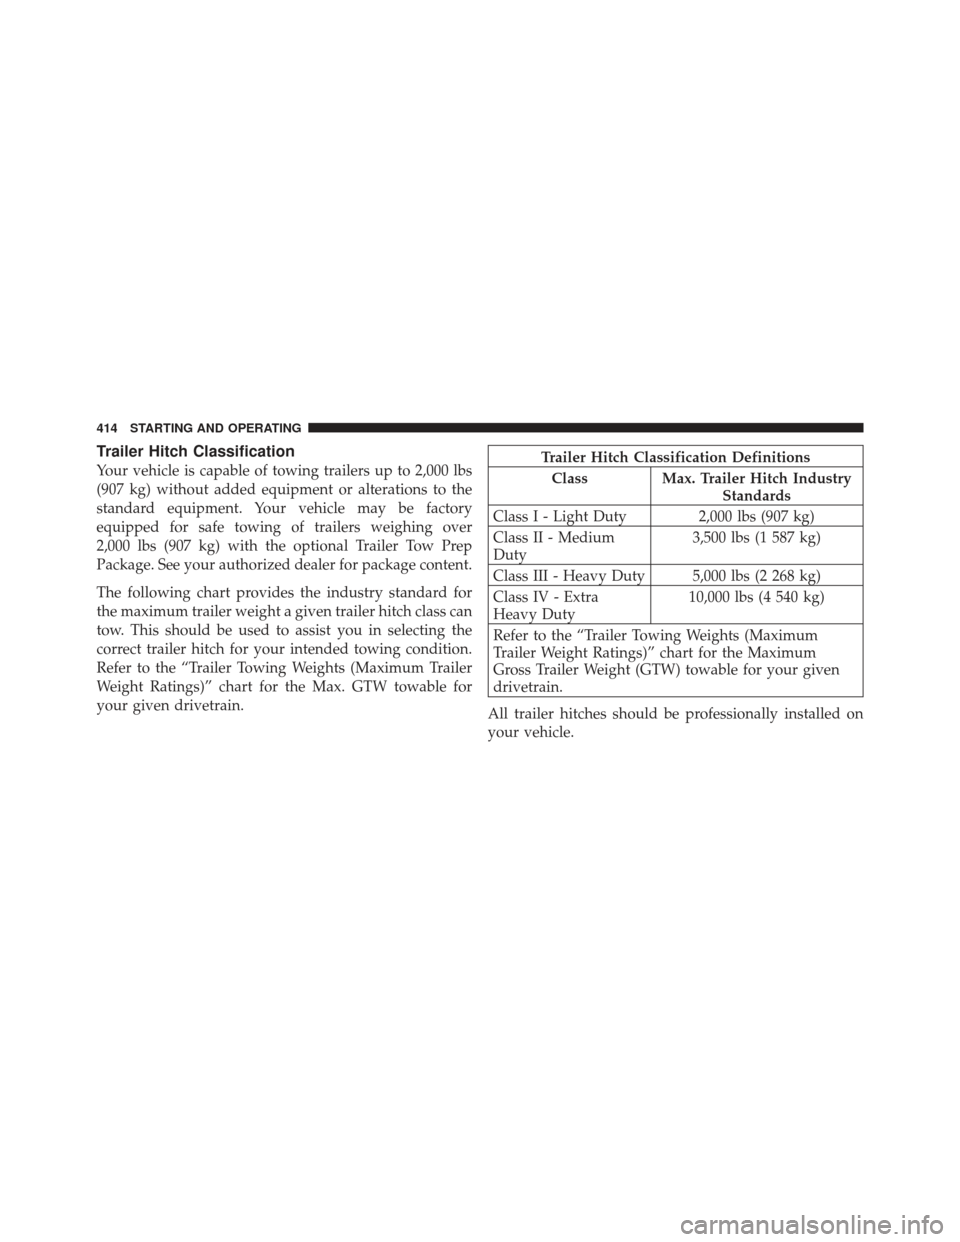
The following chart provides the industry standard for
the maximum trailer weight a given trailer hitch class can
tow. This should be used to assist you in selecting the
correct trailer hitch for your intended towing condition.
Refer to the “Trailer Towing Weights (Maximum Trailer
Weight Ratings)” chart for the Max. GTW towable for
your given drivetrain.Trailer Hitch Classification DefinitionsClass Max. Trailer Hitch Industry Standards
Class I - Light Duty 2,000 lbs (907 kg)
Class II - Medium
Duty 3,500 lbs (1 587 kg)
Class III - Heavy Duty 5,000 lbs (2 268 kg)
Class IV - Extra
Heavy Duty 10,000 lbs (4 540 kg)
Refer to the “Trailer Towing Weights (Maximum
Trailer Weight Ratings)” chart for the Maximum
Gross Trailer Weight (GTW) towable for your given
drivetrain.
All trailer hitches should be professionally installed on
your vehicle.
414 STARTING AND OPERATING
Page 425 of 558
Towing Tips
Before setting out on a trip, practice turning, stopping,
and backing the trailer in an area located away from
heavy traffic.
Automatic Transmission
The “DRIVE” range can be selected when towing. How-
ever, if frequent shifting occurs while in this range,
activate the TOW/HAUL feature. Refer to “Automatic
Transmission” in “Starting and Operating” for further
information.
NOTE:Using the TOW/HAUL feature while operating
the vehicle under heavy operating conditions will im-
prove performance and extend transmission life by re-
ducing excessive shifting and heat build up. This action
will also provide better engine braking.
If you REGULARLY tow a trailer for more than 45 min-
utes of continuous operation, then change the automatic
transmission fluid and filter according to the interval specified for “police, taxi, fleet, or frequent trailer tow-
ing.” Refer to “Maintenance Schedule” for the proper
maintenance intervals.
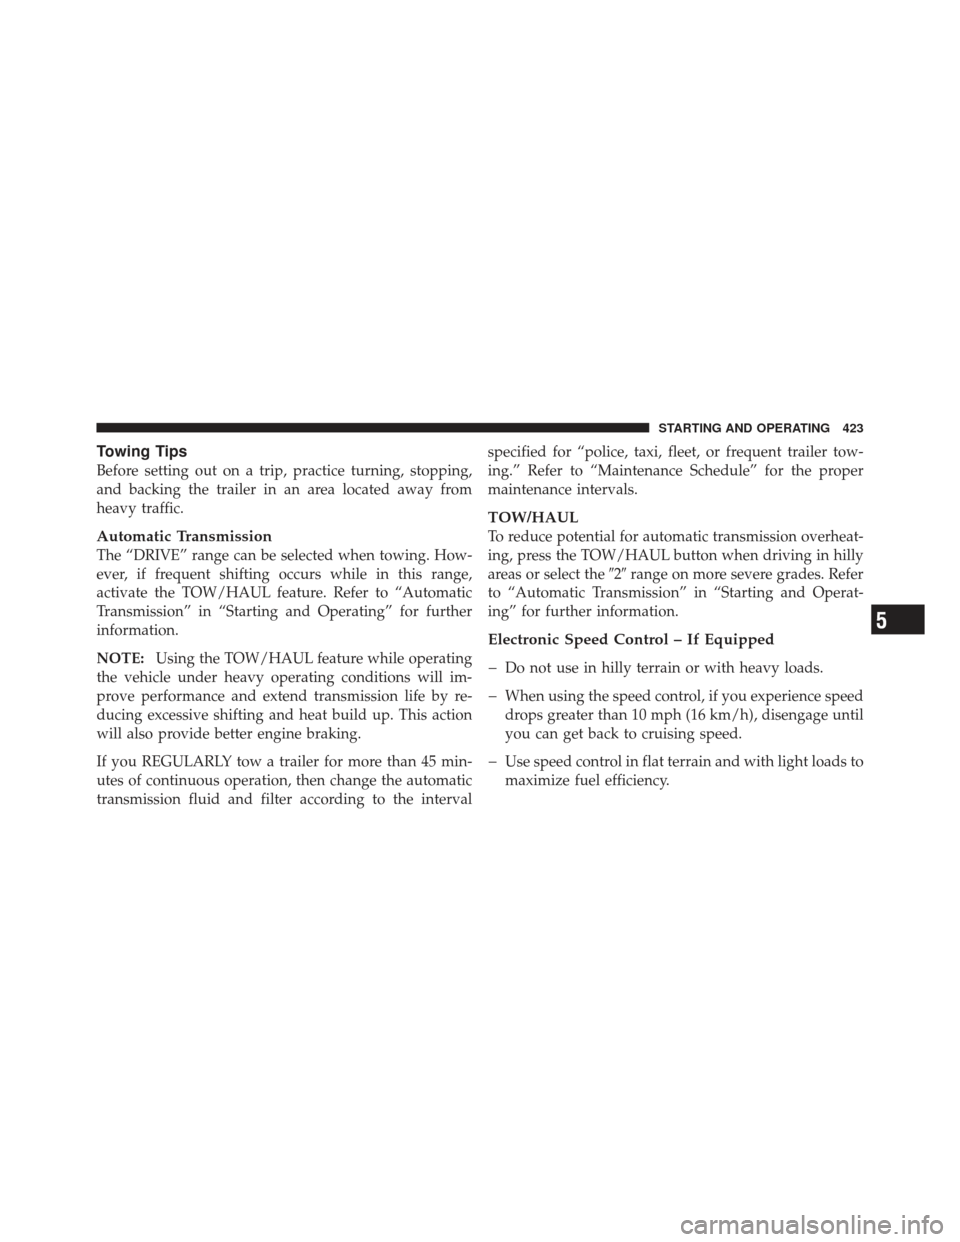
TOW/HAUL
To reduce potential for automatic transmission overheat-
ing, press the TOW/HAUL button when driving in hilly
areas or select the
�2�range on more severe grades. Refer
to “Automatic Transmission” in “Starting and Operat-
ing” for further information.
Electronic Speed Control – If Equipped
�
Do not use in hilly terrain or with heavy loads.
�When using the speed control, if you experience speed
drops greater than 10 mph (16 km/h), disengage until
you can get back to cruising speed.
�Use speed control in flat terrain and with light loads to
maximize fuel efficiency.
5
STARTING AND OPERATING 423
Page 428 of 558
CAUTION!
Towing with the rear wheels on the ground (while
the driveshaft is connected) will cause severe trans-
mission damage. Damage from improper towing is
not covered under the New Vehicle Limited War-
ranty.
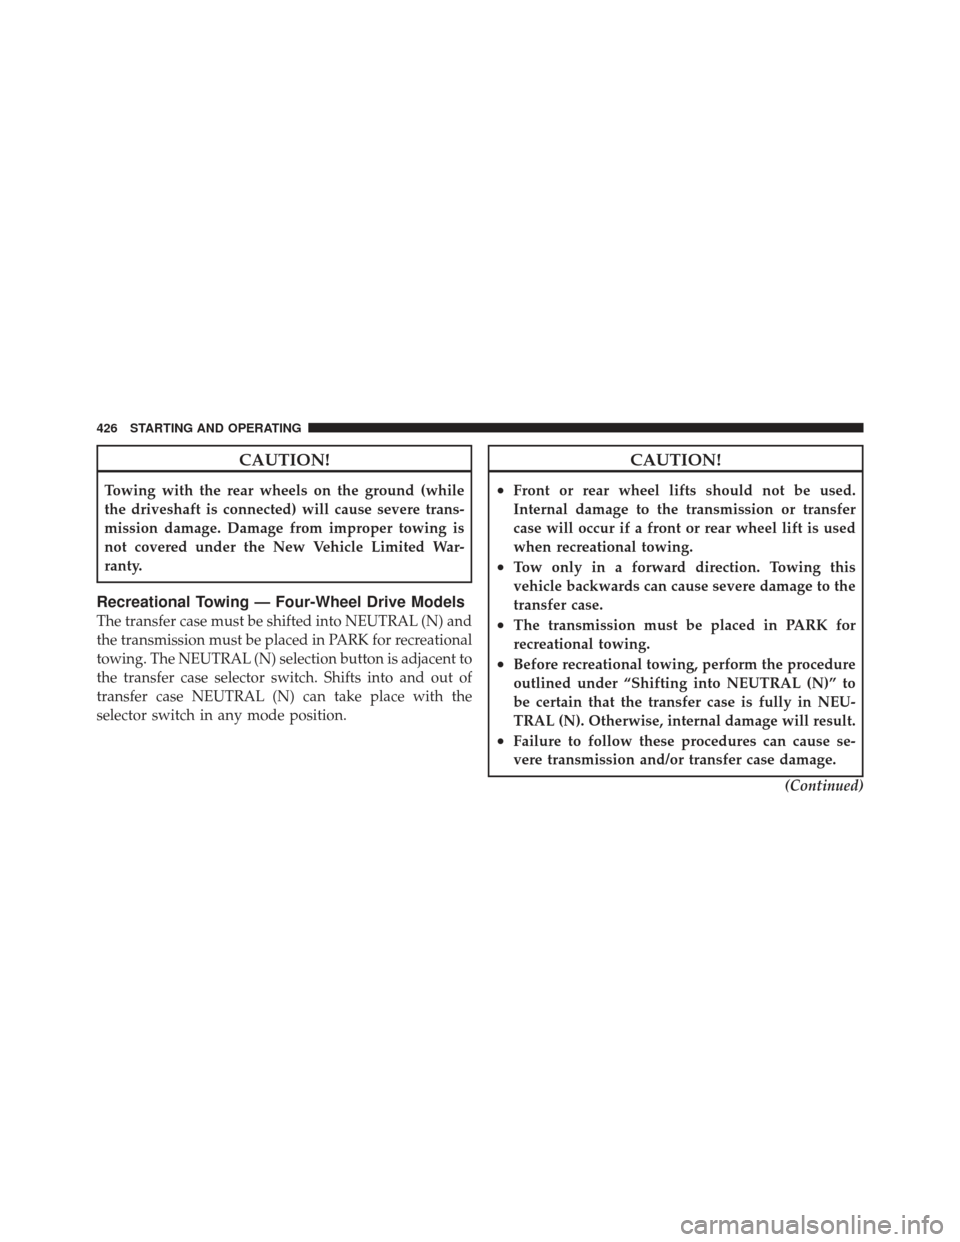
Recreational Towing — Four-Wheel Drive Models
The transfer case must be shifted into NEUTRAL (N) and
the transmission must be placed in PARK for recreational
towing. The NEUTRAL (N) selection button is adjacent to
the transfer case selector switch. Shifts into and out of
transfer case NEUTRAL (N) can take place with the
selector switch in any mode position.
CAUTION!
•Front or rear wheel lifts should not be used.
Internal damage to the transmission or transfer
case will occur if a front or rear wheel lift is used
when recreational towing.
•Tow only in a forward direction. Towing this
vehicle backwards can cause severe damage to the
transfer case.
•The transmission must be placed in PARK for
recreational towing.
•Before recreational towing, perform the procedure
outlined under “Shifting into NEUTRAL (N)” to
be certain that the transfer case is fully in NEU-
TRAL (N). Otherwise, internal damage will result.
•Failure to follow these procedures can cause se-
vere transmission and/or transfer case damage.(Continued)
426 STARTING AND OPERATING
Page 430 of 558
6. Using the point of a ballpoint pen or similar object,
press and hold the recessed transfer case NEUTRAL (N)
button (located above the selector switch) for four sec-
onds, until the light behind the NEUTRAL (N) symbol
starts to blink, indicating shift in progress. The light will
stop blinking (stay on solid) when the shift to NEUTRAL
(N) is complete.7. After the shift is completed and the NEUTRAL light
comes on, release the NEUTRAL (N) button.
8. Start the engine.
9. Shift the transmission into REVERSE.
10. Release the brake pedal for five seconds and ensure
that there is no vehicle movement.
11. Turn OFF the engine.
12. Firmly apply the parking brake.
13. Shift the transmission into PARK and remove the
ignition key.
Neutral Switch
428 STARTING AND OPERATING
Page 432 of 558
3. Turn the ignition switch to the ON/RUN position, but
do not start the engine.
4. Press and hold the brake pedal.
5. Shift the transmission into NEUTRAL.
6. Using the point of a ballpoint pen or similar object,
press and hold the recessed transfer case NEUTRAL (N)
button (located above the selector switch) for one second.7. After the NEUTRAL (N) indicator light turns off,
release the NEUTRAL (N) button.
8. After the NEUTRAL (N) button has been released, the
transfer case will shift to the position indicated by the
selector switch.
Neutral Switch
430 STARTING AND OPERATING
Page 465 of 558
CAUTION!
Overfilling or underfilling the crankcase will cause
aeration or loss of oil pressure. This could damage
your engine.
Change Engine Oil
The oil change indicator system will remind you that it is
time to take your vehicle in for scheduled maintenance.
Refer to the “Maintenance Schedule” for further informa-
tion.
NOTE: Under no circumstances should oil change
intervals exceed 8,000 miles (13 000 km) or six months,
whichever occurs first.
Engine Oil Selection
For best performance and maximum protection under all
types of operating conditions, the manufacturer recom-
mends engine oils that are API Certified and meet the
requirements of Chrysler Material Standard MS-6395.
American Petroleum Institute (API) Engine Oil
Identification Symbol
This symbol means that the oil has
been certified by the American
Petroleum Institute (API). The
manufacturer only recommends
API Certified engine oils.
7
MAINTAINING YOUR VEHICLE 463
Page 467 of 558
Engine Oil Filter
The engine oil filter should be replaced with a new filter
at every engine oil change.
NOTE:For best access to the oil filter, a drive on hoist
should be used instead of a chassis hoist (3.7L Only).
Engine Oil Filter Selection
All of this manufacturer’s engines have a full-flow type
disposable oil filter. Use a filter of this type for replace-
ment. The quality of replacement filters varies consider-
ably. Only high-quality filters should be used to assure
most efficient service. MOPAR� engine oil filters are
high-quality oil filters and are recommended.
Engine Air Cleaner Filter
Refer to the “Maintenance Schedule” for the proper
maintenance intervals.
NOTE: Be sure to follow the “dusty or off-road condi-
tions” maintenance interval if applicable.
WARNING!
The air induction system (air cleaner, hoses, etc.) can
provide a measure of protection in the case of engine
backfire. Do not remove the air induction system (air
cleaner, hoses, etc.) unless such removal is necessary
for repair or maintenance. Make sure that no one is
near the engine compartment before starting the
vehicle with the air induction system (air cleaner,
hoses, etc.) removed. Failure to do so can result in
serious personal injury.
Engine Air Cleaner Filter Selection
The quality of replacement engine air cleaner filters
varies considerably. Only high quality filters should be
used to assure most efficient service. MOPAR� engine air
cleaner filters are a high quality filter and are
recommended.7
MAINTAINING YOUR VEHICLE 465