Page 93 of 497

▫Instrument Panel Dimming ............. 151
▫ Map/Reading Lights .................. 152
� Windshield Wipers And Washers .......... 152
▫ Windshield Wiper Operation ............ 154
▫ Intermittent Wiper System .............. 154
▫ Windshield Washers .................. 155
▫ Mist Feature ........................ 155
� Tilt Steering Column ................... 156
� Electronic Speed Control — If Equipped ..... 157
▫ To Activate ......................... 158
▫ To Set A Desired Speed ................ 159
▫ To Deactivate ....................... 159
▫ To Resume Speed .................... 159 ▫
To Vary The Speed Setting .............. 159
▫ To Accelerate For Passing .............. 160
� Garage Door Opener — If Equipped ........ 160
▫ Before You Begin Programming
HomeLink� ........................ 162
▫ Programming A Rolling Code ........... 162
▫ Programming A Non-Rolling Code ........ 164
▫ Canadian/Gate Operator Programming .... 165
▫ Using HomeLink� ................... 167
▫ Security ........................... 167
▫ Troubleshooting Tips .................. 168
▫ General Information .................. 169
3
UNDERSTANDING THE FEATURES OF YOUR VEHICLE 91
Page 147 of 497
To raise the seatback, pull the strap forward and lift the
seatback into its upright position.
WARNING!
Be certain that the seatback is securely locked into
position. If the seatback is not securely locked into
position the seat will not provide the proper stability
for child seats and/or passengers. An improperly
latched seat could cause serious injury.
Reclining Rear Seat — If Equipped
For additional comfort, pull the strap forward just
enough to release the seatback latch. Then push the
seatback to a reclined position, approximately 35 degrees
maximum, and release the strap.
Rear Seats Folded Flat
3
UNDERSTANDING THE FEATURES OF YOUR VEHICLE 145
Page 149 of 497
Lift the hood prop rod, clipped to the right side (left side
facing hood) of the engine compartment to secure the
hood in the open position. Place the hood prop at the
location stamped into the inner hood surface.
CAUTION!
To prevent possible damage, do not slam the hood to
close it. Lower the hood until it is open approxi-
mately 8 in (20 cm) and then drop it. This should
secure both latches. Never drive your vehicle unless
the hood is fully closed, with both latches engaged.
WARNING!
Be sure the hood is fully latched before driving your
vehicle. If the hood is not fully latched, it could open
when the vehicle is in motion and block your vision.
Failure to follow this warning could result in serious
injury or death.
Safety Latch
3
UNDERSTANDING THE FEATURES OF YOUR VEHICLE 147
Page 162 of 497
 button. If the button is continually
held in the SET (-) position, the set speed will continue to
decrease until the butto")
To decrease speed while the Electronic Speed Control is
set, push the SET (-) button. If the button is continually
held in the SET (-) position, the set speed will continue to
decrease until the button is released. Release the button
when the desired speed is reached, and the new set speed
will be established.
Pressing the SET (-) button once will result ina1mph
(2 km/h) decrease in set speed. Each subsequent tap of
the button results in a decrease of 1 mph (2 km/h).
To Accelerate For Passing
Press the accelerator as you would normally. When the
pedal is released, the vehicle will return to the set speed.
Using Electronic Speed Control On Hills
The transmission may downshift on hills to maintain the
vehicle set speed.
NOTE:The Electronic Speed Control system maintains
speed up and down hills. A slight speed change on
moderate hills is normal. On steep hills, a greater speed loss or gain may occur so
it may be preferable to drive without Electronic Speed
Control.
WARNING!
Electronic Speed Control can be dangerous where the
system cannot maintain a constant speed. Your ve-
hicle could go too fast for the conditions, and you
could lose control and have an accident. Do not use
Electronic Speed Control in heavy traffic or on roads
that are winding, icy, snow-covered or slippery.
GARAGE DOOR OPENER — IF EQUIPPED
HomeLink�
replaces up to three hand-held transmitters
that operate devices such as garage door openers, motor-
ized gates, lighting or home security systems. The
HomeLink� unit is powered by your vehicles 12 Volt
battery.
160 UNDERSTANDING THE FEATURES OF YOUR VEHICLE
Page 163 of 497
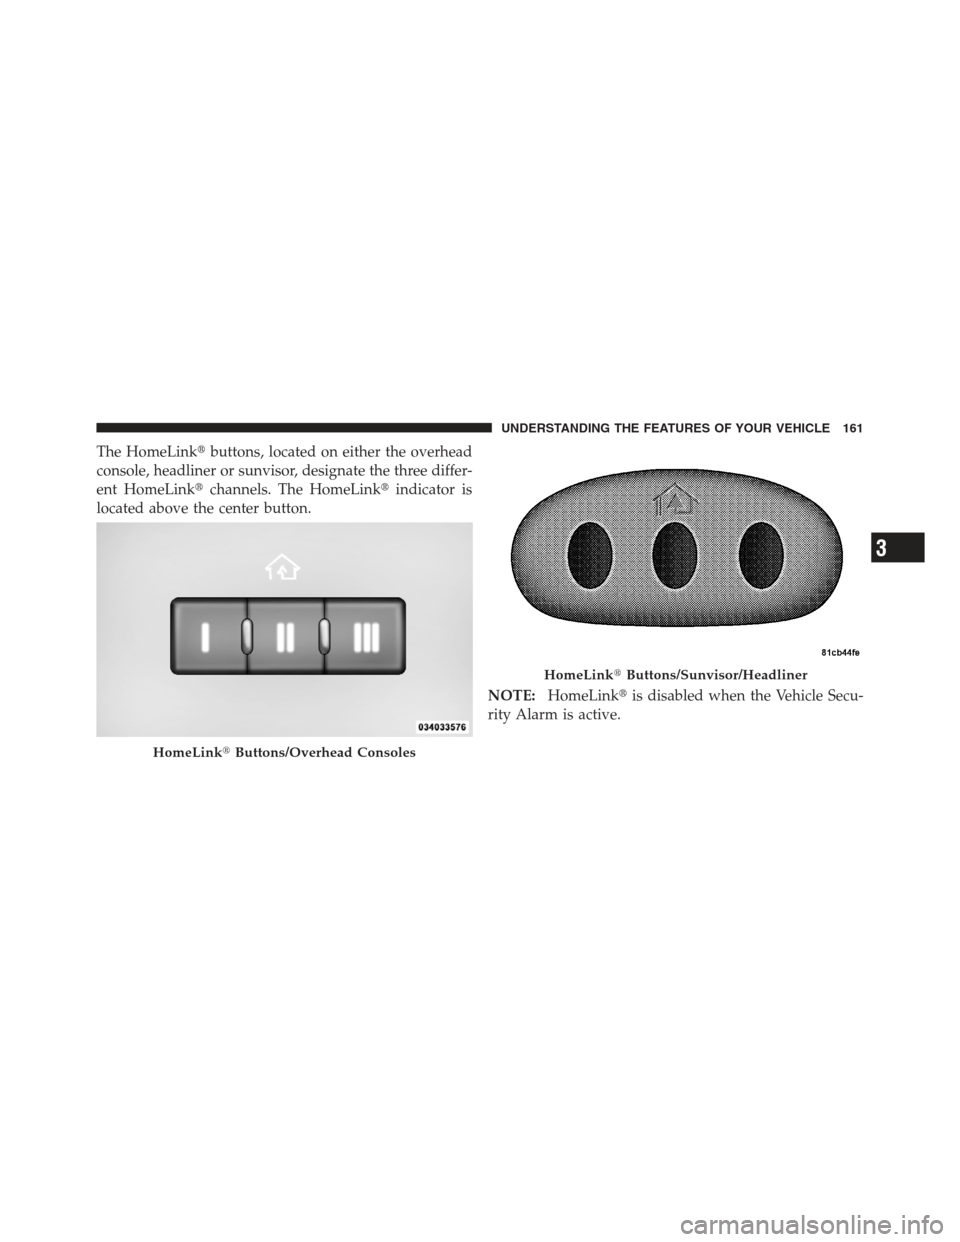
The HomeLink�buttons, located on either the overhead
console, headliner or sunvisor, designate the three differ-
ent HomeLink� channels. The HomeLink� indicator is
located above the center button.
NOTE:HomeLink� is disabled when the Vehicle Secu-
rity Alarm is active.
HomeLink� Buttons/Overhead Consoles
HomeLink�Buttons/Sunvisor/Headliner
3
UNDERSTANDING THE FEATURES OF YOUR VEHICLE 161
Page 169 of 497

Reprogramming A Single HomeLink�Button
To reprogram a channel that has been previously trained,
follow these steps:
1. Turn the ignition switch to the ON/RUN position.
2. Press and hold the desired HomeLink� button until
the indicator light begins to flash after 20 seconds. Do not
release the button.
3. Without releasing the button proceed with
“Canadian/Gate Operator Programming” Step 2 and
follow all remaining steps.
Using HomeLink�
To operate, press and release the programmed
HomeLink� button. Activation will now occur for the
programmed device (i.e., garage door opener, gate opera-
tor, security system, entry door lock, home/office light-
ing, etc.,). The hand-held transmitter of the device may
also be used at any time.
Security
It is advised to erase all channels before you sell or turn
in your vehicle.
To do this, press and hold the two outside buttons for
20 seconds until the red indicator flashes. Note that all
channels will be erased. Individual channels cannot be
erased.
The HomeLink� Universal Transceiver is disabled when
the Vehicle Security Alarm is active.
3
UNDERSTANDING THE FEATURES OF YOUR VEHICLE 167
Page 172 of 497

WARNING!
•Never leave children in a vehicle with the key in
the ignition switch. Occupants, particularly unat-
tended children, can become entrapped by the
power sunroof while operating the power sunroof
switch. Such entrapment may result in serious
injury or death.
•In a collision, there is a greater risk of being
thrown from a vehicle with an open sunroof. You
could also be seriously injured or killed. Always
fasten your seat belt properly and make sure all
passengers are properly secured too.
•Do not allow small children to operate the sun-
roof. Never allow your fingers, other body parts, or
any object to project through the sunroof opening.
Injury may result.
Opening Sunroof — Express
Press the switch rearward and release it within one-half
second and the sunroof will open automatically from any
position. The sunroof will open fully and stop automati-
cally. This is called “Express Open”. During Express
Open operation, any movement of the sunroof switch
will stop the sunroof.
Opening Sunroof — Manual Mode
To open the sunroof, press and hold the switch rearward
to full open. Any release of the switch will stop the
movement and the sunroof will remain in a partially
opened condition until the switch is pushed and held
rearward again.
170 UNDERSTANDING THE FEATURES OF YOUR VEHICLE
Page 173 of 497

Closing Sunroof — Express
Press the switch forward and release it within one-half
second and the sunroof will close automatically from any
position. The sunroof will close fully and stop automati-
cally. This is called “Express Close”. During Express
Close operation, any movement of the switch will stop
the sunroof.
Closing Sunroof — Manual Mode
To close the sunroof, press and hold the switch in the
forward position. Any release of the switch will stop the
movement and the sunroof will remain in a partially
closed condition until the switch is pushed and held
forward again.
Pinch Protect Feature
This feature will detect an obstruction in the opening of
the sunroof during Express Close operation. If an ob-
struction is detected, the sunroof will automatically re-
tract. Remove the obstruction if this occurs. Next, press
the switch forward and release to Express Close.
NOTE:If three consecutive sunroof close attempts re-
sult in Pinch Protect reversals, the fourth close attempt
will be a Manual Close movement with Pinch Protect
disabled.
Venting Sunroof — Express
Press and release the Vent button within one half second
and the sunroof will open to the vent position. This is
called “Express Vent”, and it will occur regardless of
sunroof position. During Express Vent operation, any
movement of the switch will stop the sunroof.
3
UNDERSTANDING THE FEATURES OF YOUR VEHICLE 171

 of the engine compartment to secure the
hood in the open position. Place the hood prop at the
location stamped into the inner")