2012 INFINITI FX door lock
[x] Cancel search: door lockPage 156 of 522
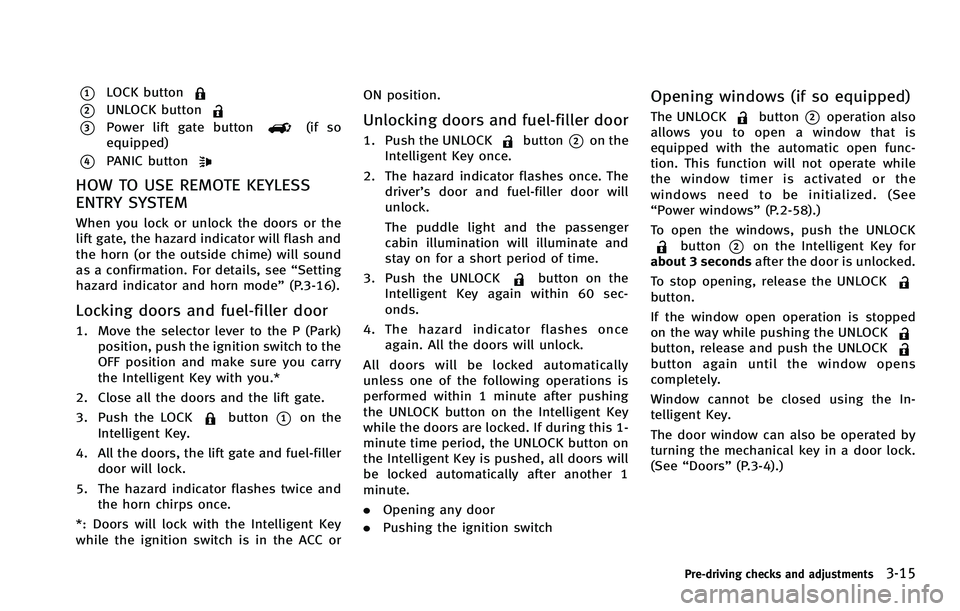
*1LOCK button
*2UNLOCK button
*3Power lift gate button(if so
equipped)
*4PANIC button
HOW TO USE REMOTE KEYLESS
ENTRY SYSTEM
When you lock or unlock the doors or the
lift gate, the hazard indicator will flash and
the horn (or the outside chime) will sound
as a confirmation. For details, see “Setting
hazard indicator and horn mode” (P.3-16).
Locking doors and fuel-filler door
1. Move the selector lever to the P (Park)
position, push the ignition switch to the
OFF position and make sure you carry
the Intelligent Key with you.*
2. Close all the doors and the lift gate.
3. Push the LOCK
button*1on the
Intelligent Key.
4. All the doors, the lift gate and fuel-filler door will lock.
5. The hazard indicator flashes twice and the horn chirps once.
*: Doors will lock with the Intelligent Key
while the ignition switch is in the ACC or ON position.
Unlocking doors and fuel-filler door
1. Push the UNLOCKbutton*2on the
Intelligent Key once.
2. The hazard indicator flashes once. The driver’s door and fuel-filler door will
unlock.
The puddle light and the passenger
cabin illumination will illuminate and
stay on for a short period of time.
3. Push the UNLOCK
button on the
Intelligent Key again within 60 sec-
onds.
4. The hazard indicator flashes once again. All the doors will unlock.
All doors will be locked automatically
unless one of the following operations is
performed within 1 minute after pushing
the UNLOCK button on the Intelligent Key
while the doors are locked. If during this 1-
minute time period, the UNLOCK button on
the Intelligent Key is pushed, all doors will
be locked automatically after another 1
minute.
. Opening any door
. Pushing the ignition switch
Opening windows (if so equipped)
The UNLOCKbutton*2operation also
allows you to open a window that is
equipped with the automatic open func-
tion. This function will not operate while
the window timer is activated or the
windows need to be initialized. (See
“Power windows” (P.2-58).)
To open the windows, push the UNLOCK
button*2on the Intelligent Key for
about 3 seconds after the door is unlocked.
To stop opening, release the UNLOCK
button.
If the window open operation is stopped
on the way while pushing the UNLOCK
button, release and push the UNLOCKbutton again until the window opens
completely.
Window cannot be closed using the In-
telligent Key.
The door window can also be operated by
turning the mechanical key in a door lock.
(See “Doors” (P.3-4).)
Pre-driving checks and adjustments3-15
Page 158 of 522

Hazard indicator and horn mode:
DOOR LOCKDOOR UNLOCK
Intelligent Key system
(Using door handle or lift gate request switch) HAZARD -
twice
OUTSIDE CHIME - twiceHAZARD -
once
OUTSIDE CHIME - once
Remote keyless entry system
(Using
,orbutton) HAZARD -
twice
HORN - once HAZARD -
once
HORN - none
Hazard indicator mode:
DOOR LOCK DOOR UNLOCK
Intelligent Key system
(Using door handle or lift gate request switch) HAZARD -
twice
OUTSIDE CHIME - twiceHAZARD - none
OUTSIDE CHIME -
once
Remote keyless entry system
(Using
,orbutton) HAZARD -
twice
HORN - none HAZARD - none
HORN - none
Switching procedure:
To switch the hazard indicator and horn
(chime) operation, push the LOCK
*1and UNLOCK*2buttons on the In-
telligent Key simultaneously for more than
2 seconds.
. When the hazard indicator mode is set,
the hazard indicator flashes 3 times.
. When the hazard indicator and horn
mode is set, the hazard indicator
flashes once and the horn chirps once.
Pre-driving checks and adjustments3-17
Page 159 of 522

3-18Pre-driving checks and adjustments
SPA2520
1. Pull the hood lock release handle*1located below the instrument panel;
the hood will then spring up slightly.
2. Pull the lever
*2up at the front of the
hood with your fingertips and raise the
hood.
3. When closing the hood, slowly close the hood down to latch both the right
and left locks. Push the hood down to
lock the hood securely into place.
WARNING
. Make sure the hood is completely closed
and latched before driving. Failure to do
so could cause the hood to fly open and
result in an accident.
. If you see steam or smoke coming from
the engine compartment, to avoid injury
do not open the hood.
WARNING
.Always be sure the lift gate has been
closed securely to prevent it from open-
ing while driving.
. Do not drive with the lift gate open. This
could allow dangerous exhaust gases to
be drawn into the vehicle. See “Exhaust
gas (carbon monoxide)” (P.5-3) of this
manual.
. Do not leave children unattended inside
the vehicle. They could unknowingly
activate switches or controls. Unat-
tended children could become involved
in serious accidents.
. Always be sure that hands and feet are
clear of the door frame to avoid injury
while closing the lift gate.
HOOD LIFT GATE
Page 160 of 522

SPA2529
OPERATING MANUAL LIFT GATE
.The power door lock system allows you
to lock or unlock all doors including the
lift gate simultaneously.
. Push the opener switch
*Ato unlock
the lift gate and pull the opener handle
to open.
OPERATING POWER LIFT GATE (if so
equipped)
To operate the power lift gate, the selector
lever must be in the P (Park) position.
The power lift gate will not operate if the
battery voltage is under approximately
11V.
SPA2547
Power lift gate main switch
The power lift gate operation can be turned
on or off by the power lift gate main switch
on the instrument panel.
When the power lift gate main switch is
pushed to the “OFF”position, the power
operation is not available by the power lift
gate switch on the lift gate and lift gate
opener switch.
Pre-driving checks and adjustments3-19
Page 165 of 522

3-24Pre-driving checks and adjustments
When the power lift gate main switch is in
the OFF position, the lift gate can be
opened manually by pushing the lift gate
opener switch. If the power lift gate opener
switch is pushed during power open or
close, the power operation will be canceled
and the lift gate can be operated manually.
AUTO CLOSURE
If the lift gate is pulled down to a partly
open position, the lift gate will pull itself to
the closed position.
Do not apply excessive force when the
auto closure is operating. Excessive force
applied may cause the mechanism to
malfunction.
CAUTION
.The lift gate will automatically close
from a partly open position. To avoid
pinching, keep hands and fingers away
from lift gate opening.
. Do not let children operate the lift gate.
SPA2522
LIFT GATE RELEASE LEVER
If the lift gate cannot be opened with the
door lock switch due to a discharged
battery, follow these steps.
1. Remove the cover
*Ainside of the lift
gate using a suitable tool.
2. Move the lever
*Bas illustrated to
open the lift gate.
Contact an INFINITI retailer as soon as
possible for repair.
SPA2523
OPENING THE FUEL-FILLER DOOR
To open the fuel-filler door, unlock the fuel-
filler door by using one of the following
operations, then push the left side of the
door.
. Push the driver’s door handle request
switch with the Intelligent Key carried
with you.
. Push the passenger’ s door handle
request switch or lift gate request
switch twice with the Intelligent Key
carried with you.
. Push the UNLOCK button on the Intelli-
gent Key.
FUEL-FILLER DOOR
Page 166 of 522

.Insert the mechanical key into the door
lock cylinder and turn it to the rear of
the vehicle.
. Push the power door lock switch to the
UNLOCK position.
To lock, close the fuel-filler door securely
and lock all doors by operating the door
handle request switch, the LOCK button on
the Intelligent Key, the mechanical key or
the power door lock switch.
FUEL-FILLER CAP
WARNING
. Gasoline is extremely flammable and
highly explosive under certain condi-
tions. You could be burned or seriously
injured if it is misused or mishandled.
Always stop engine and do not smoke or
allow open flames or sparks near the
vehicle when refueling.
. Do not attempt to top off the fuel tank
after the fuel pump nozzle shuts off
automatically. Continued refueling may
cause fuel overflow, resulting in fuel
spray and possibly a fire.
. Use only an original equipment type
fuel-filler cap as a replacement. It has a built-in safety valve needed for proper
operation of the fuel system and emis-
sion control system. An incorrect cap can
result in a serious malfunction and
possible injury. It could also cause the
malfunction indicator light to come on.
. Never pour fuel into the throttle body to
attempt to start your vehicle.
. Do not fill a portable fuel container in
the vehicle or trailer. Static electricity
can cause an explosion of flammable
liquid, vapor or gas in any vehicle or
trailer. To reduce the risk of serious
injury or death when filling portable fuel
containers:—Always place the container on the
ground when filling.
—Do not use electronic devices when
filling.
—Keep the pump nozzle in contactwith the container while you are
filling it.
—Use only approved portable fuelcontainers for flammable liquid.
CAUTION
. If fuel is spilled on the vehicle body,
flush it away with water to avoid paint
damage.
. Insert the cap straight into the fuel-filler
tube, then tighten until a single click is
heard. Failure to tighten the fuel-filler
cap properly may cause the
mal-
function indicator light (MIL) to illumi-
nate. If the
light illuminates
because the fuel-filler cap is loose or
missing, tighten or install the cap and
continue to drive the vehicle. The
light should turn off after a few driving
trips. If thelight does not turn off
after a few driving trips, have the vehicle
inspected by an INFINITI retailer.
For additional information, see “Mal-
function Indicator Light (MIL)” (P.2-19).
. The LOOSE FUEL CAP warning will appear
if the fuel-filler cap is not properly
tightened. It may take a few driving
trips for the message to be displayed.
Failure to tighten the fuel-filler cap
properly after the LOOSE FUEL CAP
warning appears may cause the
Pre-driving checks and adjustments3-25
Page 169 of 522

3-28Pre-driving checks and adjustments
SPA2456
ELECTRIC OPERATION (if so
equipped)
Tilt or telescopic operation
Move the lever to adjust the steering wheel
up or down, forward or rearward to the
desired position.
Entry/Exit function operation (if so
equipped):
The automatic drive positioner system will
make the steering wheel move up auto-
matically when the driver’s door is opened
with the ignition switch in the LOCK
position. This lets the driver get into andout of the seat more easily.
For more information, see
“Automatic drive
positioner” (P.3-32).
SPA2471
1. To block glare from the front, swing
down the main sun visor
*1.
SUN VISORS
Page 174 of 522

Cancel or activate entry/exit func-
tion
The selector lever must be in the P (Park)
position with the ignition switch in the OFF
position.
The entry/exit function can be activated or
canceled by pressing and holding the SET
switch for more than 10 seconds.
The indicator lights on the memory
switches (1 and 2) will blink once when
the function is canceled, and the indicator
lights will blink twice when the function is
activated. Note that the indicator lights
may illuminate after 5 seconds while
holding the SET switch. This indicates
readiness for linking the Intelligent Key to
a stored memory position. Keep the SET
switch pressed for more than 10 seconds
to turn on or off the entry/exit function.
The entry/exit function can also be acti-
vated or canceled if the“Lift Steering
Wheel on Exit” key or“Slide Driver Seat
Back on Exit” key is turned to ON or OFF in
the “Comfort” settings. (See “Vehicle
information and settings” (P.4-9).)
Initialize entry/exit function
If the battery cable is disconnected, or if
the fuse opens, the entry/exit function will
not work though this function was set on
before. In such a case, after connecting the
battery or replacing with a new fuse, open
and close the driver’s door more than two
times after the ignition switch is turned
from the ON position to the LOCK position.
The entry/exit function will be activated.
SPA2525
SEAT SYNCHRONIZATION FUNCTION
The seat synchronization function automa-
tically adjusts the positions of the steering
wheel and outside mirrors when the seat is
adjusted using the power seat switches.
However, the steering wheel and outside
mirrors will not move if the seat is adjusted
over the maximum thresholds. The system
considers that the steering wheel and
outside mirror adjustments are not neces-
sary because the seat may not be adjusted
for the driving position. Note that the
function is set to disabled as the factory
default setting.
Pre-driving checks and adjustments3-33