2012 HYUNDAI VELOSTER instrument cluster
[x] Cancel search: instrument clusterPage 144 of 385
465
Features of your vehicle
Cruise SET indicator
The indicator light illuminates when the
cruise function switch (SET- or RES+) is
ON.
The cruise SET indicator light in the
instrument cluster is illuminated when
the cruise control switch (SET- or RES+)
is pushed. The cruise SET indicator light
does not illuminate when the cruise con-
trol switch (CANCEL) is pushed or the
system is disengaged.Electronic power steering
(EPS) system warning light
This indicator light comes on after the
ignition key is turned to the ON position
and then it will go out.
This light also comes on when the EPS
needs repairs. If it comes on while driv-
ing, have your vehicle inspected by an
authorized HYUNDAI dealer.
Steering effort may increase significantly
if this lamp illuminates. See EPS system
in this section.
Key reminder warning chime
(if equipped)
Without smart key
If the driver’s door is opened while the
ignition key is left in the ignition switch
(ACC or LOCK position), the key
reminder warning chime will sound. This
helps prevent you from locking your keys
in the vehicle. The chime sounds until the
key is removed from the ignition switch or
the driver’s door is closed.
With smart key
If the driver’s door is opened while the
smart key is in the vehicle with the
engine start/stop button in ACC, the key
reminder warning chime will sound.
The chime sounds until the driver’s door
is closed.SETEPS
Page 243 of 385
Driving your vehicle
30 5
To dry the brakes, apply the brakes light-
ly until the braking action returns to nor-
mal, taking care to keep the car under
control at all times. If the braking action
does not return to normal, stop as soon
as it is safe to do so and call an author-
ized HYUNDAI dealer for assistance.
Do not coast down hills with the car out
of gear. This is extremely hazardous.
Keep the car in gear at all times, use
the brakes to slow down, then shift to a
lower gear so that engine braking will
help you maintain a safe speed.
Do not "ride" the brake pedal. Resting
your foot on the brake pedal while driv-
ing can be dangerous because it can
result in the brakes overheating and los-
ing their effectiveness. It also increases
the wear of the brake components.
If a tire goes flat while you are driving,
apply the brakes gently and keep the
car pointed straight ahead while you
slow down. When you are moving slow-
ly enough for it to be safe to do so, pull
off the road and stop in a safe place.
If your vehicle is equipped with an auto-
matic transaxle, don't let your vehicle
creep forward. To avoid creeping for-
ward, keep your foot firmly on the brake
pedal when the vehicle is stopped. Use caution when parking on a hill.
Firmly engage the parking brake and
place the shift lever in P (automatic
transaxle) or in first or reverse gear
(manual transaxle). If your vehicle is
facing downhill, turn the front wheels
into the curb to help keep the vehicle
from rolling. If your vehicle is facing
uphill, turn the front wheels away from
the curb to help keep the vehicle from
rolling. If there is no curb or if it is
required by other conditions to keep the
vehicle from rolling, block the wheels.
Under some conditions your parking
brake can freeze in the engaged posi-
tion. This is most likely to happen when
there is an accumulation of snow or ice
around or near the rear brakes or if the
brakes are wet. If there is a risk that the
parking brake may freeze, apply it only
temporarily while you put the gear
selector lever in P (automatic
transaxle) or in first or reverse gear
(manual transaxle) and block the rear
wheels so the vehicle cannot roll. Then
release the parking brake.
Do not hold the vehicle on the upgrade
with the accelerator pedal. This can
cause the transaxle to overheat. Always
use the brake pedal or parking brake.Vehicle stability management
(VSM) (if equipped)
This system provides further enhance-
ments to vehicle stability and steering
responses when a vehicle is driving on a
slippery road or a vehicle detected
changes in coefficient of friction between
right wheels and left wheels when braking.
VSM operation
When the VSM is in operation, ESC indi-
cator light ( ) blinks.
When the vehicle stability management
is operating properly, you can feel a slight
pulsation in the vehicle and/or abnormal
steering responses (EPS). This is only
the effect of brake and EPS control and
indicates nothing unusual.
The VSM does not operate when:
Driving on bank road such as gradient
or incline
Driving rearward
ESC OFF indicator light ( ) remains
on the instrument cluster
EPS indicator light remains on the
instrument cluster
Page 245 of 385
Driving your vehicle
32 5
The cruise control system allows you to
program the vehicle to maintain a con-
stant speed without resting your foot on
the accelerator pedal.
This system is designed to function
above approximately 25 mph (40 km/h).
✽ ✽
NOTICE
During normal cruise control operation,
when the SET switch is activated or
reactivated after applying the brakes,
the cruise control will energize after
approximately 3 seconds. This delay is
normal.
CRUISE CONTROL SYSTEM (IF EQUIPPED)
WARNING
If the cruise control is left on,
(CRUISE indicator light in the
instrument cluster illuminated)
the cruise control can be activat-
ed unintentionally. Keep the
cruise control system off
(CRUISE indicator light OFF)
when the cruise control is not in
use, to avoid inadvertently set-
ting a speed.
Use the cruise control system
only when traveling on open
highways in good weather.
Do not use the cruise control
when it may not be safe to keep
the car at a constant speed, for
instance, driving in heavy or
varying traffic, or on slippery
(rainy, icy or snow-covered) or
winding roads or over 6% up-hill
or down-hill roads.
Pay particular attention to the
driving conditions whenever
using the cruise control system.
Be careful when driving downhill
using the cruise control system,
which may increase the vehicle
speed.
CAUTION
During cruise-speed driving of a
manual transaxle vehicle, do not
shift into neutral without depress-
ing the clutch pedal, since the
engine will be overrevved. If this
happens, depress the clutch pedal
or release the cruise control ON-
OFF switch.
Page 246 of 385
533
Driving your vehicle
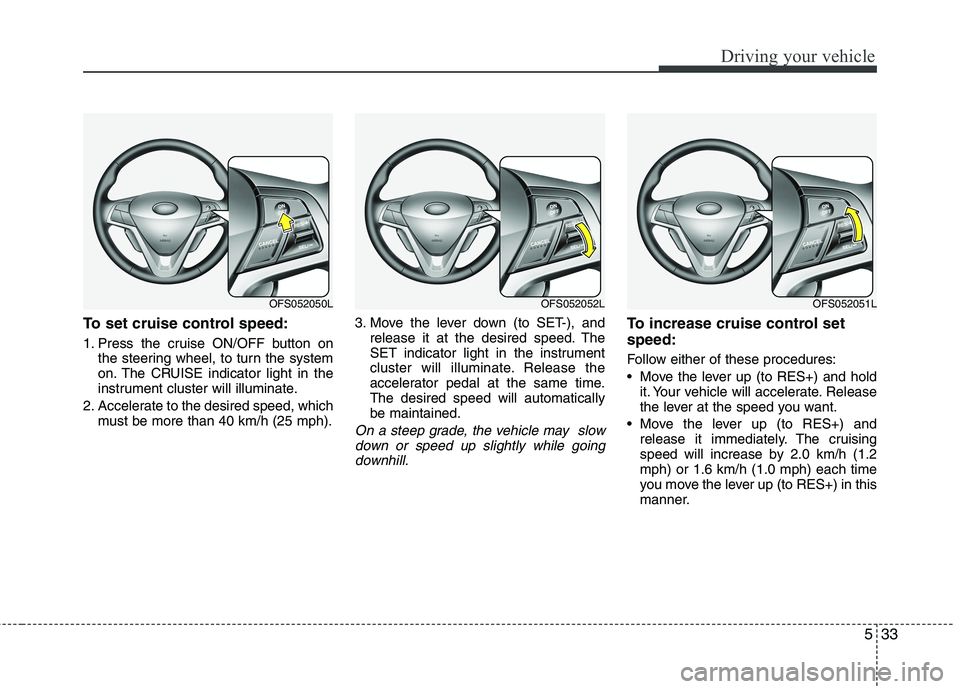
To set cruise control speed:
1. Press the cruise ON/OFF button on
the steering wheel, to turn the system
on. The CRUISE indicator light in the
instrument cluster will illuminate.
2. Accelerate to the desired speed, which
must be more than 40 km/h (25 mph).3. Move the lever down (to SET-), and
release it at the desired speed. The
SET indicator light in the instrument
cluster will illuminate. Release the
accelerator pedal at the same time.
The desired speed will automatically
be maintained.
On a steep grade, the vehicle may slow
down or speed up slightly while going
downhill.
To increase cruise control set
speed:
Follow either of these procedures:
Move the lever up (to RES+) and hold
it. Your vehicle will accelerate. Release
the lever at the speed you want.
Move the lever up (to RES+) and
release it immediately. The cruising
speed will increase by 2.0 km/h (1.2
mph) or 1.6 km/h (1.0 mph) each time
you move the lever up (to RES+) in this
manner.
OFS052052LOFS052051LOFS052050L
Page 248 of 385
535
Driving your vehicle
Each of these actions will cancel cruise
control operation (the SET indicator light
in the instrument cluster will go off), but it
will not turn the system off. If you wish to
resume cruise control operation, move
up the lever (to RES+) located on your
steering wheel. You will return to your
previously preset speed.
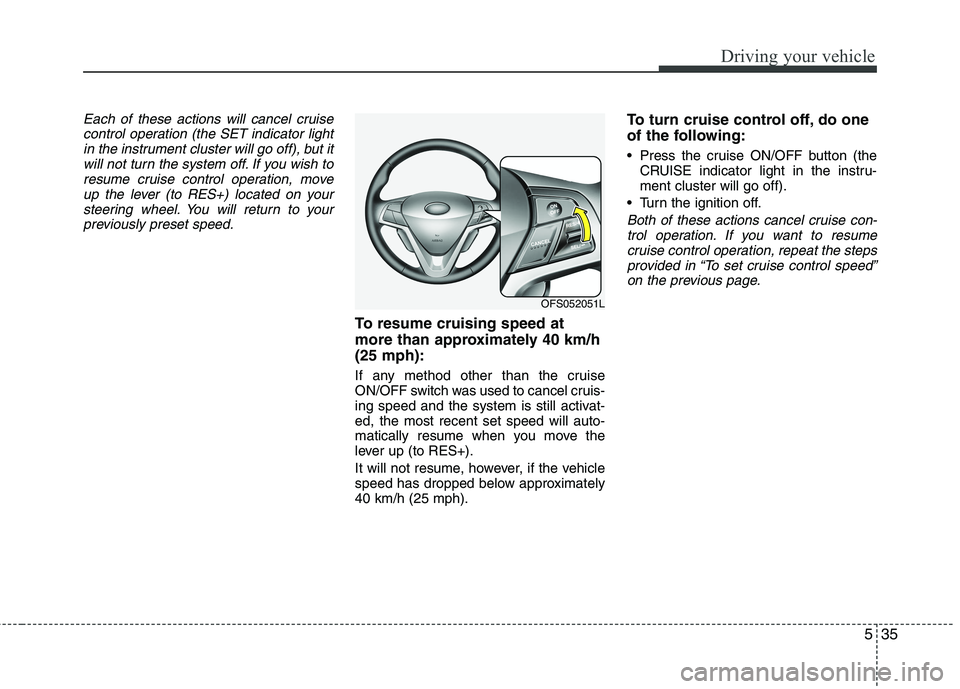
To resume cruising speed at
more than approximately 40 km/h
(25 mph):
If any method other than the cruise
ON/OFF switch was used to cancel cruis-
ing speed and the system is still activat-
ed, the most recent set speed will auto-
matically resume when you move the
lever up (to RES+).
It will not resume, however, if the vehicle
speed has dropped below approximately
40 km/h (25 mph).
To turn cruise control off, do one
of the following:
Press the cruise ON/OFF button (the
CRUISE indicator light in the instru-
ment cluster will go off).
Turn the ignition off.
Both of these actions cancel cruise con-
trol operation. If you want to resume
cruise control operation, repeat the steps
provided in “To set cruise control speed”
on the previous page.
OFS052051L
Page 347 of 385
753
Maintenance
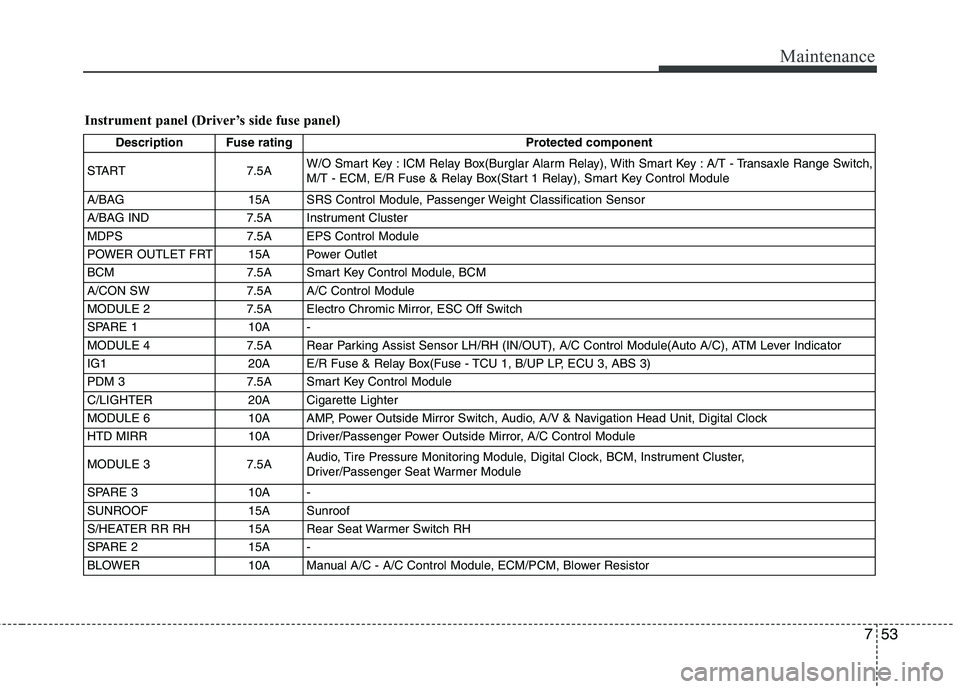
Instrument panel (Driver’s side fuse panel)
Description Fuse rating Protected component
START 7.5AW/O Smart Key : ICM Relay Box(Burglar Alarm Relay), With Smart Key : A/T - Transaxle Range Switch,
M/T - ECM, E/R Fuse & Relay Box(Start 1 Relay), Smart Key Control Module
A/BAG 15A SRS Control Module, Passenger Weight Classification Sensor
A/BAG IND 7.5A Instrument Cluster
MDPS 7.5A EPS Control Module
POWER OUTLET FRT 15A Power Outlet
BCM 7.5A Smart Key Control Module, BCM
A/CON SW 7.5A A/C Control Module
MODULE 2 7.5A Electro Chromic Mirror, ESC Off Switch
SPARE 1 10A -
MODULE 4 7.5A Rear Parking Assist Sensor LH/RH (IN/OUT), A/C Control Module(Auto A/C), ATM Lever Indicator
IG1 20A E/R Fuse & Relay Box(Fuse - TCU 1, B/UP LP, ECU 3, ABS 3)
PDM 3 7.5A Smart Key Control Module
C/LIGHTER 20A Cigarette Lighter
MODULE 6 10A AMP, Power Outside Mirror Switch, Audio, A/V & Navigation Head Unit, Digital Clock
HTD MIRR 10A Driver/Passenger Power Outside Mirror, A/C Control Module
MODULE 3 7.5AAudio, Tire Pressure Monitoring Module, Digital Clock, BCM, Instrument Cluster,
Driver/Passenger Seat Warmer Module
SPARE 3 10A -
SUNROOF 15A Sunroof
S/HEATER RR RH 15A Rear Seat Warmer Switch RH
SPARE 2 15A -
BLOWER 10A Manual A/C - A/C Control Module, ECM/PCM, Blower Resistor
Page 348 of 385
Maintenance
54 7
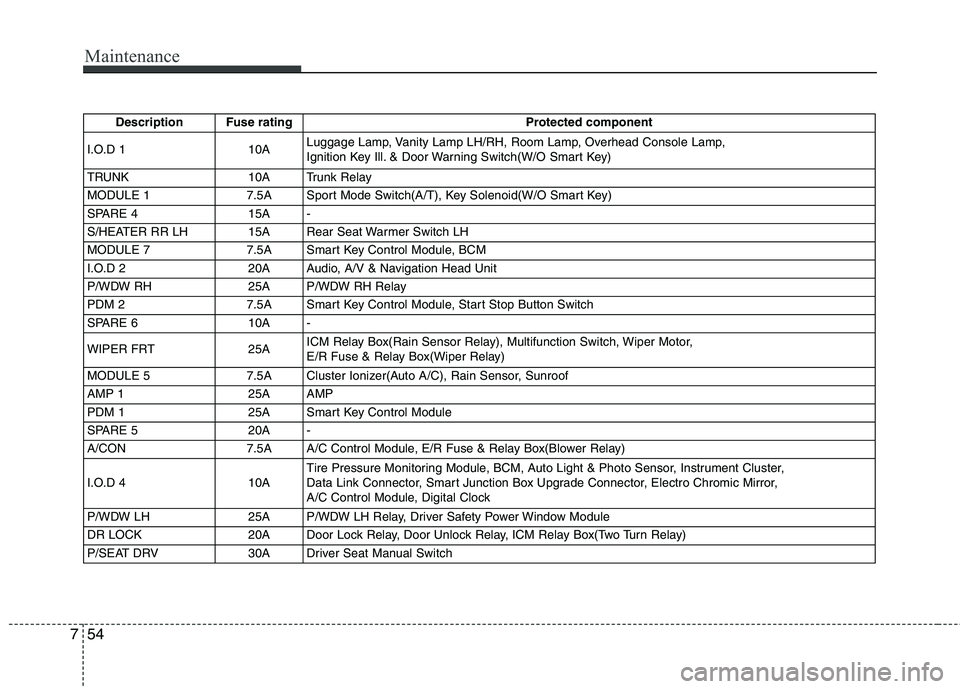
Description Fuse rating Protected component
I.O.D 1 10ALuggage Lamp, Vanity Lamp LH/RH, Room Lamp, Overhead Console Lamp,
Ignition Key Ill. & Door Warning Switch(W/O Smart Key)
TRUNK 10A Trunk Relay
MODULE 1 7.5A Sport Mode Switch(A/T), Key Solenoid(W/O Smart Key)
SPARE 4 15A -
S/HEATER RR LH 15A Rear Seat Warmer Switch LH
MODULE 7 7.5A Smart Key Control Module, BCM
I.O.D 2 20A Audio, A/V & Navigation Head Unit
P/WDW RH 25A P/WDW RH Relay
PDM 2 7.5A Smart Key Control Module, Start Stop Button Switch
SPARE 6 10A -
WIPER FRT 25AICM Relay Box(Rain Sensor Relay), Multifunction Switch, Wiper Motor,
E/R Fuse & Relay Box(Wiper Relay)
MODULE 5 7.5A Cluster Ionizer(Auto A/C), Rain Sensor, Sunroof
AMP 1 25A AMP
PDM 1 25A Smart Key Control Module
SPARE 5 20A -
A/CON 7.5A A/C Control Module, E/R Fuse & Relay Box(Blower Relay)
I.O.D 4 10ATire Pressure Monitoring Module, BCM, Auto Light & Photo Sensor, Instrument Cluster,
Data Link Connector, Smart Junction Box Upgrade Connector, Electro Chromic Mirror,
A/C Control Module, Digital Clock
P/WDW LH 25A P/WDW LH Relay, Driver Safety Power Window Module
DR LOCK 20A Door Lock Relay, Door Unlock Relay, ICM Relay Box(Two Turn Relay)
P/SEAT DRV 30A Driver Seat Manual Switch
Page 349 of 385
755
Maintenance
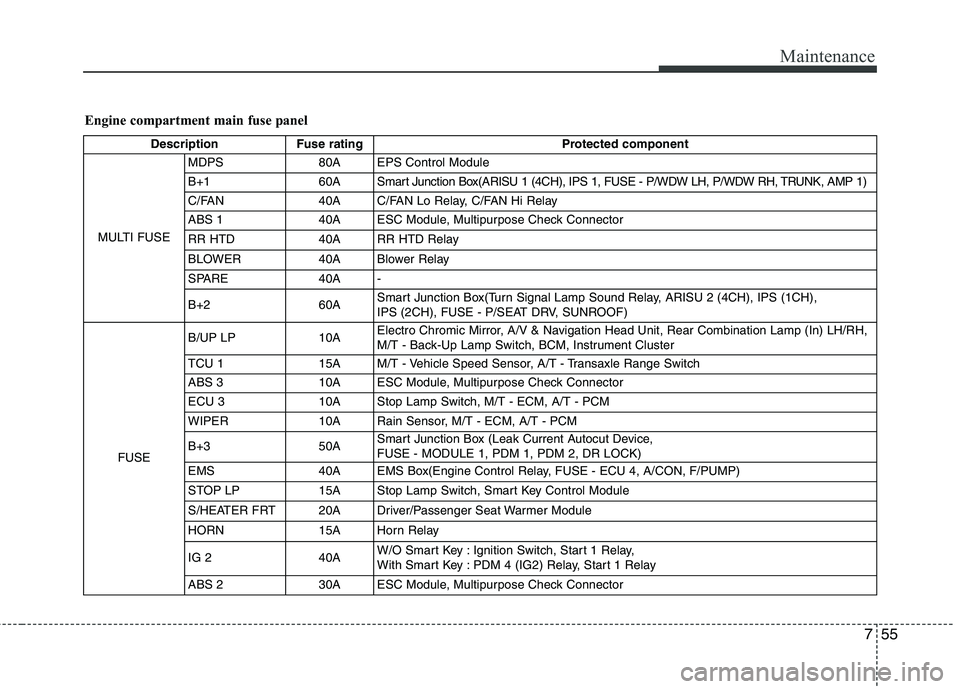
Engine compartment main fuse panel
Description Fuse rating Protected component
MULTI FUSEMDPS 80A EPS Control Module
B+1 60A Smart Junction Box(ARISU 1 (4CH), IPS 1, FUSE - P/WDW LH, P/WDW RH, TRUNK, AMP 1)
C/FAN 40A C/FAN Lo Relay, C/FAN Hi Relay
ABS 1 40A ESC Module, Multipurpose Check Connector
RR HTD 40A RR HTD Relay
BLOWER 40A Blower Relay
SPARE 40A -
B+260ASmart Junction Box(Turn Signal Lamp Sound Relay, ARISU 2 (4CH), IPS (1CH),
IPS (2CH), FUSE - P/SEAT DRV, SUNROOF)
FUSEB/UP LP 10AElectro Chromic Mirror, A/V & Navigation Head Unit, Rear Combination Lamp (In) LH/RH,
M/T - Back-Up Lamp Switch, BCM, Instrument Cluster
TCU 115AM/T - Vehicle Speed Sensor, A/T - Transaxle Range Switch
ABS 3 10A ESC Module, Multipurpose Check Connector
ECU 3 10A Stop Lamp Switch, M/T - ECM, A/T - PCM
WIPER 10A Rain Sensor, M/T - ECM, A/T - PCM
B+3 50ASmart Junction Box (Leak Current Autocut Device,
FUSE - MODULE 1, PDM 1, PDM 2, DR LOCK)
EMS 40A EMS Box(Engine Control Relay, FUSE - ECU 4, A/CON, F/PUMP)
STOP LP 15A Stop Lamp Switch, Smart Key Control Module
S/HEATER FRT 20A Driver/Passenger Seat Warmer Module
HORN 15A Horn Relay
IG 2 40AW/O Smart Key : Ignition Switch, Start 1 Relay,
With Smart Key : PDM 4 (IG2) Relay, Start 1 Relay
ABS 2 30A ESC Module, Multipurpose Check Connector