2012 HYUNDAI TUCSON change time
[x] Cancel search: change timePage 1 of 371

OOWW NNEERR ''SS MM AANN UUAA LL
Operation MaintenanceSpecifications
All information in this Owner's Manual is current at the time of publication.
However, Hyundai reserves the right to make changes at any time so that
our policy of continual product improvement may be carried out.
This manual applies to all Hyundai models and includes descriptions and
explanations of optional as well as standard equipment. As a result, you may
find material in this manual that does not apply to your specific vehicle.
Page 23 of 371
35
Safety features of your vehicle
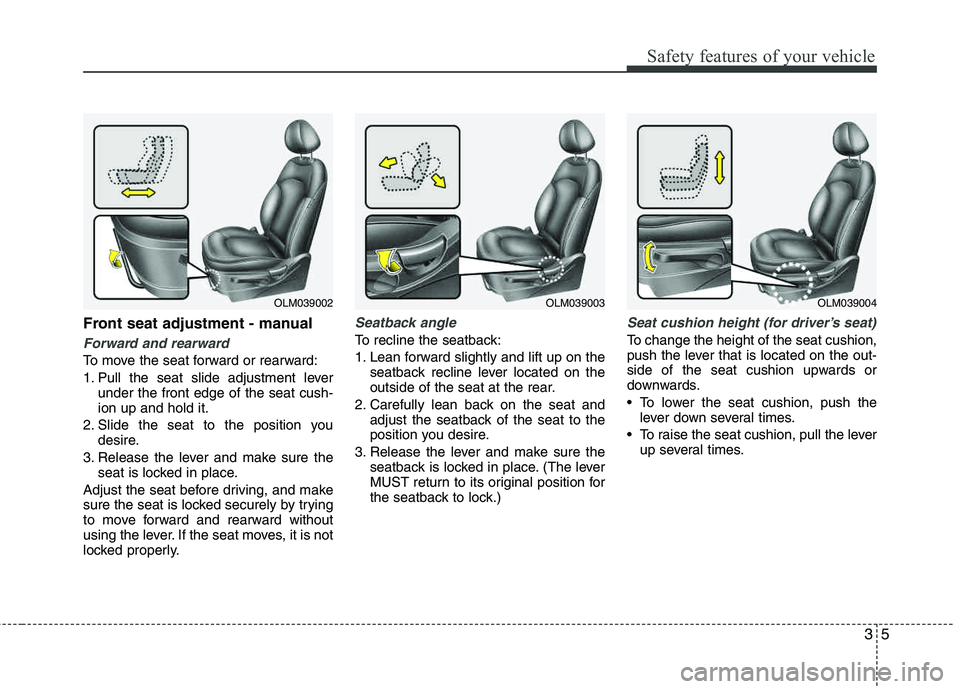
Front seat adjustment - manual
Forward and rearward
To move the seat forward or rearward:
1. Pull the seat slide adjustment leverunder the front edge of the seat cush- ion up and hold it.
2. Slide the seat to the position you desire.
3. Release the lever and make sure the seat is locked in place.
Adjust the seat before driving, and make
sure the seat is locked securely by trying
to move forward and rearward without
using the lever. If the seat moves, it is not
locked properly.
Seatback angle
To recline the seatback:
1. Lean forward slightly and lift up on the seatback recline lever located on the
outside of the seat at the rear.
2. Carefully lean back on the seat and adjust the seatback of the seat to the
position you desire.
3. Release the lever and make sure the seatback is locked in place. (The lever
MUST return to its original position for
the seatback to lock.)
Seat cushion height (for driver’s seat)
To change the height of the seat cushion,
push the lever that is located on the out-
side of the seat cushion upwards or
downwards.
To lower the seat cushion, push thelever down several times.
To raise the seat cushion, pull the lever up several times.
OLM039004OLM039003OLM039002
Page 28 of 371

Safety features of your vehicle
10
3
Seat warmer (if equipped)
The seat warmer is provided to warm the
front seats during cold weather. With the
ignition switch in the ON position, push
either of the switches to warm the driver's seat or the front passenger's seat.
During mild weather or under conditions
where the operation of the seat warmer
is not needed, keep the switches in the OFF position. Each time you push the button, the
temperature setting of the seat is
changed as follows :
The seat warmer defaults to the OFF position whenever the ignition switch is
turned on.
✽✽ NOTICE
With the seat warmer switch in the ON
position, the heating system in the seat
turns off or on automatically depending
on the seat temperature.
CAUTION
When cleaning the seats, do not use an organic solvent such aspaint thinner, benzene, alcohol
and gasoline. Doing so may dam-age the surface of the heater orseats.
To prevent overheating the seat warmer, do not place blankets,cushions or seat covers on theseats while the seat warmer is in
operation.
Do not place heavy or sharp objects on seats equipped withseat warmers. Damage to the seat
warming components could occur.
OFF �HIGH ( ) �LOW ( )
�
OLM039013
Page 86 of 371
45
Features of your vehicle
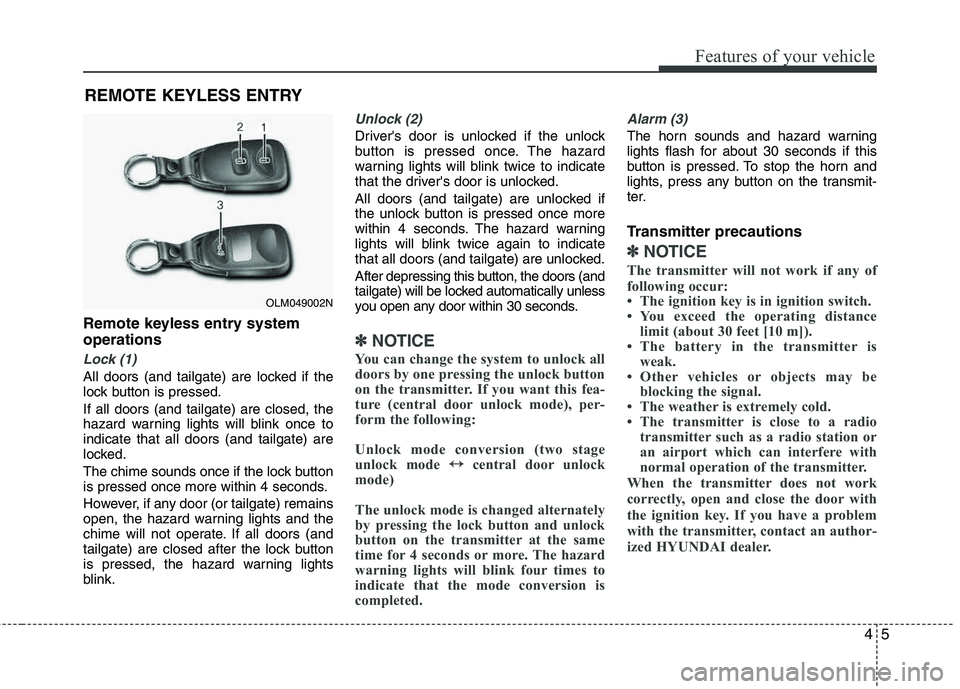
Remote keyless entry system operations
Lock (1)
All doors (and tailgate) are locked if the
lock button is pressed. If all doors (and tailgate) are closed, the
hazard warning lights will blink once to indicate that all doors (and tailgate) are
locked.
The chime sounds once if the lock button
is pressed once more within 4 seconds.
However, if any door (or tailgate) remains
open, the hazard warning lights and the
chime will not operate. If all doors (and
tailgate) are closed after the lock button
is pressed, the hazard warning lights
blink.
Unlock (2)
Driver's door is unlocked if the unlock
button is pressed once. The hazard
warning lights will blink twice to indicate
that the driver's door is unlocked.
All doors (and tailgate) are unlocked if
the unlock button is pressed once more
within 4 seconds. The hazard warning
lights will blink twice again to indicate
that all doors (and tailgate) are unlocked.
After depressing this button, the doors (and
tailgate) will be locked automatically unless
you open any door within 30 seconds.
✽✽NOTICE
You can change the system to unlock all
doors by one pressing the unlock button
on the transmitter. If you want this fea-
ture (central door unlock mode), per-
form the following:
Unlock mode conversion (two stage
unlock mode ↔
↔
central door unlock
mode)
The unlock mode is changed alternately
by pressing the lock button and unlock
button on the transmitter at the same
time for 4 seconds or more. The hazard
warning lights will blink four times to
indicate that the mode conversion is
completed.
Alarm (3)
The horn sounds and hazard warning
lights flash for about 30 seconds if this
button is pressed. To stop the horn and
lights, press any button on the transmit-
ter.
Transmitter precautions
✽✽ NOTICE
The transmitter will not work if any of
following occur:
The ignition key is in ignition switch.
You exceed the operating distance limit (about 30 feet [10 m]).
The battery in the transmitter is weak.
Other vehicles or objects may be blocking the signal.
The weather is extremely cold.
The transmitter is close to a radio
transmitter such as a radio station or
an airport which can interfere with
normal operation of the transmitter.
When the transmitter does not work
correctly, open and close the door with
the ignition key. If you have a problem
with the transmitter, contact an author-
ized HYUNDAI dealer.
REMOTE KEYLESS ENTRY
OLM049002N
Page 89 of 371
Features of your vehicle
8
4
Theft-alarm stage
The alarm will be activated if any of the
following occurs while the system is
armed.
A front or rear door is opened without
using the ignition key or transmitter.
The tailgate is opened without using the transmitter.
The engine hood is opened.
The horn will sound and the hazard
warning lights will blink continuously for
approximately 27 seconds, and repeat
the horn 2 times unless the system is dis-
armed. To turn off the system, unlock the
doors with the ignition key or transmitter.
Disarmed stage
The system will be disarmed when the
doors (and tailgate) are unlocked with the
transmitter or the ignition key.
After depressing the unlock button, the
hazard warning lights will blink twice to
indicate that the system is disarmed.
After depressing the unlock button, if any door (or tailgate) is not opened within 30
seconds, the system will be rearmed.
✽✽ NOTICE
Avoid trying to start the engine while the alarm is activated. The vehicle
starting motor is disabled during the
theft-alarm stage.
If the system is not disarmed with the
transmitter, insert the key into the
ignition switch, turn the ignition
switch to the ON position and wait for
30 seconds. Then the system will be
disarmed. (if equipped)
If you lose your keys, consult your authorized HYUNDAI dealer.
CAUTION
Do not change, alter or adjust the
theft-alarm system because it couldcause the theft-alarm system to
malfunction. The system shouldonly be serviced by an authorizedHYUNDAI dealer.
Malfunctions caused by improperalterations, adjustments or modifi-cations to the theft-alarm systemare not covered by your vehicle
manufacturer warranty.
Page 90 of 371
49
Features of your vehicle
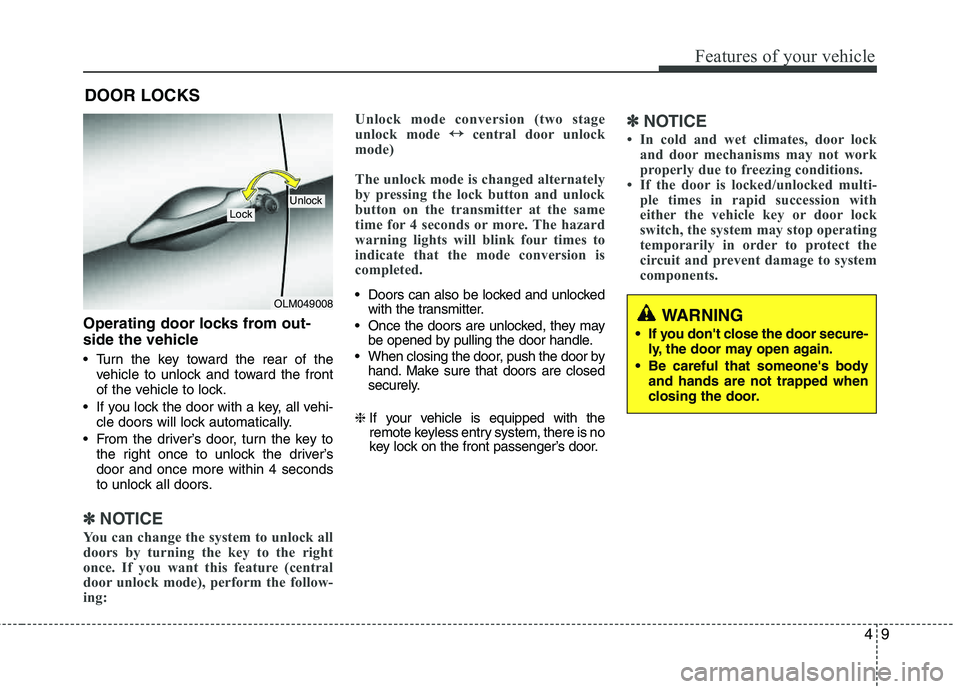
Operating door locks from out-
side the vehicle
Turn the key toward the rear of thevehicle to unlock and toward the front
of the vehicle to lock.
If you lock the door with a key, all vehi- cle doors will lock automatically.
From the driver’s door, turn the key to the right once to unlock the driver’sdoor and once more within 4 seconds
to unlock all doors.
✽✽ NOTICE
You can change the system to unlock all
doors by turning the key to the right
once. If you want this feature (central
door unlock mode), perform the follow-
ing: Unlock mode conversion (two stage
unlock mode
↔
↔
central door unlock
mode)
The unlock mode is changed alternately
by pressing the lock button and unlock
button on the transmitter at the same
time for 4 seconds or more. The hazard
warning lights will blink four times to
indicate that the mode conversion is
completed.
Doors can also be locked and unlocked with the transmitter.
Once the doors are unlocked, they may be opened by pulling the door handle.
When closing the door, push the door by hand. Make sure that doors are closed
securely.
❈ If your vehicle is equipped with the
remote keyless entry system, there is no
key lock on the front passenger’s door.
✽✽
NOTICE
In cold and wet climates, door lock and door mechanisms may not work
properly due to freezing conditions.
If the door is locked/unlocked multi- ple times in rapid succession with
either the vehicle key or door lock
switch, the system may stop operating
temporarily in order to protect the
circuit and prevent damage to system
components.
DOOR LOCKS
OLM049008
LockUnlock
WARNING
If you don't close the door secure- ly, the door may open again.
Be careful that someone's body and hands are not trapped when
closing the door.
Page 110 of 371
429
Features of your vehicle
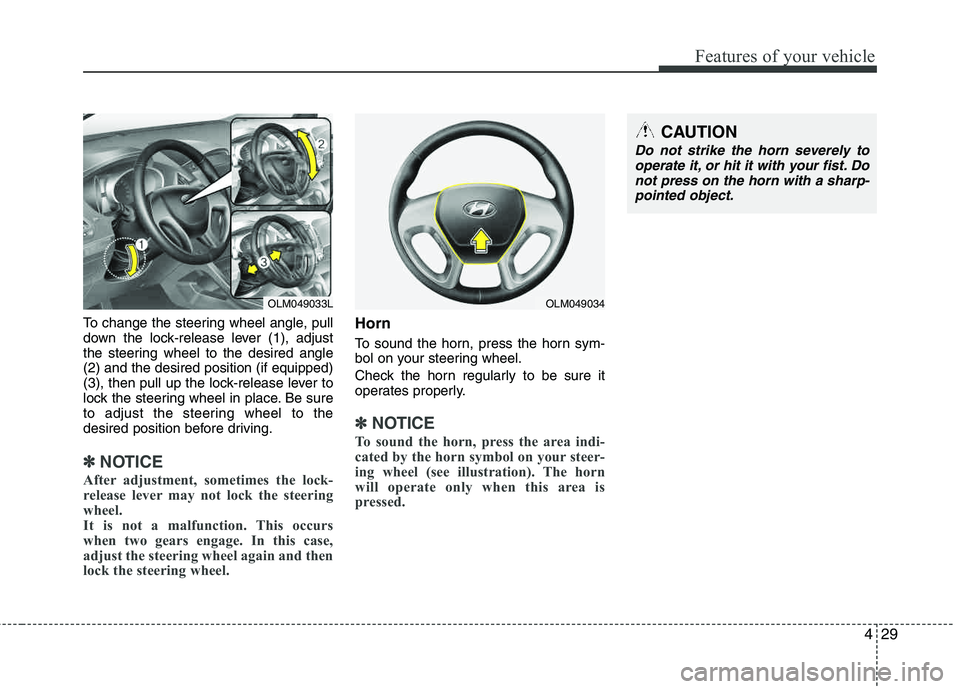
To change the steering wheel angle, pull
down the lock-release lever (1), adjust
the steering wheel to the desired angle (2) and the desired position (if equipped)
(3), then pull up the lock-release lever to
lock the steering wheel in place. Be sure
to adjust the steering wheel to the
desired position before driving.
✽✽NOTICE
After adjustment, sometimes the lock-
release lever may not lock the steering
wheel.
It is not a malfunction. This occurs
when two gears engage. In this case,
adjust the steering wheel again and then
lock the steering wheel.
Horn
To sound the horn, press the horn sym-
bol on your steering wheel.
Check the horn regularly to be sure it
operates properly.
✽✽ NOTICE
To sound the horn, press the area indi-
cated by the horn symbol on your steer-
ing wheel (see illustration). The horn
will operate only when this area is
pressed.
OLM049033L
CAUTION
Do not strike the horn severely to operate it, or hit it with your fist. Donot press on the horn with a sharp-
pointed object.
OLM049034
Page 133 of 371
Features of your vehicle
52
4
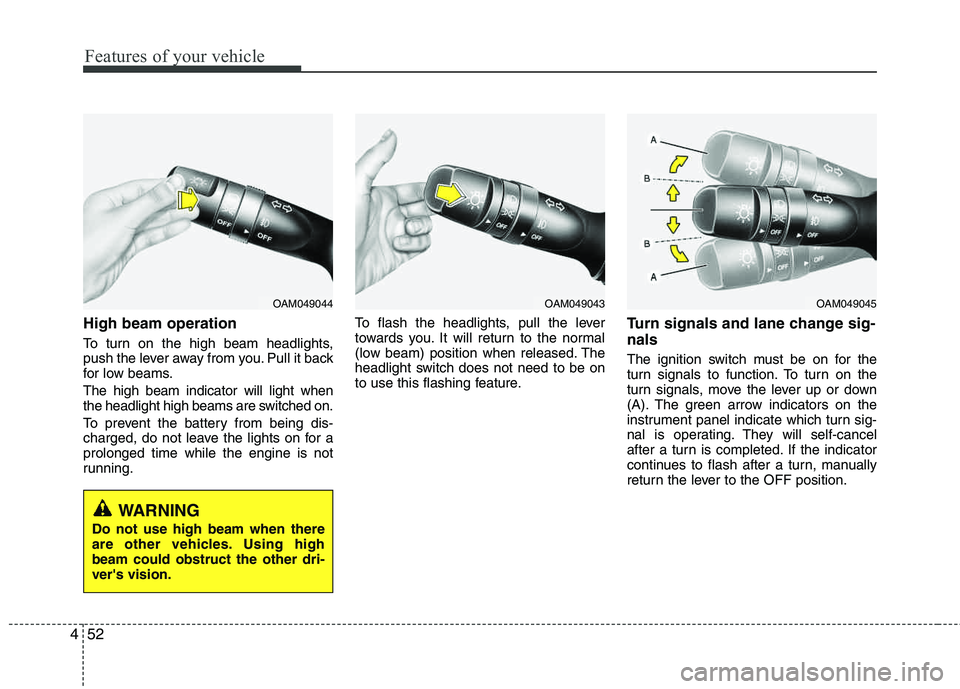
High beam operation
To turn on the high beam headlights,
push the lever away from you. Pull it back
for low beams. The high beam indicator will light when
the headlight high beams are switched on.
To prevent the battery from being dis-
charged, do not leave the lights on for a prolonged time while the engine is not
running. To flash the headlights, pull the lever
towards you. It will return to the normal
(low beam) position when released. The
headlight switch does not need to be on
to use this flashing feature.
Turn signals and lane change sig- nals
The ignition switch must be on for the
turn signals to function. To turn on the
turn signals, move the lever up or down
(A). The green arrow indicators on the
instrument panel indicate which turn sig-
nal is operating. They will self-cancel
after a turn is completed. If the indicator
continues to flash after a turn, manually
return the lever to the OFF position.
OAM049044OAM049043OAM049045
WARNING
Do not use high beam when there
are other vehicles. Using highbeam could obstruct the other dri- ver's vision.