Page 339 of 371

Maintenance
52
7
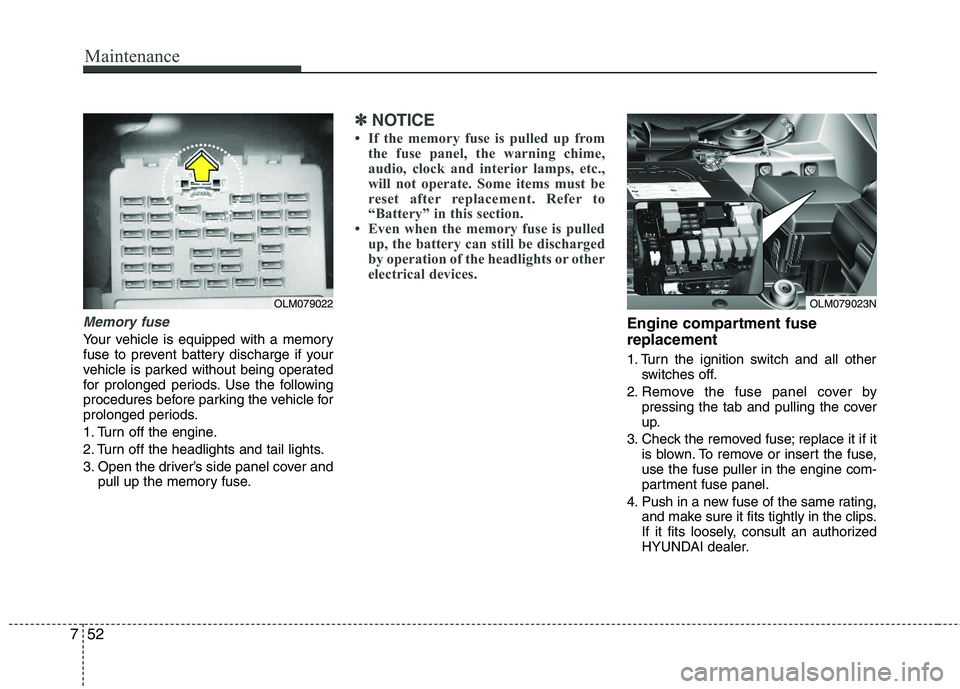
Memory fuse
Your vehicle is equipped with a memory
fuse to prevent battery discharge if your
vehicle is parked without being operated
for prolonged periods. Use the following
procedures before parking the vehicle for
prolonged periods.
1. Turn off the engine.
2. Turn off the headlights and tail lights.
3. Open the driver’s side panel cover and
pull up the memory fuse.
✽✽ NOTICE
If the memory fuse is pulled up from the fuse panel, the warning chime,
audio, clock and interior lamps, etc.,
will not operate. Some items must be
reset after replacement. Refer to
“Battery” in this section.
Even when the memory fuse is pulled
up, the battery can still be discharged
by operation of the headlights or other
electrical devices.
Engine compartment fuse replacement
1. Turn the ignition switch and all other switches off.
2. Remove the fuse panel cover by pressing the tab and pulling the cover
up.
3. Check the removed fuse; replace it if it is blown. To remove or insert the fuse,use the fuse puller in the engine com-
partment fuse panel.
4. Push in a new fuse of the same rating, and make sure it fits tightly in the clips.
If it fits loosely, consult an authorized
HYUNDAI dealer.
OLM079023NOLM079022
Page 340 of 371
753
Maintenance
Main fuse and Multi fuse
If the main fuse and Multi fuse is blown,
it must be removed as follows:
1. Disconnect the negative battery cable.
2. Remove the nuts shown in the pictureabove.
3. Replace the fuse with a new one of the same rating.
4. Reinstall in the reverse order of removal.
✽✽ NOTICE
If the main fuse is blown, consult an
authorized HYUNDAI dealer.CAUTION
After checking the fuse panel in the engine compartment, securelyinstall the fuse panel cover. If not,
electrical failures may occur fromwater contact.
OLM079052N
Page 341 of 371
Maintenance
54
7
✽✽
NOTICE
Not all fuse panel descriptions in this
manual may be applicable to your vehi-
cle. It is accurate at the time of printing.
When you inspect the fuse panel in your
vehicle, refer to the fuse panel label.Instrument panel fuse panel Engine compartment fuse panel
OLM079026/OLM079027N/OLM079053N
Fuse/relay panel description
Inside the fuse/relay panel covers, you can find the fuse/relay label describing fuse/relay name and capacity.
Page 342 of 371

755
Maintenance
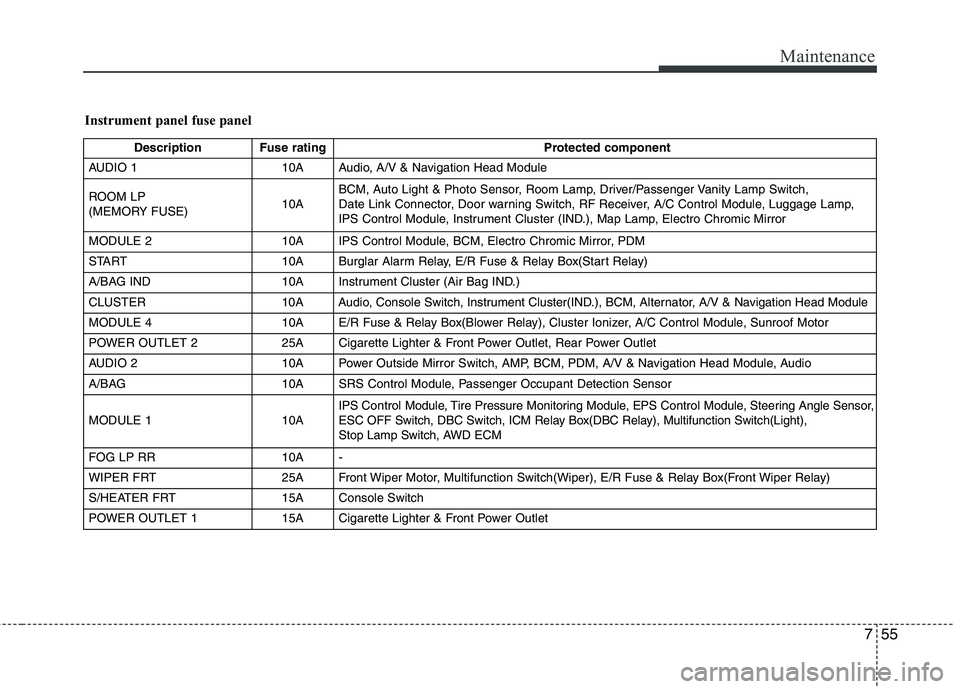
Instrument panel fuse panel
Description Fuse ratingProtected component
AUDIO 1 10A Audio, A/V & Navigation Head Module
ROOM LP
(MEMORY FUSE) 10ABCM, Auto Light & Photo Sensor, Room Lamp, Driver/Passenger Vanity Lamp Switch,
Date Link Connector, Door warning Switch, RF Receiver, A/C Control Module, Luggage Lamp,
IPS Control Module, Instrument Cluster (IND.), Map Lamp, Electro Chromic Mirror
MODULE 2 10A IPS Control Module, BCM, Electro Chromic Mirror, PDM
START 10A Burglar Alarm Relay, E/R Fuse & Relay Box(Start Relay)
A/BAG IND 10A Instrument Cluster (Air Bag IND.)
CLUSTER 10A Audio, Console Switch, Instrument Cluster(IND.), BCM, Alternator, A/V & Navigation Head Module
MODULE 4 10A E/R Fuse & Relay Box(Blower Relay), Cluster Ionizer, A/C Control Module, Sunroof Motor
POWER OUTLET 2 25A Cigarette Lighter & Front Power Outlet, Rear Power Outlet
AUDIO 2 10A Power Outside Mirror Switch, AMP, BCM, PDM, A/V & Navigation Head Module, Audio
A/BAG 10A SRS Control Module, Passenger Occupant Detection Sensor
MODULE 1 10A IPS
Control Module, Tire Pressure Monitoring Module, EPS ControlModule, Steering Angle Sensor,
ESC OFF Switch, DBC Switch, ICM Relay Box(DBC Relay), Multifunction Switch(Light),
Stop Lamp Switch, AWD ECM
FOG LP RR 10A -
WIPER FRT 25A Front Wiper Motor, Multifunction Switch(Wiper), E/R Fuse & Relay Box(Front Wiper Relay)
S/HEATER FRT 15A Console Switch
POWER OUTLET 1 15A Cigarette Lighter & Front Power Outlet
Page 343 of 371
Maintenance
56
7
Description Fuse rating Protected component
B/UP LP 10A B/UP LP Relay
DR LOCK 15A Door Lock Relay, Tail Gate Relay, Door Unlock Relay
MODULE 5 7.5A BCM, PDM
WIPER RR 15A ICM Relay Box (Rear Wiper Relay), Rear Wiper Motor, Multifunction Switch (Wiper)
SUNROOF 15A Sunroof Motor
IGN 1 20A E/R Fuse & Relay Box(ECU 2 7.5A, ABS 7.5A, TCU 2 7.5A)
A/CON 7.5A A/C Control Module
S/HEATER RR 15A -
P/WDW RH 25A Power Window Main Switch, Passenger Power Window Switch, Rear Power Window Switch RH
MODULE 3 10A -
P/SEAT (DRV) 20A Driver Seat Manual Switch
PDM 15A PDM
P/WDW LH 25A Power Window Main Switch, Rear Power Window Switch LH
AMP 25A AMP
HTD MIRR 7.5A Rear Defogger Switch, Rear Defogger (+), Driver/Passenger Power Outside Mirror
SAFETY POWER WINDOW 20A Driver Safety Power Window Module
TPMS 7.5A ATM Shift Lever, AWD ECM, Tire Pressure Monitoring Module
HAZARD 15A ICM Relay Box(Flasher Sound Relay), BCM
Page 344 of 371

757
Maintenance
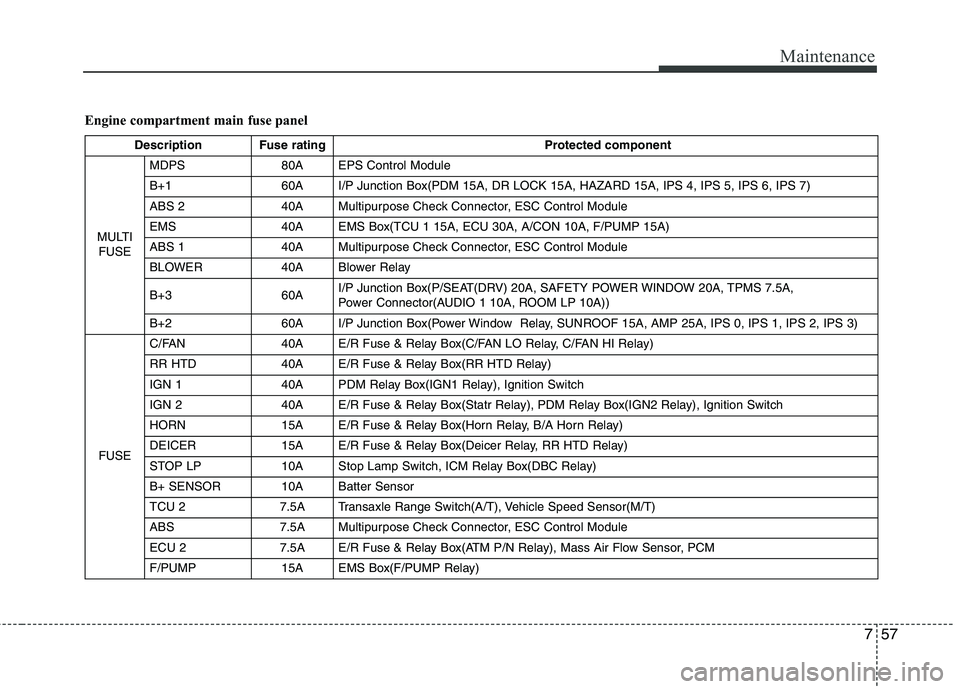
Engine compartment main fuse panel
Description Fuse ratingProtected component
MULTI FUSE MDPS 80A EPS Control Module
B+1 60A I/P Junction Box(PDM 15A, DR LOCK 15A, HAZARD 15A, IPS 4, IPS 5, IPS 6, IPS 7)
ABS 2 40A Multipurpose Check Connector, ESC Control Module
EMS 40A EMS Box(TCU 1 15A, ECU 30A, A/CON 10A, F/PUMP 15A)
ABS 1 40A Multipurpose Check Connector, ESC Control Module
BLOWER 40A Blower Relay
B+3 60A
I/P Junction Box(P/SEAT(DRV) 20A, SAFETY POWER WINDOW 20A, TPMS 7.5A,
Power Connector(AUDIO 1 10A, ROOM LP 10A))
B+2 60A I/P Junction Box(Power Window Relay, SUNROOF 15A, AMP 25A, IPS 0, IPS 1, IPS 2, IPS 3)
FUSE C/FAN 40A E/R Fuse & Relay Box(C/FAN LO Relay, C/FAN HI Relay)
RR HTD 40A E/R Fuse & Relay Box(RR HTD Relay)
IGN 1 40A PDM Relay Box(IGN1 Relay), Ignition Switch
IGN 2 40A E/R Fuse & Relay Box(Statr Relay), PDM Relay Box(IGN2 Relay), Ignition Switch
HORN 15A E/R Fuse & Relay Box(Horn Relay, B/A Horn Relay)
DEICER 15A E/R Fuse & Relay Box(Deicer Relay, RR HTD Relay)
STOP LP 10A Stop Lamp Switch, ICM Relay Box(DBC Relay)
B+ SENSOR 10A Batter Sensor
TCU 2 7.5A Transaxle Range Switch(A/T), Vehicle Speed Sensor(M/T)
ABS 7.5A Multipurpose Check Connector, ESC Control Module
ECU 2 7.5A E/R Fuse & Relay Box(ATM P/N Relay), Mass Air Flow Sensor, PCM
F/PUMP 15A EMS Box(F/PUMP Relay)
Page 345 of 371
Maintenance
58
7
Description Fuse rating Protected component
FUSE SENSOR 4 15A
E/R Fuse & Relay Box(C/FAN HI, LO Relay), EMS Box(F/PUMP Relay),
Oxygen Sensor (UP, DOWN), PCM
SENSOR 3 10A EMS Box(A/CON Relay), Injector(#1, #2, #3, #4)
SENSOR 2 10A -
TCU 1 15A PCM
A/CON 10A EMS Box(A/CON Relay)
SENSOR 1 10A Crankshaft Position Sensor, Camshaft Position Sensor #1/2, Oil Control Valve #1/2,
Canister Purge Control Solenoid Valve, Variable Intake Manifold Valve, Canister Close Valve
ECU 1 20A Ignition Colil (#1, #2, #3, #4), Condenser
ECU 30A EMS Box(Engine Control Relay)
Page 346 of 371

759
Maintenance
LIGHT BULBS
Use only the bulbs of the specifiedwattage.
✽✽ NOTICE
After heavy, driving rain or washing,
headlight and taillight lenses could
appear frosty. This condition is caused by
the temperature difference between the
lamp inside and outside. This is similar
to the condensation on your windows
inside your vehicle during the rain and
doesn’t indicate a problem with your
vehicle. If the water leaks into the lamp
bulb circuitry, have the vehicle checked
by an authorized HYUNDAI dealer.
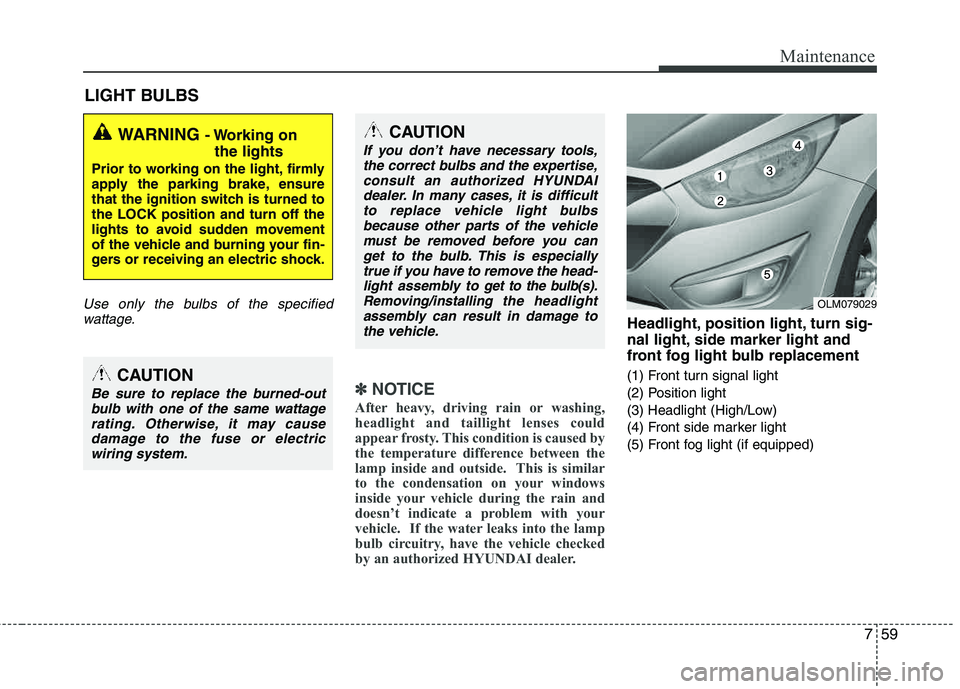
Headlight, position light, turn sig-
nal light, side marker light and
front fog light bulb replacement
(1) Front turn signal light
(2) Position light
(3) Headlight (High/Low)
(4) Front side marker light
(5) Front fog light (if equipped)
WARNING - Working on the lights
Prior to working on the light, firmly
apply the parking brake, ensure
that the ignition switch is turned tothe LOCK position and turn off the
lights to avoid sudden movement
of the vehicle and burning your fin-
gers or receiving an electric shock.
CAUTION
Be sure to replace the burned-outbulb with one of the same wattagerating. Otherwise, it may cause damage to the fuse or electric
wiring system.
CAUTION
If you don’t have necessary tools, the correct bulbs and the expertise,consult an authorized HYUNDAI
dealer. In many cases, it is difficultto replace vehicle light bulbsbecause other parts of the vehiclemust be removed before you can
get to the bulb. This is especiallytrue if you have to remove the head-light assembly to
get to the bulb(s).
Removing/installingthe headlight
assembly can result in damage to
the vehicle.OLM079029