2012 HYUNDAI TUCSON tailgate
[x] Cancel search: tailgatePage 125 of 371
Features of your vehicle
44
4
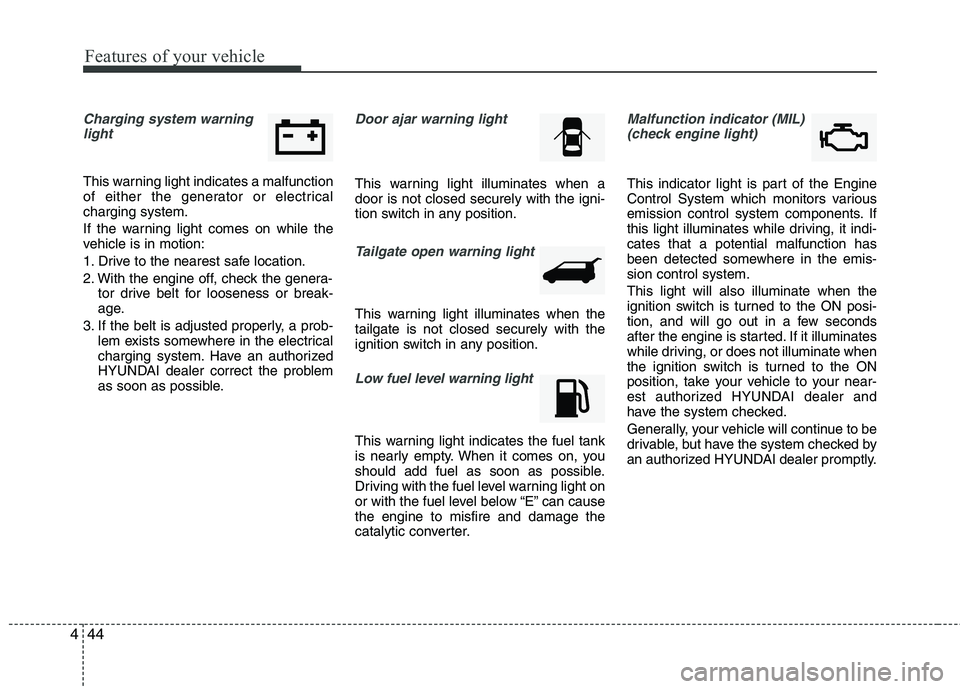
Charging system warning
light
This warning light indicates a malfunction
of either the generator or electricalcharging system.
If the warning light comes on while the
vehicle is in motion:
1. Drive to the nearest safe location.
2. With the engine off, check the genera- tor drive belt for looseness or break-
age.
3. If the belt is adjusted properly, a prob- lem exists somewhere in the electrical
charging system. Have an authorized
HYUNDAI dealer correct the problem
as soon as possible.
Door ajar warning light
This warning light illuminates when a door is not closed securely with the igni-
tion switch in any position.
Tailgate open warning light
This warning light illuminates when the tailgate is not closed securely with the
ignition switch in any position.
Low fuel level warning light
This warning light indicates the fuel tank
is nearly empty. When it comes on, you
should add fuel as soon as possible.
Driving with the fuel level warning light on
or with the fuel level below “E” can causethe engine to misfire and damage the
catalytic converter.
Malfunction indicator (MIL)
(check engine light)
This indicator light is part of the Engine
Control System which monitors various
emission control system components. If
this light illuminates while driving, it indi- cates that a potential malfunction has
been detected somewhere in the emis- sion control system. This light will also illuminate when the
ignition switch is turned to the ON posi-
tion, and will go out in a few seconds
after the engine is started. If it illuminates
while driving, or does not illuminate when
the ignition switch is turned to the ON
position, take your vehicle to your near-
est authorized HYUNDAI dealer and
have the system checked.
Generally, your vehicle will continue to be
drivable, but have the system checked by
an authorized HYUNDAI dealer promptly.
Page 131 of 371
Features of your vehicle
50
4
Headlight welcome function
When the headlight switch is in the ON
position or in the AUTO position and all doors (and tailgate) are closed and
locked, if you press the door unlock but-
ton on the transmitter, the headlight will
come on for about 15 seconds.
If the headlight switch is in the AUTO
position, the function can only operate atnight.
To turn off the headlight immediately, do
one of the following:
Press the door lock button.
Press the unlock button twice within 4
seconds.
Press the unlock button once more after 4 seconds.
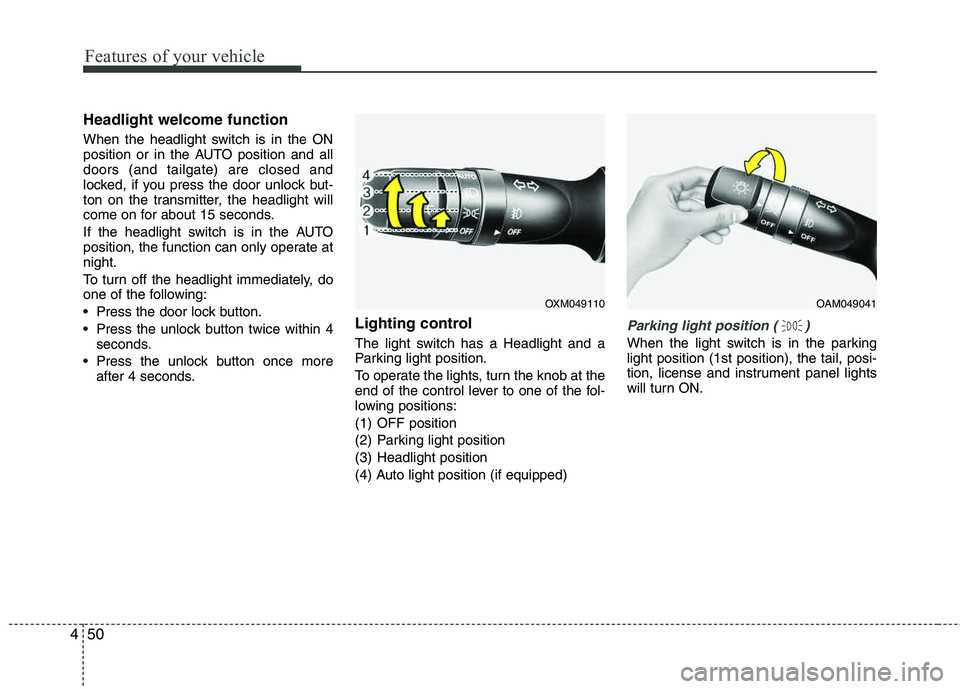
Lighting control
The light switch has a Headlight and a
Parking light position.
To operate the lights, turn the knob at the
end of the control lever to one of the fol-
lowing positions:
(1) OFF position
(2) Parking light position
(3) Headlight position
(4) Auto light position (if equipped)
Parking light position ( )
When the light switch is in the parking light position (1st position), the tail, posi-
tion, license and instrument panel lights
will turn ON.
OAM049041OXM049110
Page 138 of 371
457
Features of your vehicle
Automatic turn off function (if equipped)
The interior lights (Map lamp, Room
lamp, Vanity mirror lamp) automatically
turn off after approximately 20 minutes
when ignition switch is turned off and all doors are closed.
If your vehicle is equipped with the theft
alarm system, the interior lights automat-
ically turns off approximately 5 seconds
after the system is in the armed stage.
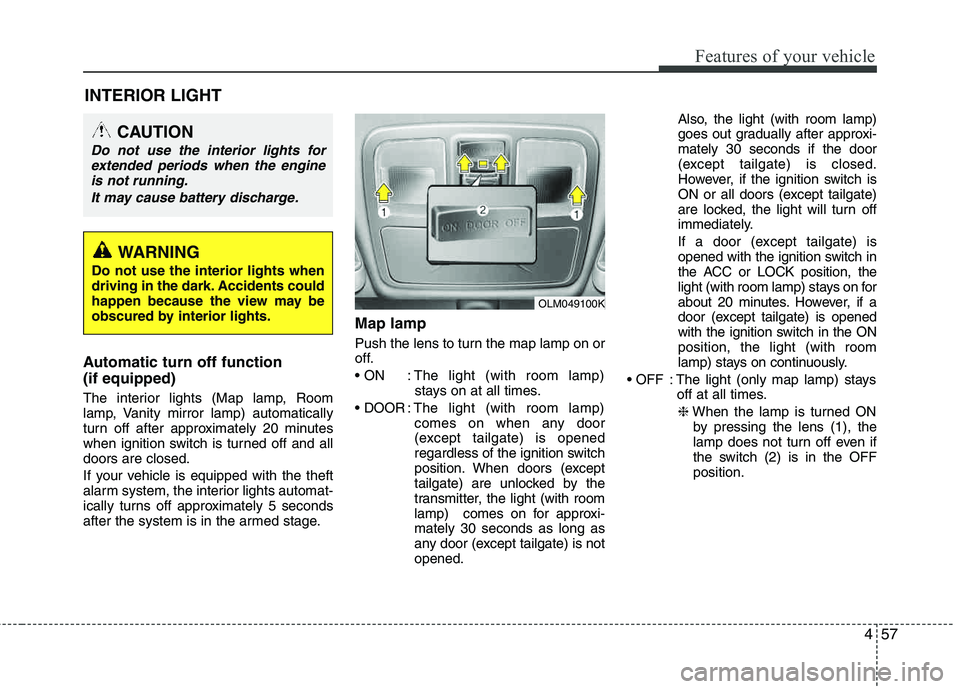
Map lamp
Push the lens to turn the map lamp on or
off.
: The light (with room lamp)stays on at all times.
: The light (with room lamp)
comes on when any door
(except tailgate) is opened
regardless of the ignition switch
position. When doors (except
tailgate) are unlocked by the
transmitter, the light (with room
lamp) comes on for approxi-mately 30 seconds as long as
any door (except tailgate) is not opened. Also, the light (with room lamp)
goes out gradually after approxi- mately 30 seconds if the door
(except tailgate) is closed.
However, if the ignition switch is
ON or all doors (except tailgate)
are locked, the light will turn off
immediately.
If a door (except tailgate) is
opened with the ignition switch in
the ACC or LOCK position, the
light (with room lamp) stays on for
about 20 minutes. However, if a
door (except tailgate) is opened
with the ignition switch in the ON position, the light (with room
lamp) stays on continuously.
: The light (only map lamp) stays off at all times.
❈ When the lamp is turned ON
by pressing the lens (1), the
lamp does not turn off even if
the switch (2) is in the OFF position.
INTERIOR LIGHT
OLM049100K
CAUTION
Do not use the interior lights for
extended periods when the engineis not running.
It may cause battery discharge.
WARNING
Do not use the interior lights when
driving in the dark. Accidents could
happen because the view may be
obscured by interior lights.
Page 203 of 371
Driving your vehicle
2
5
WARNING- ENGINE EXHAUST CAN BE DANGEROUS!
Engine exhaust fumes can be extremely dangerous. If, at any time, you smell exhaust fumes inside the vehicle, open the win-
dows immediately.
• Do not inhale exhaust fumes.
Exhaust fumes contain carbon monoxide, a colorless, odorless gas that can cause unconsciousness and death by asphyxia- tion.
The exhaust system should be checked whenever the vehicle is raised to change the oil or for any other purpose. If you hear
a change in the sound of the exhaust or if you drive over something that strikes the underneath side of the vehicle, have the
exhaust system checked as soon as possible by an authorized HYUNDAI dealer.
Letting the engine idle in your garage, even with the garage door open, is a hazardous practice. Never run the engine in your
garage any longer than it takes to start the engine and back the vehicle out.
If it is necessary to idle the engine for a prolonged period with people inside the vehicle, be sure to do so only in an open a rea
with the air intake set at "Fresh" and fan operating at one of the higher speeds so fresh air is drawn into the interior.
If you must drive with the tailgate open because you are carrying objects that make this necessary:
1. Close all windows.
2. Open side vents.
3. Set the air intake control at "Fresh", the air flow control at "Floor" or "Face" and the fan at one of the higher speeds.
To assure proper operation of the ventilation system, be sure the ventilation air intakes located just in front of the windshie ld are
kept clear of snow, ice, leaves or other obstructions.
Page 284 of 371
621
What to do in an emergency
When towing your vehicle in an emer- gency without wheel dollies :
1. Set the ignition switch in the ACC posi-tion.
2. Place the transaxle shift lever in N (Neutral).
3. Release the parking brake.
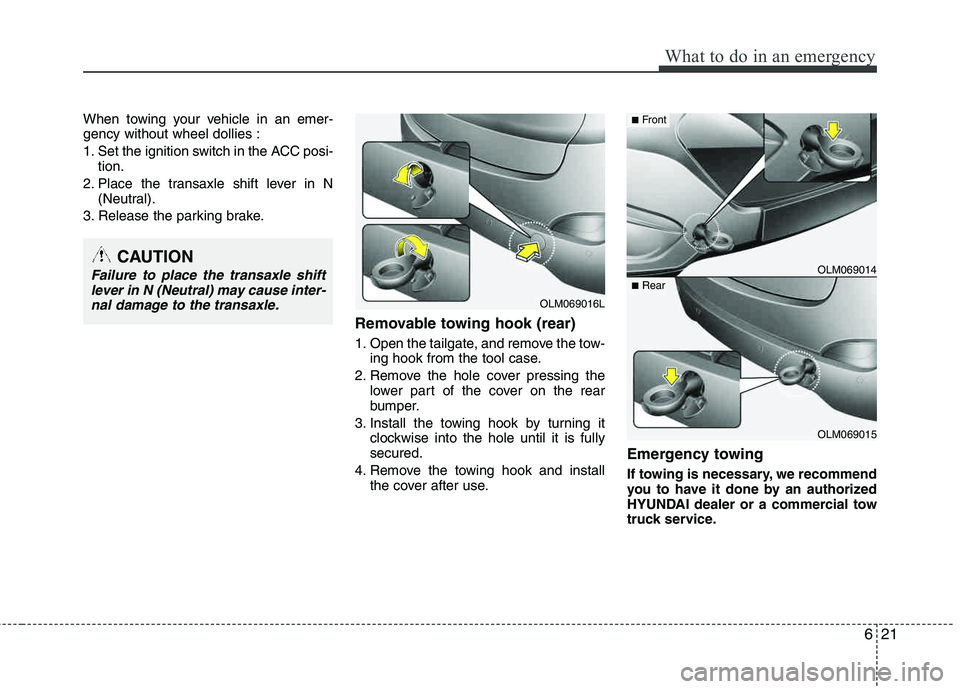
Removable towing hook (rear)
1. Open the tailgate, and remove the tow- ing hook from the tool case.
2. Remove the hole cover pressing the lower part of the cover on the rear
bumper.
3. Install the towing hook by turning it clockwise into the hole until it is fullysecured.
4. Remove the towing hook and install the cover after use.
Emergency towing
If towing is necessary, we recommend
you to have it done by an authorized
HYUNDAI dealer or a commercial tow
truck service.
CAUTION
Failure to place the transaxle shift
lever in N (Neutral) may cause inter-
nal damage to the transaxle.
OLM069016L
OLM069014
OLM069015
■ Front
■Rear
Page 349 of 371
Maintenance
62
7
Side repeater light replacement
If the light bulb does not operate, have
the vehicle checked by an authorized
HYUNDAI dealer.
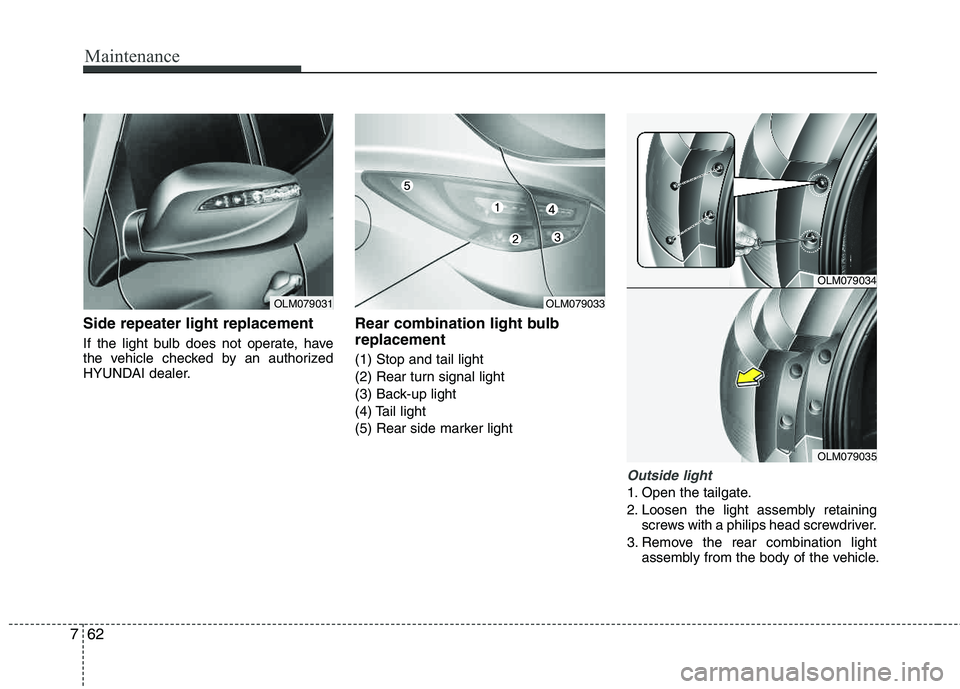
Rear combination light bulb replacement
(1) Stop and tail light
(2) Rear turn signal light
(3) Back-up light
(4) Tail light
(5) Rear side marker light
Outside light
1. Open the tailgate.
2. Loosen the light assembly retaining
screws with a philips head screwdriver.
3. Remove the rear combination light assembly from the body of the vehicle.
OLM079031OLM079033
OLM079034
OLM079035
Page 350 of 371
763
Maintenance
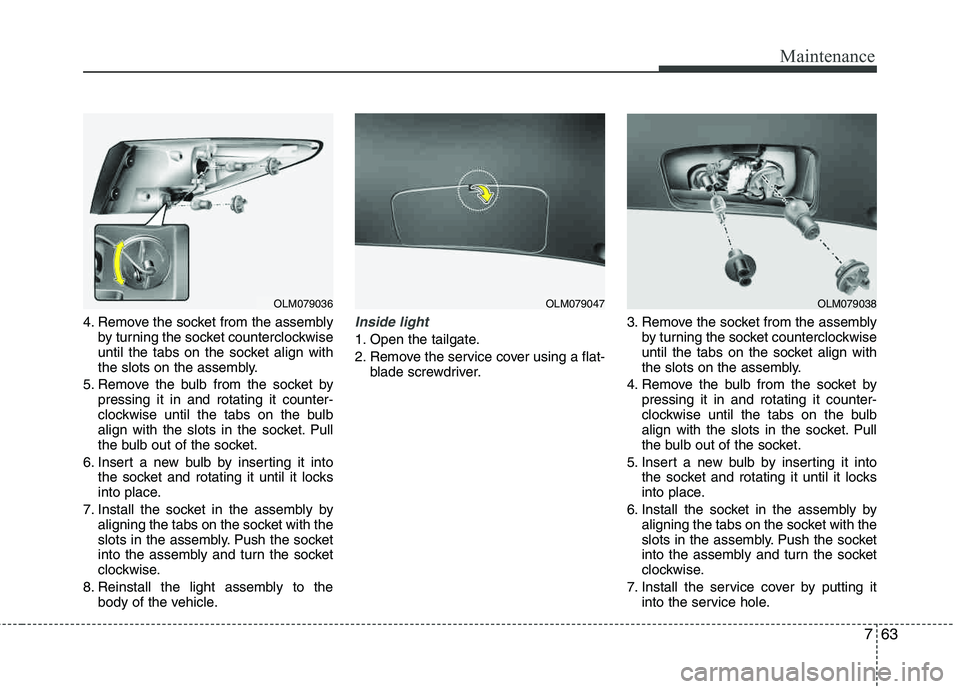
4. Remove the socket from the assemblyby turning the socket counterclockwise
until the tabs on the socket align with
the slots on the assembly.
5. Remove the bulb from the socket by pressing it in and rotating it counter-
clockwise until the tabs on the bulb
align with the slots in the socket. Pull
the bulb out of the socket.
6. Insert a new bulb by inserting it into the socket and rotating it until it locks
into place.
7. Install the socket in the assembly by aligning the tabs on the socket with the
slots in the assembly. Push the socket
into the assembly and turn the socket
clockwise.
8. Reinstall the light assembly to the body of the vehicle.Inside light
1. Open the tailgate.
2. Remove the service cover using a flat- blade screwdriver. 3. Remove the socket from the assembly
by turning the socket counterclockwise
until the tabs on the socket align with
the slots on the assembly.
4. Remove the bulb from the socket by pressing it in and rotating it counter-
clockwise until the tabs on the bulb
align with the slots in the socket. Pull
the bulb out of the socket.
5. Insert a new bulb by inserting it into the socket and rotating it until it locks
into place.
6. Install the socket in the assembly by aligning the tabs on the socket with the
slots in the assembly. Push the socket
into the assembly and turn the socket
clockwise.
7. Install the service cover by putting it into the service hole.
OLM079036OLM079047OLM079038
Page 351 of 371
Maintenance
64
7
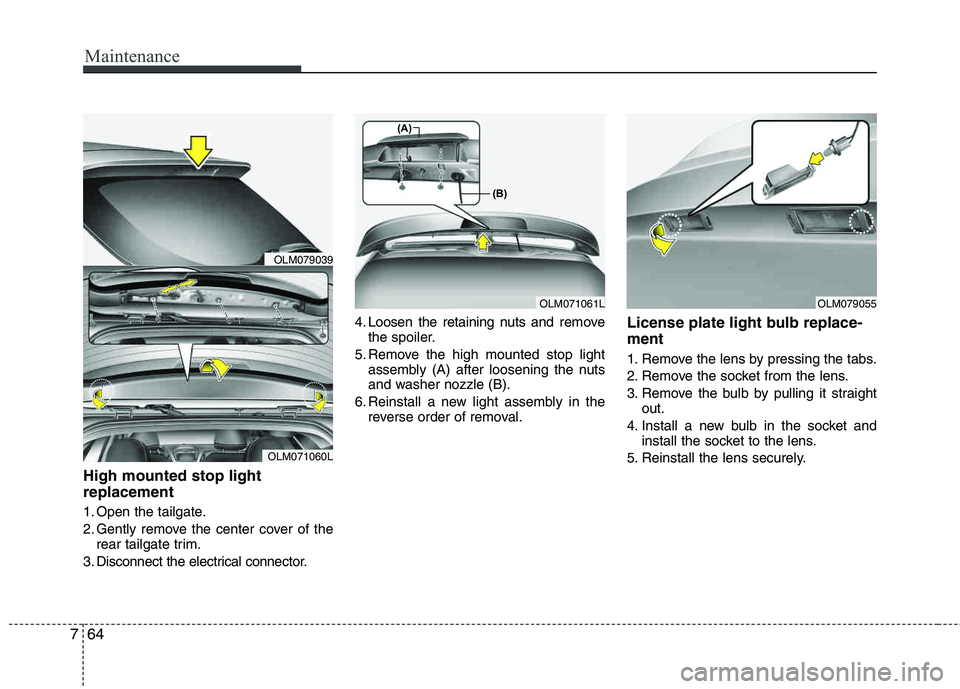
High mounted stop light replacement
1. Open the tailgate.
2. Gently remove the center cover of the
rear tailgate trim.
3. Disconnect the electrical connector. 4. Loosen the retaining nuts and
remove
the spoiler.
5. Remove the high mounted stop light assembly (A) after loosening the nuts
and washer nozzle (B).
6. Reinstall a new light assembly in the reverse order of removal.
License plate light bulb replace- ment
1. Remove the lens by pressing the tabs.
2. Remove the socket from the lens.
3. Remove the bulb by pulling it straight out.
4. Install a new bulb in the socket and install the socket to the lens.
5. Reinstall the lens securely.
OLM071061L
(A)
(B)
OLM071060L
OLM079039
OLM079055