2012 Hyundai Sonata point
[x] Cancel search: pointPage 39 of 411
Safety features of your vehicle20
3Seat belt - Driver's 3-point system
with emergency locking retractorTo fasten your seat belt:
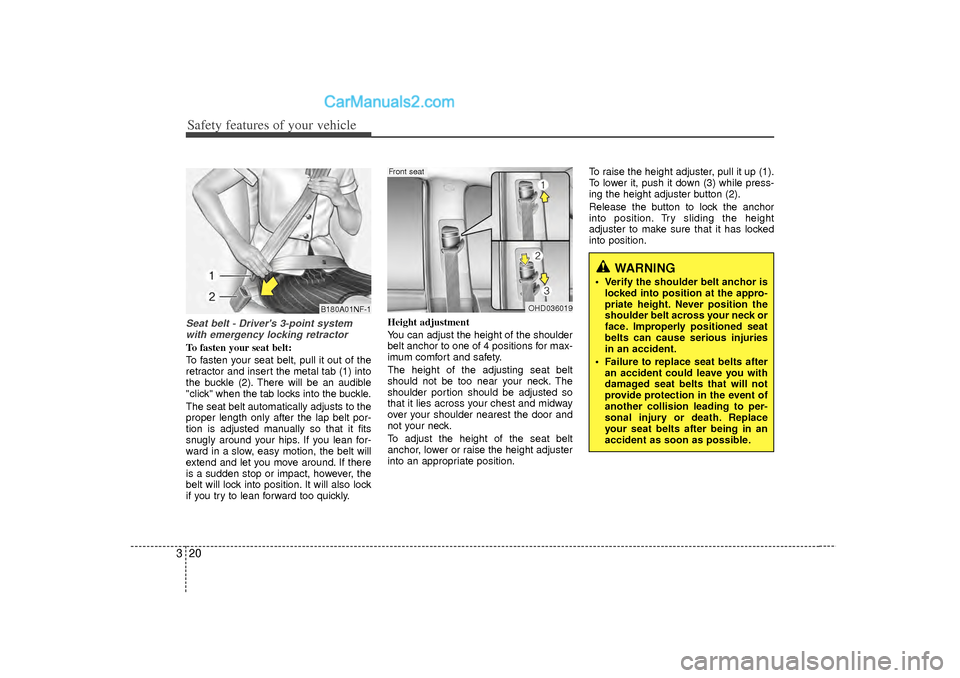
To fasten your seat belt, pull it out of the
retractor and insert the metal tab (1) into
the buckle (2). There will be an audible
"click" when the tab locks into the buckle.
The seat belt automatically adjusts to the
proper length only after the lap belt por-
tion is adjusted manually so that it fits
snugly around your hips. If you lean for-
ward in a slow, easy motion, the belt will
extend and let you move around. If there
is a sudden stop or impact, however, the
belt will lock into position. It will also lock
if you try to lean forward too quickly. Height adjustment
You can adjust the height of the shoulder
belt anchor to one of 4 positions for max-
imum comfort and safety.
The height of the adjusting seat belt
should not be too near your neck. The
shoulder portion should be adjusted so
that it lies across your chest and midway
over your shoulder nearest the door and
not your neck.
To adjust the height of the seat belt
anchor, lower or raise the height adjuster
into an appropriate position.To raise the height adjuster, pull it up (1).
To lower it, push it down (3) while press-
ing the height adjuster button (2).
Release the button to lock the anchor
into position. Try sliding the height
adjuster to make sure that it has locked
into position.
WARNING
Verify the shoulder belt anchor is
locked into position at the appro-
priate height. Never position the
shoulder belt across your neck or
face. Improperly positioned seat
belts can cause serious injuries
in an accident.
Failure to replace seat belts after an accident could leave you with
damaged seat belts that will not
provide protection in the event of
another collision leading to per-
sonal injury or death. Replace
your seat belts after being in an
accident as soon as possible.
OHD036019
Front seat
B180A01NF-1
Page 40 of 411
321
Safety features of your vehicle
Seat belts - Front passenger and rearseat 3-point system with combination locking retractorTo fasten your seat belt:
Combination retractor type seat belts are
installed in the rear seat positions to help
accommodate the installation of child
restraint systems. Although a combina-
tion retractor is also installed in the front
passenger seat position, it is strongly
recommended that children always be
seated in the rear seat. NEVER place
any infant restraint system in the front
seat of the vehicle.
This type of seat belt combines the fea-
tures of both an emergency locking
retractor seat belt and an automatic lock-
ing retractor seat belt. To fasten your seat
belt, pull it out of the retractor and insert
the metal tab into the buckle. There will
be an audible "click" when the tab locks
into the buckle. When not securing a
child restraint, the seat belt operates in
the same way as the driver's seat belt
(Emergency Locking Retractor Type). It
automatically adjusts to the proper length
only after the lap belt portion of the seat
belt is adjusted manually so that it fits
snugly around your hips. When the seat belt is fully extended from
the retractor to allow the installation of a
child restraint system, the seat belt oper-
ation changes to allow the belt to retract,
but not to extend (Automatic Locking
Retractor Type). Refer to “Using a child
restraint system” in this section.
✽ ✽
NOTICEAlthough the combination retractor
provides the same level of protection for
seated passengers in either emergency
or automatic locking modes, it is recom-
mended that seated passengers use the
emergency locking feature for improved
convenience. The automatic locking
function is intended to facilitate child
restraint installation. To convert from
the automatic locking feature to the
emergency locking operation mode,
allow the unbuckled seat belt to fully
retract.
B200A02NF
WARNING
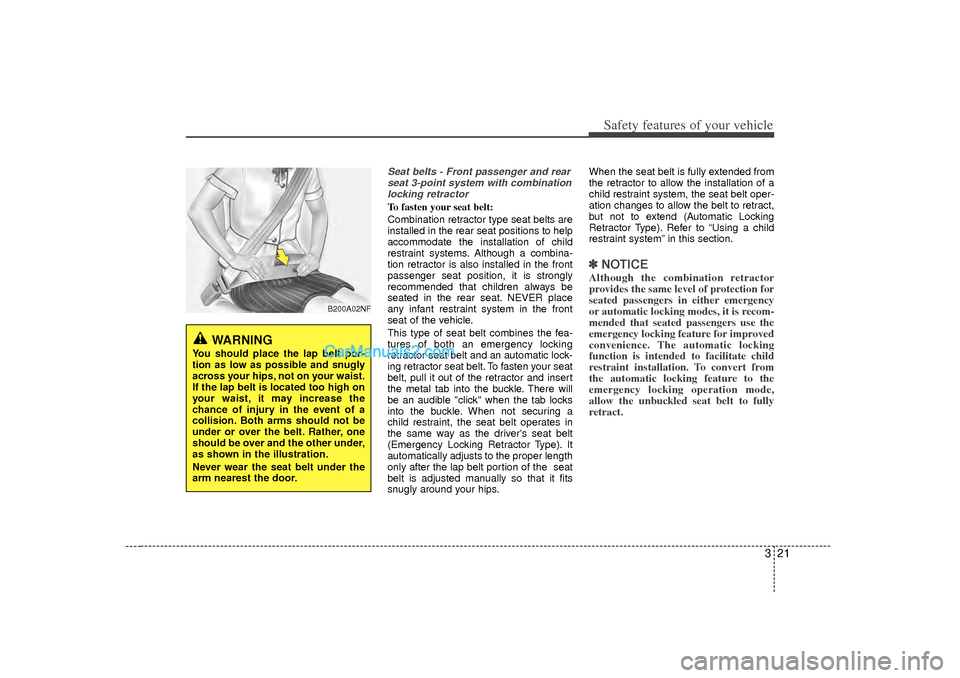
You should place the lap belt por-
tion as low as possible and snugly
across your hips, not on your waist.
If the lap belt is located too high on
your waist, it may increase the
chance of injury in the event of a
collision. Both arms should not be
under or over the belt. Rather, one
should be over and the other under,
as shown in the illustration.
Never wear the seat belt under the
arm nearest the door.
Page 53 of 411
Safety features of your vehicle34
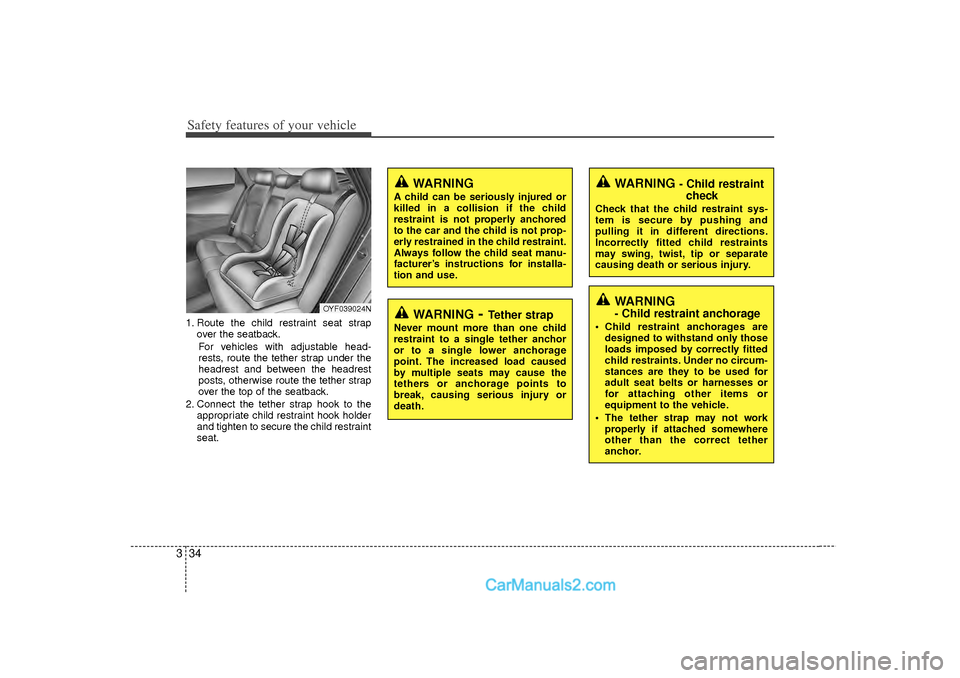
31. Route the child restraint seat strap
over the seatback.
For vehicles with adjustable head-
rests, route the tether strap under the
headrest and between the headrest
posts, otherwise route the tether strap
over the top of the seatback.
2. Connect the tether strap hook to the appropriate child restraint hook holder
and tighten to secure the child restraint
seat.
OYF039024N
WARNING
- Child restraintcheck
Check that the child restraint sys-
tem is secure by pushing and
pulling it in different directions.
Incorrectly fitted child restraints
may swing, twist, tip or separate
causing death or serious injury.
WARNING
- Tether strap
Never mount more than one child
restraint to a single tether anchor
or to a single lower anchorage
point. The increased load caused
by multiple seats may cause the
tethers or anchorage points to
break, causing serious injury or
death.
WARNING
A child can be seriously injured or
killed in a collision if the child
restraint is not properly anchored
to the car and the child is not prop-
erly restrained in the child restraint.
Always follow the child seat manu-
facturer’s instructions for installa-
tion and use.
WARNING - Child restraint anchorage
Child restraint anchorages are
designed to withstand only those
loads imposed by correctly fitted
child restraints. Under no circum-
stances are they to be used for
adult seat belts or harnesses or
for attaching other items or
equipment to the vehicle.
The tether strap may not work properly if attached somewhere
other than the correct tether
anchor.
Page 72 of 411
353
Safety features of your vehicle
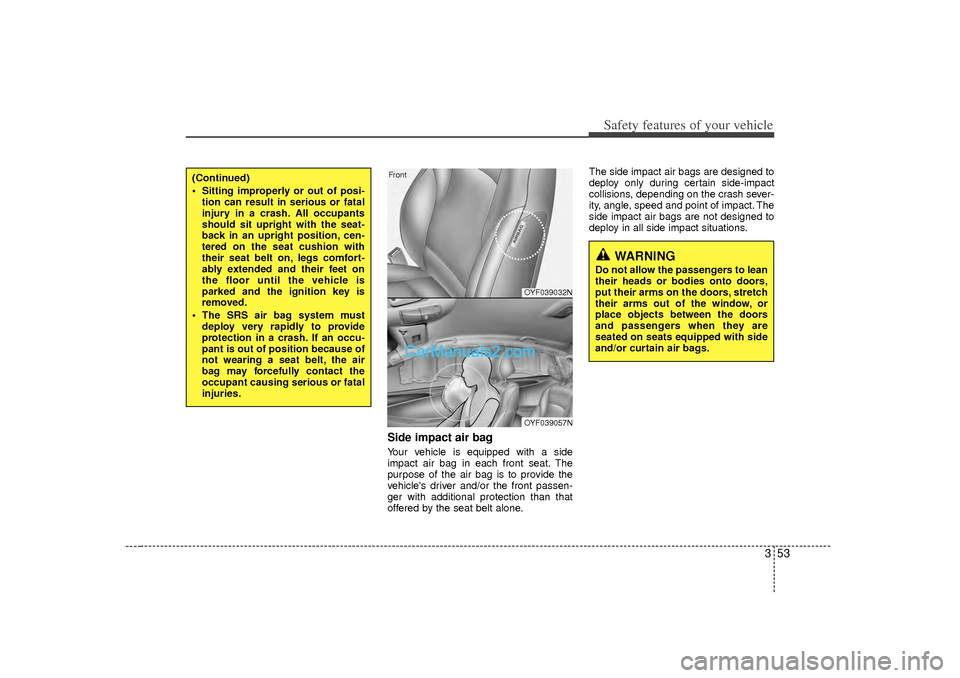
Side impact air bagYour vehicle is equipped with a side
impact air bag in each front seat. The
purpose of the air bag is to provide the
vehicle's driver and/or the front passen-
ger with additional protection than that
offered by the seat belt alone.The side impact air bags are designed to
deploy only during certain side-impact
collisions, depending on the crash sever-
ity, angle, speed and point of impact. The
side impact air bags are not designed to
deploy in all side impact situations.
(Continued)
Sitting improperly or out of posi-
tion can result in serious or fatal
injury in a crash. All occupants
should sit upright with the seat-
back in an upright position, cen-
tered on the seat cushion with
their seat belt on, legs comfort-
ably extended and their feet on
the floor until the vehicle is
parked and the ignition key is
removed.
The SRS air bag system must deploy very rapidly to provide
protection in a crash. If an occu-
pant is out of position because of
not wearing a seat belt, the air
bag may forcefully contact the
occupant causing serious or fatal
injuries.
OYF039032NOYF039057N
Front
WARNING
Do not allow the passengers to lean
their heads or bodies onto doors,
put their arms on the doors, stretch
their arms out of the window, or
place objects between the doors
and passengers when they are
seated on seats equipped with side
and/or curtain air bags.
Page 79 of 411
Safety features of your vehicle60
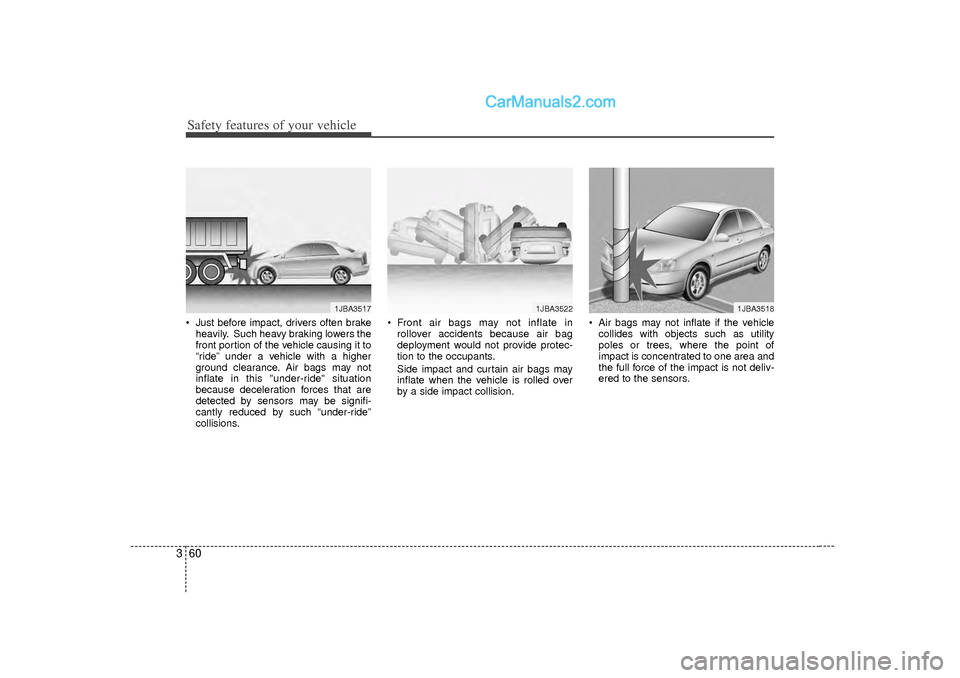
3 Just before impact, drivers often brake
heavily. Such heavy braking lowers the
front portion of the vehicle causing it to
“ride” under a vehicle with a higher
ground clearance. Air bags may not
inflate in this "under-ride" situation
because deceleration forces that are
detected by sensors may be signifi-
cantly reduced by such “under-ride”
collisions. Front air bags may not inflate in
rollover accidents because air bag
deployment would not provide protec-
tion to the occupants.
Side impact and curtain air bags may
inflate when the vehicle is rolled over
by a side impact collision. Air bags may not inflate if the vehicle
collides with objects such as utility
poles or trees, where the point of
impact is concentrated to one area and
the full force of the impact is not deliv-
ered to the sensors.
1JBA3518
1JBA3517
1JBA3522
Page 114 of 411

Features of your vehicle32
4If your vehicle is equipped with a sunroof,
you can slide or tilt your sunroof with the
sunroof control switch located on the
overhead console.
The sunroof can only be opened, closed,
or tilted when the ignition switch is in the
ON position.✽ ✽
NOTICE• In cold and wet climates, the sunroof
may not work properly due to freez-
ing conditions.
• After washing the car or after there is rain, be sure to wipe off any water
that is on the sunroof before operating
it.
✽ ✽ NOTICEThe sunroof cannot slide when it is in
the tilt position nor can it be tilted while
in an open or slide position.
Sliding the sunroof To open or close the sunroof (manual
slide feature), pull or push the sunroof
control lever backward or forward to the
first detent position.
Pulling the control lever downward also
closes the sunroof.
To open or close the sunroof completely
even when the lever is released (auto
slide feature), pull or push the sunroof
control lever backward or forward to the
second detent position. The sunroof will
slide all the way open or closed. To stop
the sunroof sliding at any point, pull or
push the sunroof control lever momentar-
ily in the opposite direction of sunroof
movement.
CAUTION
Do not continue to move the sun-
roof control lever after the sunroofis in the fully open, closed, or tiltposition. Damage to the motor orsystem components could occur.
WARNING
Never adjust the sunroof or sun-
shade while driving. This could
result in loss of control and an acci-
dent that may cause death, serious
injury, or property damage.
OYF049200
SUNROOF (IF EQUIPPED)
OYF049024
Page 118 of 411
Features of your vehicle36
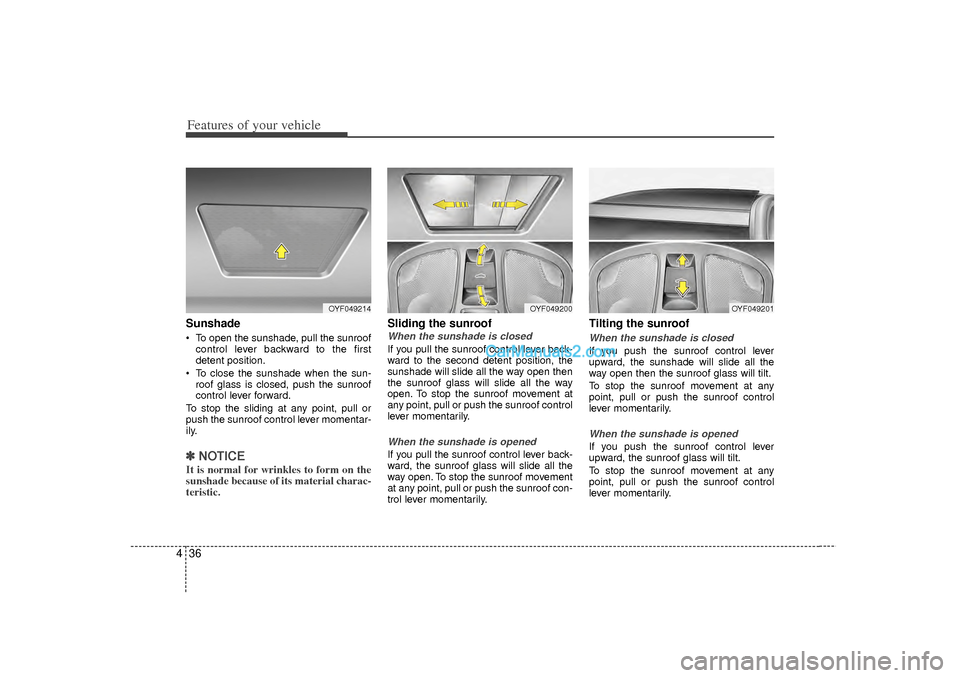
4Sunshade To open the sunshade, pull the sunroof
control lever backward to the first
detent position.
To close the sunshade when the sun- roof glass is closed, push the sunroof
control lever forward.
To stop the sliding at any point, pull or
push the sunroof control lever momentar-
ily.✽ ✽ NOTICEIt is normal for wrinkles to form on the
sunshade because of its material charac-
teristic.
Sliding the sunroof When the sunshade is closedIf you pull the sunroof control lever back-
ward to the second detent position, the
sunshade will slide all the way open then
the sunroof glass will slide all the way
open. To stop the sunroof movement at
any point, pull or push the sunroof control
lever momentarily.When the sunshade is openedIf you pull the sunroof control lever back-
ward, the sunroof glass will slide all the
way open. To stop the sunroof movement
at any point, pull or push the sunroof con-
trol lever momentarily.
Tilting the sunroof When the sunshade is closedIf you push the sunroof control lever
upward, the sunshade will slide all the
way open then the sunroof glass will tilt.
To stop the sunroof movement at any
point, pull or push the sunroof control
lever momentarily.When the sunshade is openedIf you push the sunroof control lever
upward, the sunroof glass will tilt.
To stop the sunroof movement at any
point, pull or push the sunroof control
lever momentarily.
OYF049214
OYF049200
OYF049201
Page 119 of 411
437
Features of your vehicle
Closing the sunroofTo close the sunroof glass onlyPush the sunroof control lever forward to
the first detent position or pull the lever
downward.To close the sunroof glass with thesunshade Push the sunroof control lever forward to
the second detent position. The sunroof
glass will close then the sunshade close
automatically.
To stop the sunroof movement at any
point, pull or push the sunroof control
lever momentarily.
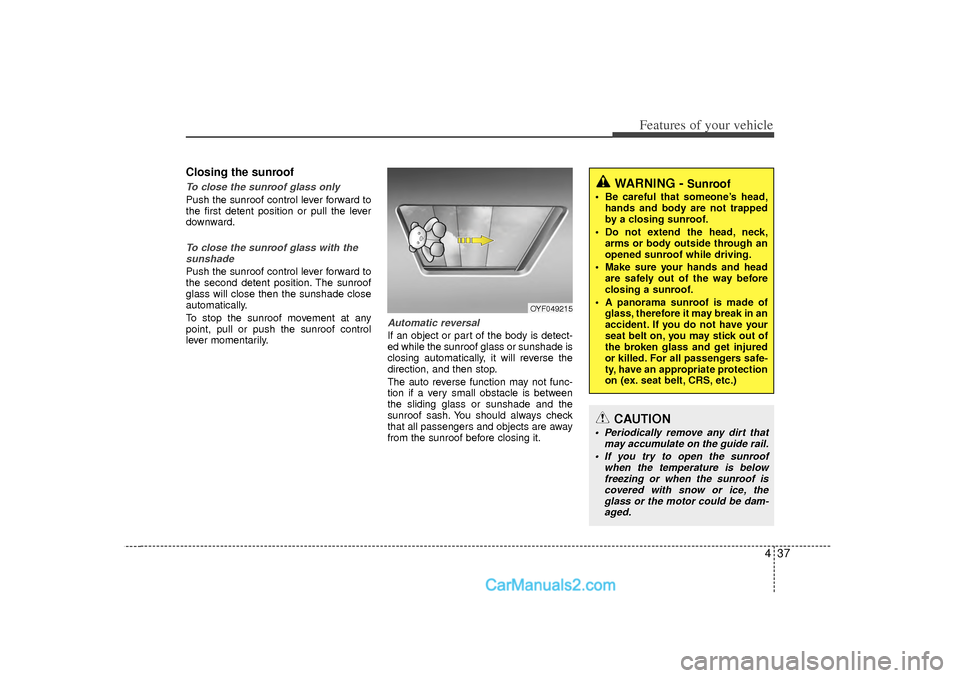
Automatic reversalIf an object or part of the body is detect-
ed while the sunroof glass or sunshade is
closing automatically, it will reverse the
direction, and then stop.
The auto reverse function may not func-
tion if a very small obstacle is between
the sliding glass or sunshade and the
sunroof sash. You should always check
that all passengers and objects are away
from the sunroof before closing it.
OYF049215
WARNING -
Sunroof
Be careful that someone’s head, hands and body are not trapped
by a closing sunroof.
Do not extend the head, neck, arms or body outside through an
opened sunroof while driving.
Make sure your hands and head are safely out of the way before
closing a sunroof.
A panorama sunroof is made of glass, therefore it may break in an
accident. If you do not have your
seat belt on, you may stick out of
the broken glass and get injured
or killed. For all passengers safe-
ty, have an appropriate protection
on (ex. seat belt, CRS, etc.)
CAUTION
Periodically remove any dirt that may accumulate on the guide rail.
If you try to open the sunroof when the temperature is belowfreezing or when the sunroof iscovered with snow or ice, the glass or the motor could be dam-aged.