2012 Hyundai Sonata warning light
[x] Cancel search: warning lightPage 298 of 411
63
What to do in an emergency
2. When the vehicle is stopped, turn onyour emergency hazard flashers, set
the parking brake and put the transaxle
in P (automatic transaxle) or reverse
(manual transaxle).
3. Have all passengers get out of the car. Be sure they all get out on the side of
the car that is away from traffic.
4. When changing a flat tire, follow the instruction provided later in this sec-
tion.If engine stalls while driving1. Reduce your speed gradually, keeping a straight line. Move cautiously off the
road to a safe place.
2. Turn on your emergency flashers.
3. Try to start the engine again. If your vehicle will not start, contact an
authorized HYUNDAI dealer or seek
other qualified assistance.
If engine doesn't turn over or
turns over slowly1. If your vehicle has an automatictransaxle, be sure the shift lever is in N
(Neutral) or P (Park) and the emer-
gency brake is set.
2. Check the battery connections to be sure they are clean and tight.
3. Turn on the interior light. If the light dims or goes out when you operate the
starter, the battery is discharged.
4. Do not push or pull the vehicle to start it. See instructions for "Jump starting".
If engine turns over normally but
does not start1. Check fuel level.
2. With the ignition switch in the LOCKposition, check all connectors at igni-
tion coils and spark plugs. Reconnect
any that may be disconnected or
loose.
3. If the engine still does not start, call an authorized HYUNDAI dealer or seek
other qualified assistance.
IF THE ENGINE WILL NOT START
WARNING
If the engine will not start, do not
push or pull the vehicle to start it.
This could result in a collision or
cause other damage. In addition,
push or pull starting may cause the
catalytic converter to be over-
loaded and create a fire hazard.
Page 306 of 411
611
What to do in an emergency
You may not be able identify a low
tire by simply looking at it. Always
use a good quality tire pressure
gauge to measure the tire's inflation
pressure. Please note that a tire that
is hot (from being driven) will have a
higher pressure measurement than a
tire that is cold.
A cold tire means the vehicle has
been sitting for 3 hours and driven for
less than 1 mile (1.6 km) in that 3
hour period.
Allow the tire to cool before measur-
ing the inflation pressure. Always be
sure the tire is cold before inflating to
the recommended pressure.This device complies with Part 15
of the FCC rules.
Operation is subject to the following
two conditions:
1.This device may not cause harmful
interference, and
2.This device must accept any inter- ference received, including inter-
ference that may cause undesired
operation.
CAUTION
Do not use any tire sealant ifyour vehicle is equipped with aTire Pressure MonitoringSystem. The liquid sealant candamage the tire pressure sen-sors.
WARNING
- Protecting TPMS
Tampering with, modifying, or
disabling the Tire Pressure
Monitoring System (TPMS) com-
ponents may interfere with the
system's ability to warn the driv-
er of low tire pressure condi-
tions and/or TPMS malfunctions.
Tampering with, modifying, or
disabling the Tire Pressure
Monitoring System (TPMS) com-
ponents may void the warranty
for that portion of the vehicle.
WARNING
- TPMS
The TPMS cannot alert you to severe and sudden tire dam-
age caused by external fac-
tors such as nails or road
debris.
If you feel any vehicle instabil- ity, immediately take your foot
off the accelerator, apply the
brakes gradually and with
light force, and slowly move to
a safe position off the road.
WARNING
Changes or modifications not
expressly approved by the party
responsible for compliance
could void the user’s authority
to operate the equipment.
Page 311 of 411
What to do in an emergency16
69. Loosen the wheel nuts and
remove them with your fingers.
Slide the wheel off the studs and
lay it flat so it cannot roll away. To
put the wheel on the hub, pick up
the spare tire, line up the holes
with the studs and slide the wheel
onto them. If this is difficult, tip the
wheel slightly and get the top hole
in the wheel lined up with the top
stud. Then jiggle the wheel back
and forth until the wheel can be
slid over the other studs. 10. To reinstall the wheel, hold it on
the studs, put the wheel nuts on
the studs and tighten them finger
tight. The nuts should be installed
with their tapered small diameter
ends directed inward. Jiggle the
tire to be sure it is completely
seated, then tighten the nuts as
much as possible with your fin-
gers again.
11. Lower the car to the ground by turning the wheel nut wrench
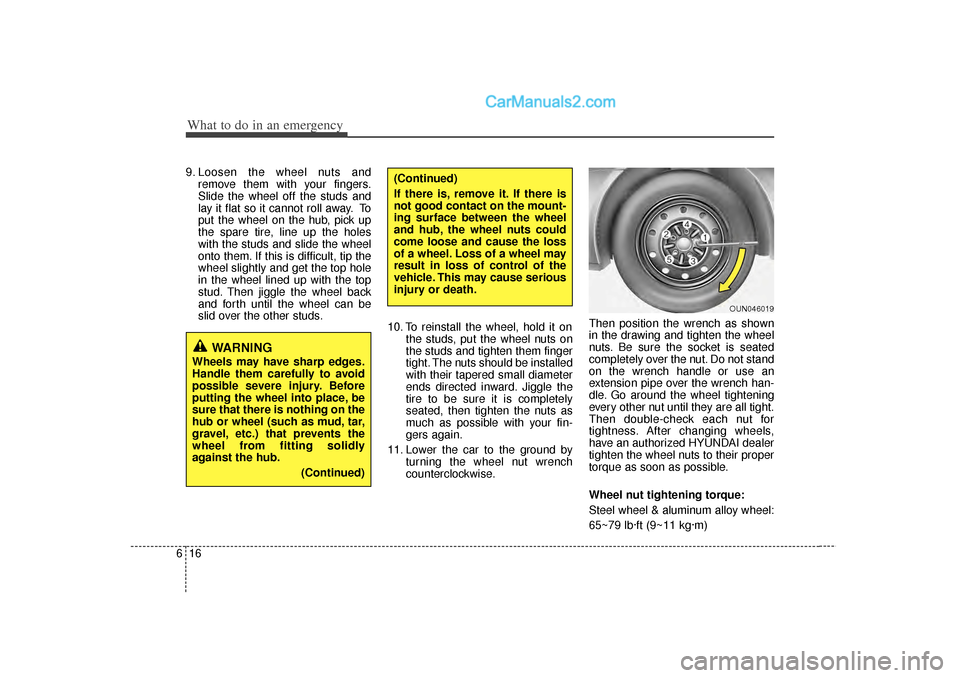
counterclockwise. Then position the wrench as shown
in the drawing and tighten the wheel
nuts. Be sure the socket is seated
completely over the nut. Do not stand
on the wrench handle or use an
extension pipe over the wrench han-
dle. Go around the wheel tightening
every other nut until they are all tight.
Then double-check each nut for
tightness. After changing wheels,
have an authorized HYUNDAI dealer
tighten the wheel nuts to their proper
torque as soon as possible.
Wheel nut tightening torque:
Steel wheel & aluminum alloy wheel:
65~79 lb·ft (9~11 kg·m)
WARNING
Wheels may have sharp edges.
Handle them carefully to avoid
possible severe injury. Before
putting the wheel into place, be
sure that there is nothing on the
hub or wheel (such as mud, tar,
gravel, etc.) that prevents the
wheel from fitting solidly
against the hub.
(Continued)
(Continued)
If there is, remove it. If there is
not good contact on the mount-
ing surface between the wheel
and hub, the wheel nuts could
come loose and cause the loss
of a wheel. Loss of a wheel may
result in loss of control of the
vehicle. This may cause serious
injury or death.
OUN046019
Page 322 of 411
Maintenance67While operating your vehicle: Note any changes in the sound of theexhaust or any smell of exhaust fumes
in the vehicle.
Check for vibrations in the steering wheel. Notice any increased steering
effort or looseness in the steering
wheel, or change in its straight-ahead
position.
Notice if your vehicle constantly turns slightly or “pulls” to one side when trav-
eling on smooth, level road.
When stopping, listen and check for unusual sounds, pulling to one side,
increased brake pedal travel or “hard-
to-push” brake pedal.
If any slipping or changes in the oper- ation of your transaxle occurs, check
the transaxle fluid level.
Check automatic transaxle P (Park) function.
Check parking brake.
Check for fluid leaks under your vehicle (water dripping from the air condition-
ing system during or after use is nor-
mal).
At least monthly: Check coolant level in the enginecoolant reservoir.
Check the operation of all exterior lights, including the stoplights, turn sig-
nals and hazard warning flashers.
Check the inflation pressures of all tires including the spare.At least twice a year (i.e., every Spring and Fall): Check radiator, heater and air condi- tioning hoses for leaks or damage.
Check windshield washer spray and wiper operation. Clean wiper blades
with clean cloth dampened with wash-
er fluid.
Check headlight alignment.
Check muffler, exhaust pipes, shields and clamps.
Check the lap/shoulder belts for wear and function.
Check for worn tires and loose wheel lug nuts.
At least once a year: Clean body and door drain holes.
Lubricate door hinges and checks, andhood hinges.
Lubricate door and hood locks and latches.
Lubricate door rubber weatherstrips.
Check the air conditioning system.
Inspect and lubricate automatic transaxle linkage and controls.
Clean battery and terminals.
Check the brake fluid level.
Page 350 of 411
Maintenance34
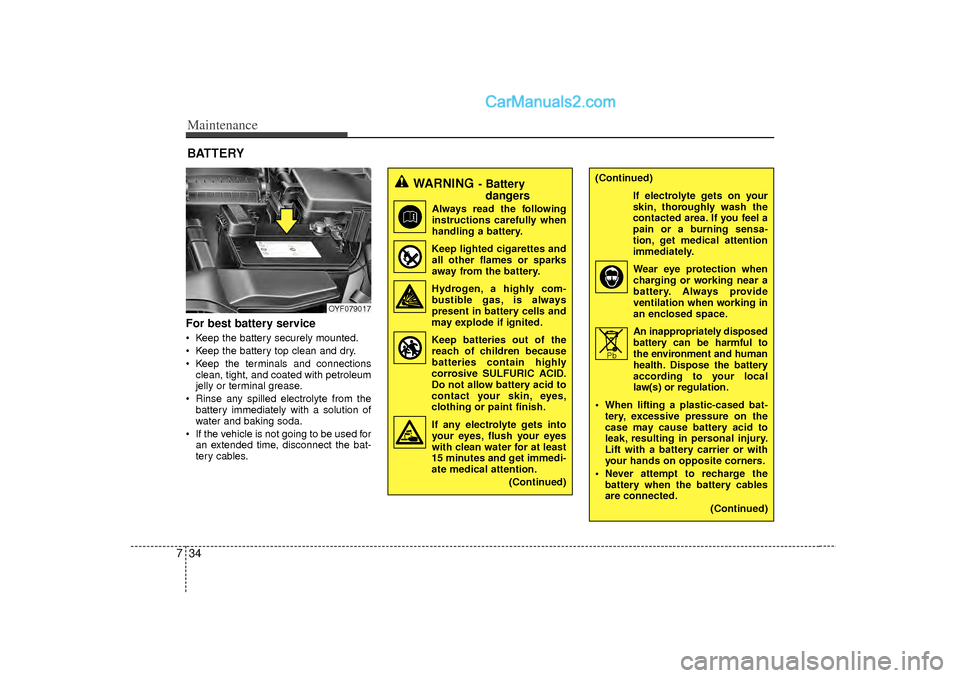
7For best battery service Keep the battery securely mounted.
Keep the battery top clean and dry.
Keep the terminals and connections
clean, tight, and coated with petroleum
jelly or terminal grease.
Rinse any spilled electrolyte from the battery immediately with a solution of
water and baking soda.
If the vehicle is not going to be used for an extended time, disconnect the bat-
tery cables.BATTERY
OYF079017
WARNING
- Battery dangers
Always read the following
instructions carefully when
handling a battery.
Keep lighted cigarettes and all other flames or sparks
away from the battery.
Hydrogen, a highly com- bustible gas, is always
present in battery cells and
may explode if ignited.
Keep batteries out of the reach of children because
batteries contain highly
corrosive SULFURIC ACID.
Do not allow battery acid to
contact your skin, eyes,
clothing or paint finish.
If any electrolyte gets into your eyes, flush your eyes
with clean water for at least
15 minutes and get immedi-
ate medical attention.
(Continued)
(Continued)
If electrolyte gets on your
skin, thoroughly wash the
contacted area. If you feel a
pain or a burning sensa-
tion, get medical attention
immediately.Wear eye protection whencharging or working near a
battery. Always provide
ventilation when working in
an enclosed space.
An inappropriately disposed battery can be harmful to
the environment and human
health. Dispose the battery
according to your local
law(s) or regulation.
When lifting a plastic-cased bat- tery, excessive pressure on the
case may cause battery acid to
leak, resulting in personal injury.
Lift with a battery carrier or with
your hands on opposite corners.
Never attempt to recharge the battery when the battery cables
are connected.
(Continued)
Pb
Page 351 of 411
735
Maintenance
Battery recharging Your vehicle has a maintenance-free,
calcium-based battery.
If the battery becomes discharged in ashort time (because, for example, the
headlights or interior lights were left on
while the vehicle was not in use),
recharge it by slow charging (trickle)
for 10 hours.
If the battery gradually discharges because of high electric load while the
vehicle is being used, recharge it at 20-
30A for two hours.
CALIFORNIA
PROPOSI-
TION 65 WARNING
Battery posts, terminals, and relat-
ed accessories contain lead and
lead compounds, chemicals known
to the State of California to cause
cancer, birth defects and reproduc-
tive harm. Batteries also contain
other chemicals known to the State
of California to cause cancer. Wash
hands after handling.
CAUTION
When you don’t use the vehicle
for a long time in the low temper-ature, remove the battery and store it indoors.
Always charge the battery fully to prevent the battery case dam-aged in low temperatures.
If you connect unauthorized elec- tronic devices to the battery, thebattery may be discharged. Neveruse unauthorized devices.
(Continued)
The electrical ignition system works with high voltage. Never
touch these components with the
engine running or the ignition
switched on.
Failure to follow the above warn-
ings can result in serious bodily
injury or death.
Page 358 of 411
Maintenance42
7Compact spare tire replacement A compact spare tire has a shorter
tread life than a regular size tire.
Replace it when you can see the
tread wear indicator bars on the tire.
The replacement compact spare tire
should be the same size and design
tire as the one provided with your
new vehicle and should be mounted
on the same compact spare tire
wheel. The compact spare tire is not
designed to be mounted on a regular
size wheel, and the compact spare
tire wheel is not designed for mount-
ing a regular size tire. Wheel replacement
When replacing the metal wheels for
any reason, make sure the new
wheels are equivalent to the original
factory units in diameter, rim width
and offset.
Tire traction
Tire traction can be reduced if you
drive on worn tires, tires that are
improperly inflated or on slippery
road surfaces. Tires should be
replaced when tread wear indicators
appear. To reduce the possibility of
losing control, slow down whenever
there is rain, snow or ice on the road.
Tire maintenance
In addition to proper inflation, correct
wheel alignment helps to decrease
tire wear. If you find a tire is worn
unevenly, have your dealer check the
wheel alignment.
When you have new tires installed,
make sure they are balanced. This
will increase vehicle ride comfort and
tire life. Additionally, a tire should
always be rebalanced if it is removed
from the wheel.
WARNING
A wheel that is not the correct
size may adversely affect wheel
and bearing life, braking and
stopping abilities, handling char-
acteristics, ground clearance,
body-to-tire clearance, snow
chain clearance, speedometer
and odometer calibration, head-
light aim and bumper height.
Page 366 of 411

Maintenance50
7FUSESA vehicle’s electrical system is protected
from electrical overload damage by
fuses. This vehicle has 2 fuse panels, one locat-
ed in the driver’s side panel bolster, the
other in the engine compartment.
If any of your vehicle’s lights, acces-
sories, or controls do not work, check the
appropriate circuit fuse. If a fuse has
blown, the element inside the fuse will be
melted.
If the electrical system does not work,
first check the driver’s side fuse panel.
Always replace a blown fuse with one of
the same rating.
If the replacement fuse blows, this indi-
cates an electrical problem. Avoid using
the system involved and immediately
consult an authorized HYUNDAI dealer.
Three kinds of fuses are used: blade type
for lower amperage rating, cartridge type,and multi fuse for higher amperage rat-ings.
OBK079042
Normal
Normal
Blade type
Cartridge type
Multi fuse Blown
Blown
Normal Blown
WARNING
- Fuse replace-
ment
Never replace a fuse with any-
thing but another fuse of the
same rating.
A higher capacity fuse could cause damage and possibly a
fire.
Never install a wire or aluminum foil instead of the proper fuse -
even as a temporary repair. It may
cause extensive wiring damage
and a possible fire.
CAUTION
Do not use a screwdriver or any
other metal object to remove fuses because it may cause a short circuitand damage the system.