2012 Hyundai Sonata clock
[x] Cancel search: clockPage 92 of 363
Features of your vehicle
20
4
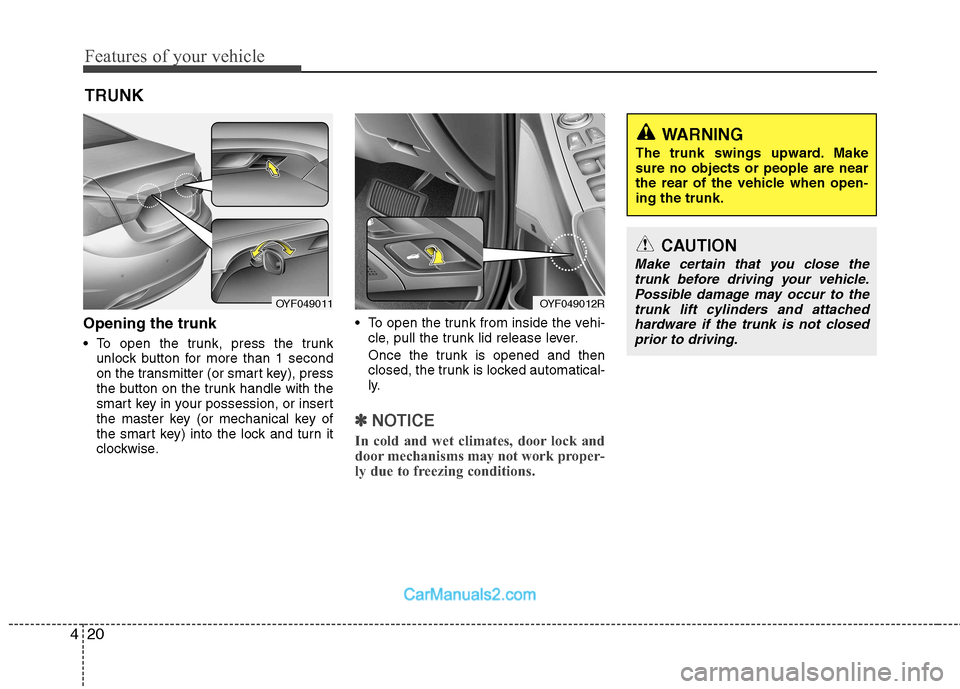
Opening the trunk
To open the trunk, press the trunk
unlock button for more than 1 second
on the transmitter (or smart key), press
the button on the trunk handle with the
smart key in your possession, or insert
the master key (or mechanical key of
the smart key) into the lock and turn it
clockwise. To open the trunk from inside the vehi-
cle, pull the trunk lid release lever.
Once the trunk is opened and then
closed, the trunk is locked automatical-
ly.
✽✽ NOTICE
In cold and wet climates, door lock and
door mechanisms may not work proper-
ly due to freezing conditions.
TRUNK
OYF049012ROYF049011
CAUTION
Make certain that you close the trunk before driving your vehicle.
Possible damage may occur to thetrunk lift cylinders and attached hardware if the trunk is not closedprior to driving.
WARNING
The trunk swings upward. Make sure no objects or people are near
the rear of the vehicle when open-ing the trunk.
Page 100 of 363
Features of your vehicle
28
4
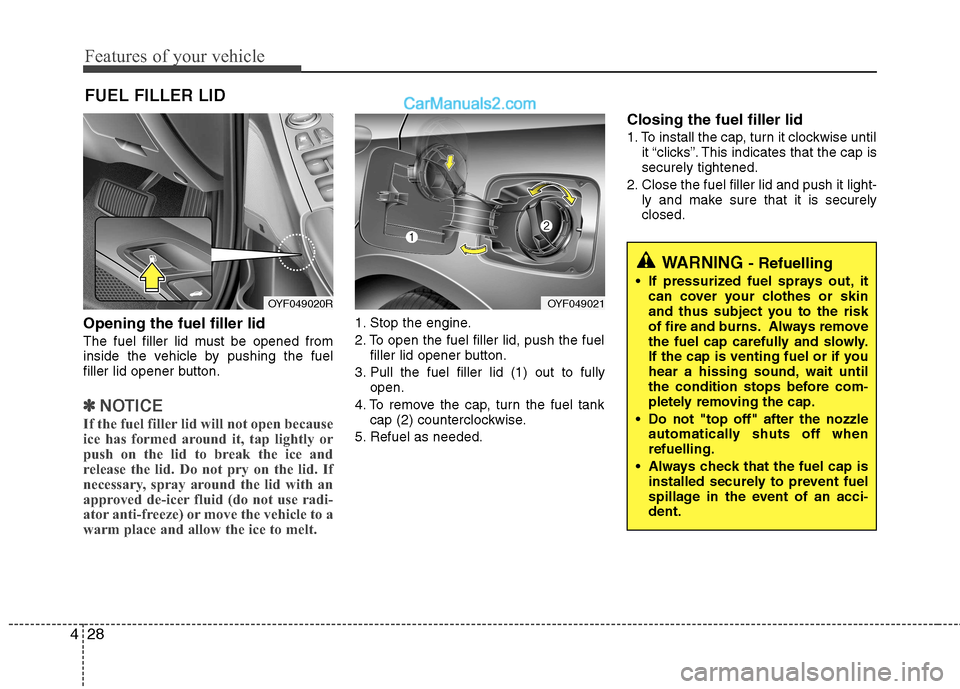
Opening the fuel filler lid
The fuel filler lid must be opened from
inside the vehicle by pushing the fuel
filler lid opener button.
✽✽
NOTICE
If the fuel filler lid will not open because
ice has formed around it, tap lightly or
push on the lid to break the ice and
release the lid. Do not pry on the lid. If
necessary, spray around the lid with an
approved de-icer fluid (do not use radi-
ator anti-freeze) or move the vehicle to a
warm place and allow the ice to melt.
1. Stop the engine.
2. To open the fuel filler lid, push the fuel filler lid opener button.
3. Pull the fuel filler lid (1) out to fully open.
4. To remove the cap, turn the fuel tank cap (2) counterclockwise.
5. Refuel as needed. Closing the fuel filler lid
1. To install the cap, turn it clockwise until
it “clicks”. This indicates that the cap is securely tightened.
2. Close the fuel filler lid and push it light- ly and make sure that it is securelyclosed.
FUEL FILLER LID
OYF049020ROYF049021
WARNING
- Refuelling
If pressurized fuel sprays out, it can cover your clothes or skin
and thus subject you to the risk
of fire and burns. Always remove
the fuel cap carefully and slowly.
If the cap is venting fuel or if you
hear a hissing sound, wait until
the condition stops before com-
pletely removing the cap.
Do not "top off" after the nozzle automatically shuts off whenrefuelling.
Always check that the fuel cap is installed securely to prevent fuel
spillage in the event of an acci-dent.
Page 165 of 363
493
Features of your vehicle
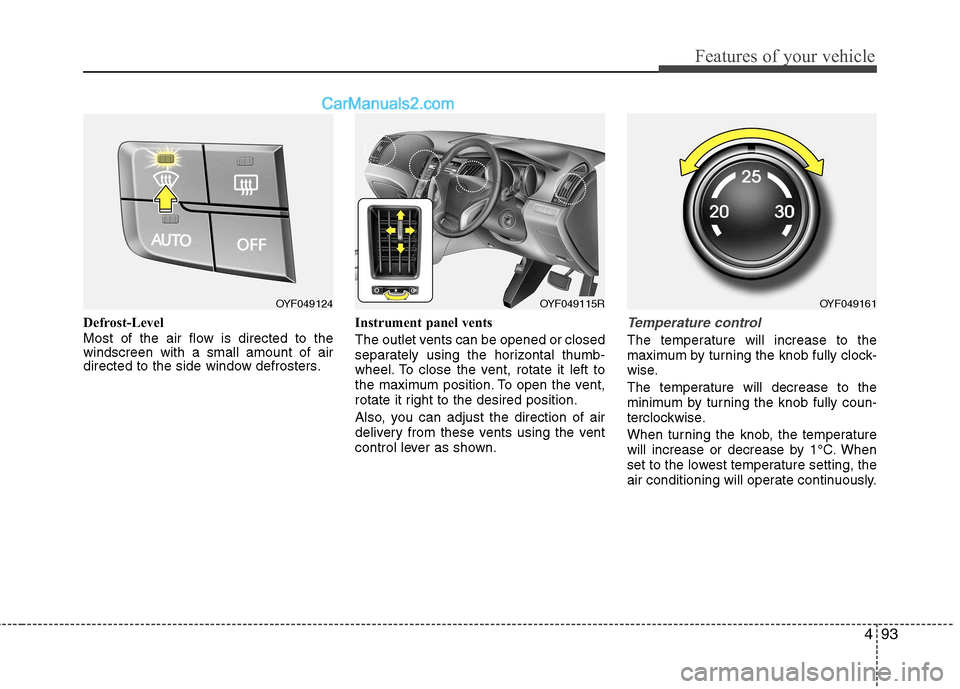
Defrost-Level
Most of the air flow is directed to the windscreen with a small amount of air
directed to the side window defrosters.Instrument panel vents
The outlet vents can be opened or closed
separately using the horizontal thumb-
wheel. To close the vent, rotate it left to
the maximum position. To open the vent,
rotate it right to the desired position.
Also, you can adjust the direction of air
delivery from these vents using the vent
control lever as shown.Temperature control
The temperature will increase to the
maximum by turning the knob fully clock-
wise.
The temperature will decrease to the
minimum by turning the knob fully coun-
terclockwise.
When turning the knob, the temperature
will increase or decrease by 1°C. When
set to the lowest temperature setting, the
air conditioning will operate continuously.
OYF049124OYF049115ROYF049161
Page 177 of 363
4105
Features of your vehicle
Digital clock (if equipped)
Whenever the battery terminals or relat-
ed fuses are disconnected, you must
reset the time.
When the ignition switch is in the ACC or
ON position, the clock buttons operate as
follows:
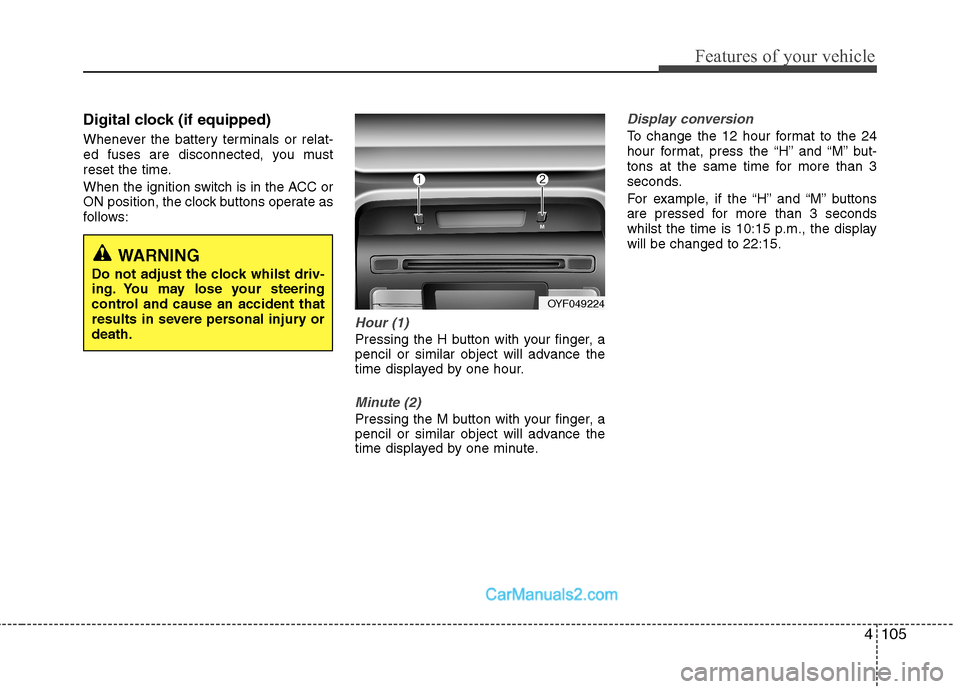
Hour (1)
Pressing the H button with your finger, a
pencil or similar object will advance the
time displayed by one hour.
Minute (2)
Pressing the M button with your finger, a
pencil or similar object will advance the
time displayed by one minute.
Display conversion
To change the 12 hour format to the 24
hour format, press the “H” and “M” but-
tons at the same time for more than 3
seconds.
For example, if the “H” and “M” buttons
are pressed for more than 3 seconds
whilst the time is 10:15 p.m., the displaywill be changed to 22:15.
WARNING
Do not adjust the clock whilst driv-
ing. You may lose your steering
control and cause an accident that
results in severe personal injury ordeath.
OYF049224
Page 185 of 363
![Hyundai Sonata 2012 Owners Manual - RHD (UK, Australia) 4113
Features of your vehicle
1. AM Selection Button
Pressing the [AM] button selects the AM
band. AM Mode is displayed on the LCD.
2. FM Selection Button
Turns to FM mode and toggles FM1and
FM2 Hyundai Sonata 2012 Owners Manual - RHD (UK, Australia) 4113
Features of your vehicle
1. AM Selection Button
Pressing the [AM] button selects the AM
band. AM Mode is displayed on the LCD.
2. FM Selection Button
Turns to FM mode and toggles FM1and
FM2](/manual-img/35/16811/w960_16811-184.png)
4113
Features of your vehicle
1. AM Selection Button
Pressing the [AM] button selects the AM
band. AM Mode is displayed on the LCD.
2. FM Selection Button
Turns to FM mode and toggles FM1and
FM2 when the button is pressed each
time.
3. Automatic Channel SelectionButton
When the [SEEK ] button is pressed, it increases the band fre- quency to automatically select chan-
nel. Stops at the previous frequency if
no channel is found.
When the [TRACK ] button is press- ed, it reduces the band frequency to
automatically select channel. Stops at
the previous frequency if no channel is
found. 4. Power ON/OFF Button &
Volume Control Button
Turns on/off the set when the IGNITION
SWITCH is on ACC or ON. If the button
is turned to the right, it increases the vol-
ume and left,decreases the volume.
Adjusts the volume of the car audio system. Rotate clockwise to increase
the volume or counterclockwise to
decrease.
5. Preset Button
Push [1]~[6] buttons less than 0.8 sec-
ond to play the channel saved in each
button. Push Preset button for 0.8 sec-
ond or longer to save current channel to
the respective button with a beep.
6. AST(AUTO STORE Button)
When the button is pressed, it automati-
cally selects and saves channels with
high reception rate to PRESET buttons
[1]~[6] and plays the channel saved in
PRESET1. If no channel is saved after
AST, it will play the previous channel. 7. SETUP Button ■
PA710YFG
Press this button to turn to the SCROLL
option and the other adjustment mode.
If no action is taken for 5 seconds after
pressing the button, it will return to the
play mode. (After entering SETUP mode,
move between items using the left, rightand PUSH functions of the [TUNE]
knob.) The setup changes in the order of
TEXT SCROLL ➟ AV C
■ PA760YFG
The setup Change in the order of TONE➟ POSITION ➟ AVC ➟ CLOCK ➟
SCROLL ➟ RETURN
This function is used to display charac-
ters longer than the LCD text display and
can be turned ON/OFF through the [
FOLDER ] button.
This function automatically adjusts the
volume level according to the speed of
the vehicle and can be turned ON/OFF
through the [ FOLDER ] button.
Page 186 of 363
![Hyundai Sonata 2012 Owners Manual - RHD (UK, Australia) Features of your vehicle
114
4
Pressing the [ENTER] button to adjust
the sound the following order : BASS,
MIDDLE, TREBLE. Adjust the BASS and
press the [ FOLDER ] button to set. Use the same metho Hyundai Sonata 2012 Owners Manual - RHD (UK, Australia) Features of your vehicle
114
4
Pressing the [ENTER] button to adjust
the sound the following order : BASS,
MIDDLE, TREBLE. Adjust the BASS and
press the [ FOLDER ] button to set. Use the same metho](/manual-img/35/16811/w960_16811-185.png)
Features of your vehicle
114
4
Pressing the [ENTER] button to adjust
the sound the following order : BASS,
MIDDLE, TREBLE. Adjust the BASS and
press the [ FOLDER ] button to set. Use the same method to adjust MIDDLE,
TREBLE and press the [ENTER] button
to complete and exit from TONE adjust-
ment mode.
Pressing the [ENTER] button to adjust
the POSITION the following order :
FADER, BALANCE. Adjust the FADER
and press the [ FOLDER ] button toset. Use the same method to adjust the BAL-
ANCE and press the [ENTER] button to
complete and exit from POSITION
adjustment mode.
Pressing the [ FOLDER ] button to
adjust the clock in the following order :
CLOCK SET, TIME FORMAT,
RETURN. Adjust the CLOCK SET and
press the [ENTER] button to set.
Use the same method to adjust TIME
FORMAT. Adjust the RETURN and press
the [ENTER] button to complete and exit
from clock adjustment mode.
8. Manual Channel Selector &
Sound Quality Control Knob
Turn this control whilst listening to a radio
channel to manually adjust frequency.
Turn clockwise to increase frequency
and counterclockwise to reduce frequen-
cy.
Pressing the button changes the BASS,
MIDDLE, TREBLE, FADER and BAL-
ANCE TUNE mode. The mode selected
is shown on the display. After selecting
each mode, rotate the Audio control knob
clockwise or counterclockwise. BASS Control
To increase the BASS, rotate the knob
clockwise, whilst to decrease the BASS,
rotate the knob counterclockwise. MIDDLE Control
To increase the MIDDLE, rotate the knob
clockwise, whilst to decrease the MID-
DLE, rotate the knob counterclockwise. TREBLE Control
To increase the TREBLE, rotate the knob
clockwise, whilst to decrease the TRE-
BLE, rotate the knob counterclockwise.
FADER Control
Turn the control knob clockwise to
emphasize rear speaker sound(front
speaker sound will be attenuated).
When the control knob is turned counter-
clockwise, front speaker sound will be
emphasized(rear speaker sound will be
attenuated). BALANCE Control
Rotate the knob clockwise to emphasize
right speaker sound(left speaker sound
will be attenuated).
When the control knob is turned counter
clockwise, left speaker sound will be
emphasized(right speaker sound will be
attenuated).
Page 190 of 363
Features of your vehicle
118
4
9. INFO Button
Displays the information of the current
CD TRACK(FILE) as below when the
button is pressed each time.
CDDA : DISC TITLE ➟ DISC ARTIST
➟ TRACK TITLE ➟ TRACK ARTIST ➟
TOTAL TRACK...
MP3/WMA : FILE NAME ➟ TITLE ➟
ARTIST ➟ ALBUM ➟ FOLDER ➟
TOTAL FILE... (not displayed if the
information is not available on the
DISC.)
10. Folder Moving Button
Press the [FOLDER ] button to move to child folder of the current fold-
er and displays the first song in the
folder. Press TUNE/ENTER knob(for
PA760YFG, press [ENTER] button) to
move to the folder displayed. It will play
the first song in the folder.
Press the [FOLDER ] button to
move to parent folder of the current
folder and displays the first song in the
folder.
Press TUNE/ENTER knob(for
PA760YFG, press [ENTER] button) to
move the folder displayed. 11. Search/ENTER Button
Turn this button clockwise to display the
songs next to the currently played song.
Turn the button counterclockwise to dis-
play the songs before the currently
played song. Press the button to skip and
play the selected song.
12. Search Button
Press the [TUNE ] button to display
the songs next to the currently playedsong.
Press the [ TUNE] button to display
the songs before to the currently playedsong.
13. ENTER Button
Press the [ENTER] button to play the selected song.
14. CD LOAD Button
Push [LOAD] button to load CDs to avail-
able CDC deck (from 1~6). Push [LOAD]
button for more than 2 seconds to load
into all available decks. The last CD will
play. 10 seconds idle status will disable
loading process. 15. DISC Selection Button
[DISC ] Change Button Changes
disc to the previous disc.
[DISC ] Change Button Changes disc to the next disc.
Page 195 of 363
4123
Features of your vehicle
8. Search/ENTER Button
Turn this button clockwise to display the
songs next to the currently played song.
Turn the button counterclockwise to dis-
play the songs before the currently
played song. Press the button to skip and
play the selected song.
9. ENTER Button
Press the [ENTER] button to play the selected song.
10. Search Button
Press the [TUNE ] button to display
the songs next to the currently played
song. Press the [ TUNE] button to dis-
play the songs before to the currently
played song.