Page 177 of 363
4105
Features of your vehicle
Digital clock (if equipped)
Whenever the battery terminals or relat-
ed fuses are disconnected, you must
reset the time.
When the ignition switch is in the ACC or
ON position, the clock buttons operate as
follows:
Hour (1)
Pressing the H button with your finger, a
pencil or similar object will advance the
time displayed by one hour.
Minute (2)
Pressing the M button with your finger, a
pencil or similar object will advance the
time displayed by one minute.
Display conversion
To change the 12 hour format to the 24
hour format, press the “H” and “M” but-
tons at the same time for more than 3
seconds.
For example, if the “H” and “M” buttons
are pressed for more than 3 seconds
whilst the time is 10:15 p.m., the displaywill be changed to 22:15.
WARNING
Do not adjust the clock whilst driv-
ing. You may lose your steering
control and cause an accident that
results in severe personal injury ordeath.
OYF049224
Page 180 of 363
Features of your vehicle
108
4
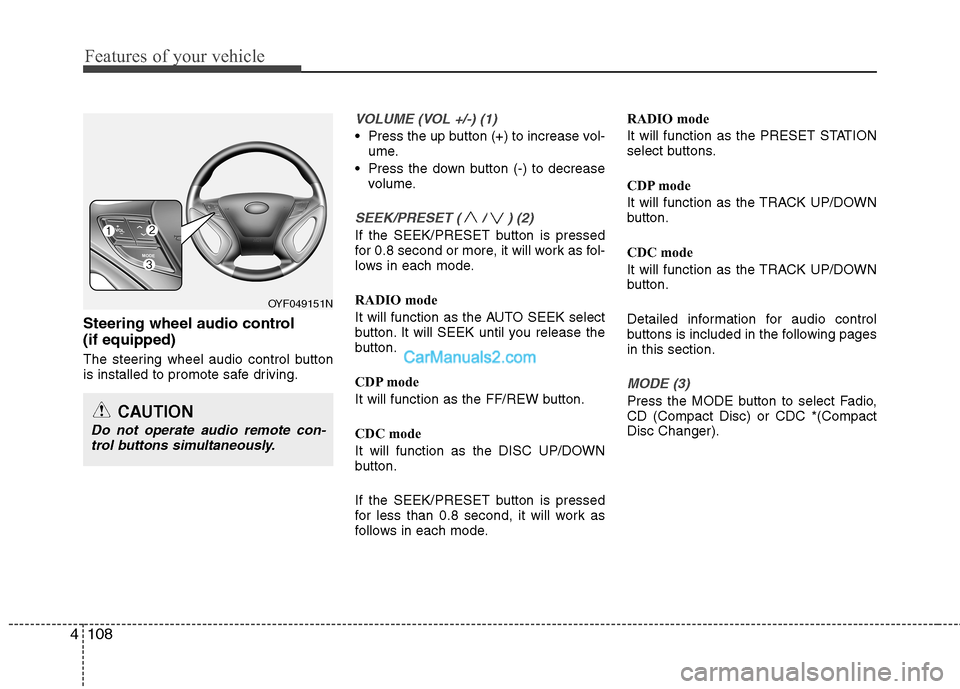
Steering wheel audio control (if equipped)
The steering wheel audio control button
is installed to promote safe driving.
VOLUME (VOL +/-) (1)
Press the up button (+) to increase vol-
ume.
Press the down button (-) to decrease volume.
SEEK/PRESET ( / ) (2)
If the SEEK/PRESET button is pressed
for 0.8 second or more, it will work as fol-
lows in each mode.
RADIO mode
It will function as the AUTO SEEK select
button. It will SEEK until you release the
button.
CDP mode
It will function as the FF/REW button.
CDC mode
It will function as the DISC UP/DOWN
button.
If the SEEK/PRESET button is pressed
for less than 0.8 second, it will work as
follows in each mode. RADIO mode
It will function as the PRESET STATION
select buttons.
CDP mode
It will function as the TRACK UP/DOWN
button.
CDC mode
It will function as the TRACK UP/DOWN
button.
Detailed information for audio control
buttons is included in the following pagesin this section.
MODE (3)
Press the MODE button to select Fadio, CD (Compact Disc) or CDC *(CompactDisc Changer).
OYF049151N
CAUTION
Do not operate audio remote con-
trol buttons simultaneously.
Page 184 of 363
Features of your vehicle
112
4
1. AM Selection Button
2. FM Selection Button
3. Automatic Channel Selection Button
4. Power ON/OFF Button & Volume Control
Knob
5. Preset Button
6. AST(AUTO STORE) Button
7. SETUP Button
8. Manual Channel Selector & Sound Quality Control Knob
9. Manual Channel Selector
10. SCAN Button
RADIO, SET UP, VOLUME, AUDIO CONTROL(PA760YFG, GENERAL MODEL)
RADIO, SET UP, VOLUME, AUDIO CONTROL(PA710YFG, GENERAL MODEL)
Page 185 of 363
![Hyundai Sonata 2012 Owners Manual - RHD (UK, Australia) 4113
Features of your vehicle
1. AM Selection Button
Pressing the [AM] button selects the AM
band. AM Mode is displayed on the LCD.
2. FM Selection Button
Turns to FM mode and toggles FM1and
FM2 Hyundai Sonata 2012 Owners Manual - RHD (UK, Australia) 4113
Features of your vehicle
1. AM Selection Button
Pressing the [AM] button selects the AM
band. AM Mode is displayed on the LCD.
2. FM Selection Button
Turns to FM mode and toggles FM1and
FM2](/manual-img/35/16811/w960_16811-184.png)
4113
Features of your vehicle
1. AM Selection Button
Pressing the [AM] button selects the AM
band. AM Mode is displayed on the LCD.
2. FM Selection Button
Turns to FM mode and toggles FM1and
FM2 when the button is pressed each
time.
3. Automatic Channel SelectionButton
When the [SEEK ] button is pressed, it increases the band fre- quency to automatically select chan-
nel. Stops at the previous frequency if
no channel is found.
When the [TRACK ] button is press- ed, it reduces the band frequency to
automatically select channel. Stops at
the previous frequency if no channel is
found. 4. Power ON/OFF Button &
Volume Control Button
Turns on/off the set when the IGNITION
SWITCH is on ACC or ON. If the button
is turned to the right, it increases the vol-
ume and left,decreases the volume.
Adjusts the volume of the car audio system. Rotate clockwise to increase
the volume or counterclockwise to
decrease.
5. Preset Button
Push [1]~[6] buttons less than 0.8 sec-
ond to play the channel saved in each
button. Push Preset button for 0.8 sec-
ond or longer to save current channel to
the respective button with a beep.
6. AST(AUTO STORE Button)
When the button is pressed, it automati-
cally selects and saves channels with
high reception rate to PRESET buttons
[1]~[6] and plays the channel saved in
PRESET1. If no channel is saved after
AST, it will play the previous channel. 7. SETUP Button ■
PA710YFG
Press this button to turn to the SCROLL
option and the other adjustment mode.
If no action is taken for 5 seconds after
pressing the button, it will return to the
play mode. (After entering SETUP mode,
move between items using the left, rightand PUSH functions of the [TUNE]
knob.) The setup changes in the order of
TEXT SCROLL ➟ AV C
■ PA760YFG
The setup Change in the order of TONE➟ POSITION ➟ AVC ➟ CLOCK ➟
SCROLL ➟ RETURN
This function is used to display charac-
ters longer than the LCD text display and
can be turned ON/OFF through the [
FOLDER ] button.
This function automatically adjusts the
volume level according to the speed of
the vehicle and can be turned ON/OFF
through the [ FOLDER ] button.
Page 198 of 363
✽✽NOTICE FOR USING iPod DEVICE
Some iPod models might not support the communication protocol and the
files will not be played.
Supported iPod models:
- iPod Mini
- iPod 4th(Photo) ~ 6th(Classic) gen-eration
- iPod Nano 1st~4th generation
- iPod Touch 1st~2nd generation
The order of search or playback of songs in the iPod can be different
from the order searched in the audio
system.
If the iPod crashes due to its own mal- function, reset the iPod. (Reset: Refer
to iPod manual)
An iPod may not operate normally on
low battery.(Continued)
When the iPod cable is connect- ed, the system can be switched tothe AUX mode even without theiPod device and may cause noise.
Disconnect the iPod cable whenyou are not using the iPod device.
When not using iPod with car audio, detach the iPod cable from
iPod. Otherwise, the iPod mayremain in accessary mode, andmay not work properly.
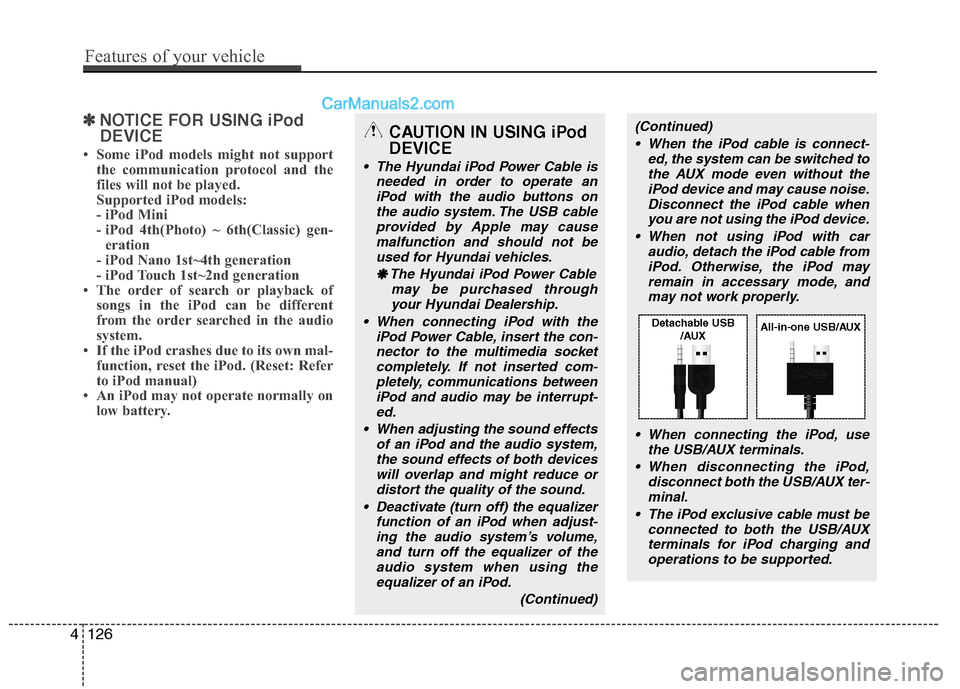
When connecting the iPod, use the USB/AUX terminals.
When disconnecting the iPod, disconnect both the USB/AUX ter-minal.
The iPod exclusive cable must be connected to both the USB/AUXterminals for iPod charging and
operations to be supported.CAUTION IN USING iPod DEVICE
The Hyundai iPod Power Cable is needed in order to operate an
iPod with the audio buttons onthe audio system. The USB cableprovided by Apple may cause malfunction and should not be
used for Hyundai vehicles.
❋
❋ The Hyundai iPod Power Cable
may be purchased throughyour Hyundai Dealership.
When connecting iPod with the iPod Power Cable, insert the con-nector to the multimedia socketcompletely. If not inserted com- pletely, communications between
iPod and audio may be interrupt-ed.
When adjusting the sound effects of an iPod and the audio system,the sound effects of both devices
will overlap and might reduce or distort the quality of the sound.
Deactivate (turn off) the equalizer function of an iPod when adjust-
ing the audio system’s volume,and turn off the equalizer of theaudio system when using theequalizer of an iPod.
(Continued)
4126
Features of your vehicle
Detachable USB/AUXAll-in-one USB/AUX
Page 237 of 363
539
Driving your vehicle
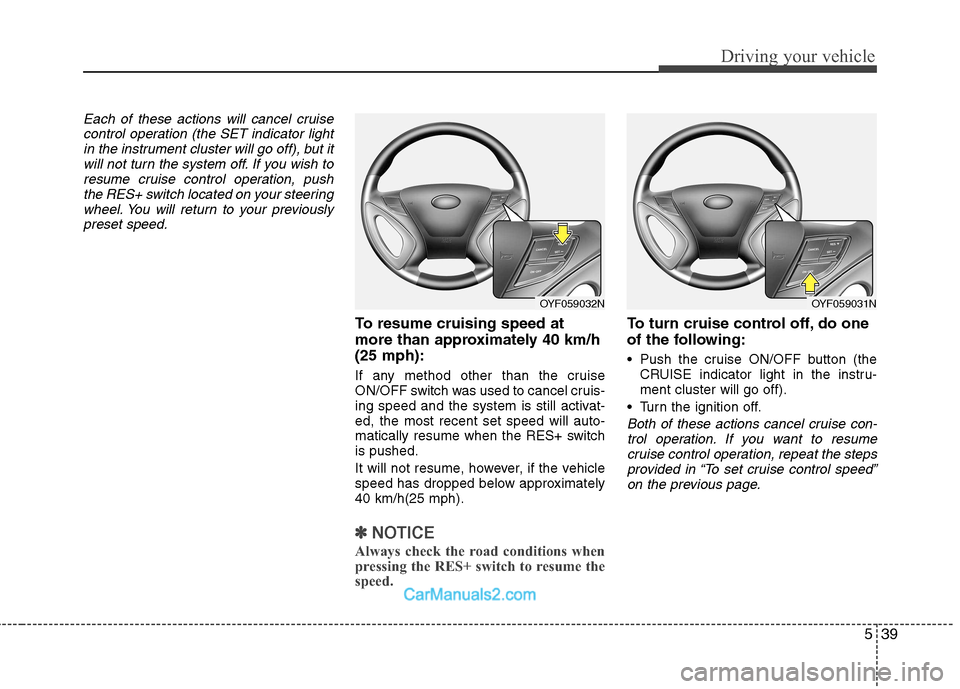
Each of these actions will cancel cruisecontrol operation (the SET indicator lightin the instrument cluster will go off), but itwill not turn the system off. If you wish to
resume cruise control operation, pushthe RES+ switch located on your steeringwheel. You will return to your previously
preset speed.
To resume cruising speed at
more than approximately 40 km/h(25 mph):
If any method other than the cruise
ON/OFF switch was used to cancel cruis-
ing speed and the system is still activat-ed, the most recent set speed will auto-
matically resume when the RES+ switchis pushed.
It will not resume, however, if the vehicle
speed has dropped below approximately40 km/h(25 mph).
✽✽ NOTICE
Always check the road conditions when
pressing the RES+ switch to resume the
speed.
To turn cruise control off, do one
of the following:
Push the cruise ON/OFF button (the CRUISE indicator light in the instru- ment cluster will go off).
Turn the ignition off.
Both of these actions cancel cruise con- trol operation. If you want to resume cruise control operation, repeat the stepsprovided in “To set cruise control speed”
on the previous page.
OYF059032NOYF059031N
Page 309 of 363
733
Maintenance
Reset items
Items should be reset after the battery
has been discharged or the battery hasbeen disconnected.
Auto up/down window (See section 4)
Sunroof (See section 4)
Driver position memory system (See section 4)
Trip computer (See section 4)
Climate control system (See section 4)
Clock (See section 4)
Audio (See section 4)
WARNING
Before performing maintenance or recharging the battery, turn off all accessories and stop the
engine.
The negative battery cable must be removed first and installed
last when the battery is discon-nected.
Operation related to the battery should be done in an authorised
HYUNDAI dealer.
CAUTION
Keep the battery away from water
or any liquid.
For your safety, use the authentic- ity by approved authorisedHYUNDAI dealer, when youreplace the battery.
WARNING - Recharging
battery
When recharging the battery,
observe the following precautions:
The battery must be removed from the vehicle and placed in an area with good ventilation.
Do not allow cigarettes, sparks, or flame near the battery.
Watch the battery during charg- ing, and stop or reduce the charg-
ing rate if the battery cells begin
gassing (boiling) violently or if
the temperature of the electrolyte
of any cell exceeds 49°C (120°F).
Wear eye protection when check- ing the battery during charging.
Disconnect the battery charger in the following order.
1. Turn off the battery charger main switch.
2. Unhook the negative clamp from the negative battery terminal.
3. Unhook the positive clamp from the positive battery terminal.
Page 313 of 363
737
Maintenance
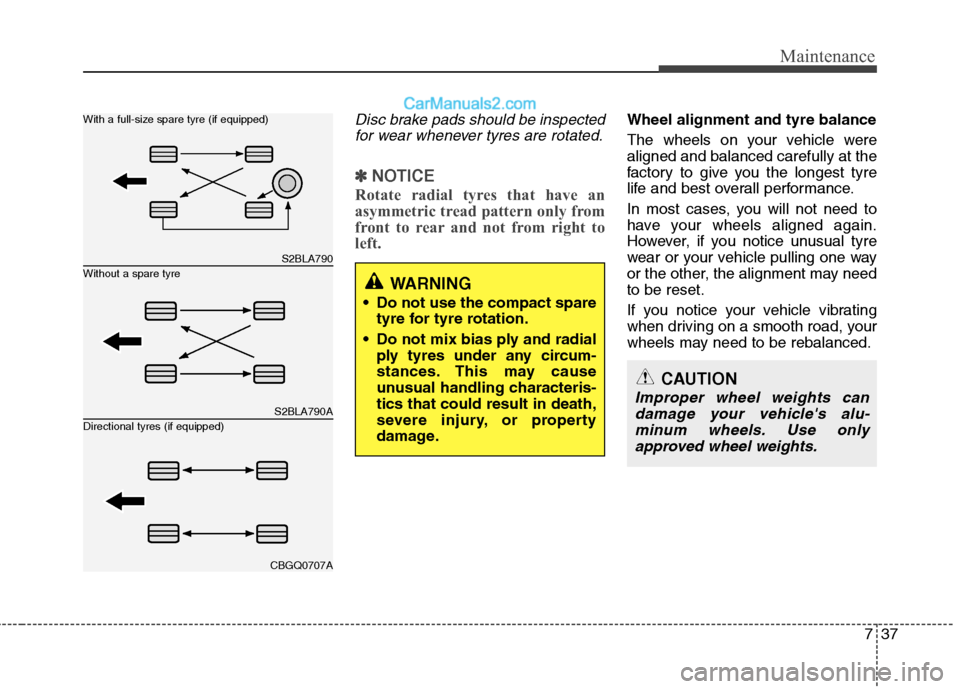
Disc brake pads should be inspectedfor wear whenever tyres are rotated.
✽✽ NOTICE
Rotate radial tyres that have an
asymmetric tread pattern only from
front to rear and not from right to
left.
Wheel alignment and tyre balance
The wheels on your vehicle were aligned and balanced carefully at the
factory to give you the longest tyre
life and best overall performance.
In most cases, you will not need to
have your wheels aligned again.
However, if you notice unusual tyre
wear or your vehicle pulling one way
or the other, the alignment may needto be reset.
If you notice your vehicle vibrating
when driving on a smooth road, your
wheels may need to be rebalanced.
S2BLA790
S2BLA790A
CBGQ0707A
Without a spare tyre
With a full-size spare tyre (if equipped) Directional tyres (if equipped)WARNING
Do not use the compact spare tyre for tyre rotation.
Do not mix bias ply and radial ply tyres under any circum-
stances. This may cause
unusual handling characteris-tics that could result in death,
severe injury, or property
damage.
CAUTION
Improper wheel weights can
damage your vehicle's alu-minum wheels. Use onlyapproved wheel weights.