Page 275 of 363
619
What to do in an emergency
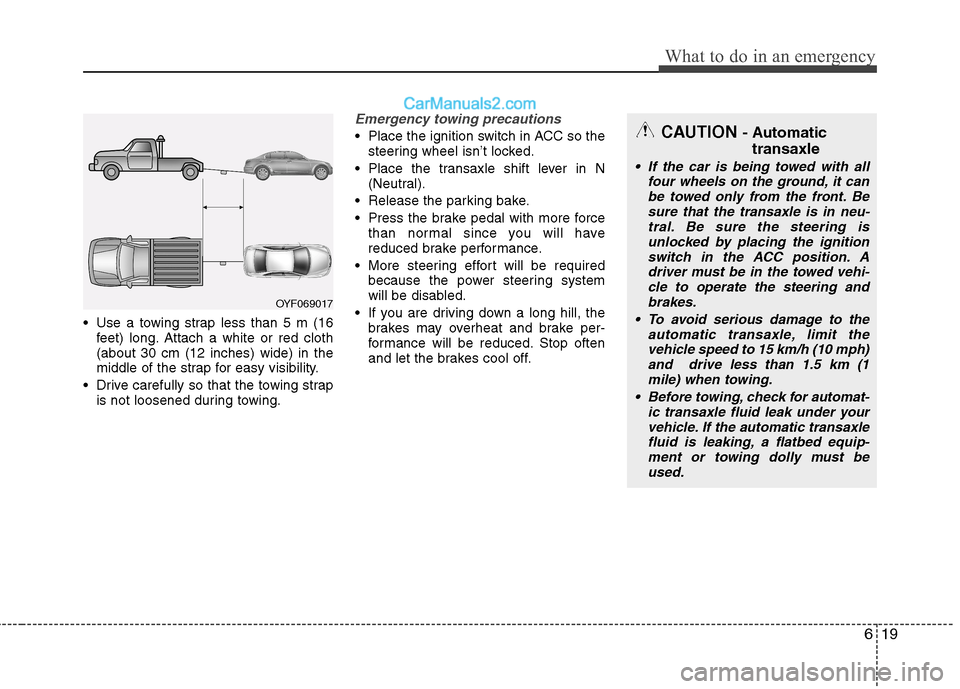
Use a towing strap less than 5 m (16feet) long. Attach a white or red cloth (about 30 cm (12 inches) wide) in the
middle of the strap for easy visibility.
Drive carefully so that the towing strap is not loosened during towing.
Emergency towing precautions
Place the ignition switch in ACC so thesteering wheel isn’t locked.
Place the transaxle shift lever in N (Neutral).
Release the parking bake.
Press the brake pedal with more force than normal since you will have
reduced brake performance.
More steering effort will be required because the power steering system
will be disabled.
If you are driving down a long hill, the brakes may overheat and brake per-
formance will be reduced. Stop often
and let the brakes cool off.
OYF069017
CAUTION - Automatic
transaxle
If the car is being towed with all four wheels on the ground, it can
be towed only from the front. Besure that the transaxle is in neu-tral. Be sure the steering isunlocked by placing the ignition
switch in the ACC position. Adriver must be in the towed vehi- cle to operate the steering and
brakes.
To avoid serious damage to the automatic transaxle, limit thevehicle speed to 15 km/h (10 mph)and drive less than 1.5 km (1
mile) when towing.
Before towing, check for automat- ic transaxle fluid leak under yourvehicle. If the automatic transaxle fluid is leaking, a flatbed equip-
ment or towing dolly must beused.
Page 277 of 363
7
Engine compartment / 7-2
Maintenance services / 7-3
Owner maintenance / 7-4
Scheduled maintenance service / 7-6
Explanation of scheduled maintenance items / 7-13
Engine oil / 7-16
Engine coolant / 7-18
Brake/clutch fluid / 7-21
Power steering fluid / 7-22
Washer fluid / 7-23
Parking brake / 7-24
Air cleaner / 7-25
Climate control air filter / 7-27
Wiper blades / 7-29
Battery / 7-31
Tyres and wheels / 7-34
Fuses / 7-44
Light bulbs / 7-55
Appearance care / 7-62
Emission control system / 7-68
Maintenance
Page 278 of 363
Maintenance
2
7
ENGINE COMPARTMENT
1. Power steering fluid reservoir
2. Engine coolant reservoir
3. Windscreen washer fluid reservoir
4. Radiator cap
5. Engine oil filler cap
6. Engine oil dipstick
7. Brake fluid reservoir
8. Air cleaner
9. Fuse box10.
Positive battery terminal
11. Negative battery terminal
OYF019003R/OYF079060R-1
■■ 2.0L
■
■ 2.4L
Page 281 of 363
75
Maintenance
Whilst operating your vehicle:
Note any changes in the sound of theexhaust or any smell of exhaust fumes
in the vehicle.
Check for vibrations in the steering wheel. Notice any increased steering
effort or looseness in the steering
wheel, or change in its straight-aheadposition.
Notice if your vehicle constantly turns slightly or “pulls” to one side when trav-
elling on smooth, level road.
When stopping, listen and check for unusual sounds, pulling to one side,
increased brake pedal travel or “hard-
to-push” brake pedal.
If any slipping or changes in the oper- ation of your transaxle occurs, check
the transaxle fluid level.
Check automatic transaxle P (Park) function.
Check parking brake.
Check for fluid leaks under your vehicle (water dripping from the air condition-
ing system during or after use is nor-mal).
At least monthly:
Check coolant level in the enginecoolant reservoir.
Check the operation of all exterior lights, including the stoplights, turn sig-
nals and hazard warning flashers.
Check the inflation pressures of all tyres including the spare.
At least twice a year
(i.e., every Spring and Fall):
Check radiator, heater and air condi- tioning hoses for leaks or damage.
Check windscreen washer spray and wiper operation. Clean wiper blades
with clean cloth dampened with wash-er fluid.
Check headlight alignment.
Check muffler, exhaust pipes, shields and clamps.
Check the lap/shoulder belts for wear and function.
Check for worn tyres and loose wheel nuts.
Page 282 of 363
Maintenance
6
7
SCHEDULED MAINTENANCE SERVICE
At least once a year:
Clean body and door drain holes.
Lubricate door hinges and checks, and
bonnet hinges.
Lubricate door and bonnet locks and latches.
Lubricate door rubber weatherstrips.
Check the air conditioning system.
Check the power steering fluid level.
Inspect and lubricate automatic transaxle linkage and controls.
Clean battery and terminals.
Check the brake (and clutch) fluid level. Follow Normal Maintenance Schedule if
the vehicle is usually operated where
none of the following conditions apply. If
any of the following conditions apply, fol-
low Maintenance Under Severe Usage
Conditions.
Repeated short distance driving.
Driving in dusty conditions or sandy
areas.
Extensive use of brakes.
Driving in areas where salt or other corrosive materials are being used.
Driving on rough or muddy roads.
Driving in mountainous areas.
Extended periods of idling or low speed operation.
Driving for a prolonged period in cold temperatures and/or extremely humid
climates.
More than 50% driving in heavy city traffic during hot weather above 32°C(90°F).
If your vehicle is operated under the
above conditions, you should inspect, replace or refill more frequently than thefollowing Normal Maintenance Schedule.
After 96 months or 120,000 km (80,000miles) continue to follow the prescribedmaintenance intervals.
Page 285 of 363
79
Maintenance
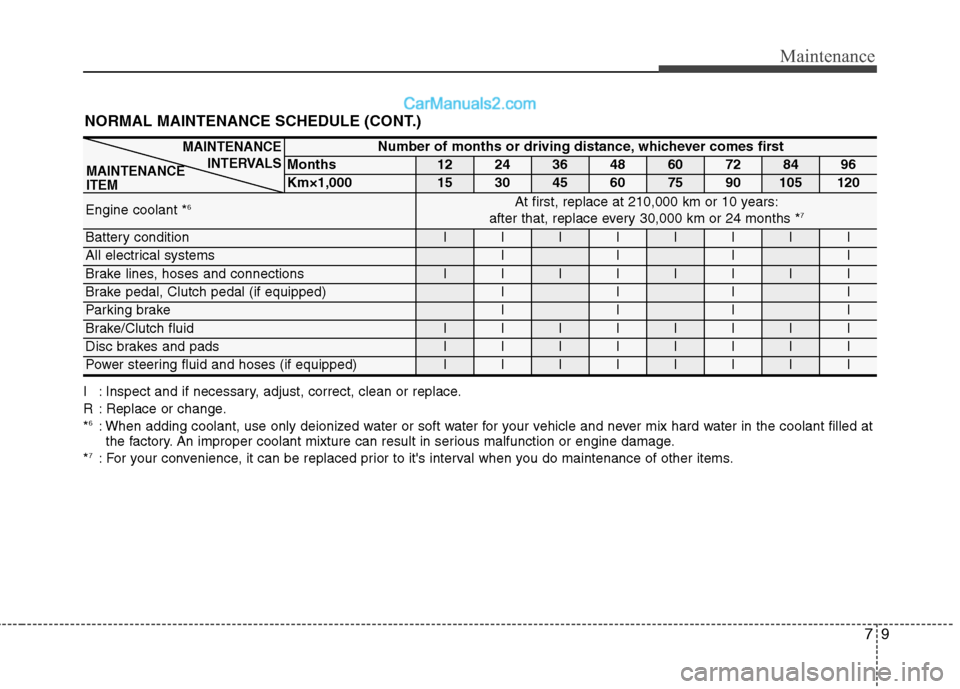
NORMAL MAINTENANCE SCHEDULE (CONT.)
I : Inspect and if necessary, adjust, correct, clean or replace.
R : Replace or change.*6
: When adding coolant, use only deionized water or soft water for your vehicle and never mix hard water in the coolant filled at
the factory. An improper coolant mixture can result in serious malfunction or engine damage.
* 7
: For your convenience, it can be replaced prior to it's interval when you do maintenance of other items.
Number of months or driving distance, whichever comes first
Months1224364860728496
Km×1,000153045607590105120
Engine coolant * 6At first, replace at 210,000 km or 10 years:
after that, replace every 30,000 km or 24 months * 7
Battery conditionIIIIIIII
All electrical systemsIIII
Brake lines, hoses and connectionsIIIIIIII
Brake pedal, Clutch pedal (if equipped)IIII
Parking brakeIIII
Brake/Clutch fluidIIIIIIII
Disc brakes and padsIIIIIIII
Power steering fluid and hoses (if equipped)IIIIIIII
MAINTENANCE
INTERVALS
MAINTENANCE ITEM
Page 291 of 363
715
Maintenance
Brake hoses and lines
Visually check for proper installation,
chafing, cracks, deterioration and any
leakage. Replace any deteriorated or
damaged parts immediately. Brake fluid
Check brake fluid level in the brake fluid
reservoir. The level should be between
“MIN” and “MAX” marks on the side of
the reservoir. Use only hydraulic brake
fluid conforming to DOT 3 or DOT 4specification.
Parking brake
Inspect the parking brake system includ-
ing the parking brake pedal or lever and
cables.Brake discs, pads, calipers and
rotors
Check the pads for excessive wear, discs
for run out and wear, and calipers for fluid
leakage. Suspension mounting bolts
Check the suspension connections for
looseness or damage. Retighten to the
specified torque.
Steering gear box, linkage &
boots/lower arm ball joint
With the vehicle stopped and engine off,
check for excessive free-play in the
steering wheel.
Check the linkage for bends or damage.
Check the dust boots and ball joints for
deterioration, cracks, or damage.
Replace any damaged parts.Power steering pump, belt and hoses
Check the power steering pump and
hoses for leakage and damage. Replace
any damaged or leaking parts immedi-
ately. Inspect the power steering belt (or
drive belt) for evidence of cuts, cracks,
excessive wear, oiliness and proper ten-
sion. Replace or adjust it if necessary. Drive shafts and boots
Check the drive shafts, boots and clamps
for cracks, deterioration, or damage.
Replace any damaged parts and, if nec-
essary, repack the grease.
Air conditioning refrigerant (if equipped)
Check the air conditioning lines and con-
nections for leakage and damage.
Page 297 of 363
721
Maintenance
BRAKE/CLUTCH FLUID
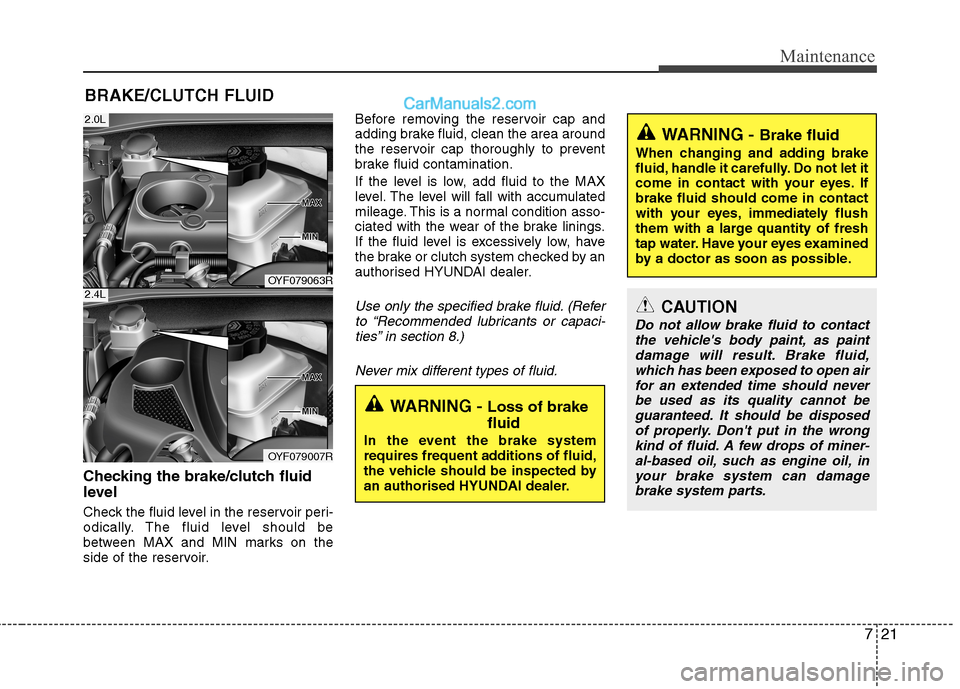
Checking the brake/clutch fluid
level
Check the fluid level in the reservoir peri-
odically. The fluid level should be
between MAX and MIN marks on the
side of the reservoir. Before removing the reservoir cap and
adding brake fluid, clean the area around
the reservoir cap thoroughly to prevent
brake fluid contamination.
If the level is low, add fluid to the MAX
level. The level will fall with accumulated
mileage. This is a normal condition asso-
ciated with the wear of the brake linings.
If the fluid level is excessively low, have
the brake or clutch system checked by an
authorised HYUNDAI dealer.
Use only the specified brake fluid. (Refer
to “Recommended lubricants or capaci- ties” in section 8.)
Never mix different types of fluid.
WARNING - Brake fluid
When changing and adding brake
fluid, handle it carefully. Do not let it
come in contact with your eyes. Ifbrake fluid should come in contact
with your eyes, immediately flush
them with a large quantity of fresh
tap water. Have your eyes examined
by a doctor as soon as possible.
WARNING - Loss of brake fluid
In the event the brake system
requires frequent additions of fluid,
the vehicle should be inspected by
an authorised HYUNDAI dealer.
CAUTION
Do not allow brake fluid to contact the vehicle's body paint, as paintdamage will result. Brake fluid, which has been exposed to open air
for an extended time should never be used as its quality cannot beguaranteed. It should be disposedof properly. Don't put in the wrong
kind of fluid. A few drops of miner- al-based oil, such as engine oil, inyour brake system can damage brake system parts.
OYF079063R
OYF079007R
2.0L
2.4L