Page 289 of 403
623
What to do in an emergency
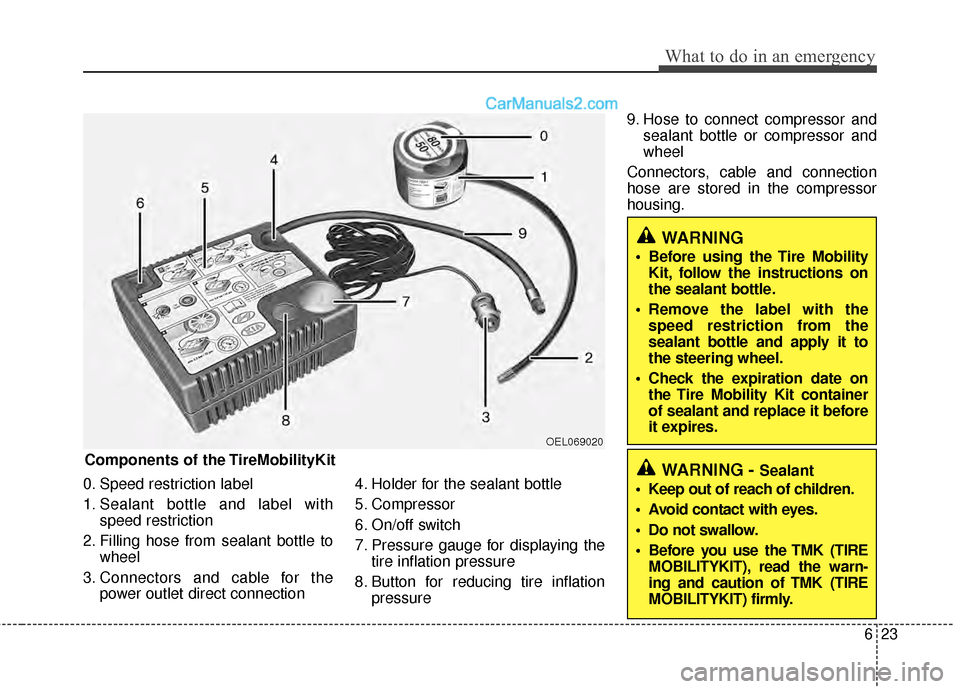
0. Speed restriction label
1. Sealant bottle and label withspeed restriction
2. Filling hose from sealant bottle to wheel
3. Connectors and cable for the power outlet direct connection 4. Holder for the sealant bottle
5. Compressor
6. On/off switch
7. Pressure gauge for displaying the
tire inflation pressure
8. Button for reducing tire inflation pressure 9. Hose to connect compressor and
sealant bottle or compressor and
wheel
Connectors, cable and connection
hose are stored in the compressor
housing.
Components of the TireMobilityKit
OEL069020
WARNING
Before using the Tire Mobility Kit, follow the instructions on
the sealant bottle.
Remove the label with the speed restriction from the
sealant bottle and apply it to
the steering wheel.
Check the expiration date on the Tire Mobility Kit container
of sealant and replace it before
it expires.
WARNING - Sealant
Keep out of reach of children.
Avoid contact with eyes.
Do not swallow.
Before you use the TMK (TIRE MOBILITYKIT), read the warn-
ing and caution of TMK (TIRE
MOBILITYKIT) firmly.
Page 290 of 403
What to do in an emergency
24
6
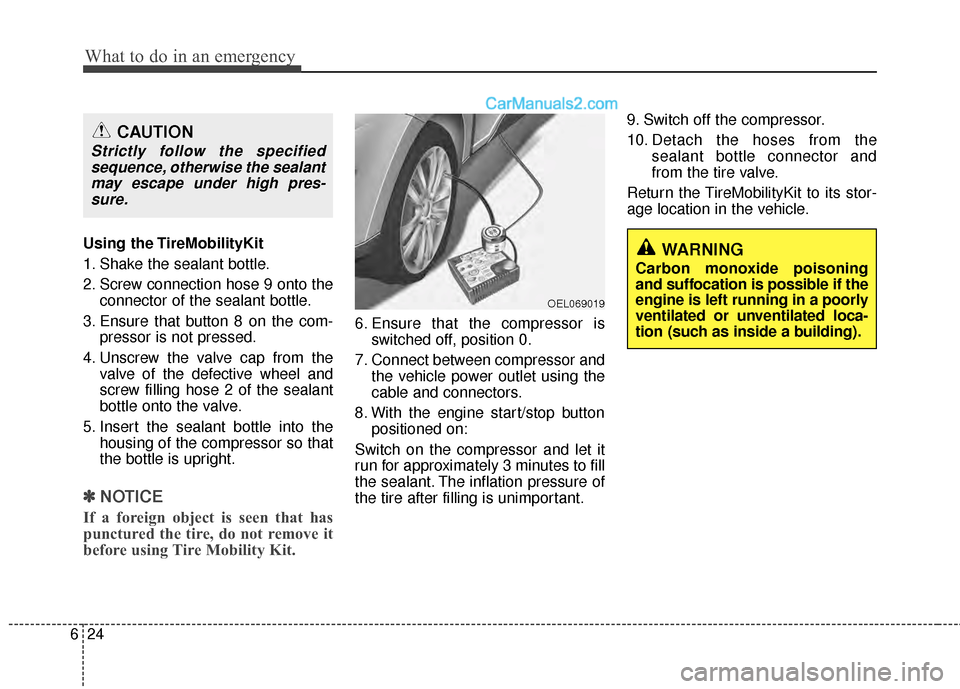
Using the TireMobilityKit
1. Shake the sealant bottle.
2. Screw connection hose 9 onto the
connector of the sealant bottle.
3. Ensure that button 8 on the com- pressor is not pressed.
4. Unscrew the valve cap from the valve of the defective wheel and
screw filling hose 2 of the sealant
bottle onto the valve.
5. Insert the sealant bottle into the housing of the compressor so that
the bottle is upright.
✽ ✽NOTICE
If a foreign object is seen that has
punctured the tire, do not remove it
before using Tire Mobility Kit.
6. Ensure that the compressor is
switched off, position 0.
7. Connect between compressor and the vehicle power outlet using the
cable and connectors.
8. With the engine start/stop button positioned on:
Switch on the compressor and let it
run for approximately 3 minutes to fill
the sealant. The inflation pressure of
the tire after filling is unimportant. 9. Switch off the compressor.
10. Detach the hoses from the
sealant bottle connector and
from the tire valve.
Return the TireMobilityKit to its stor-
age location in the vehicle.
WARNING
Carbon monoxide poisoning
and suffocation is possible if the
engine is left running in a poorly
ventilated or unventilated loca-
tion (such as inside a building).
OEL069019
CAUTION
Strictly follow the specified sequence, otherwise the sealantmay escape under high pres-sure.
Page 291 of 403
625
What to do in an emergency
Distributing the sealant
11. Immediately drive approximately3 km (2 miles) to evenly distribute
the sealant in the tire. Producing the tire inflation pres-
sure
12. After driving approximately 3 km
(2 miles), stop at a suitable loca-
tion.
13. Connect connection hose 9 of the compressor directly to the tire
valve.
14. Connect between compressor and the vehicle power outlet
using the cable and connectors.
15. Adjust the tire inflation pressure to 230 kPa (33 psi). With the
engine start/stop button posi-
tioned on, proceed as follows.
- To increase the inflation pres- sure: Switch on the compressor,
position I. To check the current
inflation pressure setting, briefly
switch off the compressor.✽ ✽ NOTICE
The pressure gauge may show high-
er than actual reading when the
compressor is running. To get an
accurate tire reading, the compres-
sor needs to be turned off.
- To reduce the inflation pres-
sure: Press the button 8 on the
compressor.
16. Remove the speed restriction label(0) from the sealant bottle(1)
and place it in a highly visible
place in the vehicle such as on
the steering wheel to remind you
not to drive too fast.
WARNING
Do not let the compressor run for
more than 10 minutes, otherwise
the device will overheat and may
be damaged.
CAUTION
Do not exceed a speed of 60km/h (35 mph). If possible, donot fall below a speed of 20km/h (12 mph).
While driving, if you experienceany unusual vibration, ride dis-turbance or noise, reduce yourspeed and drive with cautionuntil you can safely pull off ofthe side of the road.
Call for road side service or tow-ing.
CAUTION
Be careful not to overinflate thetire and stay away from the tirewhen filling it.
Page 293 of 403
627
What to do in an emergency
TOWING
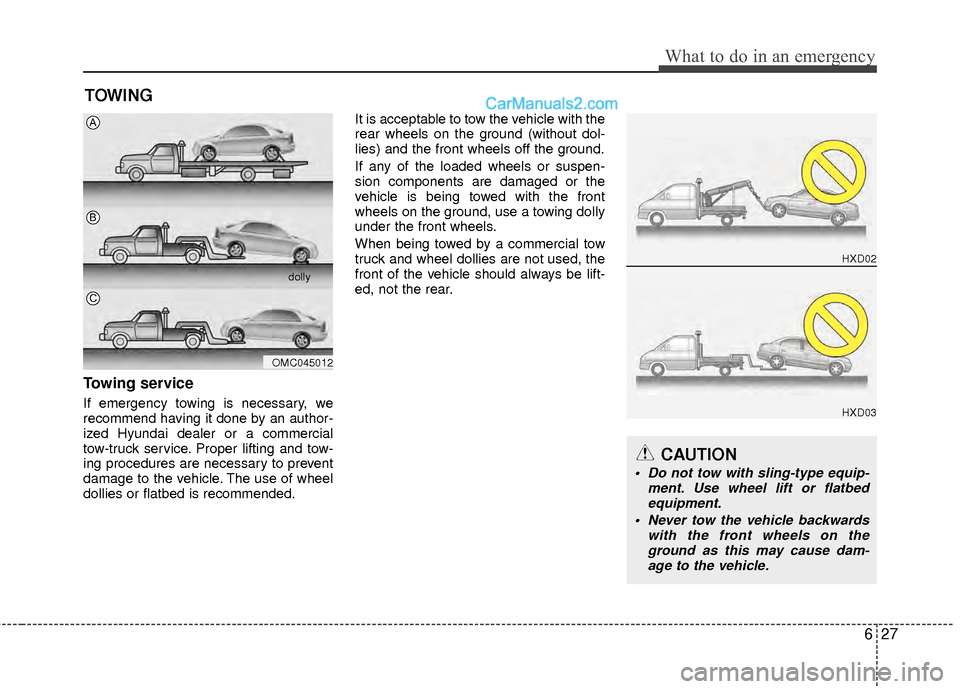
Towing service
If emergency towing is necessary, we
recommend having it done by an author-
ized Hyundai dealer or a commercial
tow-truck service. Proper lifting and tow-
ing procedures are necessary to prevent
damage to the vehicle. The use of wheel
dollies or flatbed is recommended.It is acceptable to tow the vehicle with the
rear wheels on the ground (without dol-
lies) and the front wheels off the ground.
If any of the loaded wheels or suspen-
sion components are damaged or the
vehicle is being towed with the front
wheels on the ground, use a towing dolly
under the front wheels.
When being towed by a commercial tow
truck and wheel dollies are not used, the
front of the vehicle should always be lift-
ed, not the rear.
OMC045012
dolly
A
B
C
CAUTION
Do not tow with sling-type equip-
ment. Use wheel lift or flatbedequipment.
Never tow the vehicle backwards with the front wheels on theground as this may cause dam-age to the vehicle.
HXD02
HXD03
Page 294 of 403
7
Engine compartment / 7-2
Maintenance services / 7-3
Owner maintenance / 7-5
Scheduled maintenance service / 7-7
Explanation of scheduled maintenance items / 7-19
Engine oil / 7-22
Inverter coolant / 7-24
Engine coolant / 7-24
Brake fluid / 7-27
Washer fluid / 7-28
Parking brake / 7-28
Air cleaner / 7-29
Climate control air filter / 7-30
Wiper blades / 7-32
Battery / 7-34
Tires and wheels / 7-37
Fuses / 7-50
Light bulbs / 7-60
Appearance care / 7-69
Emission control system / 7-75
California perchlorate notice / 7-78
Maintenance
Page 298 of 403
75
Maintenance
OWNER MAINTENANCE
The following lists are vehicle checks and
inspections that should be performed by
the owner or an authorized HYUNDAI
dealer at the frequencies indicated to
help ensure safe, dependable operation
of your vehicle.
Any adverse conditions should be
brought to the attention of your dealer as
soon as possible.
These Owner Maintenance Checks are
generally not covered by warranties and
you may be charged for labor, parts and
lubricants used.Owner maintenance schedule
When you stop for fuel:
Check the engine oil level.
Check coolant level in coolant reser-voirs (engine and inverter).
Check the windshield washer fluid level.
Look for low or under-inflated tires.
While operating your vehicle:
Note any changes in the sound of the exhaust or any smell of exhaust fumes
in the vehicle.
Check for vibrations in the steering wheel. Notice any increased steering
effort or looseness in the steering
wheel, or change in its straight-ahead
position.
Notice if your vehicle constantly turns slightly or “pulls” to one side when trav-
eling on smooth, level road.
When stopping, listen and check for unusual sounds, pulling to one side,
increased brake pedal travel or “hard-
to-push” brake pedal.
If any slipping or changes in the oper- ation of your transaxle occurs, check
the transaxle fluid level.
Check automatic transaxle P (Park) function.
Check parking brake.
Check for fluid leaks under your vehicle (water dripping from the air condition-
ing system during or after use is nor-
mal).
Check inverter coolant.
WARNING
Be careful when checking your
engine coolant level when the
engine is hot. Scalding hot coolant
and steam may blow out under
pressure. This could cause burns
or other serious injury.
Page 299 of 403
Maintenance
67
At least monthly:
Check coolant level in the enginecoolant reservoir and inverter coolant.
Check the operation of all exterior lights, including the stoplights, turn sig-
nals and hazard warning flashers.
Check the inflation pressures of all tires including the spare.
At least twice a year (i.e., every Spring and Fall):
Check radiator, heater and air condi- tioning hoses for leaks or damage.
Check windshield washer spray and wiper operation. Clean wiper blades
with clean cloth dampened with wash-
er fluid.
Check headlight alignment.
Check muffler, exhaust pipes, shields and clamps.
Check the lap/shoulder belts for wear and function.
Check for worn tires and loose wheel lug nuts.
At least once a year:
Clean body and door drain holes.
Lubricate door hinges and checks, andhood hinges.
Lubricate door and hood locks and latches.
Lubricate door rubber weatherstrips.
Check the air conditioning system.
Inspect and lubricate automatic transaxle linkage and controls.
Clean battery and terminals.
Check the brake fluid level.
Check the drive belt.
Page 314 of 403
721
Maintenance
Parking brake
Inspect the parking brake system includ-
ing the parking brake pedal and cables.
Brake discs, pads, calipers and
rotors
Check the pads for excessive wear, discs
for run out and wear, and calipers for fluid
leakage.
Exhaust pipe and muffler
Visually inspect the exhaust pipes, muf-
fler and hangers for cracks, deterioration,
or damage. Start the engine and listen
carefully for any exhaust gas leakage.
Tighten connections or replace parts as
necessary.
Suspension mounting bolts
Check the suspension connections for
looseness or damage. Retighten to the
specified torque.
Steering gear box, linkage &
boots/lower arm ball joint
With the vehicle stopped and engine off,
check for excessive free-play in the
steering wheel.
Check the linkage for bends or damage.
Check the dust boots and ball joints for
deterioration, cracks, or damage.
Replace any damaged parts.
Drive shafts and boots
Check the drive shafts, boots and clamps
for cracks, deterioration, or damage.
Replace any damaged parts and, if nec-
essary, repack the grease.
Air conditioning refrigerant
Check the air conditioning lines and con-
nections for leakage and damage.