2012 Hyundai Sonata Hybrid lock
[x] Cancel search: lockPage 101 of 403

Features of your vehicle
20
4
Power window lock button
The driver can disable the power win-
dow switches on a front and rear pas-
senger door by pressing the power
window lock button located on the dri-
ver’s door to the LOCK position
(pressed).
When the power window lock button is in the LOCK position (pressed),
the driver’s master control cannot
operate the front and rear passen-
ger door power windows.
OYF049017
CAUTION
To prevent possible damage to the power window system, do notopen or close two windows ormore at the same time. This willalso ensure the longevity of the fuse.
Never try to operate the main switch on the driver's door andthe individual door windowswitch in opposing directions atthe same time. If this is done, thewindow will stop and cannot beopened or closed.WARNING - Windows
NEVER leave the smart key in the vehicle.
NEVER leave any child unattend- ed in the vehicle. Even very
young children may inadvertently
cause the vehicle to move, entan-
gle themselves in the windows,
or otherwise injure themselves or
others.
Always double check to make sure all arms, hands, head and
other obstructions are safely out
of the way before closing a win-
dow.
Do not allow children to play with the power windows. Keep the dri-
ver’s door power window lock
switch in the LOCK position
(depressed). Serious injury can
result from unintentional window
operation by the child.
Do not extend any head or arms outside through the window
opening while driving.
Page 102 of 403
421
Features of your vehicle
Opening the hood
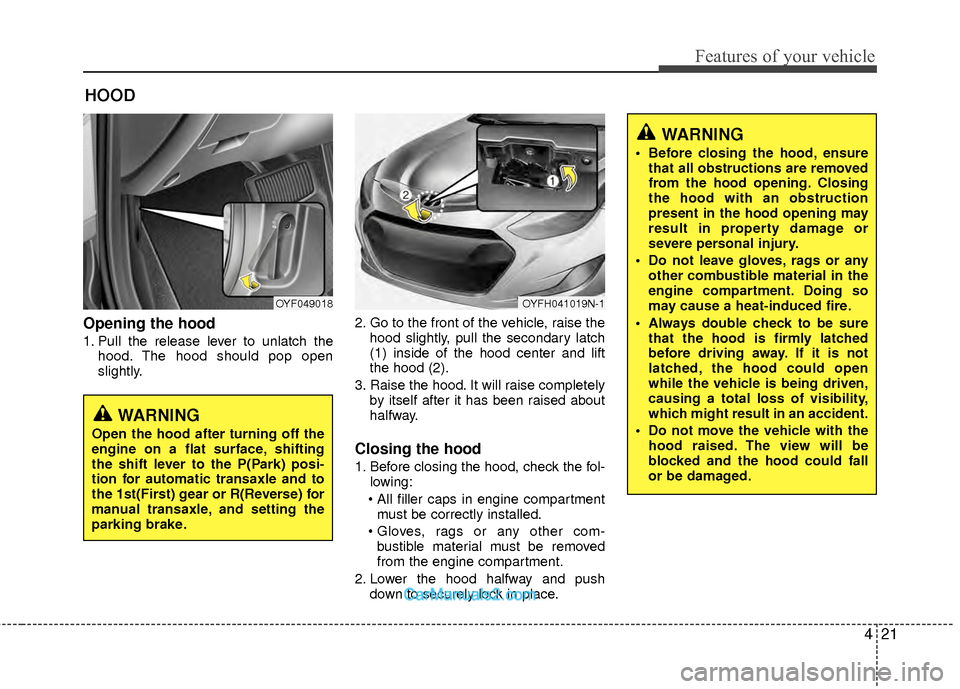
1. Pull the release lever to unlatch thehood. The hood should pop open
slightly. 2. Go to the front of the vehicle, raise the
hood slightly, pull the secondary latch
(1) inside of the hood center and lift
the hood (2).
3. Raise the hood. It will raise completely by itself after it has been raised about
halfway.
Closing the hood
1. Before closing the hood, check the fol-lowing:
must be correctly installed.
bustible material must be removed
from the engine compartment.
2. Lower the hood halfway and push down to securely lock in place.
HOOD
OYF049018OYFH041019N-1
WARNING
Before closing the hood, ensurethat all obstructions are removed
from the hood opening. Closing
the hood with an obstruction
present in the hood opening may
result in property damage or
severe personal injury.
Do not leave gloves, rags or any other combustible material in the
engine compartment. Doing so
may cause a heat-induced fire.
Always double check to be sure that the hood is firmly latched
before driving away. If it is not
latched, the hood could open
while the vehicle is being driven,
causing a total loss of visibility,
which might result in an accident.
Do not move the vehicle with the hood raised. The view will be
blocked and the hood could fall
or be damaged.
WARNING
Open the hood after turning off the
engine on a flat surface, shifting
the shift lever to the P(Park) posi-
tion for automatic transaxle and to
the 1st(First) gear or R(Reverse) for
manual transaxle, and setting the
parking brake.
Page 103 of 403
Features of your vehicle
22
4
Opening the fuel filler lid
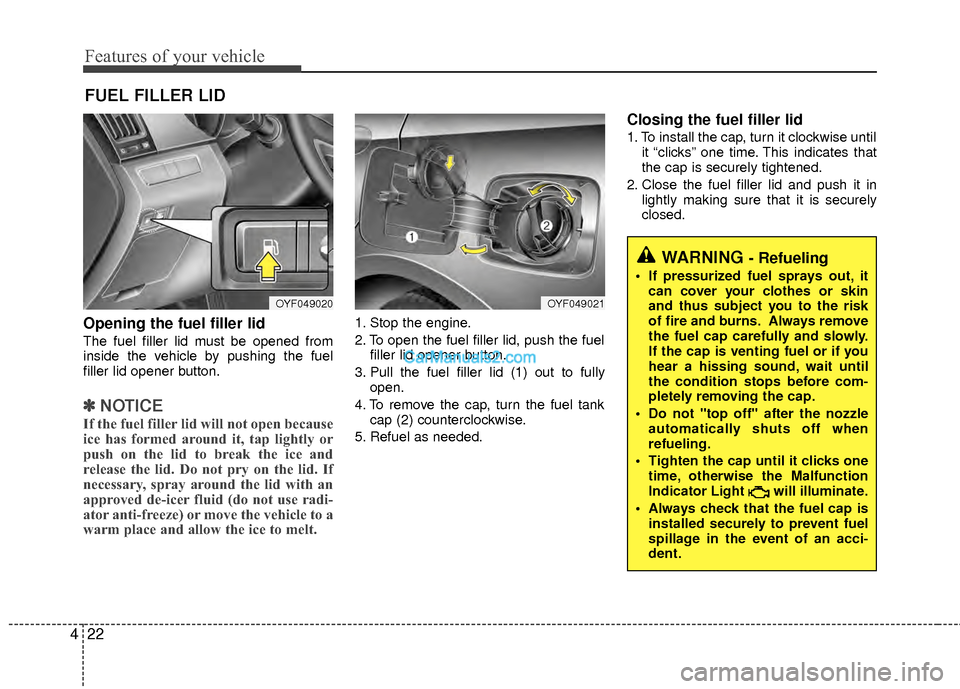
The fuel filler lid must be opened from
inside the vehicle by pushing the fuel
filler lid opener button.
✽ ✽
NOTICE
If the fuel filler lid will not open because
ice has formed around it, tap lightly or
push on the lid to break the ice and
release the lid. Do not pry on the lid. If
necessary, spray around the lid with an
approved de-icer fluid (do not use radi-
ator anti-freeze) or move the vehicle to a
warm place and allow the ice to melt.
1. Stop the engine.
2. To open the fuel filler lid, push the fuel
filler lid opener button.
3. Pull the fuel filler lid (1) out to fully open.
4. To remove the cap, turn the fuel tank cap (2) counterclockwise.
5. Refuel as needed.
Closing the fuel filler lid
1. To install the cap, turn it clockwise until it “clicks” one time. This indicates that
the cap is securely tightened.
2. Close the fuel filler lid and push it in lightly making sure that it is securely
closed.
FUEL FILLER LID
OYF049020OYF049021
WARNING - Refueling
If pressurized fuel sprays out, itcan cover your clothes or skin
and thus subject you to the risk
of fire and burns. Always remove
the fuel cap carefully and slowly.
If the cap is venting fuel or if you
hear a hissing sound, wait until
the condition stops before com-
pletely removing the cap.
Do not "top off" after the nozzle automatically shuts off when
refueling.
Tighten the cap until it clicks one time, otherwise the Malfunction
Indicator Light will illuminate.
Always check that the fuel cap is installed securely to prevent fuel
spillage in the event of an acci-
dent.
Page 110 of 403
429
Features of your vehicle
Electric power steering (EPS)
The power steering uses a motor to
assist you in steering the vehicle. If the
engine is off or if the power steering sys-
tem becomes inoperative, the vehicle
may still be steered, but it will require
increased steering effort.
The motor driven power steering is con-
trolled by a power steering control unit
which senses the steering wheel torque
and vehicle speed to command the
motor.
The steering becomes heavier as the
vehicle’s speed increases and becomes
lighter as the vehicle’s speed decreases
for optimum steering control.
Should you notice any change in the
effort required to steer during normal
vehicle operation, have the power steer-
ing checked by an authorized HYUNDAI
dealer.
✽ ✽NOTICE
The following symptoms may occur dur-
ing normal vehicle operation:
• The EPS warning light does not illumi-
nate.
• The steering effort is high immediately after turning the engine start/stop but-
ton on. This happens as the system
performs the EPS system diagnostics.
When the diagnostics is completed, the
steering wheel will return to its normal
condition.
• A click noise may be heard from the EPS relay after the engine start/stop
button is turned to the ON or LOCK
position.
• A motor noise may be heard when the vehicle is at a stop or at a low driving
speed.
• If the Electric Power Steering System does not operate normally, the warn-
ing light will illuminate on the instru-
ment cluster. The steering wheel may
become difficult to control or operate
abnormally. Take your vehicle to an
authorized HYUNDAI dealer and
have the vehicle checked as soon as
possible.
• When you operate the steering wheel in low temperature, noise could occur.
If temperature rises, the noise will dis-
appear. This is a normal condition.
STEERING WHEEL
CAUTION
If the Electric Power Steering
System does not operate normal-ly, the warning light will illuminateon the instrument cluster. Thesteering wheel may become diffi- cult to control or operate abnor-mally. Take your vehicle to anauthorized HYUNDAI dealer andhave the vehicle checked as soonas possible.
When you operate the steering wheel in low temperature, abnor-mal noise could occur. If tempera-ture rises, the noise will disap-pear. This is a normal condition.
Page 111 of 403
Features of your vehicle
30
4
Tilt steering Tilt steering allows you to adjust the
steering wheel before you drive. You can
also raise it to give your legs more room
when you exit and enter the vehicle.
The steering wheel should be positioned
so that it is comfortable for you to drive,
while permitting you to see the instru-
ment panel warning lights and gauges.
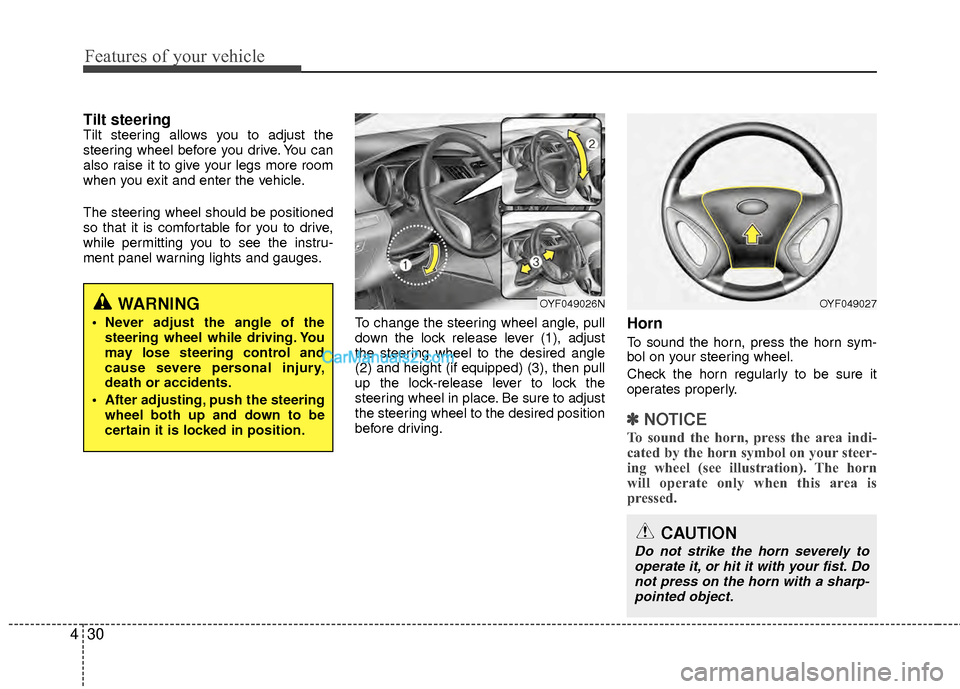
To change the steering wheel angle, pull
down the lock release lever (1), adjust
the steering wheel to the desired angle
(2) and height (if equipped) (3), then pull
up the lock-release lever to lock the
steering wheel in place. Be sure to adjust
the steering wheel to the desired position
before driving.
Horn
To sound the horn, press the horn sym-
bol on your steering wheel.
Check the horn regularly to be sure it
operates properly.
✽ ✽NOTICE
To sound the horn, press the area indi-
cated by the horn symbol on your steer-
ing wheel (see illustration). The horn
will operate only when this area is
pressed.
OYF049026NOYF049027
CAUTION
Do not strike the horn severely to
operate it, or hit it with your fist. Do not press on the horn with a sharp-pointed object.
WARNING
Never adjust the angle of the steering wheel while driving. You
may lose steering control and
cause severe personal injury,
death or accidents.
After adjusting, push the steering wheel both up and down to be
certain it is locked in position.
Page 115 of 403
Features of your vehicle
34
4
To adjust the Zone setting:
1. Determine the desired Zone Number
based upon your current location on
the Zone Map.
2. Press and hold the button for more than 3 but less than 6 seconds, the
current Zone Number will appear on
the display.
3. Pressing and holding the button again will cause the numbers to incre-
ment (Note: they will repeat …13, 14,
15, 1, 2, …). Releasing the button
when the desired Zone Number
appears on the display will set the new
Zone.
4. Within about 5 seconds the compass will start displaying a compass head-
ing again.
There are some conditions that can
cause changes to the vehicle magnets,
such as installing a ski rack or a CB
antenna. Body repair work on the vehicle
can also cause changes to the vehicle's
magnetic field. In these situations, the
compass will need to be re-calibrated to
quickly correct for these changes. To re-
calibrate the compass: 1. Press and hold the button for more
than 6 seconds. When the compass
memory is cleared a "C" will appear in
the display.
2. To calibrate the compass, drive the vehicle in 2 complete circles at less
than 5 mph (8 km/h).
Integrated HomeLink
®Wireless Control
System
The HomeLink® Wireless Control
System provides a convenient way to
replace up to three hand-held radio-fre-
quency (RF) transmitters with a single
built-in device. This innovative feature will
learn the radio frequency codes of most
current transmitters to operate devices
such as gate operators, garage door
openers, entry door locks, security sys-
tems, even home lighting. Both standard
and rolling code-equipped transmitters
can be programmed by following the out-
lined procedures. Additional HomeLink
®
information can be found at: www.home-
link.com or by calling 1-800-355-3515. Retain the original transmitter of the RF
device you are programming for use in
other vehicles as well as for future
HomeLink
®programming. It is also sug-
gested that upon the sale of the vehicle,
the programmed HomeLink
®buttons be
erased for security purposes.
CAUTION
Before programming HomeLink®to
a garage door opener or gate oper- ator, make sure that people and objects are out of the way of thedevice to prevent potential harm ordamage. Do not use HomeLink
®
with any garage door opener thatlacks the safety stop and reverse features required by U.S. federalsafety standards (this includes any garage door opener model manu-factured before April 1, 1982). Agarage door that cannot detect anobject - signaling the door to stop and reverse - does not meet currentU.S. federal safety standards. Using a garage door opener without thesefeatures increases the risk of seri- ous injury or death.
Page 117 of 403
Features of your vehicle
36
4
To train rolling code devices, follow these
instructions:
1. At the garage door opener receiver
(motor-head unit) in the garage, locate
the "learn" or "smart" button. This can
usually be found where the hanging
antenna wire is attached to the motor-
head unit. Exact location and color of
the button may vary by garage door
opener brand.
If there is difficulty locating the training
button, reference the device owner's
manual or please visit our Web site at
www.homelink.com.
2. Firmly press and release the "learn" or "smart" button (which activates the
"training light").
✽ ✽NOTICE
There are 30 seconds in which to initiate
step3.
3. Return to the vehicle, firmly press and
hold for two seconds the desired
HomeLink
®button then release.
Repeat the "press/hold/release"
sequence a second time to complete
the programming. (Some devices may
require you to repeat this sequence a
third time to complete the program-
ming.)
4. Press and hold the just-trained HomeLink
®button and observe the red
Status Indicator LED. If the indicator
light stays on constantly, programming
is complete and your device should
activate.
5. To program the remaining two HomeLink
®buttons, follow either steps
1 through 4 above for other Rolling
Code devices or steps 2 through 5 in
Standard Programming for standard
devices. Gate operator & Canadian program-
ming
During programming, your handheld
transmitter may automatically stop trans-
mitting. Continue to press the Integrated
HomeLink
®Wireless Control System but-
ton (note steps 2 through 4 in the
Standard Programming portion of this
document) while you press and re-press
("cycle") your handheld transmitter every
two seconds until the frequency signal
has been learned. The indicator light will
flash slowly and then rapidly after sever-
al seconds upon successful training.
Operating HomeLink
®
To operate, simply press and release the
programmed HomeLink®button.
Activation will now occur for the trained
device (i.e. garage door opener, gate
operator, security system, entry door
lock, home/office lighting, etc.). For con-
venience, the hand-held transmitter of
the device may also be used at any time.
Page 133 of 403
Features of your vehicle
52
4
Auto door lock
Off - The auto door lock operation will be
canceled.
Speed - All doors will be automatically
locked when the vehicle speed
exceeds 9.3mph (15km/h).
Shift Lever
All doors will be automatically locked if
the shift lever is shifted from the P(Park)
position to the R(Reverse), N(Neutral) or
D(Drive) position.
Auto door unlock
Off - The auto door unlock operation will
be canceled.
Key Out - All doors will be automatically
unlocked when smart key is
removed from the smart key
holder.
Door - All doors will be automatically
unlocked if the driver's door is
unlocked inside.
Shift Lever
All doors will be automatically unlocked if
the shift lever is shifted to the P(Park)
position.
Two-press unlock
Driver Door 1st Press - The driver's door
will unlock when pressing the unlock but-
ton on the transmitter or smart key, press-
ing the button of the driver's outside door
handle with the smart key, or inserting the
key into the key hole of the driver's out-
side door and turning the key toward the
rear of the vehicle. All doors will unlock
when pressing the unlock button on the
transmitter or smart key, pressing the but-
ton of the driver's outside door handle
with the smart key, or inserting the key
into the key hole of the driver's outside
door and turning the key toward the rear
of the vehicle within 4 seconds.
All Doors 1st Press - All doors will
unlock when pressing the unlock button
on the transmitter or smart key, pressing
the button of the driver's outside door
handle with the smart key, or inserting
the key into the key hole of the driver's
outside door and turning the key toward
the rear of the vehicle.
Headlamp delay
On - If you turn the engine start/stop but-
ton to the ACC or OFF position with
the headlamp ON, the headlamps
remain on for about 20 minutes.
Also, the headlamp welcome opera-
tion will be activated. Refer to the
[LIGHTING] section in this chapter.
Off - The headlamp delay and headlamp
welcome operation will be can-
celed.