Page 185 of 403
Features of your vehicle
104
4
Defogging logic
To reduce the probability of fogging up
the inside of the windshield, the air intake
is controlled automatically according to
certain conditions such as or
position. To cancel or return the defog-
ging logic, perform the following steps.
Automatic climate control system
1. Turn the engine start/stop button to the
ON position.
2. Select the defrost position pressing defrost button ( ).
3. While holding the air conditioning but- ton (A/C) pressed, press the air intake
control button at least 5 times within 3
seconds.
The indicator on the air intake control
button blinks 3 times with 0.5 second of
interval. It indicates that the defogging
logic is canceled or returned to the pro-
grammed status. If the battery has been discharged or dis-
connected, the system resets to the pro-
grammed defogging logic.
OYFH041220N-1
Page 189 of 403

Features of your vehicle
108
4
Power outlet
The power outlet is designed to provide
power for mobile telephones or other
devices designed to operate with vehicle
electrical systems. The devices should
draw less than 10 amps with the engine
running.
Digital clock (if equipped)
Whenever the battery terminals or relat-
ed fuses are disconnected, you must
reset the time.
When the engine start/stop button is in
the ACC or ON position, the clock but-
tons operate as follows:
CAUTION
Use the power outlet only when
the engine is running and removethe accessory plug after use.Using the accessory plug for pro-longed periods of time with the engine off could cause the bat-tery to discharge.
Only use 12V electric accessories which are less than 10A in elec-tric capacity.
Adjust the air-conditioner or heater to the lowest operatinglevel when using the power outlet.
Close the cover when not in use. Some electronic devices can cause electronic interference whenplugged into a vehicle’s power out-let. These devices may causeexcessive audio static and malfunc-tions in other electronic systems ordevices used in your vehicle.
WARNING
Do not put a finger or a foreign ele-
ment (pin, etc.) into a power outlet
and do not touch with a wet hand.
You may get an electric shock.
OYF049146NOYF049224
WARNING
Do not adjust the clock while driv-
ing. You may lose your steering
control and cause an accident that
results in severe personal injury or
death.
Page 193 of 403

Features of your vehicle
112
4
1. VOLUME (VOL+/-)
Push the lever upward (+) to increase the
volume.
Push the lever downward (-) to decrease the volume.
2. PRESET/SEEK ( / )
The SEEK/PRESET button has different
functions based on the system mode.
For the following functions the button
should be pressed for 0.8 second or
more.
RADIO mode
It will function as the AUTO SEEK select
button.
CD/USB/ iPod mode
It will function as the FF/REW button.
If the SEEK/PRESET button is pressed
for less than 0.8 second, it will work as
follows in each mode. RADIO mode
It will function as the PRESET STATION
buttons.
CD/USB/ iPod mode
It will function as TRACK UP/DOWN
button.
3. MODE
Press the button to change audio source.
- FM(1~2)
➟AM➟SAT(1~3)➟CD➟USB
AUX(iPod) FM...
Detailed information for audio control
buttons are described in the following
pages in this section.
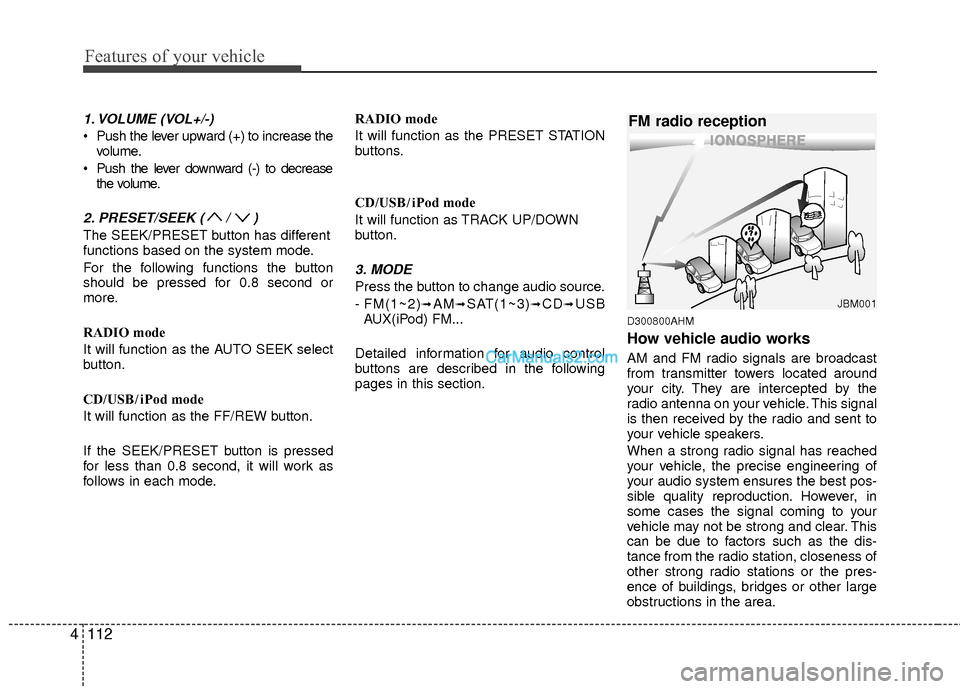
D300800AHM
How vehicle audio works
AM and FM radio signals are broadcast
from transmitter towers located around
your city. They are intercepted by the
radio antenna on your vehicle. This signal
is then received by the radio and sent to
your vehicle speakers.
When a strong radio signal has reached
your vehicle, the precise engineering of
your audio system ensures the best pos-
sible quality reproduction. However, in
some cases the signal coming to your
vehicle may not be strong and clear. This
can be due to factors such as the dis-
tance from the radio station, closeness of
other strong radio stations or the pres-
ence of buildings, bridges or other large
obstructions in the area.
JBM001
FM radio reception
Page 197 of 403
Features of your vehicle
116
4
1. AM Selection Button
2. FM Selection Button
3. Power ON/OFF Button & Volume Control
Knob
4. Preset Button
5. SCAN Button
6. MUTE Button
7. SETUP Button
8. Manual Channel Selector & Sound Quality Control Knob
RADIO, SET UP, VOLUME, AUDIO CONTROL
❋There will be no , logo if the Bluetooth/XM SATELLITE feature is not supported.
CD Player : PA710YF
Page 198 of 403
![Hyundai Sonata Hybrid 2012 Owners Manual 4117
Features of your vehicle
1. AM Selection Button
Pressing the [AM] button selects the AM
band. AM Mode is displayed on the LCD.
2. FM Selection Button
Turns to FM mode and toggles FM1and
FM2 when Hyundai Sonata Hybrid 2012 Owners Manual 4117
Features of your vehicle
1. AM Selection Button
Pressing the [AM] button selects the AM
band. AM Mode is displayed on the LCD.
2. FM Selection Button
Turns to FM mode and toggles FM1and
FM2 when](/manual-img/35/19651/w960_19651-197.png)
4117
Features of your vehicle
1. AM Selection Button
Pressing the [AM] button selects the AM
band. AM Mode is displayed on the LCD.
2. FM Selection Button
Turns to FM mode and toggles FM1and
FM2 when the button is pressed each
time.
3.Power ON/OFF Button & VolumeControl Knob
Turns on/off the set when the IGNITION
SWITCH is on ACC or ON. If the button
is turned to the right, it increases the vol-
ume and left,decreases the volume.
system. Rotate clockwise to increase
the volume or counterclockwise to
decrease.
4. Preset Button
Push [1]~[6] buttons less than 0.8 sec-
ond to play the channel saved in each
button.Push Preset button for 0.8 second
or longer to save current channel to the
respective button with a beep.
5. SCAN Button
ically scans the radio stations upwards.
station, starting from the initial station,
for ten seconds.
the scan feature and to listen to the cur-
rently selected channel.
6. MUTE Button
Press the button to mute the sound.
7. SETUP Button
Press this button to turn to the XM option
and the other adjustment mode.
If no action is taken for 5 seconds after
pressing the button, it will return to the
play mode.(After entering SEPUP mode,
move between items using the left, right
and PUSH functions of the [TUNE]
knob.)
The setup changes in the order of TEXT
SCROLL
➟AV C➟BT➟XM
This funtion is used to display characters
longer than the LCD text display and can
be turned ON/OFF through the sound
quality control knob.
This funtion automatically adjusts the
volume level according to the speed of
the vehicle and can be turned ON/OFF
through the sound quality control knob.
Page 207 of 403

Features of your vehicle
126
4
✽
✽
NOTICE FOR USING THE
iPod®DEVICE
• Some iPod models might not sup-
port the communication protocol
and the files will not be played.
Supported iPod models:
- iPod Mini
- iPod 4th(Photo) ~ 6th(Classic)
generation
- iPod Nano 1st~4th generation
- iPod Touch 1st~2nd generation
• The order of search or playback of songs in the iPod can be different
from the order searched in the
audio system.
• If the iPod disabled due to its own malfunction, reset the iPod. (Reset:
Refer to iPod manual)
• An iPod may not operate normally on low battery.
• Some iPod devices, such as the iPhone, can be connected through the
Bluetooth
®interface. The device
must have audio Bluetooth®capabili-
ty (such as for stereo headphone
Bluetooth
®). The device can play, but
it will not be controlled by the audio
system.
(Continued)
When the iPod cable is connected, the system can be switched to AUXmode even without iPod deviceand may cause noise. D isconnect
the iPod cable when you are not using the iPod device.
When not using iPod with car audio, detach the iPod cable fromiPod. Otherwise, iPod may remainin accessory mode, and may notwork properly.CAUTION IN USING THE
iPod®DEVICE
The Hyundai iPod Power Cable is
needed in order to operate iPodwith the audio buttons on theaudio system. The USB cable pro-vided by Apple may cause mal-function and should not be usedfor Hyundai vehicles.
❋ The Hyundai iPod Power Cable may be purchased through yourHyundai Dealership.
When connecting iPod with the iPod Power Cable, insert the con-nector to the multimedia socket completely. If not inserted com-pletely, communications betweeniPod and audio may be interrupted.
When adjusting the sound effects of the iPod and the audio system, thesound effects of both devices willoverlap and might reduce or distort the quality of the sound.
Deactivate (turn off) the equalizer function of an iPod when adjust-ing the audio system’s volume,and turn off the equalizer of theaudio system when using theequalizer of an iPod.
(Continued)
Page 209 of 403

Features of your vehicle
128
4
1. iPod Selection Button
If an iPod is connected, he system
switches to the iPod mode from the pre-
vious to play the song files stored in iPod.
If no CD and auxiliary device is connect-
ed, the system displays "NO Media" for 3
seconds and returns to the previous
mode
2. Track Moving Button
Press the [TRACK ] button for less
than 0.8 second to play from the begin-
ning of the song currently played.
Press the button for less than 0.8 sec-
ond and press it again within 1 sec-
onds to move and play the previous
track. Press the button for 0.8 second
or longer to play the song in reverse
direction in fast speed.
Press the [SEEK ] button for less than 0.8 second to move to the next
track. Press the button for 0.8 second
or longer to play the song in forward
direction in fast speed.
3. RANDOM Playback Button
Press the button for less than 0.8 second
to activate or deactivate the random play-
back of the songs within the current cat-
egory. Press the button for longer than
0.8 second to randomly play all songs in
the entire album of iPod. Press the button
once again to cancel the mode.
4. REPEAT Button
Repeats the song currently played.
5. INFO Selection Button
Displays the information of the file cur-
rently played in the order of TITLE➟ARTIST➟ALBUM➟NORMAL DISPLAY➟TITLE➟... (Displays no information if the
file has no song information.)
6. Category Selection Button
Moves to the upper category from cur-
rently played category of iPod.
To move to(play) the category(song) dis-
played, MENU(preset6) You will be able
to search through the lower category of
the selected category.
The order of iPod's category is SONG,
ALBUMES ARTISTS, GENRES, and
iPod.
7. Search/ENTER Button
When you turn the button clockwise, it
will display the songs(category) next to
the song currently played(category in the
same level). Also, when you turn the but-
ton counterclockwise, it will display the
songs(category) before the song current-
ly played (category in the same level).
If you want to listen to the song displayed
in the song category, press the button,
then it will skip to the selected song and
play.
Page 210 of 403
4129
Features of your vehicle
1. XM Selection Button
2. INFO Button
3. Automatic Channel Selection Button
4. SCAN Button
5. CATEGORY Search Button
6. Manual Channel Selection Button
7. Preset Button
XM SATELLITE RADIO
❋There will be no , logo if the Bluetooth/XM SATELLITE feature is not supported.
CD Player : PA710YF