2012 Hyundai Sonata Hybrid ABS
[x] Cancel search: ABSPage 244 of 403
Driving your vehicle
22
5
ESC OFF usage
When driving
ESC should be turned on for daily driv-
ing whenever possible.
To turn ESC off while driving, press the ESC OFF button while driving on a flat
road surface.
Never press the ESC OFF button while
ESC is operating (ESC indicator light
blinks).
If ESC is turned off while ESC is operat-
ing, the vehicle may slip out of control.
✽ ✽ NOTICE
• When operating the vehicle on a
dynamometer, ensure that the ESC is
turned off (ESC OFF light illuminated).
• Turning the ESC off does not affect ABS or brake system operation.
Hill-start assist control (HAC)
(if equipped)
A vehicle has the tendency to slip back
on a steep hill when it starts to go after
stopping. The Hill-start Assist Control
(HAC) prevents the vehicle from slipping
back by operating the brakes automati-
cally for about 2 seconds. The brakes are
released when the accelerator pedal is
depressed or after about 2 seconds.
✽ ✽ NOTICE
• The HAC does not operate when the
transaxle shift lever is in the P (Park)
or N (Neutral) position.
• The HAC activates even though the ESC is off but it does not activate
when the ESC has malfunctioned.
WARNING
Never press the ESC OFF button
while ESC is operating.
If the ESC is turned off while ESC is
operating, the vehicle may go out of
control.
To turn ESC off while driving, press
the ESC OFF button while driving
on a flat road surface.
WARNING
The HAC is activated only for about
2 seconds, so when the vehicle is
starting off always depress the
accelerator pedal.
Page 252 of 403
Driving your vehicle
30
5
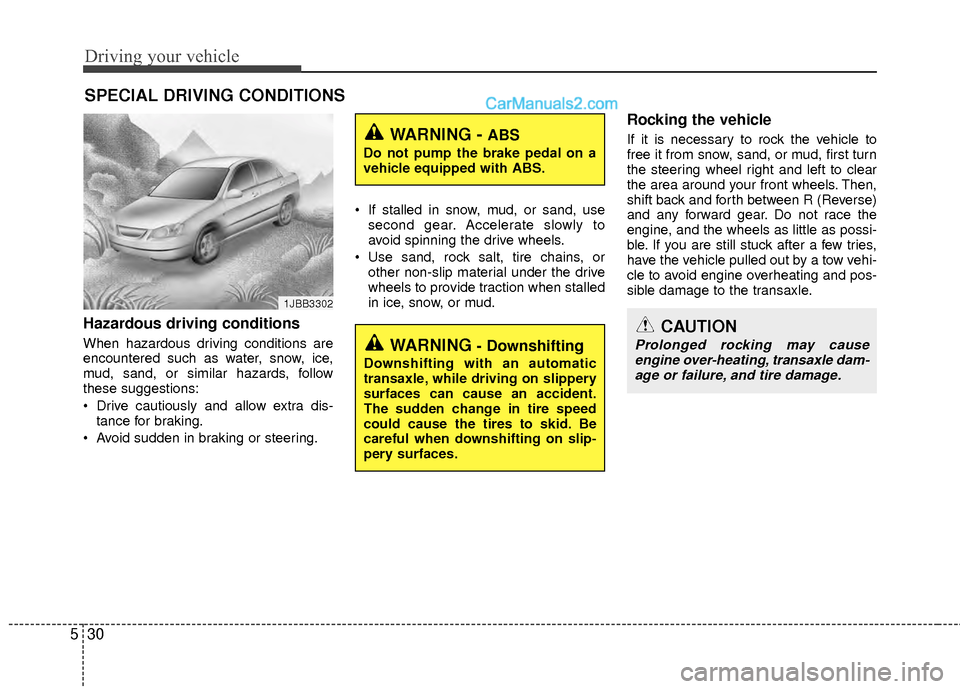
Hazardous driving conditions
When hazardous driving conditions are
encountered such as water, snow, ice,
mud, sand, or similar hazards, follow
these suggestions:
Drive cautiously and allow extra dis-
tance for braking.
Avoid sudden in braking or steering. If stalled in snow, mud, or sand, use
second gear. Accelerate slowly to
avoid spinning the drive wheels.
Use sand, rock salt, tire chains, or other non-slip material under the drive
wheels to provide traction when stalled
in ice, snow, or mud.
Rocking the vehicle
If it is necessary to rock the vehicle to
free it from snow, sand, or mud, first turn
the steering wheel right and left to clear
the area around your front wheels. Then,
shift back and forth between R (Reverse)
and any forward gear. Do not race the
engine, and the wheels as little as possi-
ble. If you are still stuck after a few tries,
have the vehicle pulled out by a tow vehi-
cle to avoid engine overheating and pos-
sible damage to the transaxle.
SPECIAL DRIVING CONDITIONS
1JBB3302
WARNING - ABS
Do not pump the brake pedal on a
vehicle equipped with ABS.
WARNING - Downshifting
Downshifting with an automatic
transaxle, while driving on slippery
surfaces can cause an accident.
The sudden change in tire speed
could cause the tires to skid. Be
careful when downshifting on slip-
pery surfaces.
CAUTION
Prolonged rocking may causeengine over-heating, transaxle dam- age or failure, and tire damage.
Page 334 of 403
741
Maintenance
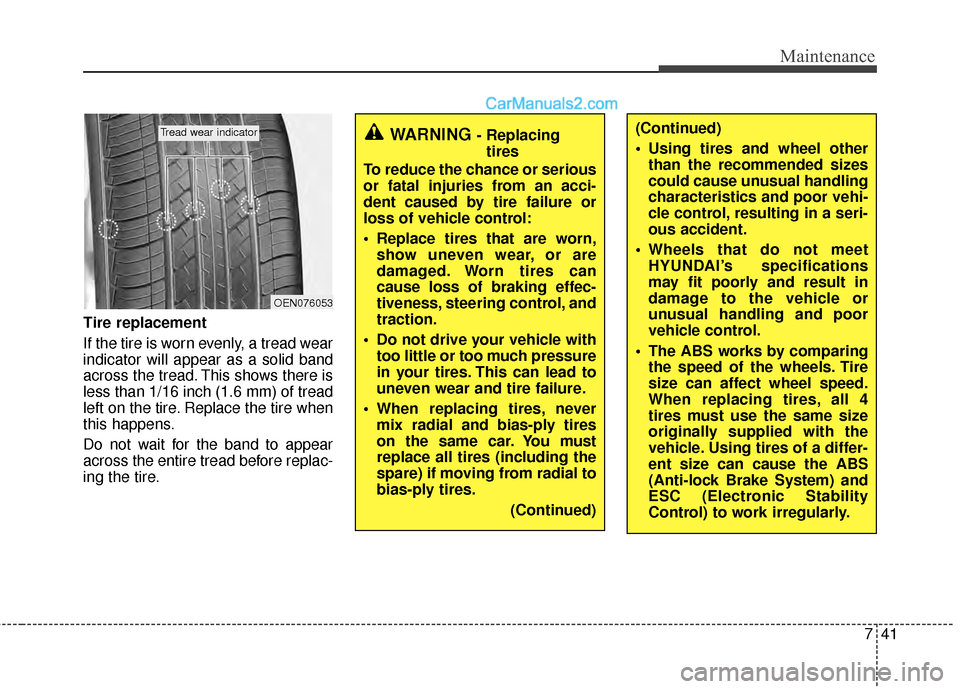
Tire replacement
If the tire is worn evenly, a tread wear
indicator will appear as a solid band
across the tread. This shows there is
less than 1/16 inch (1.6 mm) of tread
left on the tire. Replace the tire when
this happens.
Do not wait for the band to appear
across the entire tread before replac-
ing the tire.
OEN076053
Tread wear indicatorWARNING - Replacingtires
To reduce the chance or serious
or fatal injuries from an acci-
dent caused by tire failure or
loss of vehicle control:
Replace tires that are worn, show uneven wear, or are
damaged. Worn tires can
cause loss of braking effec-
tiveness, steering control, and
traction.
Do not drive your vehicle with too little or too much pressure
in your tires. This can lead to
uneven wear and tire failure.
When replacing tires, never mix radial and bias-ply tires
on the same car. You must
replace all tires (including the
spare) if moving from radial to
bias-ply tires.
(Continued)(Continued)
Using tires and wheel otherthan the recommended sizes
could cause unusual handling
characteristics and poor vehi-
cle control, resulting in a seri-
ous accident.
Wheels that do not meet HYUNDAI’s specifications
may fit poorly and result in
damage to the vehicle or
unusual handling and poor
vehicle control.
The ABS works by comparing the speed of the wheels. Tire
size can affect wheel speed.
When replacing tires, all 4
tires must use the same size
originally supplied with the
vehicle. Using tires of a differ-
ent size can cause the ABS
(Anti-lock Brake System) and
ESC (Electronic Stability
Control) to work irregularly.
Page 356 of 403
763
Maintenance
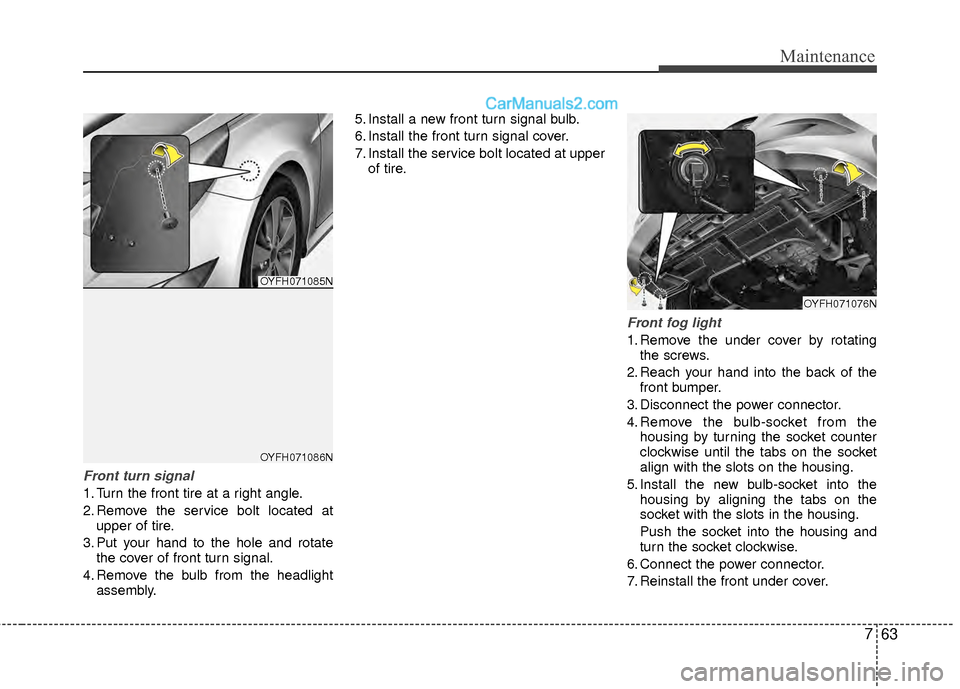
Front turn signal
1. Turn the front tire at a right angle.
2. Remove the service bolt located atupper of tire.
3. Put your hand to the hole and rotate the cover of front turn signal.
4. Remove the bulb from the headlight assembly. 5. Install a new front turn signal bulb.
6. Install the front turn signal cover.
7. Install the service bolt located at upper
of tire.
Front fog light
1. Remove the under cover by rotatingthe screws.
2. Reach your hand into the back of the front bumper.
3. Disconnect the power connector.
4. Remove the bulb-socket from the housing by turning the socket counter
clockwise until the tabs on the socket
align with the slots on the housing.
5. Install the new bulb-socket into the housing by aligning the tabs on the
socket with the slots in the housing.
Push the socket into the housing and
turn the socket clockwise.
6. Connect the power connector.
7. Reinstall the front under cover.
OYFH071076N
OYFH071085N
OYFH071086N
Page 358 of 403
765
Maintenance
3. Remove the socket from the assemblyby turning the socket counterclockwise
until the tabs on the socket align with
the slots on the assembly.
4. Remove the bulb from the socket by pressing it in and rotating it counter-
clockwise until the tabs on the bulb
align with the slots in the socket. Pull
the bulb out of the socket.
5. Insert a new bulb by inserting it into the socket and rotating it until it locks
into place.
6. Install the socket in the assembly by aligning the tabs on the socket with the
slots in the assembly. Push the socket
into the assembly and turn the socket
clockwise.
7. Install the service cover by putting it into the service hole.
Tail light, stop and tail light,side marker, light curtain
If the light is not operating, have the vehi-
cle checked by an authorized HYUNDAI
dealer.
1. Open the trunk lid.
2. Remove the service cover by pulling out the service cover.
3. Remove the socket from the assembly by turning the socket counterclockwise
until the tabs on the socket align with
the slots on the assembly.
4. Remove the bulb from the socket by pressing it in and rotating it counter-
clockwise until the tabs on the bulb
align with the slots in the socket. Pull
the bulb out of the socket. 5. Insert a new bulb by inserting it into
the socket and rotating it until it locks
into place.
6. Install the socket in the assembly by aligning the tabs on the socket with the
slots in the assembly. Push the socket
into the assembly and turn the socket
clockwise.
7. Install the service cover by putting it into the service hole.
OYFH071087N
Page 361 of 403
Maintenance
68
7
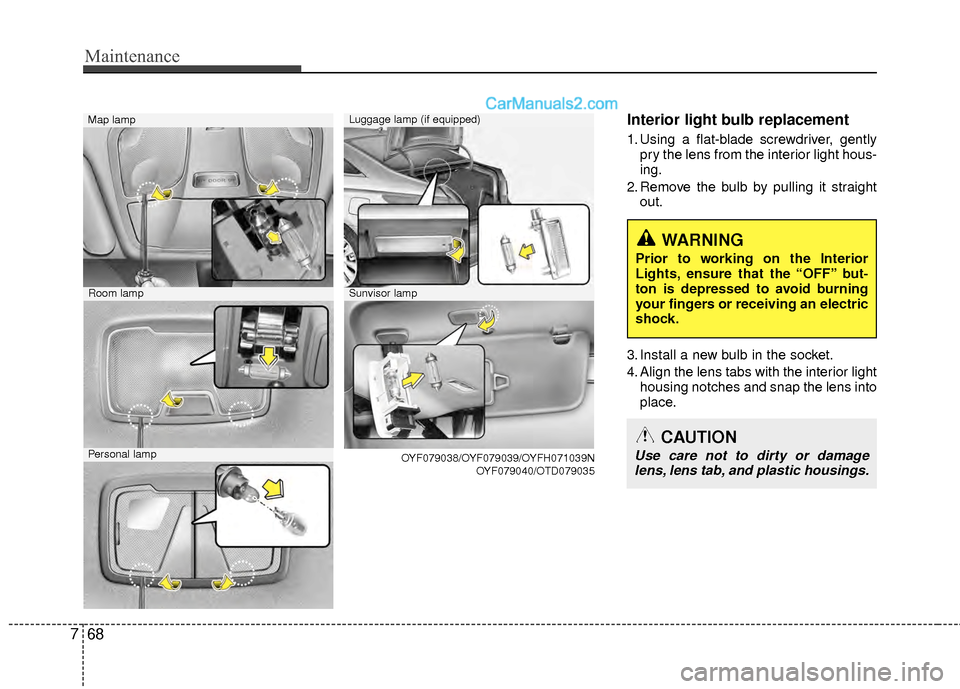
Interior light bulb replacement
1. Using a flat-blade screwdriver, gently
pry the lens from the interior light hous-
ing.
2. Remove the bulb by pulling it straight out.
3. Install a new bulb in the socket.
4. Align the lens tabs with the interior light housing notches and snap the lens into
place.
WARNING
Prior to working on the Interior
Lights, ensure that the “OFF” but-
ton is depressed to avoid burning
your fingers or receiving an electric
shock.
CAUTION
Use care not to dirty or damagelens, lens tab, and plastic housings.
Map lampLuggage lamp (if equipped)
Room lamp
Personal lamp OYF079038/OYF079039/OYFH071039N
OYF079040/OTD079035
Sunvisor lamp
Page 368 of 403
775
Maintenance
EMISSION CONTROL SYSTEM
The emission control system of your
vehicle is covered by a written limited
warranty. Please see the warranty infor-
mation contained in the Owner’s
Handbook & Warranty Information book-
let in your vehicle.
Your vehicle is equipped with an emis-
sion control system to meet all applicable
emission regulations.
There are three emission control sys-
tems, as follows.
(1) Crankcase emission control system
(2) Evaporative emission control system
(3) Exhaust emission control system
In order to assure the proper function of
the emission control systems, it is rec-
ommended that you have your car
inspected and maintained by an author-
ized HYUNDAI dealer in accordance with
the maintenance schedule in this manu-
al.Caution for the Inspection and
Maintenance Test (With Electronic
Stability Control (ESC) system)
To prevent the vehicle from misfir-
ing during dynamometer testing,
turn the Electronic Stability Control
(ESC) system off by pressing the
ESC switch.
After dynamometer testing is com- pleted, turn the ESC system back on
by pressing the ESC switch again.
1. Crankcase emission control system
The positive crankcase ventilation sys-
tem is employed to prevent air pollution
caused by blow-by gases being emitted
from the crankcase. This system supplies
fresh filtered air to the crankcase through
the air intake hose. Inside the crankcase,
the fresh air mixes with blow-by gases,
which then pass through the PCV valve
into the induction system.
2. Evaporative emission control(including ORVR: Onboard
Refueling Vapor Recovery)
system
The Evaporative Emission Control
System is designed to prevent fuel vapors
from escaping into the atmosphere.
(The ORVR system is designed to allow
the vapors from the fuel tank to be
loaded into a canister while refueling at
the gas station, preventing the escape of
fuel vapors into the atmosphere.)
Canister
Fuel vapors generated inside the fuel
tank are absorbed and stored in the
onboard canister. When the engine is
running, the fuel vapors absorbed in the
canister are drawn into the surge tank
through the purge control solenoid valve.
Purge Control Solenoid Valve (PCSV)
The purge control solenoid valve is con-
trolled by the Engine Control Module
(ECM); when the engine coolant tempera-
ture is low during idling, the PCSV closes
so that evaporated fuel is not taken into
the engine. After the engine warms-up
during ordinary driving, the PCSV opens
to introduce evaporated fuel to the engine.
Page 396 of 403
Index
2I
Air bags··················\
··················\
··················\
··················\
··3-35Air bag warning label··················\
··················\
············3-62
Air bag warning light ··················\
··················\
············3-38
Curtain air bag··················\
··················\
··················\
·····3-53
Driver's and passenger's front air bag ··················\
·····3-48
Occupant classification system ··················\
···············3-42
Side impact air bag··················\
··················\
················3-52
SRS components and functions ··················\
··············3-39
Air cleaner ··················\
··················\
··················\
···············7-30
Antenna (glass) ··················\
··················\
··················\
······4-111
Anti-lock brake system (ABS) ··················\
··················\
··5-18
Appearance care··················\
··················\
··················\
·······7-69 Exterior care ··················\
··················\
··················\
········7-69
Interior care ··················\
··················\
··················\
·········7-73
Armrest ··················\
··················\
··················\
··················\
··3-13
Audio system ··················\
··················\
··················\
·········4-111 Glass antenna ··················\
··················\
··················\
·····4-111
Steering wheel audio control ··················\
·················4-111
Automatic climate control system (Type A)··················\
4-80 Air conditioning ··················\
··················\
··················\
··4-88
Climate control air filter··················\
··················\
········4-90
Economy air conditioning ··················\
··················\
·····4-87
Heating and air conditioning··················\
··················\
·4-81
Automatic climate control system (Type B)··················\
4-91 Air conditioning ··················\
··················\
··················\
··4-99
Automatic heating and air conditioning··················\
··4-92
Economy air conditioning ··················\
··················\
·····4-98 Manual heating and air conditioning ··················\
······4-93
Automatic transaxle ··················\
··················\
··················\
···5-9 Shift lock system ··················\
··················\
··················\
·5-12
Aux, USB and iPod port ··················\
··················\
··········4-110
Battery ··················\
··················\
··················\
··············7-34, 8-2
Battery saver function··················\
··················\
················4-69
Before driving ··················\
··················\
··················\
············5-3
Bottle holders, see cup holders ··················\
··················\
4-106
Brake system··················\
··················\
··················\
············5-14 Anti-lock brake system (ABS) ··················\
················5-18
Electronic stability control (ESC) ··················\
···········5-19
Hill-start assist control (HAC) ··················\
················5-22
Parking brake ··················\
··················\
··················\
······5-16
Power brakes ··················\
··················\
··················\
·······5-14
Brakes fluid··················\
··················\
··················\
··············7-27
Bulb replacement ··················\
··················\
··················\
·····7-60
Bulb wattage ··················\
··················\
··················\
·············8-3
Button start/stop, see engine start/stop button·················5-5
California perchlorate notice ··················\
··················\
·····7-78
Camera (Rear view) ··················\
··················\
··················\
·4-68
Capacities (Lubricants) ··················\
··················\
···············8-5
Capacity/Weight ·················\
··················\
··················\
·········8-2
A
B
C