Page 299 of 403

Maintenance
67
At least monthly:
Check coolant level in the enginecoolant reservoir and inverter coolant.
Check the operation of all exterior lights, including the stoplights, turn sig-
nals and hazard warning flashers.
Check the inflation pressures of all tires including the spare.
At least twice a year (i.e., every Spring and Fall):
Check radiator, heater and air condi- tioning hoses for leaks or damage.
Check windshield washer spray and wiper operation. Clean wiper blades
with clean cloth dampened with wash-
er fluid.
Check headlight alignment.
Check muffler, exhaust pipes, shields and clamps.
Check the lap/shoulder belts for wear and function.
Check for worn tires and loose wheel lug nuts.
At least once a year:
Clean body and door drain holes.
Lubricate door hinges and checks, andhood hinges.
Lubricate door and hood locks and latches.
Lubricate door rubber weatherstrips.
Check the air conditioning system.
Inspect and lubricate automatic transaxle linkage and controls.
Clean battery and terminals.
Check the brake fluid level.
Check the drive belt.
Page 318 of 403

725
Maintenance
Check the condition and connections of
all cooling system hoses and heater
hoses. Replace any swollen or deterio-
rated hoses.
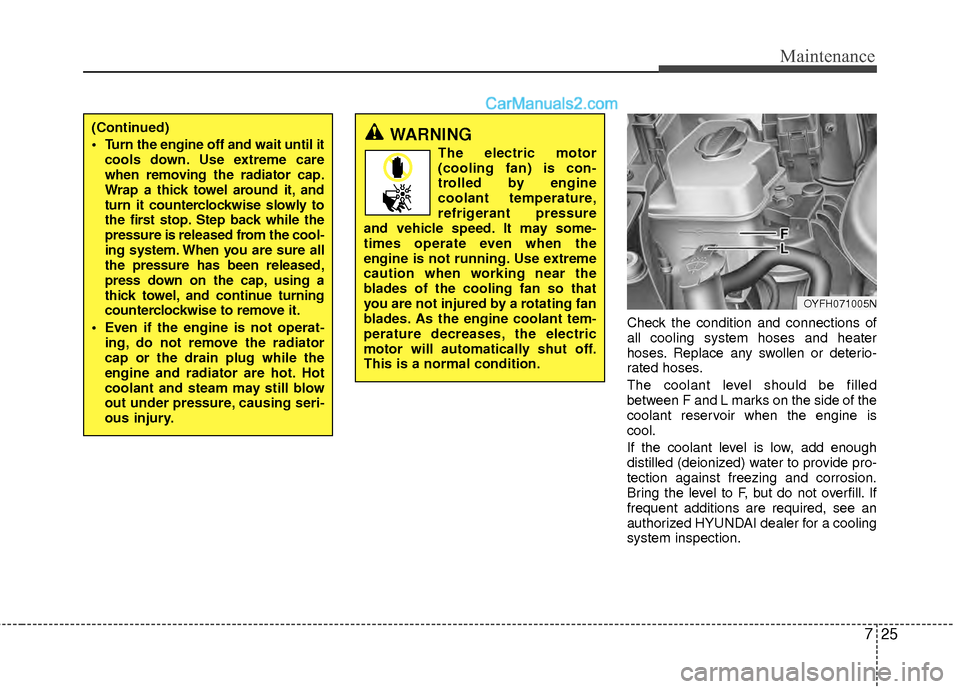
The coolant level should be filled
between F and L marks on the side of the
coolant reservoir when the engine is
cool.
If the coolant level is low, add enough
distilled (deionized) water to provide pro-
tection against freezing and corrosion.
Bring the level to F, but do not overfill. If
frequent additions are required, see an
authorized HYUNDAI dealer for a cooling
system inspection.
OYFH071005N
(Continued)
Turn the engine off and wait until itcools down. Use extreme care
when removing the radiator cap.
Wrap a thick towel around it, and
turn it counterclockwise slowly to
the first stop. Step back while the
pressure is released from the cool-
ing system. When you are sure all
the pressure has been released,
press down on the cap, using a
thick towel, and continue turning
counterclockwise to remove it.
Even if the engine is not operat- ing, do not remove the radiator
cap or the drain plug while the
engine and radiator are hot. Hot
coolant and steam may still blow
out under pressure, causing seri-
ous injury.WARNING
The electric motor
(cooling fan) is con-
trolled by engine
coolant temperature,
refrigerant pressure
and vehicle speed. It may some-
times operate even when the
engine is not running. Use extreme
caution when working near the
blades of the cooling fan so that
you are not injured by a rotating fan
blades. As the engine coolant tem-
perature decreases, the electric
motor will automatically shut off.
This is a normal condition.
Page 322 of 403
729
Maintenance
AIR CLEANER
Filter replacement
It must be replaced when necessary, and
should not be cleaned and reused.
You can clean the filter when inspecting
the air cleaner element.
Clean the filter by using compressed air.1. Loosen the air cleaner cover attaching
clips and open the cover. 2. Wipe the inside of the air cleaner.
3. Replace the air cleaner filter.
4. Lock the cover with the cover attaching
clips.
OYFH071011NOYFH071012NOYF079013
Page 324 of 403
731
Maintenance
2. With the glove box open, remove thestoppers by turning them counter-
clockwise on both sides. 3. Remove the climate control air filter
cover while pressing the lock on the
right of the cover. 4. Replace the climate control air filter.
5. Reassemble in the reverse order of
disassembly.
✽ ✽NOTICE
When replacing the climate control air
filter install it properly. Otherwise, the
system may produce noise and the effec-
tiveness of the filter may be reduced.
OYF079016OYF079015OYF079046
Page 329 of 403

Maintenance
36
7
Reset items
Items should be reset after the battery
has been discharged or the battery has
been disconnected.
Auto up/down window (See section 4)
Sunroof (See section 4)
Trip computer (See section 4)
Climate control system
(See section 4)
Clock (See section 4)
Audio (See section 4)WARNING
Before performing maintenance or recharging the battery, turn off
all accessories and stop the
engine.
The negative battery cable must be removed first and installed
last when the battery is discon-
nected.
Operation related to the battery should be done in an authorized
HYUNDAI dealer.
WARNING- Rechargingbattery
When recharging the battery,
observe the following precautions:
The battery must be removed
from the vehicle and placed in an
area with good ventilation.
Do not allow cigarettes, sparks, or flame near the battery.
Watch the battery during charg- ing, and stop or reduce the charg-
ing rate if the battery cells begin
gassing (boiling) violently or if
the temperature of the electrolyte
of any cell exceeds 120°F (49°C).
Wear eye protection when check- ing the battery during charging.
Disconnect the battery charger in the following order.
1. Turn off the battery charger main switch.
2. Unhook the negative clamp from the negative battery terminal.
3. Unhook the positive clamp from the positive battery terminal.
Page 334 of 403

741
Maintenance
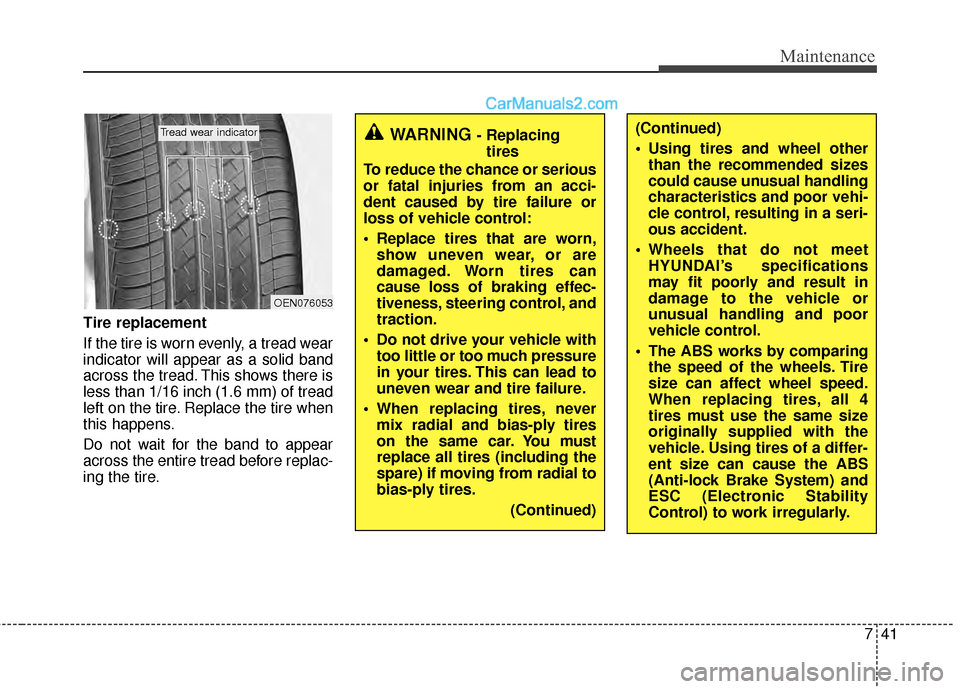
Tire replacement
If the tire is worn evenly, a tread wear
indicator will appear as a solid band
across the tread. This shows there is
less than 1/16 inch (1.6 mm) of tread
left on the tire. Replace the tire when
this happens.
Do not wait for the band to appear
across the entire tread before replac-
ing the tire.
OEN076053
Tread wear indicatorWARNING - Replacingtires
To reduce the chance or serious
or fatal injuries from an acci-
dent caused by tire failure or
loss of vehicle control:
Replace tires that are worn, show uneven wear, or are
damaged. Worn tires can
cause loss of braking effec-
tiveness, steering control, and
traction.
Do not drive your vehicle with too little or too much pressure
in your tires. This can lead to
uneven wear and tire failure.
When replacing tires, never mix radial and bias-ply tires
on the same car. You must
replace all tires (including the
spare) if moving from radial to
bias-ply tires.
(Continued)(Continued)
Using tires and wheel otherthan the recommended sizes
could cause unusual handling
characteristics and poor vehi-
cle control, resulting in a seri-
ous accident.
Wheels that do not meet HYUNDAI’s specifications
may fit poorly and result in
damage to the vehicle or
unusual handling and poor
vehicle control.
The ABS works by comparing the speed of the wheels. Tire
size can affect wheel speed.
When replacing tires, all 4
tires must use the same size
originally supplied with the
vehicle. Using tires of a differ-
ent size can cause the ABS
(Anti-lock Brake System) and
ESC (Electronic Stability
Control) to work irregularly.
Page 345 of 403

Maintenance
52
7
✽
✽
NOTICE
• If the memory fuse is pulled up from
the fuse panel, the warning chime,
audio, clock and interior lamps, etc.,
will not operate. Some items must be
reset after replacement. Refer to
“Battery” in this section.
• Even though the memory fuse is pulled up, the battery can still be dis-
charged by operation of the head-
lights or other electrical devices.
Engine compartment fuse
replacement
1. Turn the engine start/stop button and
all other switches off.
2. Remove the fuse panel cover by pressing the tab and pulling up. 3. Check the removed fuse; replace it if it
is blown. To remove or insert the fuse,
use the fuse puller in the engine com-
partment fuse panel.
4. Push in a new fuse of the same rating, and make sure it fits tightly in the clips.
If it fits loosely, consult an authorized
HYUNDAI dealer.
OYFH071023N
CAUTION
After checking the fuse panel in theengine compartment, securelyinstall the fuse panel cover. If not, electrical failures may occur fromwater contact.
Page 348 of 403

755
Maintenance
Inner fuse panel (Driver’s side fuse panel)
DescriptionFuse rating Protected component
P/SEAT DRI 30A Driver Manual Switch
AMP 30A JBL AMP, AMP
TRUNK 10A I/P Junction Box (Trunk Lid Relay), Fuel Filler Door & Trunk Lid Switch
SAFETY POWER WINDOW 25A Safety Power Window Module
P/WDW LH 25A Power Window Main Switch, Rear Power Window Switch LH
MODULE HEV 7.5A Low DC Converter, Hybrid Inverter, BMS Control Module
BMS 10A BMS Control Module
START 2 7.5A Fob Holder, Start Stop Button Switch, PDM, Stop Lamp Switch, Smart Key Module
MODULE 3 7.5AE/R Fuse & Relay Box (AUX Water Pump Relay), Sport Mode Switch, Key Solenoid,
Active Air Flap
P/WDW RH 25A Power Window Main Switch, Rear Power Window Switch RH
HTD MIRR 10A Driver Power Outside Mirror, Passenger Power Outside Mirror
P/SEAT ASST 20A Passenger Power Seat
S/HEATER FRT 15A Driver Seat Warmer Module, Passenger Seat Warmer Module
PDM 25A PDM
CLOCK 10ASmart Key Module, PDM, BCM, Front Monitor, Clock, Rear Camera Module,
A/V & Navigation Head Unit, Audio, Overhead Console Lamp, AMP, JBL AMP,
Power Outside Mirror Switch
A/CON 7.5A E/R Fuse & Relay Box (Blower Relay), A/C Control Module
S/HTR RR 20A Rear Seat Warmer Switch LH, Rear Seat Warmer Switch RH
SUN ROOF 20A Panorama Sunroof
POWER OUTLET 1 15A Front Power Outlet RH
MODULE 2 7.5A Rear Camera Module, BCM
Spare 20A -