2012 HYUNDAI IX35 wheel nut
[x] Cancel search: wheel nutPage 5 of 560
15
Introduction
Biodiesel
Commercially supplied Diesel blends of no more than 7% biodiesel, commonly
known as "B7 Diesel" may be used in
your vehicle if Biodiesel meets EN 14214
or equivalent specifications. (EN stands
for "European Norm"). The use of biofu-
els exceeding 7%, made from rapeseed
methyl ester (RME), fatty acid methyl
ester (FAME), vegetable oil methyl ester
(VME) etc. or mixing diesel exceeding7% with biodiesel will cause increased
wear or damage to the engine and fuel
system. Repair or replacement of worn ordamaged components due to the use of
non approved fuels will not be covered by
the manufactures warranty.As with other vehicles of this type, failure
to operate this vehicle correctly mayresult in loss of control, an accident or
vehicle rollover.
Specific design characteristics (higher
ground clearance, track, etc.) give this
vehicle a higher centre of gravity than
other types of vehicles. In other words
they are not designed for cornering at the
same speeds as conventional 2-wheel
drive vehicles. Avoid sharp turns or
abrupt manoeuvres. Again, failure to
operate this vehicle correctly may result
in loss of control, an accident or vehicle
rollover.
Be sure to read the “Reducing
the risk of a rollover” driving guide-
lines, in section 5 of this manual. No special run-in period is needed. By
following a few simple precautions for the
first 600 miles (1,000 km) you may add to
the performance, economy and life of
your vehicle.
Do not race the engine.
Whilst driving, keep your engine speed
(rpm, or revolutions per minute)
between 2,000 rpm and 4,000 rpm.
Do not maintain a single speed for long
periods of time, either fast or slow.
Varying engine speed is needed to
properly run-in the engine.
Avoid hard stops, except in emergen- cies, to allow the brakes to seat prop-
erly.
Don't let the engine idle longer than 3
minutes at one time.
Don't tow a trailer/caravan during the first 1,200 miles (2,000 km) of opera-tion.
CAUTION
Never use any fuel, whether
diesel, B7 biodiesel or otherwise,that fails to meet the latest petro-leum industry specification.
Never use any fuel additives or treatments that are not recom-
mended or approved by the vehi-cle manufacturer.
VEHICLE HANDLING
INSTRUCTIONS VEHICLE RUN-IN PROCESS
EL UK 1.QXP 1/12/2010 2:51 PM Page 5
Page 108 of 560

433
Features of your vehicle
Electric power steering (if equipped)
Power steering uses the motor to assist
you in steering the vehicle. If the engine
is off or if the power steering system
becomes inoperative, the vehicle may
still be steered, but it will require
increased steering effort.
The motor driven power steering is con-
trolled by the power steering control unit
which senses the steering wheel torque
and vehicle speed to command the
motor.
The steering wheel becomes heavier as
the vehicle’s speed increases and
becomes lighter as the vehicle’s speed
decreases for better control of the steer-ing wheel.
Should you notice any change in the
effort required to steer during normal
vehicle operation, have the power steer-
ing checked by an authorized HYUNDAI
dealer.✽✽NOTICE
The following symptoms may occur dur-
ing normal vehicle operation:
The EPS warning light does not illumi- nate.
The steering effort is high immediately after turning the ignition switch on.
This happens as the system performs
the EPS system diagnostics. When the
diagnostics is completed, the steering
wheel will return to its normal condi-
tion.
A click noise may be heard from the
EPS relay after the ignition switch is
turned to the ON or LOCK position.
Motor noise may be heard when the vehicle is at a stop or at a low driving
speed.
The steering effort can suddenly
increase, if the operation of the EPS
system is stopped to prevent serious
accidents when it detects malfunction
of the EPS system by self-diagnosis.
The steering effort increases if the steering wheel is rotated continuously
when the vehicle is not in motion.
However, after a few minutes, it will
return to its normal conditions.
(Continued)(Continued)
If the Electric Power Steering System
does not operate normally, the warn-
ing light will illuminate on the instru-
ment cluster. The steering wheel may
become difficult to control or operate
abnormally. Take your vehicle to an
authorized HYUNDAI dealer and
have the vehicle checked as soon as
possible.
When you operate the steering wheel
in low temperature, abnormal noise
could occur. If temperature rises, the
noise will disappear. This is a normal
condition.
STEERING WHEEL
Page 300 of 560
What to do in an emergency
8
6
TYRE PRESSURE MONITORING SYSTEM (TPMS) (IF EQUIPPED)
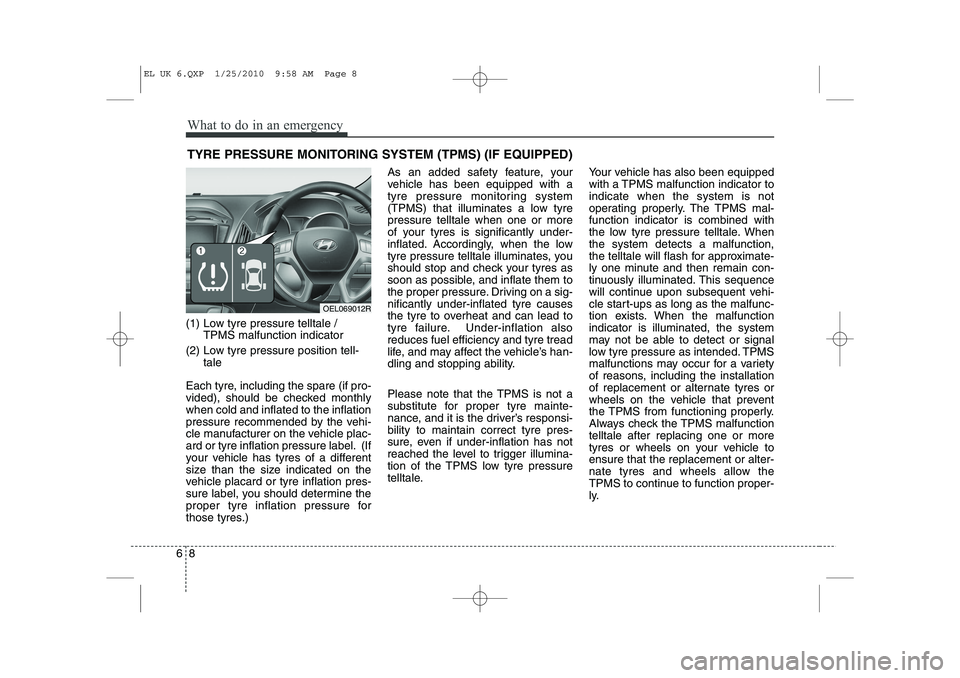
(1) Low tyre pressure telltale / TPMS malfunction indicator
(2) Low tyre pressure position tell- tale
Each tyre, including the spare (if pro-
vided), should be checked monthlywhen cold and inflated to the inflation
pressure recommended by the vehi-
cle manufacturer on the vehicle plac-
ard or tyre inflation pressure label. (If
your vehicle has tyres of a different
size than the size indicated on the
vehicle placard or tyre inflation pres-
sure label, you should determine the
proper tyre inflation pressure for
those tyres.) As an added safety feature, your
vehicle has been equipped with a
tyre pressure monitoring system
(TPMS) that illuminates a low tyrepressure telltale when one or more
of your tyres is significantly under-
inflated. Accordingly, when the low
tyre pressure telltale illuminates, you
should stop and check your tyres as
soon as possible, and inflate them to
the proper pressure. Driving on a sig-nificantly under-inflated tyre causes
the tyre to overheat and can lead to
tyre failure. Under-inflation alsoreduces fuel efficiency and tyre tread
life, and may affect the vehicle’s han-
dling and stopping ability.
Please note that the TPMS is not a
substitute for proper tyre mainte-
nance, and it is the driver’s responsi-bility to maintain correct tyre pres-
sure, even if under-inflation has not
reached the level to trigger illumina-
tion of the TPMS low tyre pressure
telltale.
Your vehicle has also been equipped
with a TPMS malfunction indicator toindicate when the system is not
operating properly. The TPMS mal-function indicator is combined with
the low tyre pressure telltale. Whenthe system detects a malfunction,
the telltale will flash for approximate-
ly one minute and then remain con-
tinuously illuminated. This sequence
will continue upon subsequent vehi-
cle start-ups as long as the malfunc-
tion exists. When the malfunctionindicator is illuminated, the system
may not be able to detect or signal
low tyre pressure as intended. TPMS
malfunctions may occur for a variety
of reasons, including the installation
of replacement or alternate tyres or
wheels on the vehicle that prevent
the TPMS from functioning properly.
Always check the TPMS malfunctiontelltale after replacing one or more
tyres or wheels on your vehicle toensure that the replacement or alter-
nate tyres and wheels allow the
TPMS to continue to function proper-
ly.
OEL069012R
EL UK 6.QXP 1/25/2010 9:58 AM Page 8
Page 303 of 560
611
What to do in an emergency
Changing a tyre with TPMS
If you have a flat tyre, the Low Tyre
Pressure and Position telltales will
come on. Have the flat tyre repaired
by a HYUNDAI authorised repairer
as soon as possible or replace the
flat tyre with the spare tyre. Each wheel is equipped with a tyre pressure sensor mounted inside the
tyre behind the valve stem. You must
use TPMS specific wheels. It is rec-
ommended that you always have
your tyres serviced by a HYUNDAI
authorised repairer.Even if you replace the low pressure
tyre with the spare tyre, the Low Tyre
Pressure and Position telltales will
remain on until the low pressure tyre
is repaired and placed on the vehi-
cle.
After you replace the low pressure
tyre with the spare tyre, the TPMS
malfunction indicator may illuminate
after a few minutes because theTPMS sensor is not mounted on thespare wheel.
Once the low pressure tyre is rein- flated to the recommended pressure
and installed on the vehicle or the
new TPMS sensor mounted on the
wheel, the TPMS malfunction indica-
tor and the low tyre pressure and
position telltales will extinguish within
a few minutes of driving.
If the indicators are not extinguished
after a few minutes of driving, please
visit a HYUNDAI authorised repairer.CAUTION
If the TPMS sensor on the origi-
nal mounted wheel located inthe spare tyre carrier still acti-vates, the tyre pressure moni- toring system may not operateproperly. Have the tyre withTPMS serviced or replaced by a HYUNDAI authorised repairer assoon as possible.
CAUTION
NEVER use a puncture-repair-ing agent to repair and/or inflatea low pressure tyre. The tyre sealant can damage the tyrepressure sensor. If used, youwill have to replace the tyre pressure sensor.
EL UK 6.QXP 1/25/2010 9:58 AM Page 11
Page 305 of 560
613
What to do in an emergency
IF YOU HAVE A FLAT TYRE
Jack and tools
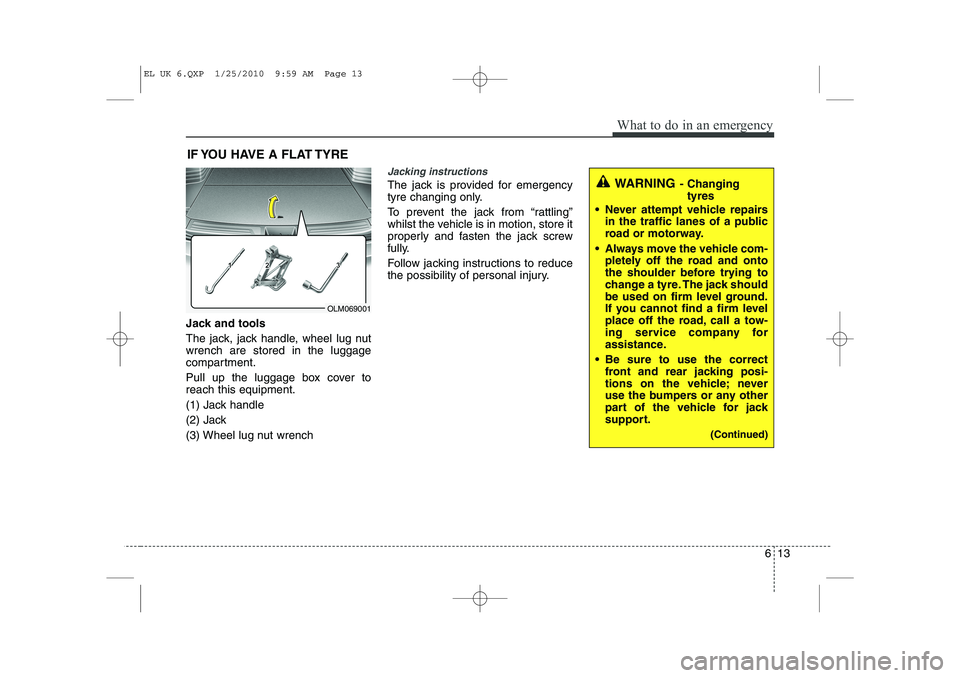
The jack, jack handle, wheel lug nut wrench are stored in the luggage
compartment.
Pull up the luggage box cover to reach this equipment.
(1) Jack handle
(2) Jack
(3) Wheel lug nut wrench
Jacking instructions
The jack is provided for emergency
tyre changing only.
To prevent the jack from “rattling”
whilst the vehicle is in motion, store it
properly and fasten the jack screw
fully.
Follow jacking instructions to reduce
the possibility of personal injury.
OLM069001
WARNING - Changing
tyres
Never attempt vehicle repairs in the traffic lanes of a public
road or motorway.
Always move the vehicle com- pletely off the road and onto
the shoulder before trying to
change a tyre. The jack should
be used on firm level ground.
If you cannot find a firm level
place off the road, call a tow-
ing service company for
assistance.
Be sure to use the correct front and rear jacking posi-
tions on the vehicle; never
use the bumpers or any other
part of the vehicle for jack
support.
(Continued)
EL UK 6.QXP 1/25/2010 9:59 AM Page 13
Page 307 of 560
615
What to do in an emergency
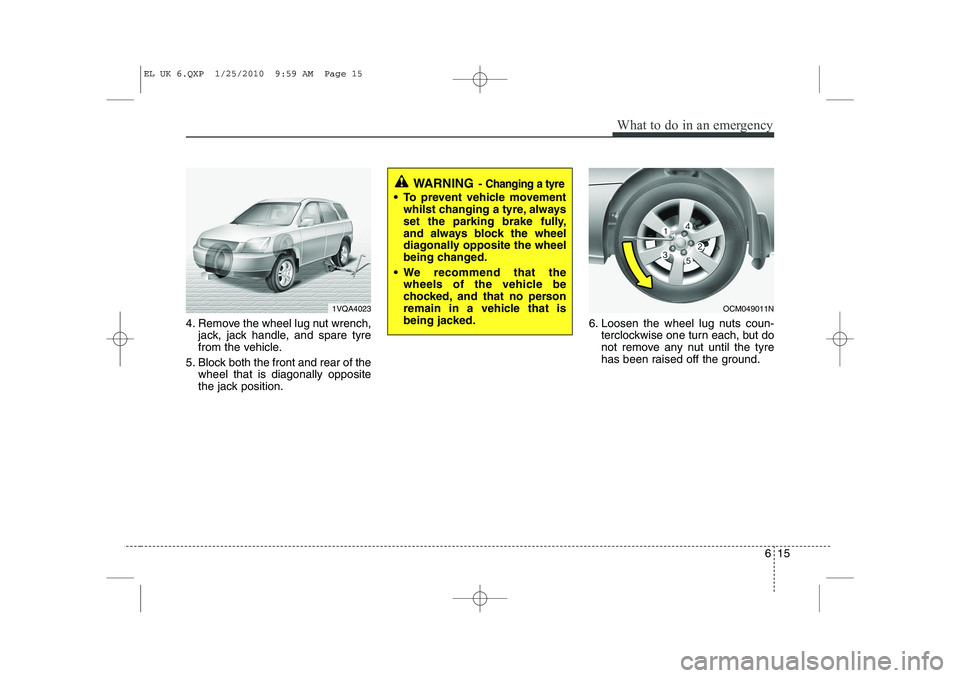
4. Remove the wheel lug nut wrench,jack, jack handle, and spare tyre
from the vehicle.
5. Block both the front and rear of the wheel that is diagonally opposite
the jack position. 6. Loosen the wheel lug nuts coun-
terclockwise one turn each, but do
not remove any nut until the tyre
has been raised off the ground.
WARNING - Changing a tyre
To prevent vehicle movement
whilst changing a tyre, always
set the parking brake fully,
and always block the wheel
diagonally opposite the wheel
being changed.
We recommend that the wheels of the vehicle be
chocked, and that no person
remain in a vehicle that is
being jacked.
1VQA4023OCM049011N
EL UK 6.QXP 1/25/2010 9:59 AM Page 15
Page 308 of 560
What to do in an emergency
16
6
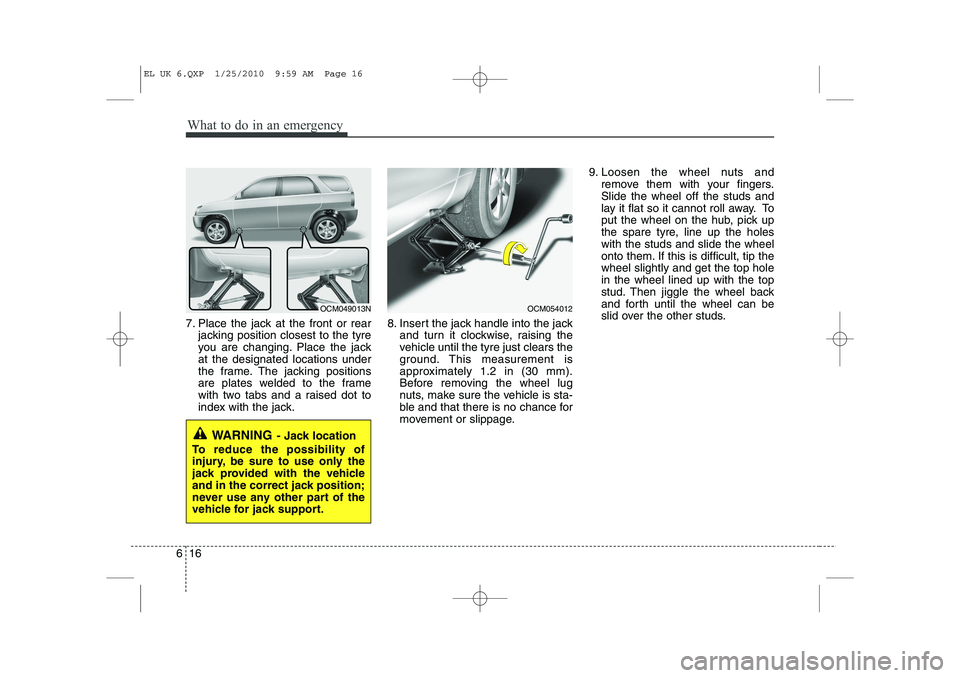
7. Place the jack at the front or rear
jacking position closest to the tyre
you are changing. Place the jackat the designated locations under
the frame. The jacking positions
are plates welded to the frame
with two tabs and a raised dot to
index with the jack. 8. Insert the jack handle into the jack
and turn it clockwise, raising the
vehicle until the tyre just clears the
ground. This measurement is
approximately 1.2 in (30 mm).
Before removing the wheel lug
nuts, make sure the vehicle is sta-
ble and that there is no chance for
movement or slippage. 9. Loosen the wheel nuts and
remove them with your fingers.Slide the wheel off the studs and
lay it flat so it cannot roll away. To
put the wheel on the hub, pick up
the spare tyre, line up the holeswith the studs and slide the wheel
onto them. If this is difficult, tip thewheel slightly and get the top holein the wheel lined up with the top
stud. Then jiggle the wheel back
and forth until the wheel can be
slid over the other studs.
WARNING - Jack location
To reduce the possibility of
injury, be sure to use only the
jack provided with the vehicle
and in the correct jack position;
never use any other part of the
vehicle for jack support.
OCM049013NOCM054012
EL UK 6.QXP 1/25/2010 9:59 AM Page 16
Page 309 of 560
617
What to do in an emergency
10. To reinstall the wheel, hold it onthe studs, put the wheel nuts on the studs and tighten them finger
tight. The nuts should be installedwith their tapered small diameter
ends directed inward. Jiggle thetyre to be sure it is completely
seated, then tighten the nuts as
much as possible with your fin-gers again.
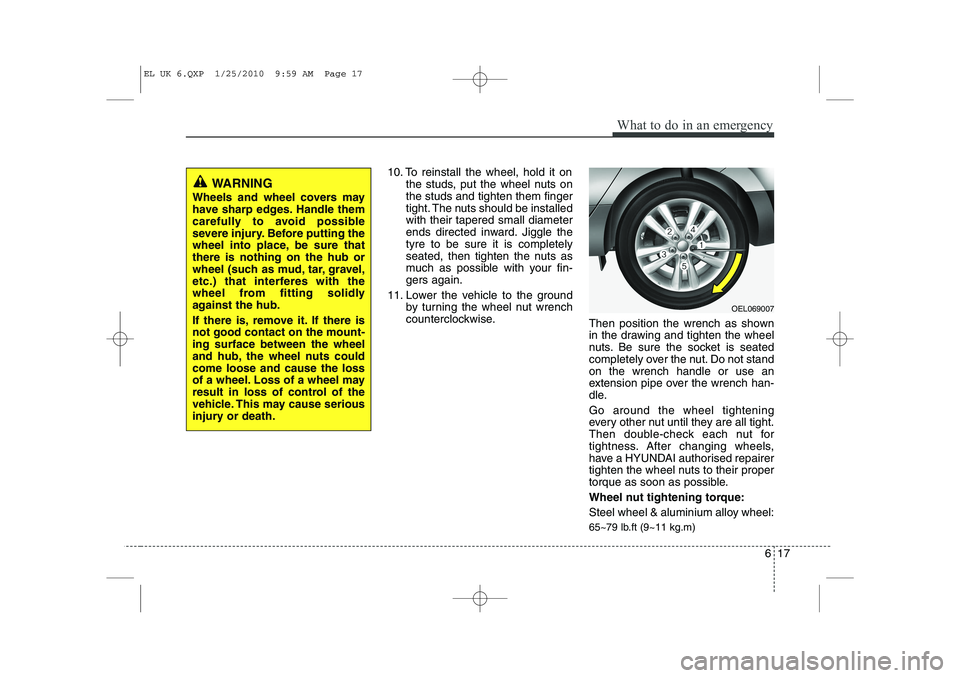
11. Lower the vehicle to the ground by turning the wheel nut wrench
counterclockwise. Then position the wrench as shown
in the drawing and tighten the wheel
nuts. Be sure the socket is seated
completely over the nut. Do not standon the wrench handle or use an
extension pipe over the wrench han-
dle. Go around the wheel tightening
every other nut until they are all tight.
Then double-check each nut for
tightness. After changing wheels,
have a HYUNDAI authorised repairer
tighten the wheel nuts to their proper
torque as soon as possible.
Wheel nut tightening torque:
Steel wheel & aluminium alloy wheel:
65~79 lb.ft (9~11 kg.m)
WARNING
Wheels and wheel covers may
have sharp edges. Handle them
carefully to avoid possible
severe injury. Before putting the
wheel into place, be sure thatthere is nothing on the hub or
wheel (such as mud, tar, gravel,
etc.) that interferes with the
wheel from fitting solidly
against the hub.
If there is, remove it. If there is not good contact on the mount-ing surface between the wheel
and hub, the wheel nuts couldcome loose and cause the loss
of a wheel. Loss of a wheel may
result in loss of control of the
vehicle. This may cause serious
injury or death.
OEL069007
EL UK 6.QXP 1/25/2010 9:59 AM Page 17