Page 11 of 560
Your vehicle at a glance
4
2
ENGINE COMPARTMENT
OEL079001R
1. Engine coolant reservoir ..................7-13
2. Engine oil filler cap ..........................7-12
3. Brake/clutch* fluid reservoir .............7-16
4. Air cleaner .......................................7-19
5. Fuse box ..........................................7-39
6. Negative battery terminal ................7-26
7. Positive battery terminal ..................7-26
8. Radiator cap ....................................7-15
9. Engine oil dipstick ............................7-12
10. Windscreen washer fluid
reservoir .........................................7-17
* : if equipped
■■Petrol
* The actual engine room in the vehicle may differ from the illustration.
EL UK 2.QXP 1/12/2010 2:53 PM Page 4
Page 12 of 560
25
Your vehicle at a glance
OEL079002R
1. Engine coolant reservoir ..................7-13
2. Fuse box ..........................................7-39
3. Fuel filter ..........................................7-18
4. Engine oil dipstick ............................7-12
5. Engine oil filler cap ..........................7-12
6. Brake/clutch* fluid reservoir ............7-16
7. Air cleaner ........................................7-19
8. Negative battery terminal ................7-26
9. Positive battery terminal ..................7-26
10. Radiator cap ..................................7-15
11. Windscreen washer fluid reservoir ........................................7-17
* : if equipped
■■Diesel
* The actual engine room in the vehicle may differ from the illustration.
EL UK 2.QXP 1/12/2010 2:53 PM Page 5
Page 59 of 560

347
Safety system of your vehicle
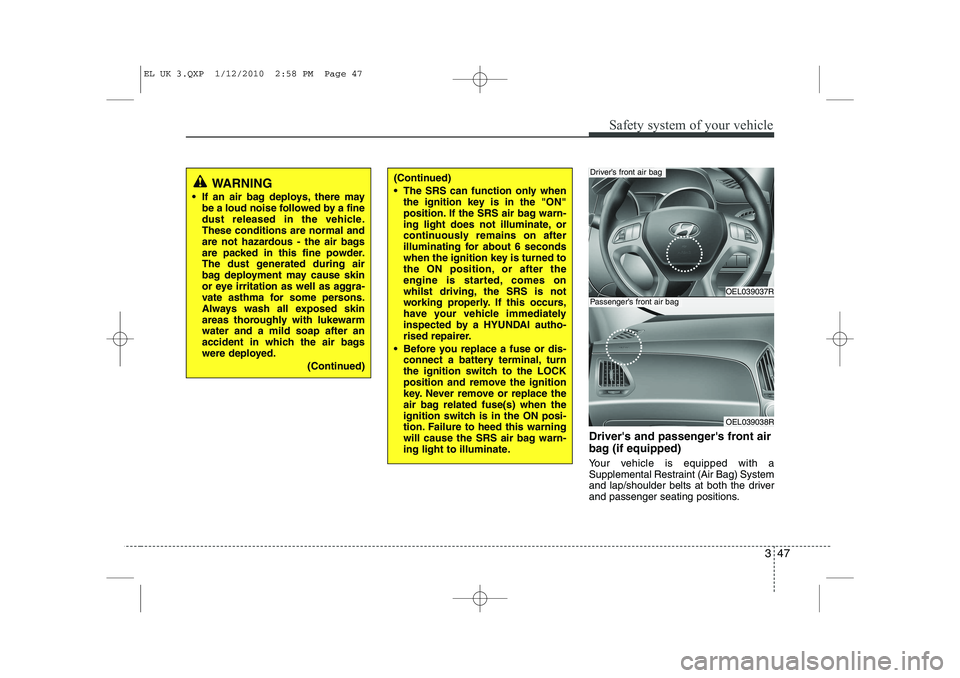
Driver's and passenger's front air
bag (if equipped)
Your vehicle is equipped with a
Supplemental Restraint (Air Bag) System
and lap/shoulder belts at both the driver
and passenger seating positions.
WARNING
If an air bag deploys, there may be a loud noise followed by a fine
dust released in the vehicle.These conditions are normal and
are not hazardous - the air bags
are packed in this fine powder.
The dust generated during air
bag deployment may cause skin
or eye irritation as well as aggra-
vate asthma for some persons.
Always wash all exposed skin
areas thoroughly with lukewarmwater and a mild soap after an
accident in which the air bags
were deployed.
(Continued)(Continued)
The SRS can function only whenthe ignition key is in the "ON"
position. If the SRS air bag warn-
ing light does not illuminate, or
continuously remains on after
illuminating for about 6 seconds
when the ignition key is turned to
the ON position, or after the
engine is started, comes on
whilst driving, the SRS is not
working properly. If this occurs,
have your vehicle immediately
inspected by a HYUNDAI autho-
rised repairer.
Before you replace a fuse or dis- connect a battery terminal, turn
the ignition switch to the LOCK
position and remove the ignition
key. Never remove or replace the
air bag related fuse(s) when the
ignition switch is in the ON posi-
tion. Failure to heed this warning
will cause the SRS air bag warn-
ing light to illuminate.
OEL039037R
OEL039038R
Driver’s front air bag
Passenger’s front air bag
EL UK 3.QXP 1/12/2010 2:58 PM Page 47
Page 188 of 560

4113
Features of your vehicle
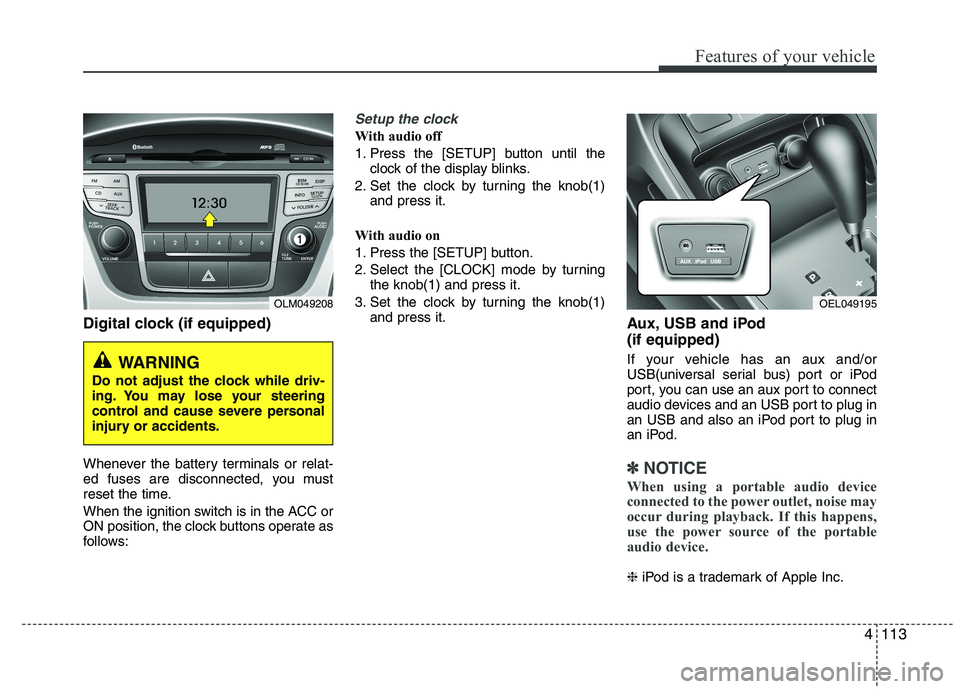
Digital clock (if equipped)
Whenever the battery terminals or relat-
ed fuses are disconnected, you must
reset the time.
When the ignition switch is in the ACC or
ON position, the clock buttons operate as
follows:
Setup the clock
With audio off
1. Press the [SETUP] button until theclock of the display blinks.
2. Set the clock by turning the knob(1) and press it.
With audio on
1. Press the [SETUP] button.
2. Select the [CLOCK] mode by turning the knob(1) and press it.
3. Set the clock by turning the knob(1) and press it. Aux, USB and iPod (if equipped)
If your vehicle has an aux and/or
USB(universal serial bus) port or iPod
port, you can use an aux port to connect
audio devices and an USB port to plug in
an USB and also an iPod port to plug in
an iPod.
✽✽NOTICE
When using a portable audio device
connected to the power outlet, noise may
occur during playback. If this happens,
use the power source of the portable
audio device.
❈ iPod is a trademark of Apple Inc.
OLM049208
WARNING
Do not adjust the clock while driv-
ing. You may lose your steering
control and cause severe personal
injury or accidents.
OEL049195
Page 296 of 560

What to do in an emergency
4
6
IF THE ENGINE WILL NOT START
If engine cannot be cranked
1. If your vehicle has an automatic
transaxle, be sure the shift lever is in N
(Neutral) or P (Park) and the emer-
gency brake is set.
2. Check the battery terminals and con- nections to ensure that these are cleanand also tight.
3. If the interior lights dim when the engine is cranked and the battery ter-
minals have been checked, a dis-
charged battery is indicated.
4. Do not attempt to push or tow start the vehicle, refer to "Jump Starting" for
information regarding engine starting
when the battery is discharged. F030200AFD
If engine turns over normally but
does not start
1. Check fuel level.
2. With the ignition switch in the LOCK/
OFF position, check all connectors at
ignition, coil and spark plugs.
Reconnect any that may be discon-
nected or loose.
3. Check the fuel line in the engine com- partment.
4. If the engine still does not start, call a HYUNDAI authorised repairer or seek
other qualified assistance.
WARNING
If the engine refuses to start, no attempt should be made to push or
tow start the vehicle. Vehicles withautomatic transaxle or fuel injec-
tion will not be able to be started inthis manner since no drive is trans-
mitted through the automatictransaxle whilst the engine is not
running, and in the case of fuel
injected derivatives, the fuel pump
will not operate under tow start
conditions. In addition, if the vehi-
cle is equipped with an exhaust cat-
alyst, damage to the catalyst may
result if the vehicle is tow started.
EL UK 6.QXP 1/25/2010 9:58 AM Page 4
Page 298 of 560

What to do in an emergency
6
6
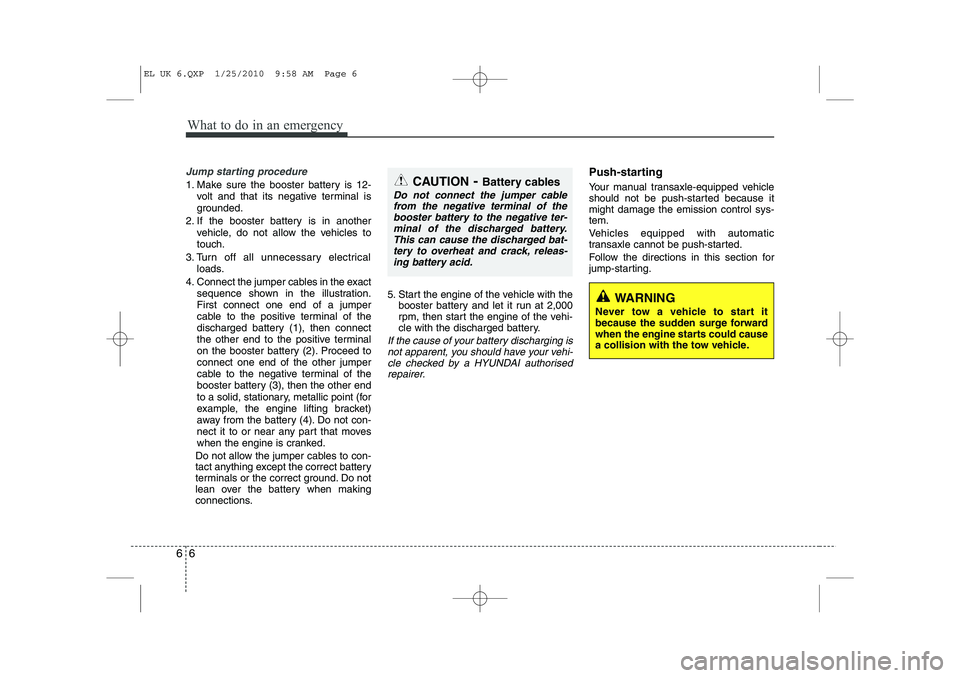
Jump starting procedure
1. Make sure the booster battery is 12-
volt and that its negative terminal is
grounded.
2. If the booster battery is in another vehicle, do not allow the vehicles totouch.
3. Turn off all unnecessary electrical loads.
4. Connect the jumper cables in the exact sequence shown in the illustration.First connect one end of a jumper
cable to the positive terminal of the
discharged battery (1), then connect
the other end to the positive terminal
on the booster battery (2). Proceed toconnect one end of the other jumper
cable to the negative terminal of the
booster battery (3), then the other end
to a solid, stationary, metallic point (for
example, the engine lifting bracket)
away from the battery (4). Do not con-
nect it to or near any part that moves
when the engine is cranked.
Do not allow the jumper cables to con-
tact anything except the correct battery
terminals or the correct ground. Do not
lean over the battery when making
connections. 5. Start the engine of the vehicle with the
booster battery and let it run at 2,000
rpm, then start the engine of the vehi-
cle with the discharged battery.
If the cause of your battery discharging is
not apparent, you should have your vehi-cle checked by a HYUNDAI authorised repairer.
Push-starting
Your manual transaxle-equipped vehicle
should not be push-started because itmight damage the emission control sys-tem.
Vehicles equipped with automatic
transaxle cannot be push-started.
Follow the directions in this section for
jump-starting.
WARNING
Never tow a vehicle to start it
because the sudden surge forward
when the engine starts could cause
a collision with the tow vehicle.
CAUTION - Battery cables
Do not connect the jumper cable
from the negative terminal of the
booster battery to the negative ter-minal of the discharged battery. This can cause the discharged bat-tery to overheat and crack, releas-
ing battery acid.
EL UK 6.QXP 1/25/2010 9:58 AM Page 6
Page 322 of 560
Maintenance
2
7
ENGINE COMPARTMENT
OEL079001R
1. Engine coolant reservoir
2. Engine oil filler cap
3. Brake/clutch* fluid reservoir
4. Air cleaner
5. Fuse box
6. Negative battery terminal
7. Positive battery terminal
8. Radiator cap
9. Engine oil dipstick
10. Windscreen washer fluid reservoir
* : if equipped
■■
Petrol Engine
* The actual engine room in the vehicle may differ from the illustration.
EL UK 7.QXP 1/25/2010 10:01 AM Page 2
Page 323 of 560
73
Maintenance
OEL079002R
1. Engine coolant reservoir
2. Fuse box
3. Fuel filter
4. Engine oil dipstick
5. Engine oil filler cap
6. Brake/clutch* fluid reservoir
7. Air cleaner
8. Negative battery terminal
9. Positive battery terminal
10. Radiator cap
11. Windscreen washer fluid reservoir
* : if equipped
■■Diesel Engine
* The actual engine room in the vehicle may differ from the illustration.
EL UK 7.QXP 1/25/2010 10:01 AM Page 3