2012 HYUNDAI IX35 trailer
[x] Cancel search: trailerPage 288 of 560
563
Driving your vehicle
Parking on hills
Generally, if you have a trailer attached to
your vehicle, you should not park your
vehicle on a hill. People can be seriously
or fatally injured, and both your vehicle
and the trailer can be damaged if unex-
pectedly roll down hill.However, if you ever have to park your
trailer on a hill, here's how to do it:
1. Pull the vehicle into the parking space.
Turn the steering wheel in the direction
of the kerb (left if headed down hill,
right if headed up hill).
2. If the vehicle has a manual transaxle, place the car in neutral. If the vehicle
has an automatic transaxle, place the
car in P (Park).
3. Set the parking brake and shut off the vehicle.
4. Place chocks under the trailer wheels on the down hill side of the wheels.
5. Start the vehicle, hold the brakes, shift to neutral, release the parking brake
and slowly release the brakes until the
trailer chocks absorb the load.
6. Reapply the brakes, reapply the park- ing brake and shift the vehicle to R
(Reverse) for manual transaxle or P
(Park) for automatic transaxle.
7. Shut off the vehicle and release the vehicle brakes but leave the parking
brake set.
WARNING - Parking on a
hill
Parking your vehicle on a hill with a
trailer attached could cause seri-
ous injury or death, should the trail-
er break loose.
WARNING - Parking brake
It can be dangerous to get out of
your vehicle if the parking brake is
not firmly set.
If you have left the engine running,
the vehicle can move suddenly. You
or others could be seriously or
fatally injured.
EL UK 5.QXP 1/25/2010 9:57 AM Page 63
Page 289 of 560
Driving your vehicle
64
5
When you are ready to leave after park- ing on a hill
1. With the manual transaxle in Neutral
or automatic transaxle in P (Park),
apply your brakes and hold the brake
pedal down whilst you:
Start your engine;
Shift into gear; and
Release the parking brake.
2. Slowly remove your foot from the brake pedal.
3. Drive slowly until the trailer is clear of the chocks.
4. Stop and have someone pick up and store the chocks. Maintenance when trailer towing
Your vehicle will need service more often
when you regularly pull a trailer.
Important items to pay particular atten-tion to include engine oil, automatic
transaxle fluid, axle lubricant and cooling
system fluid. Brake condition is another
important item to frequently check. Each
item is covered in this manual, and the
Index will help you find them quickly. If
you’re trailering, it’s a good idea to review
these sections before you start your trip.
Don’t forget to also maintain your trailer
and towbar. Follow the maintenance
schedule that accompanied your trailer
and check it periodically. Preferably, con-
duct the check at the start of each day’s
driving. Most importantly, all towbar nutsand bolts should be tight.CAUTION
Due to higher load during trailer
usage, overheating might occur
in hot days or during uphill driv-ing. If the coolant gauge indicatesover-heating, switch off the A/C and stop the vehicle in a safe area
to cool down the engine.
When towing check transaxle fluid more frequently.
If your vehicle is not equipped with the air conditioner, you
should install a condenser fan toimprove engine performance when towing a trailer.
EL UK 5.QXP 1/25/2010 9:57 AM Page 64
Page 290 of 560
565
Driving your vehicle
If you do decide to pull a trailer
Here are some important points if you
decide to pull a trailer:
Consider using a sway control. You canask a towbar dealer about sway con- trol.
Do not do any towing with your car dur- ing its first 1,200 miles (2,000 km) in
order to allow the engine to properly
break in. Failure to heed this caution
may result in serious engine or
transaxle damage.
When towing a trailer, be sure to con- sult a HYUNDAI authorised repairer for
further information on additional
requirements such as a towing kit, etc.
Always drive your vehicle at a moderate speed (less than 60 mph (100 km/h)).
On a long uphill grade, do not exceed 45 mph (70 km/h) or the posted towing
speed limit, whichever is lower.
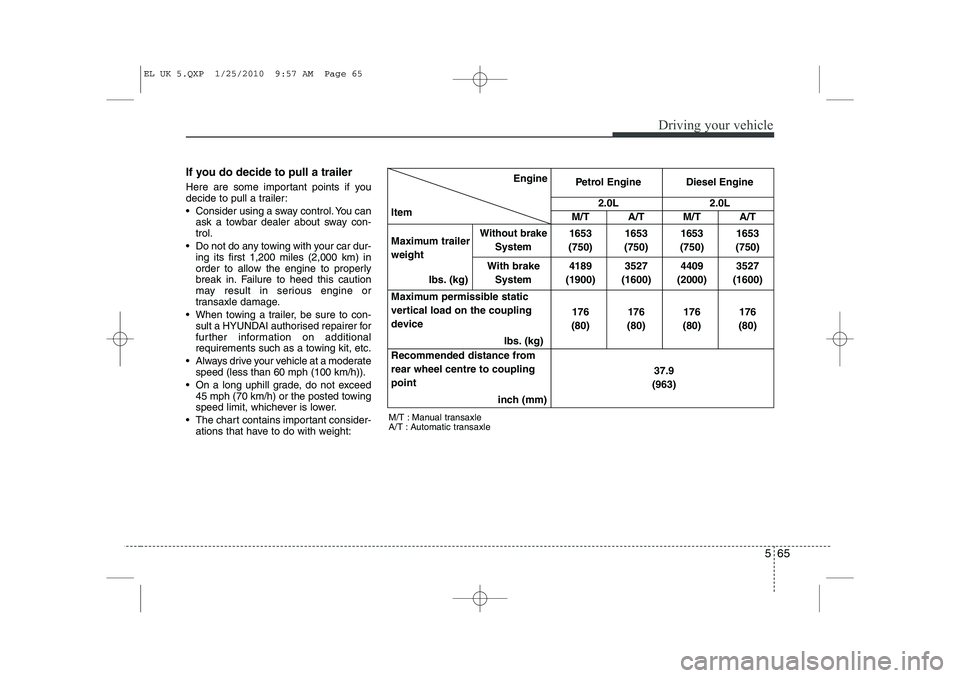
The chart contains important consider- ations that have to do with weight: Engine
Item Petrol Engine Diesel Engine
2.0L2.0L
M/T A/T M/T A/T
Maximum trailer weight
Ibs. (kg)
Without brake
System 1653
(750) 1653
(750) 1653
(750) 1653
(750)
With brake System 4189
(1900) 3527
(1600) 4409
(2000) 3527
(1600)
Maximum permissible static
vertical load on the coupling
device Ibs. (kg)176
(80) 176
(80) 176
(80) 176
(80)
Recommended distance fromrear wheel centre to couplingpoint inch (mm) 37.9
(963)
M/T : Manual transaxle
A/T : Automatic transaxle
EL UK 5.QXP 1/25/2010 9:57 AM Page 65
Page 291 of 560
Driving your vehicle
66
5
Weight of the trailer
How heavy can a trailer safely be? It
should never weigh more than the maxi-
mum trailer weight with trailer brakes. But
even that can be too heavy.
It depends on how you plan to use your
trailer. For example, speed, altitude, road
grades, outside temperature and how
often your vehicle is used to pull a trailer
are all important. The ideal trailer weight
can also depend on any special equip-
ment that you have on your vehicle.
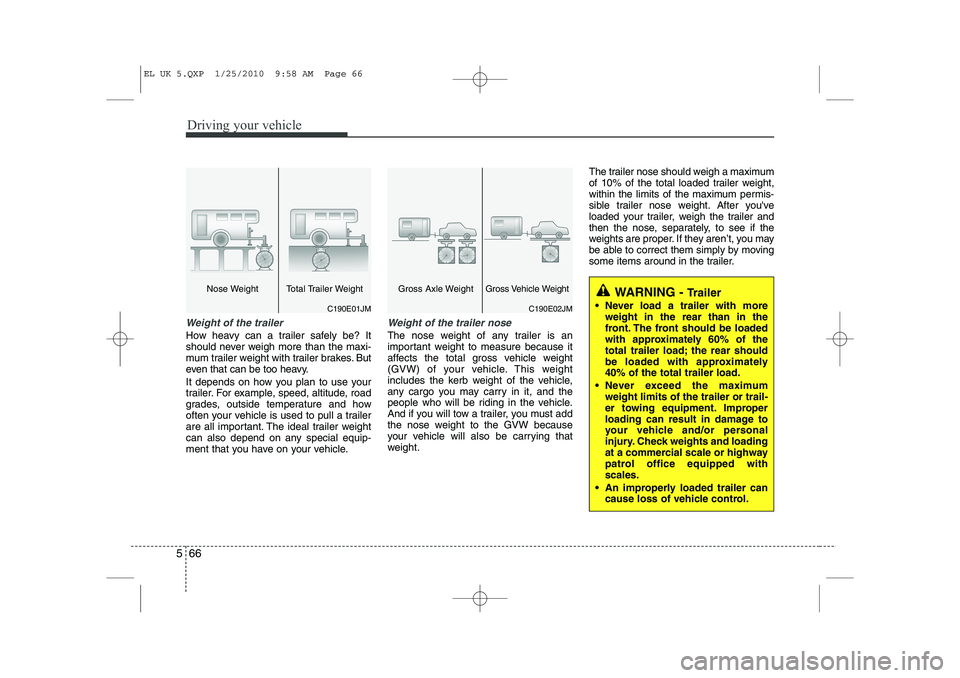
Weight of the trailer nose
The nose weight of any trailer is an
important weight to measure because it
affects the total gross vehicle weight
(GVW) of your vehicle. This weight
includes the kerb weight of the vehicle,
any cargo you may carry in it, and the
people who will be riding in the vehicle.
And if you will tow a trailer, you must add
the nose weight to the GVW because
your vehicle will also be carrying that
weight. The trailer nose should weigh a maximum
of 10% of the total loaded trailer weight,
within the limits of the maximum permis-
sible trailer nose weight. After you've
loaded your trailer, weigh the trailer and
then the nose, separately, to see if the
weights are proper. If they aren’t, you may
be able to correct them simply by moving
some items around in the trailer.
WARNING -
Trailer
Never load a trailer with more weight in the rear than in the
front. The front should be loaded
with approximately 60% of the
total trailer load; the rear should
be loaded with approximately40% of the total trailer load.
Never exceed the maximum weight limits of the trailer or trail-
er towing equipment. Improper
loading can result in damage to
your vehicle and/or personal
injury. Check weights and loading
at a commercial scale or highway
patrol office equipped withscales.
An improperly loaded trailer can cause loss of vehicle control.
C190E02JM
Gross Axle WeightGross Vehicle Weight
C190E01JM
Nose Weight Total Trailer Weight
EL UK 5.QXP 1/25/2010 9:58 AM Page 66
Page 292 of 560
567
Driving your vehicle
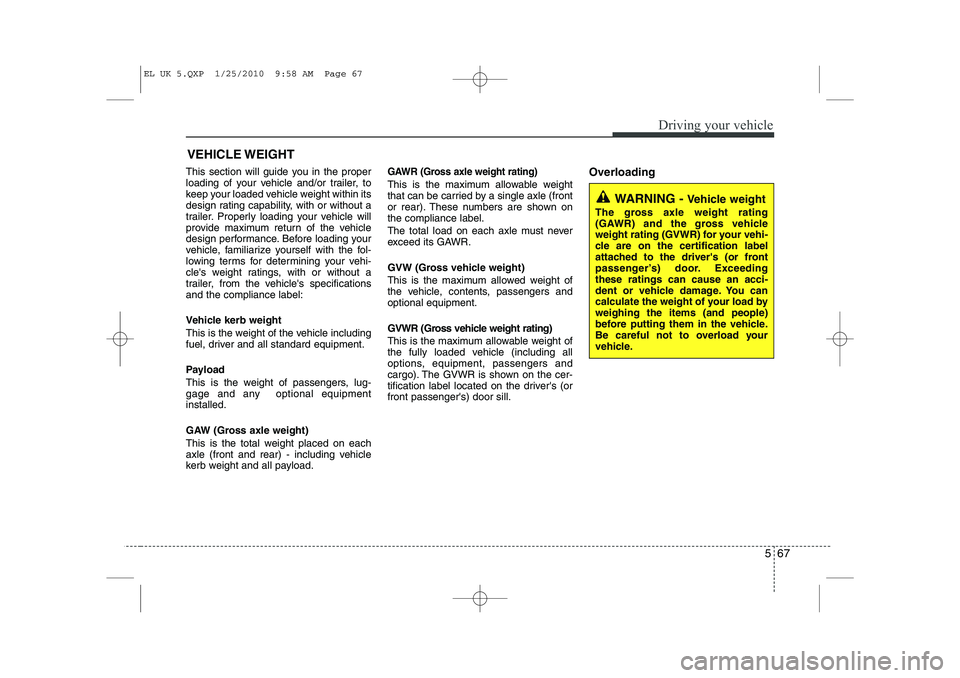
This section will guide you in the proper
loading of your vehicle and/or trailer, to
keep your loaded vehicle weight within its
design rating capability, with or without a
trailer. Properly loading your vehicle will
provide maximum return of the vehicle
design performance. Before loading your
vehicle, familiarize yourself with the fol-
lowing terms for determining your vehi-
cle's weight ratings, with or without a
trailer, from the vehicle's specificationsand the compliance label:
Vehicle kerb weight
This is the weight of the vehicle including
fuel, driver and all standard equipment.
Payload
This is the weight of passengers, lug-
gage and any optional equipmentinstalled.
GAW (Gross axle weight)
This is the total weight placed on each
axle (front and rear) - including vehicle
kerb weight and all payload.GAWR (Gross axle weight rating)
This is the maximum allowable weight
that can be carried by a single axle (front
or rear). These numbers are shown onthe compliance label.
The total load on each axle must never
exceed its GAWR.
GVW (Gross vehicle weight)
This is the maximum allowed weight of
the vehicle, contents, passengers andoptional equipment.
GVWR (Gross vehicle weight rating)
This is the maximum allowable weight of
the fully loaded vehicle (including all
options, equipment, passengers and
cargo). The GVWR is shown on the cer-
tification label located on the driver's (orfront passenger's) door sill.Overloading
VEHICLE WEIGHT
WARNING -
Vehicle weight
The gross axle weight rating
(GAWR) and the gross vehicle
weight rating (GVWR) for your vehi-
cle are on the certification label
attached to the driver's (or front
passenger’s) door. Exceedingthese ratings can cause an acci-
dent or vehicle damage. You can
calculate the weight of your load byweighing the items (and people)
before putting them in the vehicle.
Be careful not to overload your
vehicle.
EL UK 5.QXP 1/25/2010 9:58 AM Page 67
Page 311 of 560
619
What to do in an emergency
IF YOU HAVE A FLAT TYRE (WITH TYREMOBILITYKIT, IF EQUIPPED)
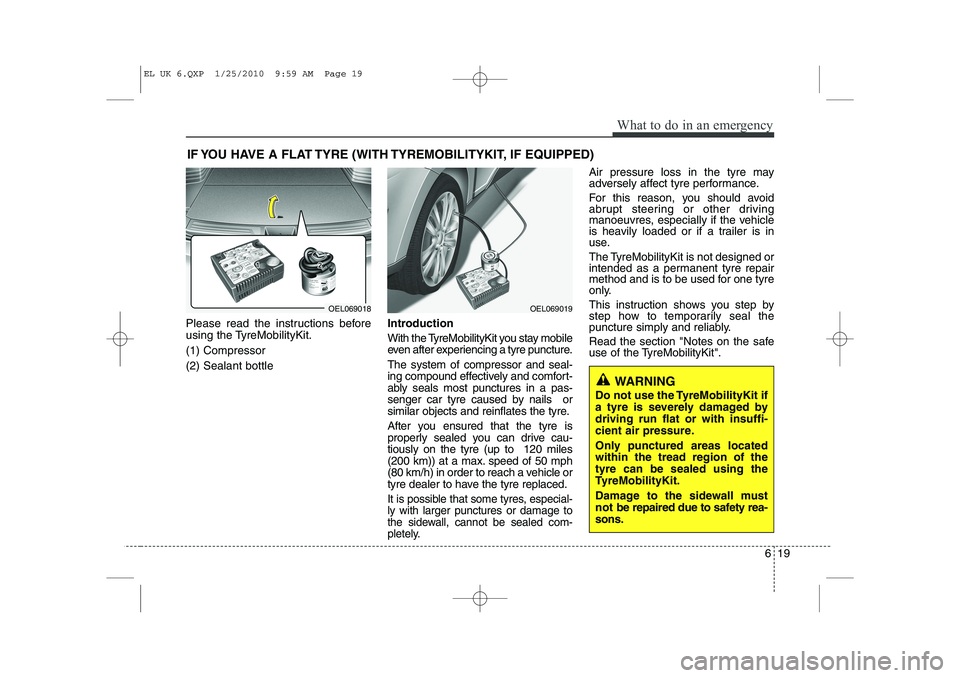
Please read the instructions before
using the TyreMobilityKit. (1) Compressor(2) Sealant bottleIntroduction
With the TyreMobilityKit you stay mobile
even after experiencing a tyre puncture. The system of compressor and seal-
ing compound effectively and comfort-
ably seals most punctures in a pas-
senger car tyre caused by nails or
similar objects and reinflates the tyre.
After you ensured that the tyre is
properly sealed you can drive cau-tiously on the tyre (up to 120 miles
(200 km)) at a max. speed of 50 mph
(80 km/h) in order to reach a vehicle or
tyre dealer to have the tyre replaced.
It is possible that some tyres, especial-ly with larger punctures or damage to
the sidewall, cannot be sealed com-
pletely.
Air pressure loss in the tyre may
adversely affect tyre performance.
For this reason, you should avoid
abrupt steering or other driving
manoeuvres, especially if the vehicle
is heavily loaded or if a trailer is in
use.
The TyreMobilityKit is not designed or
intended as a permanent tyre repair
method and is to be used for one tyre
only.
This instruction shows you step by
step how to temporarily seal the
puncture simply and reliably.
Read the section "Notes on the safe
use of the TyreMobilityKit".
OEL069019
WARNING
Do not use the TyreMobilityKit if
a tyre is severely damaged bydriving run flat or with insuffi-
cient air pressure.
Only punctured areas located within the tread region of thetyre can be sealed using the
TyreMobilityKit.
Damage to the sidewall must
not be repaired due to safety rea-
sons.
OEL069018
EL UK 6.QXP 1/25/2010 9:59 AM Page 19
Page 411 of 560
Index
10
I
Tachometer ····································································4-43 Tailgate ··········································································4-17
Emergency tailgate safety release ····························4-18
Tether anchor system ·····················································3-33
Theft-alarm system ························································4-11
Tilt steering ····································································4-34Towing ···········································································6-24 Emergency towing ···················································6-26
Removable towing hook ··········································6-25
Trailer towing ·································································5-58Transaxle Automatic transaxle ·················································5-17
Manual transaxle ······················································5-14
Tripmeter ·······································································4-47
Trip computer ································································4-46
Turn signals and lane change signals ·····························4-75
Turn signal light bulb replacement ································7-51
TyreMobilityKit ······························································6-19
Tyre Pressure Monitoring System (TPMS) ······················6-8
Tyre specification and pressure label ······························8-8
Tyres and wheels ····················································7-29, 8-3 Checking tyre inflation pressure ······························7-31
Recommended cold tyre inflation pressures ············7-29
Tyre care ··································································7-29
Tyre maintenance ·····················································7-35
Tyre replacement ······················································7-33 Tyre rotation ·····························································7-32
Tyre sidewall labeling ··············································7-35
Tyre traction ·····························································7-35
Wheel alignment and tyre balance ···························7-33
Wheel replacement ···················································7-34
Vanity mirror lamp ·························································4-83
Vehicle certification label ················································8-7
Vehicle handling instructions ···········································1-5
Vehicle identification number (VIN) ······························8-7
Vehicle run-in process ·····················································1-5
Vehicle weight ·······························································5-67 GAW (Gross axle weight) ·······································5-67
GAWR (Gross axle weight rating) ··························5-67
GVW (Gross vehicle weight) ··································5-67
GVWR (Gross vehicle weight rating) ·····················5-67
Payload ······································································5-67
Vehicle kerb weight ·················································5-67
V
T
EL UK INDEX.QXP 1/12/2010 3:27 PM Page 10
Page 480 of 560
Features of your vehicle
68
4
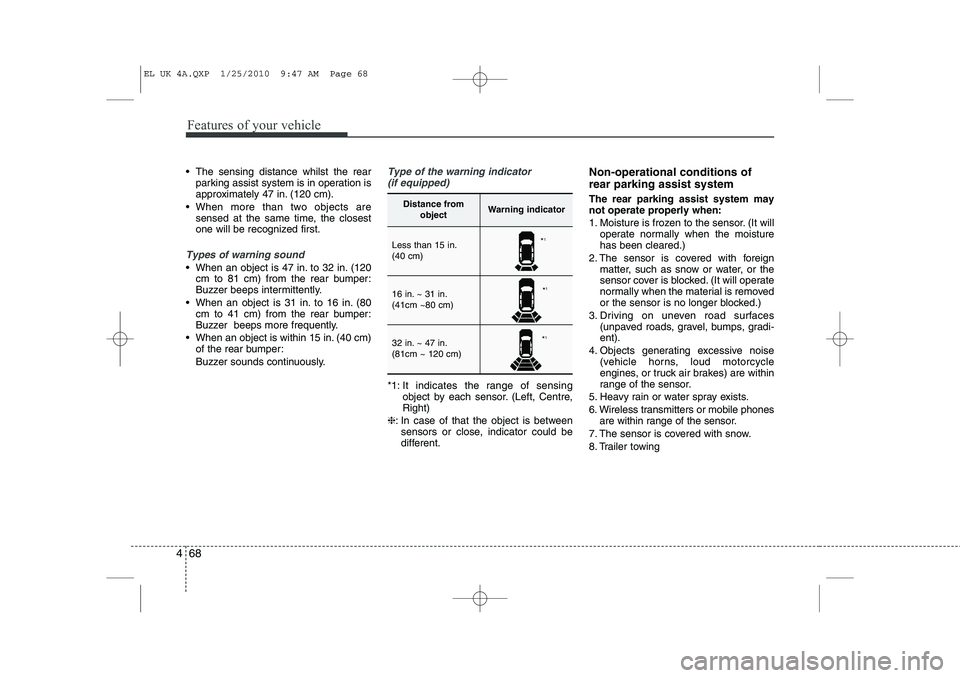
The sensing distance whilst the rear
parking assist system is in operation is
approximately 47 in. (120 cm).
When more than two objects are sensed at the same time, the closest
one will be recognized first.
Types of warning sound
When an object is 47 in. to 32 in. (120cm to 81 cm) from the rear bumper:
Buzzer beeps intermittently.
When an object is 31 in. to 16 in. (80 cm to 41 cm) from the rear bumper:
Buzzer beeps more frequently.
When an object is within 15 in. (40 cm) of the rear bumper:
Buzzer sounds continuously.
Type of the warning indicator
(if equipped)
*1: It indicates the range of sensing object by each sensor. (Left, Centre, Right)
❈ : In case of that the object is between
sensors or close, indicator could be
different. Non-operational conditions of rear parking assist system The rear parking assist system may not operate properly when:
1. Moisture is frozen to the sensor. (It will
operate normally when the moisture has been cleared.)
2. The sensor is covered with foreign matter, such as snow or water, or the
sensor cover is blocked. (It will operate
normally when the material is removed
or the sensor is no longer blocked.)
3. Driving on uneven road surfaces (unpaved roads, gravel, bumps, gradi-ent).
4. Objects generating excessive noise (vehicle horns, loud motorcycle
engines, or truck air brakes) are within
range of the sensor.
5. Heavy rain or water spray exists.
6. Wireless transmitters or mobile phones are within range of the sensor.
7. The sensor is covered with snow.
8. Trailer towing
Distance from objectWarning indicator
Less than 15 in. (40 cm)
16 in. ~ 31 in. (41cm ~80 cm)
32 in. ~ 47 in. (81cm ~ 120 cm)
*1
* 1
* 1
EL UK 4A.QXP 1/25/2010 9:47 AM Page 68