2012 HYUNDAI I30 wheel nut
[x] Cancel search: wheel nutPage 302 of 635

What to do in an emergency
10
6
F060300AFD
Changing a tire with TPMS
If you have a flat tire, the Low Tire
Pressure and Position telltales will
come on. Have the flat tire repaired
by an authorized HYUNDAI dealer
as soon as possible or replace the
flat tire with the spare tire. Each wheel is equipped with a tire pressure sensor mounted inside the
tire behind the valve stem. You must
use TPMS specific wheels. It is rec-
ommended that you always have
your tires serviced by an authorized
HYUNDAI dealer. Even if you replace the low pressure
tire with the spare tire, the TPMS
malfunction indicator may turn on
and the Low Tire Pressure telltale
may turn off after restarting and
about 20 minutes of continuous driv-
ing before you have the low pressuretire repaired and replaced on the
vehicle.
However, if the low pressure tire is
not in the vehicle, the Low Tire
Pressure and Position telltales will go
off and the TPMS malfunction indica-
tor will go on after a few minutes
because the spare tire does not have
a sensor.
Once the low pressure tire is re- inflated to the recommended pres-
sure and installed on the vehicle, theTPMS malfunction indicator and the
low tire pressure and position tell-
tales will extinguish within a few min-
utes of driving.
If the indicators are not extinguished
after a few minutes of driving, please
visit an authorized HYUNDAI dealer.
CAUTION
The TPMS malfunction indica-
tor may be illuminated if thevehicle is moving around elec-tric power supply cables orradios transmitter such as at police stations, governmentand public offices, broadcast-ing stations, military installa- tions, airports, or transmittingtowers, etc. This can interferewith normal operation of the Tire Pressure MonitoringSystem (TPMS).
The TPMS malfunction indica- tor may be illuminated if snowchains are used or some sep-arate electronic devices suchas notebook computer, mobile charger, remote starter or nav-igation etc., are used in thevehicle. This can interfere with normal operation of the TirePressure Monitoring System(TPMS).
CAUTION
NEVER use a puncture-repair-
ing agent to repair and/or inflatea low pressure tire. The tire sealant can damage the tirepressure sensor. If used, youwill have to replace the tire pres-sure sensor.
Page 304 of 635
What to do in an emergency
12
6
IF YOU HAVE A FLAT TIRE
F070100AFD
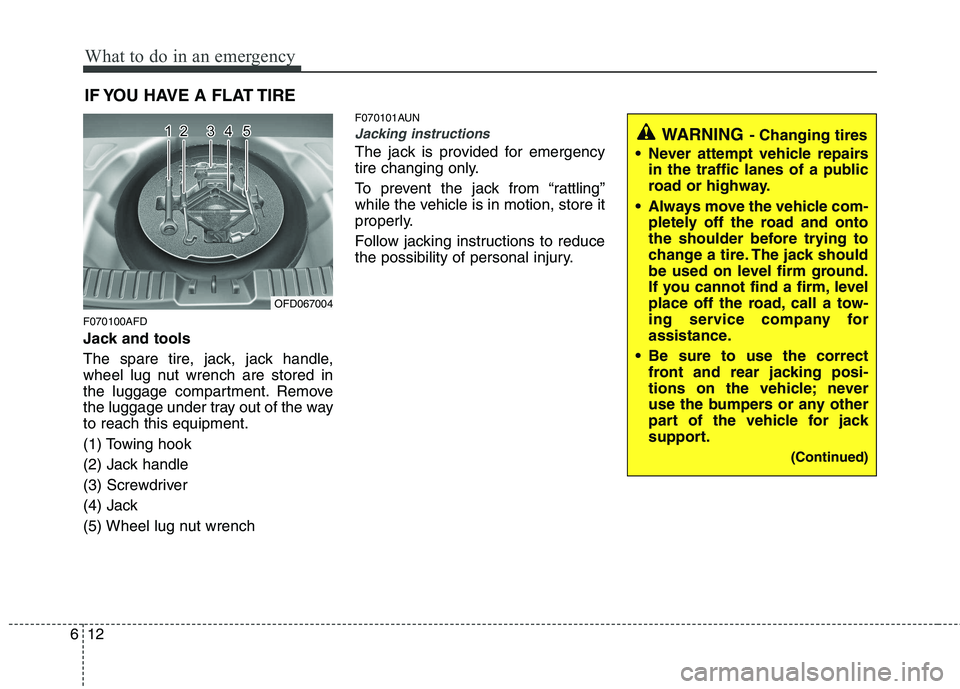
Jack and tools
The spare tire, jack, jack handle,
wheel lug nut wrench are stored in
the luggage compartment. Remove
the luggage under tray out of the wayto reach this equipment.
(1) Towing hook
(2) Jack handle
(3) Screwdriver
(4) Jack
(5) Wheel lug nut wrench F070101AUN
Jacking instructions
The jack is provided for emergency
tire changing only.
To prevent the jack from “rattling”
while the vehicle is in motion, store it
properly.
Follow jacking instructions to reduce
the possibility of personal injury.
OFD067004
WARNING
- Changing tires
Never attempt vehicle repairs in the traffic lanes of a public
road or highway.
Always move the vehicle com- pletely off the road and onto
the shoulder before trying to
change a tire. The jack should
be used on level firm ground.
If you cannot find a firm, level
place off the road, call a tow-
ing service company for
assistance.
Be sure to use the correct front and rear jacking posi-
tions on the vehicle; never
use the bumpers or any other
part of the vehicle for jack
support.
(Continued)
Page 306 of 635
What to do in an emergency
14
6
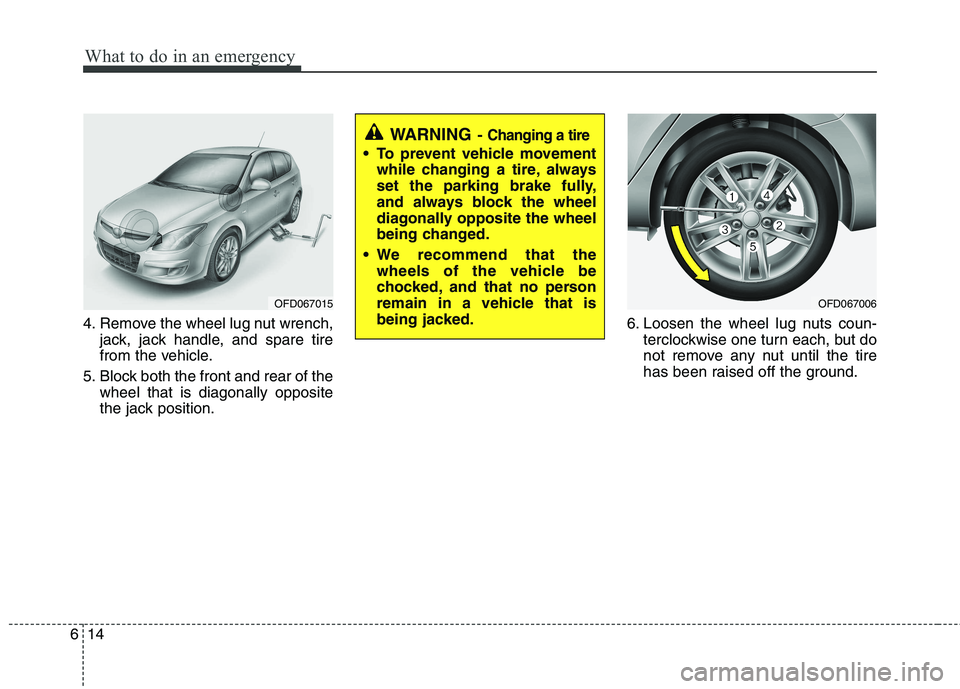
4. Remove the wheel lug nut wrench,
jack, jack handle, and spare tire
from the vehicle.
5. Block both the front and rear of the wheel that is diagonally opposite
the jack position. 6. Loosen the wheel lug nuts coun-
terclockwise one turn each, but do
not remove any nut until the tire
has been raised off the ground.
OFD067015OFD067006
WARNING - Changing a tire
To prevent vehicle movement
while changing a tire, always
set the parking brake fully,
and always block the wheel
diagonally opposite the wheel
being changed.
We recommend that the wheels of the vehicle be
chocked, and that no person
remain in a vehicle that is
being jacked.
Page 307 of 635
615
What to do in an emergency
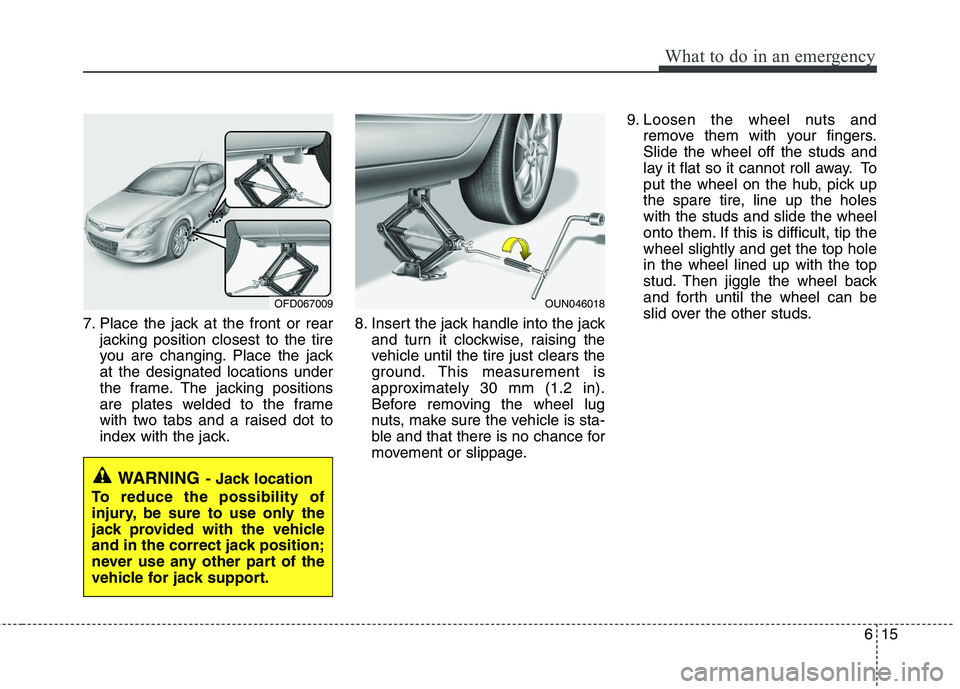
7. Place the jack at the front or rearjacking position closest to the tire
you are changing. Place the jackat the designated locations under
the frame. The jacking positions
are plates welded to the frame
with two tabs and a raised dot to
index with the jack. 8. Insert the jack handle into the jack
and turn it clockwise, raising the
vehicle until the tire just clears the
ground. This measurement is
approximately 30 mm (1.2 in).
Before removing the wheel lug
nuts, make sure the vehicle is sta-
ble and that there is no chance for
movement or slippage. 9. Loosen the wheel nuts and
remove them with your fingers.Slide the wheel off the studs and
lay it flat so it cannot roll away. To
put the wheel on the hub, pick up
the spare tire, line up the holeswith the studs and slide the wheel
onto them. If this is difficult, tip thewheel slightly and get the top holein the wheel lined up with the top
stud. Then jiggle the wheel back
and forth until the wheel can be
slid over the other studs.
WARNING - Jack location
To reduce the possibility of
injury, be sure to use only the
jack provided with the vehicle
and in the correct jack position;
never use any other part of the
vehicle for jack support.
OFD067009OUN046018
Page 308 of 635
What to do in an emergency
16
6
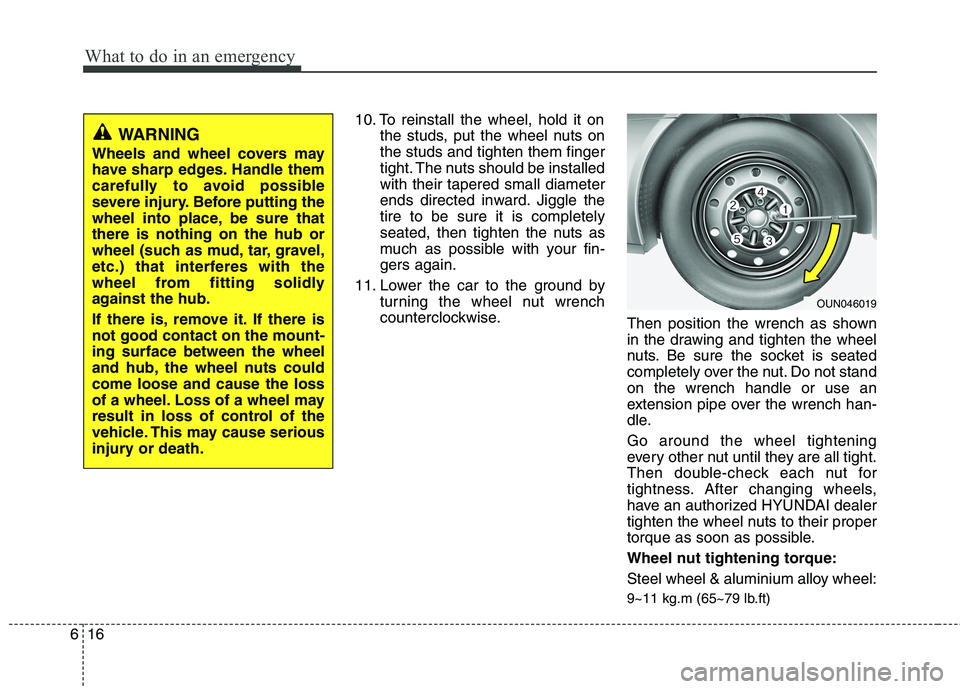
10. To reinstall the wheel, hold it on
the studs, put the wheel nuts on the studs and tighten them finger
tight. The nuts should be installedwith their tapered small diameter
ends directed inward. Jiggle thetire to be sure it is completely
seated, then tighten the nuts as
much as possible with your fin-gers again.
11. Lower the car to the ground by turning the wheel nut wrench
counterclockwise. Then position the wrench as shown
in the drawing and tighten the wheel
nuts. Be sure the socket is seated
completely over the nut. Do not standon the wrench handle or use an
extension pipe over the wrench han-
dle. Go around the wheel tightening
every other nut until they are all tight.
Then double-check each nut for
tightness. After changing wheels,
have an authorized HYUNDAI dealer
tighten the wheel nuts to their proper
torque as soon as possible.
Wheel nut tightening torque:
Steel wheel & aluminium alloy wheel:
9~11 kg.m (65~79 lb.ft)
OUN046019
WARNING
Wheels and wheel covers may
have sharp edges. Handle them
carefully to avoid possible
severe injury. Before putting the
wheel into place, be sure thatthere is nothing on the hub or
wheel (such as mud, tar, gravel,
etc.) that interferes with the
wheel from fitting solidly
against the hub.
If there is, remove it. If there is not good contact on the mount-ing surface between the wheel
and hub, the wheel nuts couldcome loose and cause the loss
of a wheel. Loss of a wheel may
result in loss of control of the
vehicle. This may cause serious
injury or death.
Page 309 of 635
617
What to do in an emergency
If you have a tire gauge, remove the
valve cap and check the air pressure.
If the pressure is lower than recom-
mended, drive slowly to the nearest
service station and inflate to the cor-
rect pressure. If it is too high, adjust
it until it is correct. Always reinstall
the valve cap after checking or
adjusting tire pressure. If the cap is
not replaced, air may leak from the
tire. If you lose a valve cap, buyanother and install it as soon as pos-
sible.
After you have changed wheels,
always secure the flat tire in its place
and return the jack and tools to their
proper storage locations.To prevent the jack, jack handle,
wheel lug nut wrench and spare tire
from rattling while the vehicle is in
motion, store them properly.CAUTION
Your vehicle has metric threads
on the wheel studs and nuts.Make certain during wheel removal that the same nuts thatwere removed are reinstalled -or, if replaced, that nuts withmetric threads and the same chamfer configuration are used.Installation of a non-metricthread nut on a metric stud or vice-versa will not secure thewheel to the hub properly andwill damage the stud so that it must be replaced.
Note that most lug nuts do nothave metric threads. Be sure touse extreme care in checkingfor thread style before installing aftermarket lug nuts or wheels.If in doubt, consult an author-ized HYUNDAI dealer.
WARNING - Wheel studs
If the studs are damaged, they
may lose their ability to retain
the wheel. This could lead to theloss of the wheel and a collisionresulting in serious injuries.
WARNING - Inadequate
spare tire pressure
Check the inflation pressures as
soon as possible after installing
the spare tire. Adjust it to the
specified pressure, if necessary.
Refer to “Tires and wheels” insection 9.
Page 324 of 635

77
Maintenance
G030103AUN
At least monthly:
Check coolant level in the enginecoolant reservoir.
Check the operation of all exterior lights, including the stoplights, turn sig-
nals and hazard warning flashers.
Check the inflation pressures of all tires including the spare. G030104AUN
At least twice a year
(i.e., every Spring and Fall) :
Check radiator, heater and air condi- tioning hoses for leaks or damage.
Check windshield washer spray and wiper operation. Clean wiper blades
with clean cloth dampened with wash-er fluid.
Check headlight alignment.
Check muffler, exhaust pipes, shields and clamps.
Check the lap/shoulder belts for wear and function.
Check for worn tires and loose wheel lug nuts. G030105AFD
At least once a year :
Clean body and door drain holes.
Lubricate door hinges and checks, and
hood hinges.
Lubricate door and hood locks and latches.
Lubricate door rubber weatherstrips.
Check the air conditioning system.
Inspect and lubricate automatic transaxle linkage and controls.
Clean battery and terminals.
Check the brake (and clutch) fluid level.
Page 363 of 635

Maintenance
46
7
G200400AUN
Tire rotation
To equalize tread wear, it is recom- mended that the tires be rotated
every 12,000 km (7,500 miles) or
sooner if irregular wear develops.
During rotation, check the tires for
correct balance.
When rotating tires, check for uneven
wear and damage. Abnormal wear is
usually caused by incorrect tire pres-
sure, improper wheel alignment, out-
of-balance wheels, severe braking or
severe cornering. Look for bumps or
bulges in the tread or side of tire.
Replace the tire if you find either of
these conditions. Replace the tire if
fabric or cord is visible. After rotation,
be sure to bring the front and rear tire
pressures to specification and check
lug nut tightness.
Refer to “Tire and wheels” in section 9.Disc brake pads should be inspected
for wear whenever tires are rotated.
✽✽ NOTICE
Rotate radial tires that have an
asymmetric tread pattern only from
front to rear and not from right to
left.
WARNING
Do not use the compact spare tire for tire rotation.
Do not mix bias ply and radial ply tires under any circum-
stances. This may cause
unusual handling characteris-tics that could result in death,
severe injury, or property
damage.
S2BLA790
S2BLA790A
CBGQ0707A
Without a spare tire
With a full-size spare tire (if equipped) Directional tires (if equipped)