2012 HYUNDAI I30 low beam
[x] Cancel search: low beamPage 14 of 635

17
Introduction
A050000BFDINDICATOR SYMBOLS ON THE INSTRUMENT CLUSTER
Door and tailgate ajar warning light
Seat belt warning light
High beam indicator
Turn signal indicator
Front fog light indicator (if equipped)
Rear fog light indicator (if equipped)
ABS warning light (if equipped)
Parking brake & Brake fluid
warning light
Engine oil pressure warning light
Charging system warning light
ESP indicator (if equipped)
ESP OFF indicator (if equipped)
Malfunction indicator (if equipped)
Air bag warning light (if equipped)
Cruise indicator (if equipped)
Cruise SET indicator (if equipped)
Immobilizer indicator (if equipped)
Low fuel level warning light
Glow indicator (Diesel only)
Fuel filter warning light (Diesel only)
Electric power steering (EPS)
system warning light
Low windshield washer fluid
level warning light (if equipped) * For more detailed explanations, refer to
section 4, “Instrument cluster”.
TPMS (Tire Pressure Monitoring System) malfunction indicator (if equipped)
Low tire pressure telltale (if equipped)
Low tire pressure position tell- tale (if equipped)
Passenger’s front air bag OFF indicator (if equipped)
Overspeed warning light(if equipped)
120 km/h
Page 123 of 635

445
Features of your vehicle
D150305AFD
Turn signal indicator
The blinking green arrows on the instru-
ment panel show the direction indicated
by the turn signals. If the arrow comes on
but does not blink, blinks more rapidly
than normal, or does not illuminate at all,
a malfunction in the turn signal system is
indicated. Your dealer should be consult-
ed for repairs.
This indicator also blinks when the haz-
ard warning switch is turned on.
D150306AUN
High beam indicator
This indicator illuminates when the head- lights are on and in the high beam posi-
tion or when the turn signal lever is pulled
into the Flash-to-Pass position.
Low beam indicator
This indicator light illuminates when the headlights are on.
D150309AUN
Front fog light indicator (if equipped)
This light comes on when the front fog lights are ON. D150310AFD
Rear fog light Indicator
(If equipped)
This light comes on when the rear fog lights are ON.
Tail light indicator (if equipped)
This indicator illuminates when the tail lights are on. D150307AFD
Engine oil pressure warn-
ing
This warning light indicates the engine oil
pressure is low.
If the warning light illuminates while driv- ing:
1. Drive safely to the side of the road and stop.
2. With the engine off, check the engine oil level. If the level is low, add oil as required.
If the warning light remains on after
adding oil or if oil is not available, call an
authorized HYUNDAI dealer.
CAUTION
If the engine is not stopped imme- diately after the engine oil pressure
warning light is illuminated, severe damage could result.
Page 139 of 635

461
Features of your vehicle
D190403AUN
Auto light position (if equipped)
When the light switch is in the AUTO light position, the taillights and headlights will
be turned ON or OFF automaticallydepending on the amount of light outside
the vehicle.D190500AUN High - beam operation
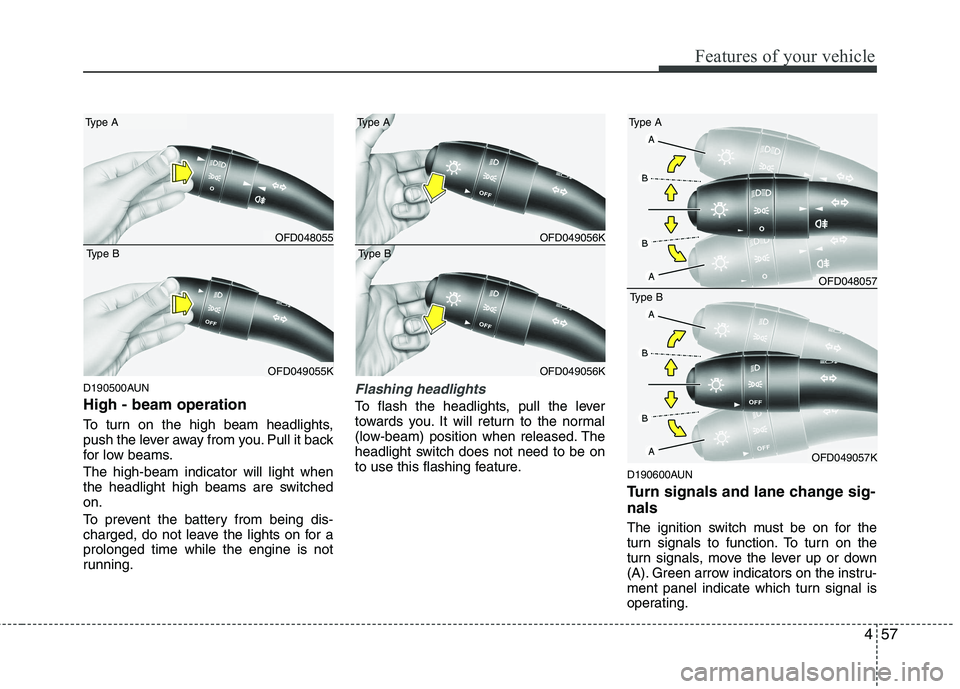
To turn on the high beam headlights,
push the lever away from you. Pull it back
for low beams. The high-beam indicator will light when
the headlight high beams are switchedon.
To prevent the battery from being dis-
charged, do not leave the lights on for aprolonged time while the engine is not
running.
OFD049055KOFD040054K
CAUTION
Never place anything over sensor
(1) located on the instrument
panel, this will ensure better auto- light system control.
Don’t clean the sensor using a window cleaner, the cleaner may
leave a light film which could interfere with sensor operation.
If your vehicle has window tint or other types of metallic coating onthe front windshield, the Auto
light system may not work prop- erly.
Page 140 of 635

Features of your vehicle
62
4
Flashing headlights
To flash the headlights, pull the lever
towards you. It will return to the normal
(low-beam) position when released. The
headlight switch does not need to be on
to use this flashing feature. D190600AUN
Turn signals and lane change sig- nals
The ignition switch must be on for the
turn signals to function. To turn on the
turn signals, move the lever up or down
(A). Green arrow indicators on the instru-
ment panel indicate which turn signal is
operating.
They will self-cancel after a turn is com-
pleted. If the indicator continues to flash
after a turn, manually return the lever tothe OFF position.
To signal a lane change, move the turn
signal lever slightly and hold it in position
(B). The lever will return to the OFF posi-tion when released.If an indicator stays on and does not
flash or if it flashes abnormally, one of the
turn signal bulbs may be burned out andwill require replacement.
✽✽
NOTICE
If an indicator flash is abnormally quick
or slow, bulb may be burned out or have
a poor electrical connection in the cir-cuit.
OFD049057KOFD049056K
Page 142 of 635

Features of your vehicle
64
4
D191000AFD
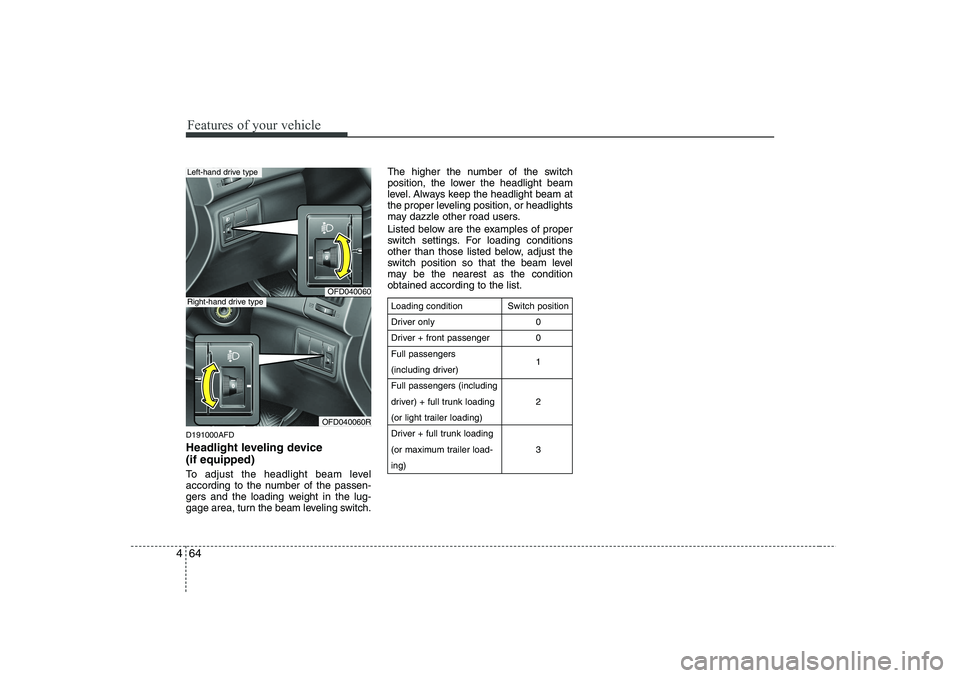
Headlight leveling device (if equipped)
To adjust the headlight beam level
according to the number of the passen-
gers and the loading weight in the lug-
gage area, turn the beam leveling switch. The higher the number of the switch
position, the lower the headlight beam
level. Always keep the headlight beam at
the proper leveling position, or headlights
may dazzle other road users.
Listed below are the examples of proper
switch settings. For loading conditions
other than those listed below, adjust the
switch position so that the beam level
may be the nearest as the conditionobtained according to the list.
Loading condition
Driver only
Driver + front passengerFull passengers
(including driver)Full passengers (including
driver) + full trunk loading
(or light trailer loading)
Driver + full trunk loading
(or maximum trailer load-ing)
Switch position
00 1 2 3
OFD040060
OFD040060R
Left-hand drive type
Right-hand drive type
Page 381 of 635

Maintenance
64
7
1. Open the hood.
2. Remove the headlight assembly by
loosening the headlight installation
bolts(3EA). (for replacement of low
beam bulb)
3. Remove the headlight bulb cover by turning it counterclockwise.
4. Disconnect the headlight bulb socket- connector.
5. Unsnap the headlight bulb retaining wire by depressing the end and push-
ing it upward.
6. Remove the bulb from the headlight assembly.
7. Install a new headlight bulb and snap the headlight bulb retaining wire into
position by aligning the wire with the
groove on the bulb. 8. Connect the headlight bulb socket-
connector.
9. Install the headlight bulb cover by turn- ing it clockwise.
10. Install the headlight assembly. (for low beam bulb)
✽✽NOTICE
If the headlight aiming adjustment is
necessary after the headlight assembly is
reinstalled, consult an authorized
HYUNDAI dealer.
G220102AFD
Turn signal light/position light, fog light bulb (if equipped)
Turn signal light/position light
1. Remove the headlight assembly by loosening the headlight installation bolts(3EA).
2. Replace the malfunctioned light bulb.
3. Install the headlight assembly.
Fog light bulb
1. Remove the fog light under cover by loosening the screw(2EA).
2. Replace the malfunctioned light bulb.
3. Install the fog light under cover. F220200AUN
Side repeater light bulb replace- ment (if equipped)
1. Remove the light assembly from the
vehicle by prying the lens and pulling
the assembly out.
2. Disconnect the bulb electrical connec- tor.
3. Separate the socket and the lens parts by turning the socket counterclockwise
until the tabs on the socket align with
the slots on the lens part.
OHD076035OFD077023
Page 529 of 635

457
Features of your vehicle
D190500AUN High - beam operation
To turn on the high beam headlights,
push the lever away from you. Pull it back
for low beams. The high-beam indicator will light when
the headlight high beams are switchedon.
To prevent the battery from being dis-
charged, do not leave the lights on for aprolonged time while the engine is not
running.Flashing headlights
To flash the headlights, pull the lever
towards you. It will return to the normal
(low-beam) position when released. The
headlight switch does not need to be on
to use this flashing feature.D190600AUN
Turn signals and lane change sig- nals
The ignition switch must be on for the
turn signals to function. To turn on the
turn signals, move the lever up or down
(A). Green arrow indicators on the instru-
ment panel indicate which turn signal is
operating.
OFD048055
Type A
OFD049055K
Type B
OFD049056K
Type A
OFD049056K
Type B
OFD048057
Type A
OFD049057K
Type B
Page 531 of 635

459
Features of your vehicle
The rear fog lights turn on when the rear
fog light switch is turned on after the front
fog light switch is turned on and the
headlight switch to the parklight position.
To turn the rear fog lights off, turn the rear
fog light switch to the on position again or
turn the headlight switch off.
D190900AUN
Daytime running light (if equipped)
Daytime Running Lights (DRL) can make
it easier for others to see the front of your
vehicle during the day. DRL can be help-
ful in many different driving conditions,
and it is especially helpful after dawn and
before sunset.
The DRL system will make the head-
lights turn OFF when:
1. The parklight switch is ON.
2. Engine stops.D191000AFD
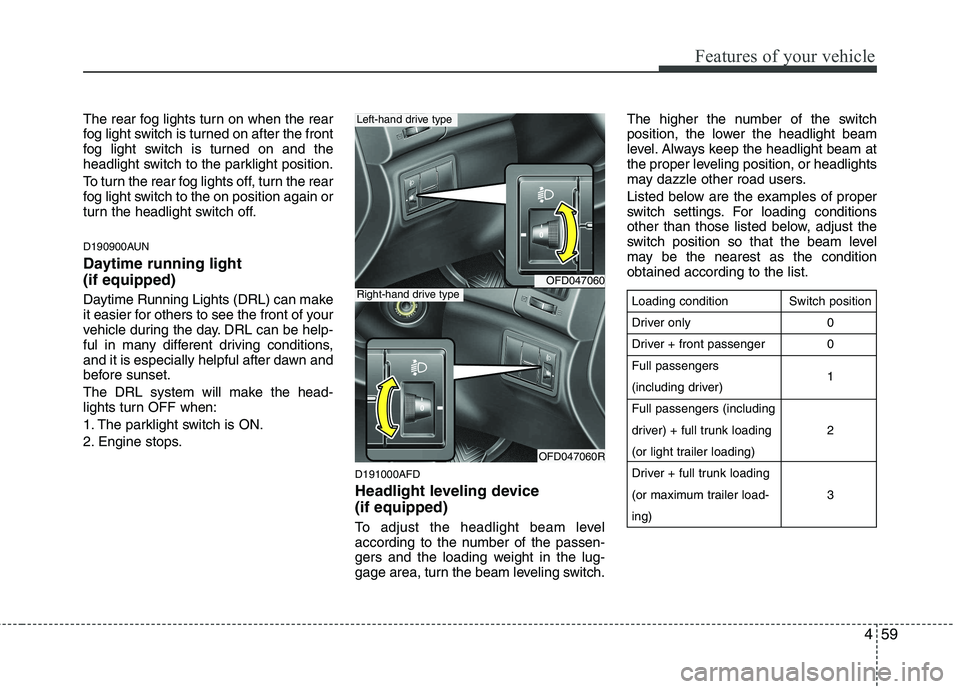
Headlight leveling device (if equipped)
To adjust the headlight beam level
according to the number of the passen-
gers and the loading weight in the lug-
gage area, turn the beam leveling switch.The higher the number of the switch
position, the lower the headlight beam
level. Always keep the headlight beam at
the proper leveling position, or headlights
may dazzle other road users.
Listed below are the examples of proper
switch settings. For loading conditions
other than those listed below, adjust the
switch position so that the beam level
may be the nearest as the conditionobtained according to the list.
OFD047060
OFD047060R
Left-hand drive type
Right-hand drive typeLoading condition
Driver only
Driver + front passengerFull passengers
(including driver)Full passengers (including
driver) + full trunk loading
(or light trailer loading)
Driver + full trunk loading
(or maximum trailer load-ing)
Switch position
00 1 2 3