2012 HYUNDAI I30 air condition
[x] Cancel search: air conditionPage 332 of 635

715
Maintenance
NORMAL MAINTENANCE SCHEDULE - DIESEL ENGINE
G040300AFD
I : Inspect and if necessary, adjust, correct, clean or replace. R : Replace or change. * 1
: Adjust alternator and power steering (and water pump drive belt) and air conditioner drive belt (if equipped).
Inspect and if necessary correct or replace.
* 2
: Check the engine oil level and leak every 500 km (350 miles) or before starting a long trip.
MAINTENANCE
INTERVALS
MAINTENANCE ITEMNumber of months or driving distance, whichever comes first
Months 12 24 36 48 60 72 84 96
Miles×1,000 12.5 25 37.5 50 62.5 75 87.5 100
Km×1,000 20 40 60 80 100 120 140 160
Drive belts * 1
III IIIII
Engine oil and engine oil filter * 2For Europe R R R R R R R R Except Europe
Tensioner/idler/damper pulley Air cleaner filter I R I R I R I R
Inspect when replacing the drive belt or timing belt
Replace every 10,000 km (6,000 miles) or 12 months
Page 335 of 635
Maintenance
18
7
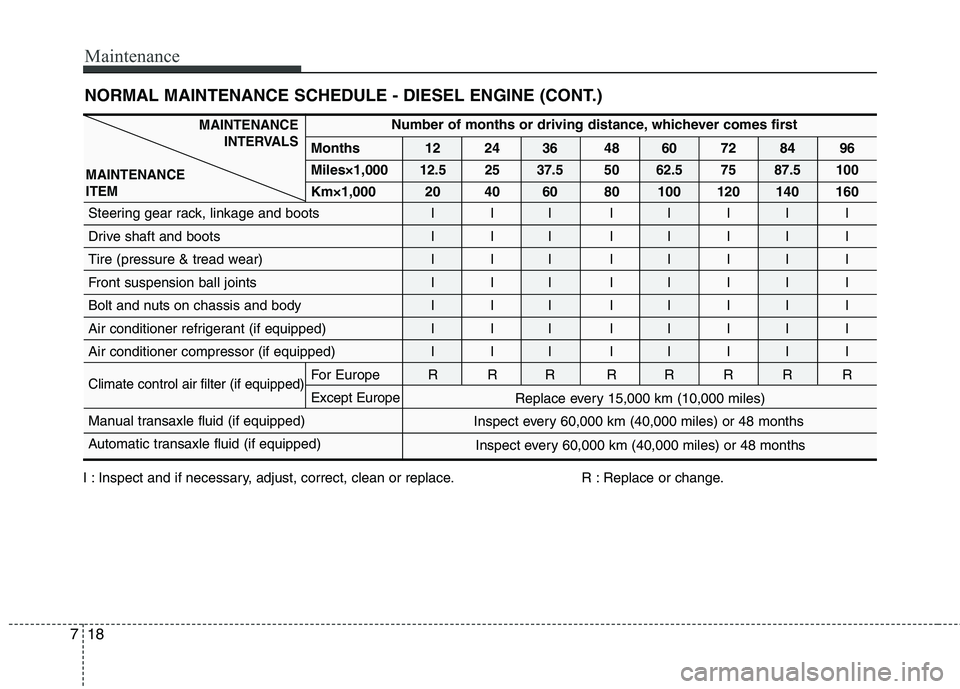
NORMAL MAINTENANCE SCHEDULE - DIESEL ENGINE (CONT.)
Number of months or driving distance, whichever comes first
Months 12 24 36 48 60 72 84 96 Miles×1,000
12.5 25 37.5 50 62.5 75 87.5 100
Km×1,000 20 40 60 80 100 120 140 160
Steering gear rack, linkage and boots I I I I I I I I
Drive shaft and boots I I I I I I I I
Tire (pressure & tread wear) I I I I I I I I
Front suspension ball joints I I I I I I I I
Bolt and nuts on chassis and body I I I I I I I I
Air conditioner refrigerant (if equipped) I I I I I I I I
Air conditioner compressor (if equipped) I I I I I I I I
Climate control air filter (if equipped)For Europe R R R R R R R RExcept Europe
Manual transaxle fluid (if equipped)
Automatic transaxle fluid (if equipped)
MAINTENANCE INTERVALS
MAINTENANCE ITEM
I : Inspect and if necessary, adjust, correct, clean or replace. R : Replace or change. Replace every 15,000 km (10,000 miles)
Inspect every 60,000 km (40,000 miles) or 48 months
Inspect every 60,000 km (40,000 miles) or 48 months
Page 336 of 635
719
Maintenance
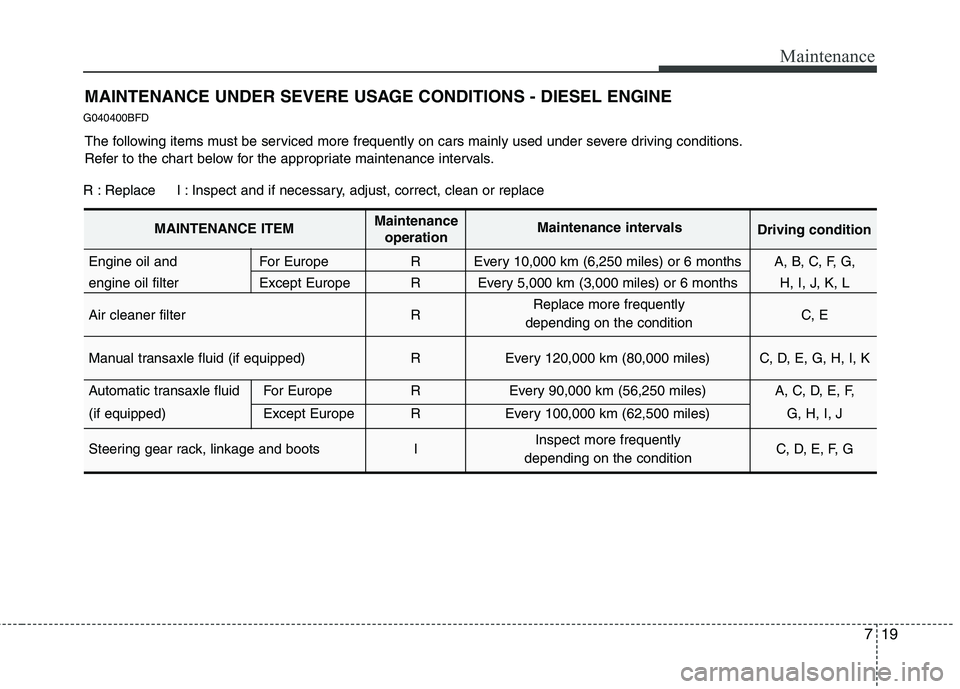
MAINTENANCE UNDER SEVERE USAGE CONDITIONS - DIESEL ENGINE
G040400BFD
The following items must be serviced more frequently on cars mainly used under severe driving conditions.
Refer to the chart below for the appropriate maintenance intervals.
R : Replace I : Inspect and if necessary, adjust, correct, clean or replace
MAINTENANCE ITEM Maintenance
operation Maintenance intervals
Driving condition
Replace more frequently
depending on the condition
Engine oil and For Europe R Every 10,000 km (6,250 miles) or 6 months A, B, C, F, G,
engine oil filter Except Europe R Every 5,000 km (3,000 miles) or 6 months H, I, J, K, L
Air cleaner filter R
C, E
Manual transaxle fluid (if equipped) R Every 120,000 km (80,000 miles) C, D, E, G, H, I, K
Automatic transaxle fluid For Europe R Every 90,000 km (56,250 miles) A, C, D, E, F,
(if equipped) Except Europe R Every 100,000 km (62,500 miles) G, H, I, J
Steering gear rack, linkage and boots I C, D, E, F, G
Inspect more frequently
depending on the condition
Page 337 of 635
Maintenance
20
7
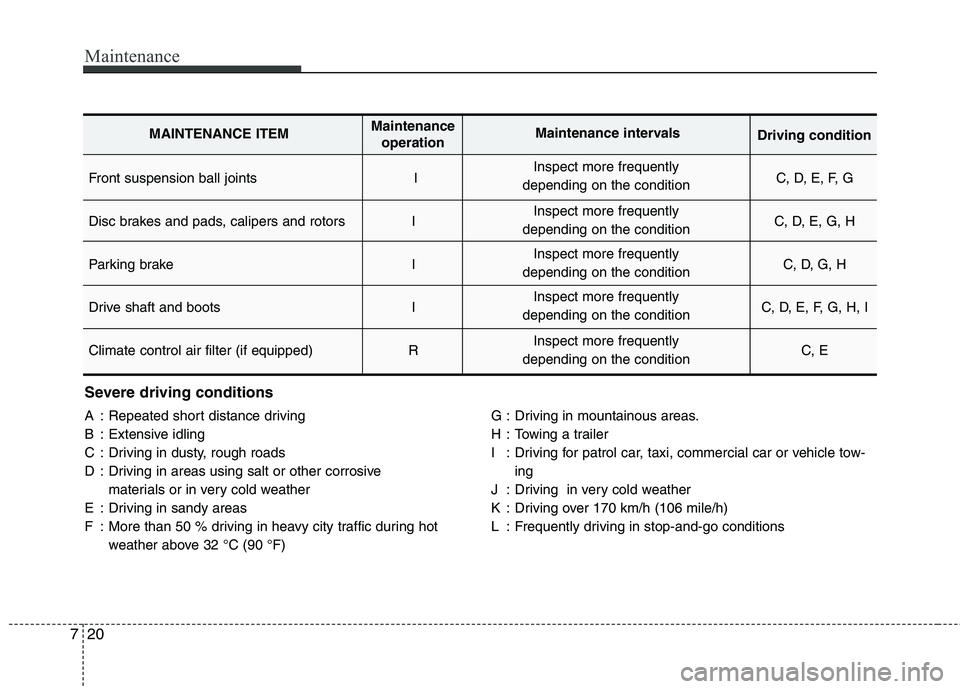
Severe driving conditions
A : Repeated short distance driving
B : Extensive idling
C : Driving in dusty, rough roads
D : Driving in areas using salt or other corrosive
materials or in very cold weather
E : Driving in sandy areas
F : More than 50 % driving in heavy city traffic during hot weather above 32 °C (90 °F) G : Driving in mountainous areas.
H : Towing a trailer
I : Driving for patrol car, taxi, commercial car or vehicle tow-
ing
J : Driving in very cold weather
K : Driving over 170 km/h (106 mile/h)
L : Frequently driving in stop-and-go conditions
Front suspension ball joints I C, D, E, F, G
Disc brakes and pads, calipers and rotors I C, D, E, G, H
Parking brake I C, D, G, H
Drive shaft and boots I C, D, E, F, G, H, I
Climate control air filter (if equipped) R C, E
MAINTENANCE ITEMMaintenance
operation Maintenance intervals
Driving condition
Inspect more frequently
depending on the condition
Inspect more frequently
depending on the condition
Inspect more frequently
depending on the condition
Inspect more frequently
depending on the condition
Inspect more frequently
depending on the condition
Page 340 of 635

723
Maintenance
G051300AUN
Manual transaxle fluid (if equipped)
Inspect the manual transaxle fluid
according to the maintenance schedule.
G051400AUN
Automatic transaxle fluid (if equipped)
The fluid level should be in the "HOT"
range of the dipstick, after the engine
and transaxle are at normal operating
temperature. Check the automatic
transaxle fluid level with the engine run-
ning and the transaxle in neutral, with the
parking brake properly applied.
G051500AUN Brake hoses and lines
Visually check for proper installation,
chafing, cracks, deterioration and any
leakage. Replace any deteriorated or
damaged parts immediately.G051600AUN Brake fluid
Check brake fluid level in the brake fluid
reservoir. The level should be between
“MIN” and “MAX” marks on the side of
the reservoir. Use only hydraulic brake
fluid conforming to DOT 3 or DOT 4specification.
G051700AUN
Parking brake
Inspect the parking brake system includ-
ing the parking brake lever and cables.
G051900AUN
Brake pads, calipers and rotors
Check the pads for excessive wear, discs
for run out and wear, and calipers for fluid
leakage.
G052100AUN Suspension mounting bolts
Check the suspension connections for
looseness or damage. Retighten to the
specified torque.G052200AUN
Steering gear box, linkage &
boots/lower arm ball joint
With the vehicle stopped and engine off,
check for excessive free-play in the
steering wheel.
Check the linkage for bends or damage.
Check the dust boots and ball joints for
deterioration, cracks, or damage.
Replace any damaged parts.
G052400AUN Drive shafts and boots
Check the drive shafts, boots and clamps
for cracks, deterioration, or damage.
Replace any damaged parts and, if nec-
essary, repack the grease.
G052500AUN
Air conditioning refrigerant (if equipped)
Check the air conditioning lines and con-
nections for leakage and damage.
Page 345 of 635

Maintenance
28
7
BRAKES AND CLUTCH (IF EQUIPPED) FLUID
G080100AFD
Checking the brake/clutch fluid
level
Check the fluid level in the reservoir peri-
odically. The fluid level should be
between MAX and MIN marks on the
side of the reservoir. Before removing the reservoir cap and
adding brake/clutch fluid, clean the area
around the reservoir cap thoroughly to
prevent brake/clutch fluid contamination.
If the level is low, add fluid to the MAX
level. The level will fall with accumulated
mileage. This is a normal condition asso-
ciated with the wear of the brake linings.
If the fluid level is excessively low, have
the brake system checked by an author-
ized HYUNDAI dealer.
Use only the specified brake/clutch fluid.
(Refer to “Recommended lubricants and capacities” in section 9.)
Never mix different types of fluid.
WARNING - Brake fluid
When changing and adding
brake/clutch fluid, handle it careful-
ly. Do not let it come in contact with
your eyes. If brake/clutch fluid
should come in contact with your
eyes, immediately flush them with a
large quantity of fresh tap water.
Have your eyes examined by a doc-
tor as soon as possible.
WARNING - Loss of brake fluid
In the event the brake system
requires frequent additions of fluid,
the vehicle should be inspected by
an authorized HYUNDAI dealer.
OHD076011
CAUTION
Do not allow brake/clutch fluid to contact the vehicle's body paint, aspaint damage will result.Brake/clutch fluid, which has been exposed to open air for an extended
time should never be used as itsquality cannot be guaranteed. It should be disposed of properly.Don't put in the wrong kind of fluid.
A few drops of mineral-based oil,such as engine oil, in your brake clutch system can damage brakeclutch system parts.
Brake fluid reservoir
OHD076011R
Clutch fluid reservoir (if equipped)
Page 368 of 635
751
Maintenance
G201004AUN
4. Tire ply composition and material
The number of layers or plies of rub-
ber-coated fabric are in the tire. Tire
manufacturers also must indicate the
materials in the tire, which include
steel, nylon, polyester, and others.
The letter "R" means radial ply con-
struction; the letter "D" means diago-
nal or bias ply construction; and theletter "B" means belted-bias ply con-
struction.G201005AUN
5. Maximum permissible inflation
pressure
This number is the greatest amount of air pressure that should be put in
the tire. Do not exceed the maximum
permissible inflation pressure. Refer
to the Tire and Loading Information
label for recommended inflation
pressure.
G201006AUN
6. Maximum load rating
This number indicates the maximum
load in kilograms and pounds that
can be carried by the tire. When
replacing the tires on the vehicle,
always use a tire that has the same
load rating as the factory installed
tire.
G201007BUN
7. Uniform tire quality grading
Quality grades can be found where
applicable on the tire sidewall
between tread shoulder and maxi-
mum section width.
For example:
TREADWEAR 200
TRACTION AA
TEMPERATURE A Tread wear
The tread wear grade is a compara-
tive rating based on the wear rate ofthe tire when tested under controlled
conditions on a specified govern-
ment test course. For example, a tire
graded 150 would wear one-and-a-
half times (1½) as well on the gov-
ernment course as a tire graded 100.
The relative performance of tires depends upon the actual conditions
of their use, however, and may
depart significantly from the norm
because of variations in driving
habits, service practices and differ-
ences in road characteristics and cli-
mate.
These grades are molded on the
side-walls of passenger vehicle tires.
The tires available as standard or
optional equipment on your vehicles
may vary with respect to grade.
WARNING - Tire age
Tires degrade over time, even
when they are not being used.
Regardless of the remaining
tread, it is recommended that
tires generally be replaced after
six (6) years of normal service.
Heat caused by not climates orfrequent high loading condi-
tions can accelerate the aging
process. Failure to follow this
Warning can result in sudden
tire failure, which could lead to
a loss of control and an acci-
dent involving serious injury ordeath.
Page 388 of 635
771
Maintenance
G230107AUN
Corrosion protection
Protecting your vehicle from corrosion
By using the most advanced design and
construction practices to combat corro-
sion, we produces cars of the highest
quality. However, this is only part of the
job. To achieve the long-term corrosion
resistance your vehicle can deliver, the
owner's cooperation and assistance isalso required.
Common causes of corrosion The most common causes of corrosion
on your car are:
allowed to accumulate underneath the
car.
Removal of paint or protective coatings by stones, gravel, abrasion or minor
scrapes and dents which leave unpro-
tected metal exposed to corrosion. High-corrosion areas
If you live in an area where your car is
regularly exposed to corrosive materials,
corrosion protection is particularly impor-
tant. Some of the common causes of
accelerated corrosion are road salts,
dust control chemicals, ocean air and
industrial pollution.
Moisture breeds corrosion Moisture creates the conditions in which
corrosion is most likely to occur. For
example, corrosion is accelerated by
high humidity, particularly when tempera-
tures are just above freezing. In such
conditions, the corrosive material is kept
in contact with the car surfaces by mois-
ture that is slow to evaporate.
Mud is particularly corrosive because it is
slow to dry and holds moisture in contact
with the vehicle. Although the mud
appears to be dry, it can still retain themoisture and promote corrosion.
High temperatures can also accelerate
corrosion of parts that are not properly
ventilated so the moisture can be dis-
persed. For all these reasons, it is par-
ticularly important to keep your car clean
and free of mud or accumulations of
other materials. This applies not only to
the visible surfaces but particularly to the
underside of the car.