2012 HYUNDAI I30 ECO mode
[x] Cancel search: ECO modePage 289 of 635
Driving your vehicle
46
5
E140600BFD
If you do decide to pull a trailer
Here are some important points if you
decide to pull a trailer:
Consider using a sway control. You can
ask a hitch dealer about sway control.
Do not do any towing with your car dur- ing its first 2,000 km (1,200 miles) in
order to allow the engine to properly
break in. Failure to heed this caution
may result in serious engine or
transaxle damage.
When towing a trailer, be sure to con- sult an authorized HYUNDAI dealer for
further information on additional
requirements such as a towing kit, etc.
Always drive your vehicle at a moder- ate speed (less than 100 km/h (60mph)).
On a long uphill grade, do not exceed 70 km/h (45 mph) or the posted towing
speed limit, whichever is lower.
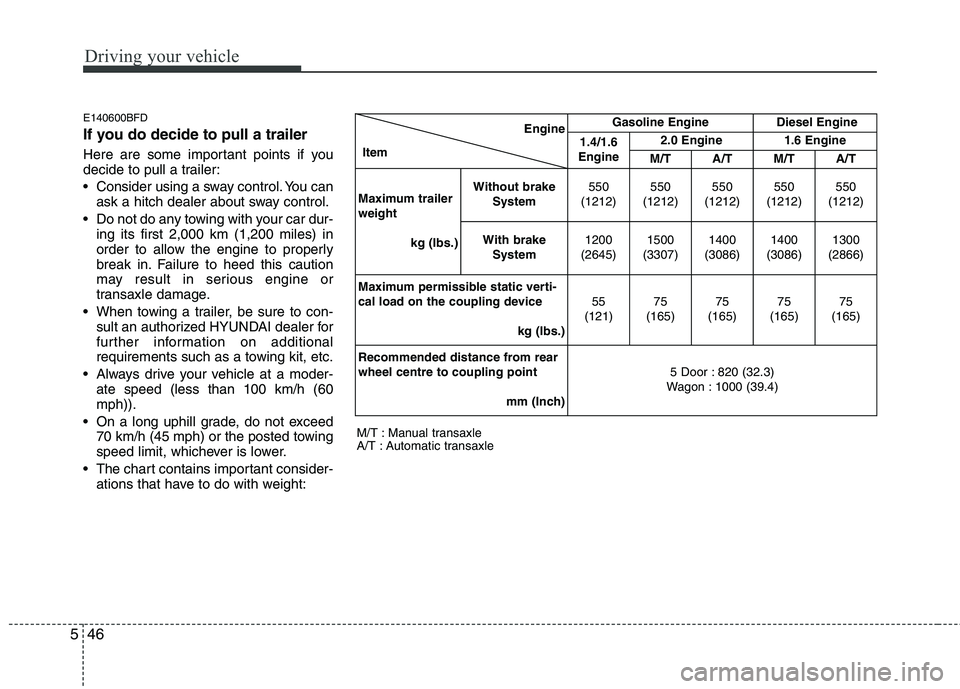
The chart contains important consider- ations that have to do with weight: M/T : Manual transaxle
A/T : Automatic transaxleEngine
Item Gasoline Engine Diesel Engine
1.4/1.6
Engine 2.0 Engine 1.6 Engine
M/T A/T M/T A/T
Maximum trailer weight kg (Ibs.) Without brake
System 550
(1212) 550
(1212) 550
(1212) 550
(1212) 550
(1212)
With brake System 1200
(2645) 1500
(3307) 1400
(3086) 1400
(3086) 1300
(2866)
Maximum permissible static verti-
cal load on the coupling device kg (Ibs.)55
(121) 75
(165) 75
(165) 75
(165) 75
(165)
Recommended distance from rearwheel centre to coupling point mm (Inch) 5 Door : 820 (32.3)
Wagon : 1000 (39.4)
Page 512 of 635
Features of your vehicle
40
4
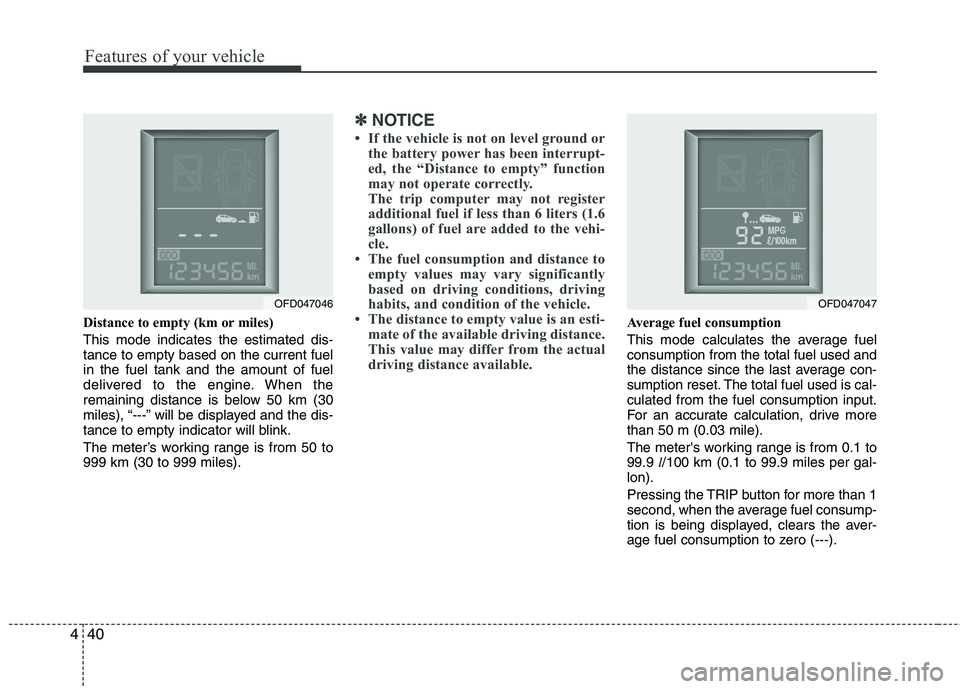
Distance to empty (km or miles) This mode indicates the estimated dis- tance to empty based on the current fuelin the fuel tank and the amount of fuel
delivered to the engine. When the
remaining distance is below 50 km (30
miles), “---” will be displayed and the dis-
tance to empty indicator will blink.
The meter’s working range is from 50 to 999 km (30 to 999 miles).
✽✽
NOTICE
If the vehicle is not on level ground or the battery power has been interrupt-
ed, the “Distance to empty” function
may not operate correctly.
The trip computer may not register
additional fuel if less than 6 liters (1.6
gallons) of fuel are added to the vehi-
cle.
The fuel consumption and distance to
empty values may vary significantly
based on driving conditions, driving
habits, and condition of the vehicle.
The distance to empty value is an esti-
mate of the available driving distance.
This value may differ from the actual
driving distance available.
Average fuel consumption
This mode calculates the average fuel consumption from the total fuel used and
the distance since the last average con-
sumption reset. The total fuel used is cal-culated from the fuel consumption input.
For an accurate calculation, drive morethan 50 m (0.03 mile).
The meter's working range is from 0.1 to 99.9 l/100 km (0.1 to 99.9 miles per gal-
lon).
Pressing the TRIP button for more than 1
second, when the average fuel consump-
tion is being displayed, clears the aver-
age fuel consumption to zero (---).
OFD047046OFD047047
Page 513 of 635

441
Features of your vehicle
Average speed (km/h or mph)
This mode calculates the average speed
of the vehicle since the last averagespeed reset.
Even if the vehicle is not in motion, the
average speed keeps going while the
engine is running.
The meter's working range is from 0 to 999 km/h (0 to 999 mph).
Pressing the TRIP button for more than 1
second, when the average speed is
being displayed, clears the average
speed to zero (---).Tripmeter (km or miles) This mode indicates the distance of indi-
vidual trip since the last tripmeter reset.
The meter's working range is from 0.0 to 999.9 km (miles).
Pressing the TRIP button for more than 1
second when the tripmeter is being dis-
played clears the tripmeter to zero (0.0).D150300AFD
Warnings and indicators
All warning lights are checked by turning
the ignition switch ON (do not start the
engine). Any light that does not illuminate
should be checked by an authorized
HYUNDAI dealer.
After starting the engine, check to make
sure that all warning lights are off. If anyare still on, this indicates a situation that
needs attention. When releasing the
parking brake, the brake system warning
light should go off. The fuel warning light
will stay on if the fuel level is low. D150302AFD
Air bag warning light
(if equipped)
This warning light will illuminate for
approximately 6 seconds each time you
turn the ignition switch to the ON posi-tion. This light also comes on when the SRS
is not working properly. If the AIRBAG
warning light does not come on, or con-
tinuously remains on after operating for
about 6 seconds when you turned the
ignition switch to the ON position or start-
ed the engine, or if it comes on while
driving, have the SRS inspected by an
authorized HYUNDAI dealer.
OFD047048
Average speed
OdometerOFD047049
Tripmeter
Odometer
Page 520 of 635

Features of your vehicle
48
4
D150323AUN-EE
ESP indicator (Electronic
Stability Program)
(if equipped)
The ESP indicator will illuminate when
the ignition switch is turned ON, but
should go off after approximately 3 sec-
onds. When the ESP is on, it monitors the
driving conditions and under normal driv-
ing conditions, the ESP light will remain
off. When a slippery or low traction con-dition is encountered, the ESP will oper-
ate, and the ESP indicator will blink to
indicate the ESP is operating. D150324BFD
ESP OFF indicator (if equipped)
The ESP OFF indicator will illuminate
when the ignition switch is turned ON,
but should go off after approximately 3
seconds. To switch to ESP OFF mode,
press the ESP OFF button. The ESPOFF indicator will illuminate indicating
the ESP is deactivated. If this indicator
stays on when ESP OFF is not selected,
the ESP may have a malfunction. Take
your car to an authorized HYUNDAI deal-
er and have the system checked.
CAUTION
Prolonged driving with the
Emission Control System
Malfunction Indicator Light illumi-nated may cause damage to theemission control systems which could effect drivability and/or fuel
economy.ESP
ESP
OFF
CAUTION - Gasoline engine
If the Emission Control System
Malfunction Indicator Light illumi-nates, potential catalytic converterdamage is possible which couldresult in loss of engine power. Have
the Engine Control System inspect- ed as soon as possible by anauthorized HYUNDAI dealer.
CAUTION - Diesel engine
(if equipped with DPF)
When the malfunction indicator light is blinks, it may stop blinking
after driving the vehicle at morethan 60km/h (37 mph) or at morethan second gear with 1500 ~ 2000 engine rpm for a certain time (for
about 25 minutes).
If the malfunction indicator lightcontinues to be blinked in spite ofthe procedure, please visit an
authorized HYUNDAI dealer andthen check the DPF system.
If you continue to drive with themalfunction indicator light blinking for a long time, the DPF system can
be damaged and fuel consumptioncan be worsen.
Page 542 of 635

Features of your vehicle
70
4
D230101AFD
Mode selection
The mode buttons control the direction of
the air flow through the ventilation sys-tem.
Air can be directed to the floor, dashboard
outlets, or windshield. Five symbols are
used to represent Face, Bi-Level, Floor,Floor-Defrost and Defrost air position.
Face-Level (B,D)
Air flow is directed toward the upper body
and face. Additionally, each outlet can becontrolled to direct the air dischargedfrom the outlet.
Bi-Level (B, D, C, E)
Air flow is discharged towards the face and
floor.
Floor-Level (C, E, A, D)
Most of the air flow is directed to the
floor, with a small amount of the air beingdirected to the windshield and side win-
dow defroster.
Floor/Defrost-Level (A, C, E, D)
Most of the air flow is directed to the floorand the windshield with a small amount
directed to the side window defrosters.
Defrost-Level (A, D)
Most of the air flow is directed to thewindshield with a small amount of air
directed to the side window defrosters. Instrument panel vents
The outlet port can be opened or closed
separately using the horizontal thumb-
wheel. To close the vent, rotate it left to
the maximum position. To open the vent,
rotate it right to the desired position.
Also, you can adjust the direction of air
delivery from these vents using the vent
control lever as shown.
OFD040077OFD047079
Page 545 of 635
473
Features of your vehicle
D230105AUN
Air conditioning (if equipped)
Push the A/C button to turn the air condi- tioning system on (indicator light will illu-
minate). Push the button again to turn the
air conditioning system off.System operation
D230501AUN
Ventilation
1. Set the mode to the position.
2. Set the air intake control to the outside
(fresh) air position.
3. Set the temperature control to the desired position.
4. Set the fan speed control to the desired speed.
D230502AUN
Heating
1. Set the mode to the position.
2. Set the air intake control to the outside (fresh) air position.
3. Set the temperature control to the desired position.
4. Set the fan speed control to the desired speed.
5. If dehumidified heating is desired, turn the air conditioning system (if equipped) on.
If the windshield fogs up, set the mode to the ,
position. Operation Tips
To keep dust or unpleasant fumes from
entering the car through the ventilation
system, temporarily set the air intakecontrol to the recirculated air position.
Be sure to return the control to the
fresh air position when the irritation
has passed to keep fresh air in the
vehicle. This will help keep the driver
alert and comfortable.
Air for the heating/cooling system is drawn in through the grilles just ahead
of the windshield. Care should be
taken that these are not blocked by
leaves, snow, ice or other obstructions.
To prevent interior fog on the wind- shield, set the air intake control to the
fresh air position and fan speed to the
desired position, turn on the air condi-
tioning system, and adjust temperature
control to desired temperature.
OFD047082
Page 546 of 635
Features of your vehicle
74
4
D230503AFD
Air conditioning (if equipped)
All HYUNDAI Air Conditioning Systems
are filled with environmentally friendly
R-134a refrigerant which does not dam-
age to the ozone layer.
1. Start the engine. Push the air condi-
tioning button.
2. Set the mode to the position.
3. Set the air intake control to the outside air or recirculated air position.
4. Adjust the fan speed control and tem- perature control to maintain maximum
comfort.
When maximum cooling is desired, set the temperature control to the extreme
left position then set the fan speedcontrol to the highest speed.
✽✽ NOTICE
When using the air conditioning sys- tem, monitor the temperature gauge
closely while driving up hills or in
heavy traffic when outside tempera-
tures are high. Air conditioning sys-
tem operation may cause engine over-
heating. Continue to use the blower
fan but turn the air conditioning sys-
tem off if the temperature gauge indi-
cates engine overheating.
When opening the windows in humid weather air conditioning may create
water droplets inside the vehicle.
Since excessive water droplets may
cause damage to electrical equipment,
air conditioning should only be run
with the windows closed.Air conditioning system operation tips
If the vehicle has been parked in directsunlight during hot weather, open the
windows for a short time to let the hot
air inside the vehicle escape.
To help reduce moisture inside of win- dows on rainy or humid days, decrease
the humidity inside the vehicle by oper-ating the air conditioning system.
During air conditioning system opera- tion, you may occasionally notice aslight change in engine speed as the
air conditioning compressor cycles.
This is a normal system operation
characteristic.
Use the air conditioning system every month if only for a few minutes to
ensure maximum system performance.
When using the air conditioning sys- tem, you may notice clear water drip-
ping (or even puddling) on the ground
under the passenger side of the vehi-
cle. This is a normal system operation
characteristic.
Operating the air conditioning system in the recirculated air position provides
maximum cooling, however, continual
operation in this mode may cause the
air inside the vehicle to become stale.
During cooling operation, you may occasionally notice a misty air flow
because of rapid cooling and humid air
intake. This is a normal system opera-
tion characteristics.
Page 551 of 635
479
Features of your vehicle
D240200AUN
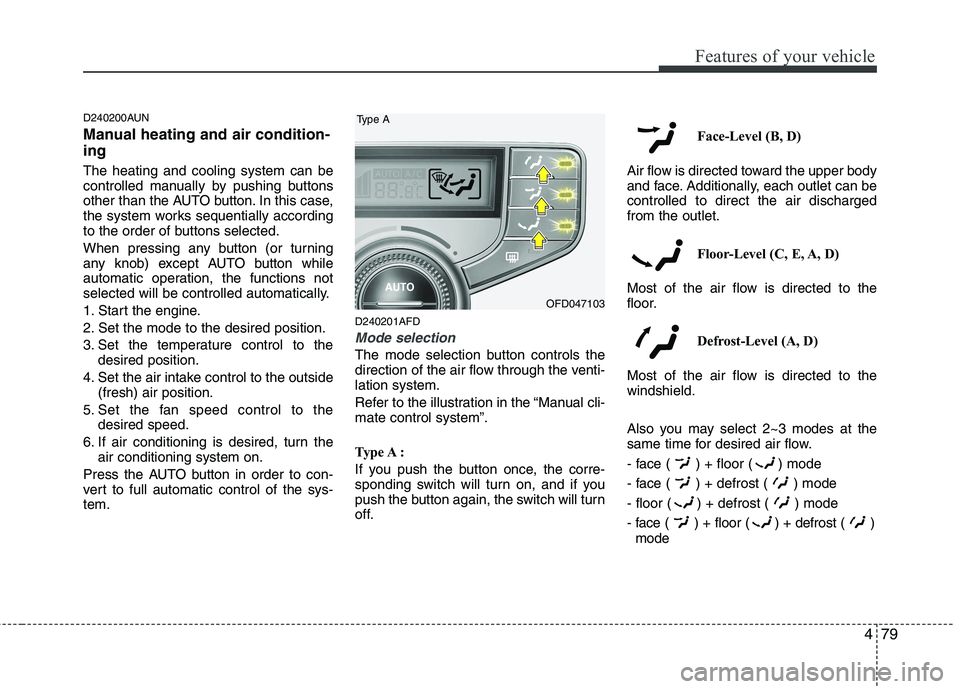
Manual heating and air condition- ing The heating and cooling system can be
controlled manually by pushing buttons
other than the AUTO button. In this case,
the system works sequentially according
to the order of buttons selected.
When pressing any button (or turning
any knob) except AUTO button while
automatic operation, the functions not
selected will be controlled automatically.
1. Start the engine.
2. Set the mode to the desired position.
3. Set the temperature control to thedesired position.
4. Set the air intake control to the outside (fresh) air position.
5. Set the fan speed control to the desired speed.
6. If air conditioning is desired, turn the air conditioning system on.
Press the AUTO button in order to con-
vert to full automatic control of the sys-tem. D240201AFD
Mode selection
The mode selection button controls the
direction of the air flow through the venti-lation system.
Refer to the illustration in the “Manual cli- mate control system”.
Type A :
If you push the button once, the corre-
sponding switch will turn on, and if you
push the button again, the switch will turn
off. Face-Level (B, D)
Air flow is directed toward the upper body
and face. Additionally, each outlet can becontrolled to direct the air dischargedfrom the outlet.
Floor-Level (C, E, A, D)
Most of the air flow is directed to the
floor.
Defrost-Level (A, D)
Most of the air flow is directed to thewindshield.
Also you may select 2~3 modes at the
same time for desired air flow.
- face ( ) + floor ( ) mode
- face ( ) + defrost ( ) mode
- floor ( ) + defrost ( ) mode
- face ( ) + floor ( ) + defrost ( ) mode
OFD047103
Type A