2012 HYUNDAI I30 change time
[x] Cancel search: change timePage 418 of 635
35
Safety system of your vehicle
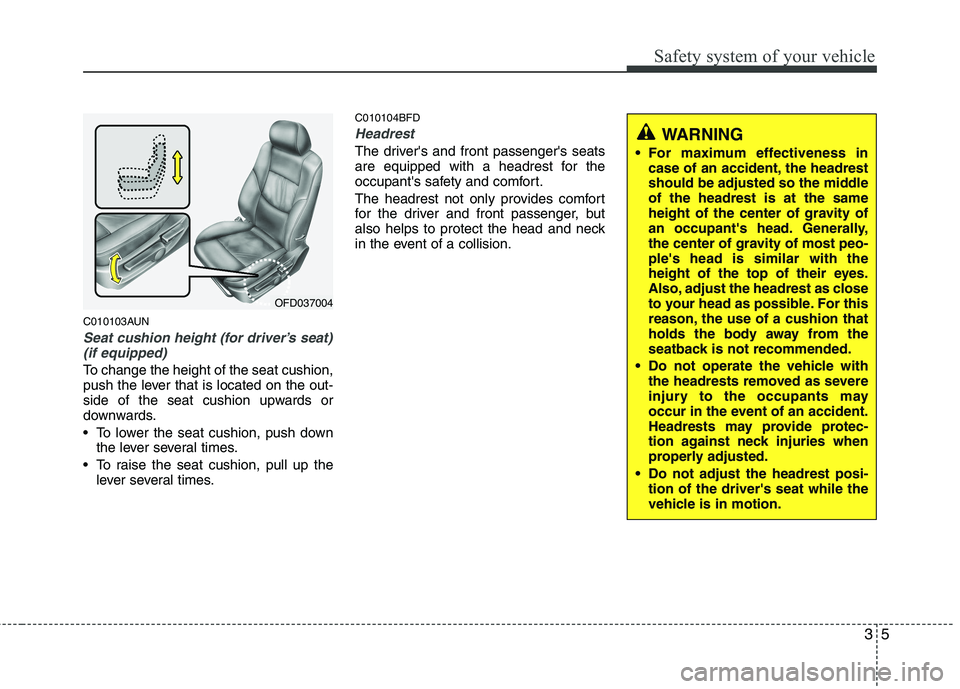
C010103AUN
Seat cushion height (for driver’s seat)(if equipped)
To change the height of the seat cushion,
push the lever that is located on the out-
side of the seat cushion upwards or
downwards.
• To lower the seat cushion, push down the lever several times.
To raise the seat cushion, pull up the lever several times. C010104BFD
Headrest
The driver's and front passenger's seats
are equipped with a headrest for the
occupant's safety and comfort.
The headrest not only provides comfort
for the driver and front passenger, but
also helps to protect the head and neck
in the event of a collision.
OFD037004
WARNING
For maximum effectiveness in case of an accident, the headrest
should be adjusted so the middleof the headrest is at the same
height of the center of gravity of
an occupant's head. Generally,
the center of gravity of most peo-ple's head is similar with the
height of the top of their eyes.
Also, adjust the headrest as close
to your head as possible. For this
reason, the use of a cushion that
holds the body away from the
seatback is not recommended.
Do not operate the vehicle with the headrests removed as severe
injury to the occupants may
occur in the event of an accident.
Headrests may provide protec-
tion against neck injuries when
properly adjusted.
Do not adjust the headrest posi- tion of the driver's seat while the
vehicle is in motion.
Page 420 of 635
37
Safety system of your vehicle
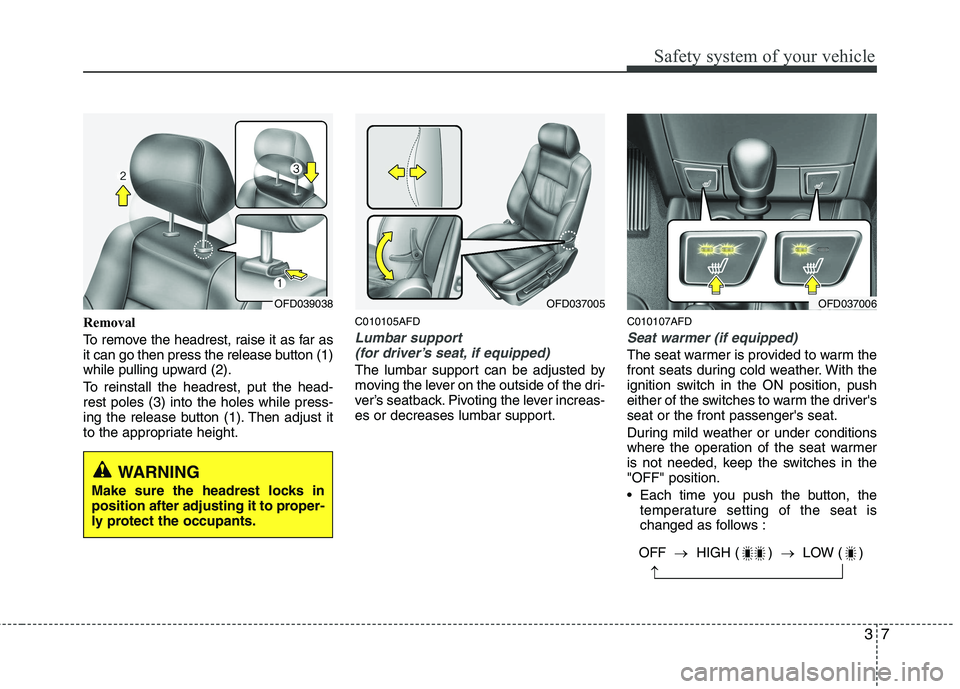
Removal
To remove the headrest, raise it as far as
it can go then press the release button (1)
while pulling upward (2).
To reinstall the headrest, put the head- rest poles (3) into the holes while press-
ing the release button (1). Then adjust it
to the appropriate height.C010105AFD
Lumbar support
(for driver’s seat, if equipped)
The lumbar support can be adjusted by
moving the lever on the outside of the dri-
ver’s seatback. Pivoting the lever increas-
es or decreases lumbar support. C010107AFD
Seat warmer (if equipped)
The seat warmer is provided to warm the
front seats during cold weather. With the
ignition switch in the ON position, push
either of the switches to warm the driver'sseat or the front passenger's seat.
During mild weather or under conditions
where the operation of the seat warmer
is not needed, keep the switches in the"OFF" position.
Each time you push the button, the
temperature setting of the seat is
changed as follows :
OFD037005OFD039038OFD037006
OFF �HIGH ( ) �LOW ( )
�
WARNING
Make sure the headrest locks in
position after adjusting it to proper-
ly protect the occupants.
Page 529 of 635
457
Features of your vehicle
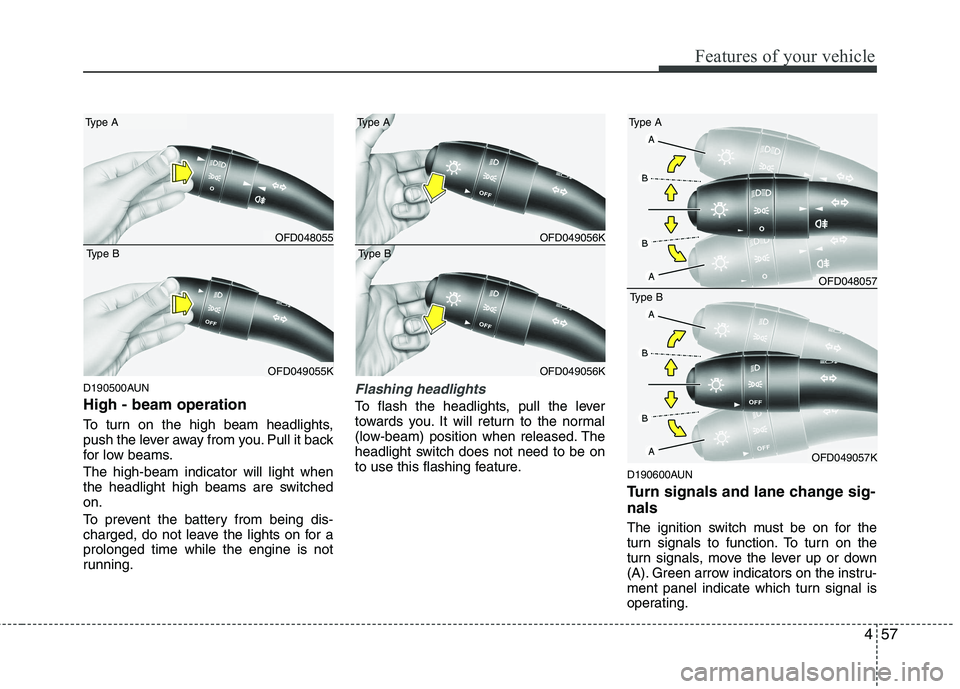
D190500AUN High - beam operation
To turn on the high beam headlights,
push the lever away from you. Pull it back
for low beams. The high-beam indicator will light when
the headlight high beams are switchedon.
To prevent the battery from being dis-
charged, do not leave the lights on for aprolonged time while the engine is not
running.Flashing headlights
To flash the headlights, pull the lever
towards you. It will return to the normal
(low-beam) position when released. The
headlight switch does not need to be on
to use this flashing feature.D190600AUN
Turn signals and lane change sig- nals
The ignition switch must be on for the
turn signals to function. To turn on the
turn signals, move the lever up or down
(A). Green arrow indicators on the instru-
ment panel indicate which turn signal is
operating.
OFD048055
Type A
OFD049055K
Type B
OFD049056K
Type A
OFD049056K
Type B
OFD048057
Type A
OFD049057K
Type B
Page 530 of 635
Features of your vehicle
58
4
They will self-cancel after a turn is com-
pleted. If the indicator continues to flash
after a turn, manually return the lever tothe OFF position.
To signal a lane change, move the turn
signal lever slightly and hold it in position
(B). The lever will return to the OFF posi-tion when released.
If an indicator stays on and does not
flash or if it flashes abnormally, one of the
turn signal bulbs may be burned out andwill require replacement.
One-touch triple turn signal
(if equipped)
To activate an one-touch triple turn signal
move the turn signal lever slightly and
then release it. The lane change signals
will blink 3 times.
✽✽ NOTICE
If an indicator flash is abnormally quick
or slow, bulb may be burned out or have
a poor electrical connection in the cir-
cuit.
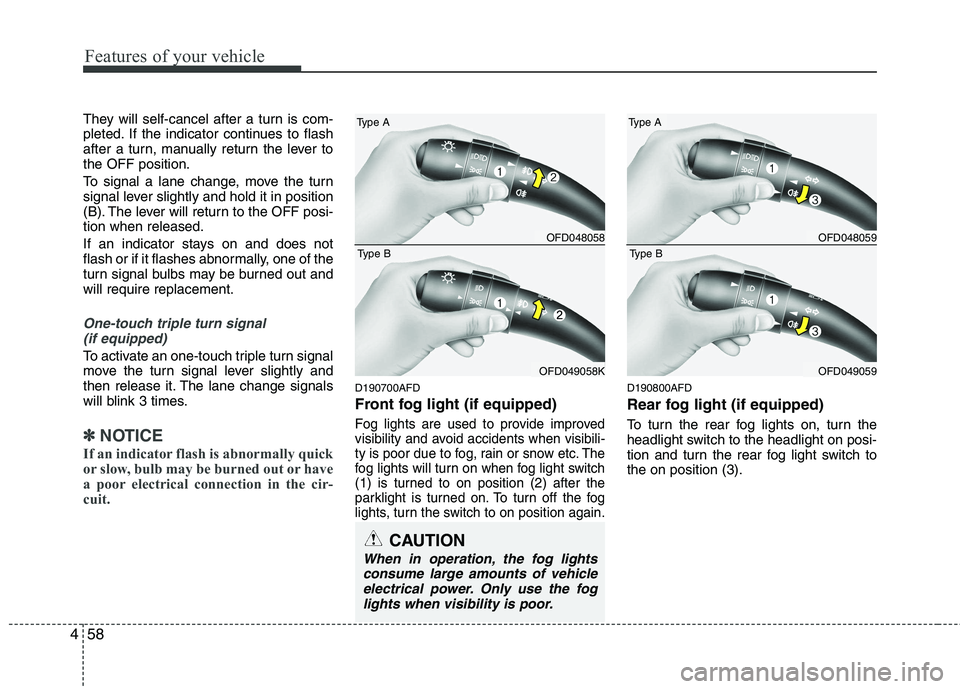
D190700AFD
Front fog light (if equipped)
Fog lights are used to provide improved
visibility and avoid accidents when visibili-
ty is poor due to fog, rain or snow etc. The
fog lights will turn on when fog light switch
(1) is turned to on position (2) after the
parklight is turned on. To turn off the fog
lights, turn the switch to on position again.
D190800AFD
Rear fog light (if equipped)
To turn the rear fog lights on, turn the
headlight switch to the headlight on posi-
tion and turn the rear fog light switch tothe on position (3).
CAUTION
When in operation, the fog lights consume large amounts of vehicleelectrical power. Only use the foglights when visibility is poor.
OFD048058
Type A
OFD049058K
Type B
OFD048059
Type A
OFD049059
Type B
Page 546 of 635
Features of your vehicle
74
4
D230503AFD
Air conditioning (if equipped)
All HYUNDAI Air Conditioning Systems
are filled with environmentally friendly
R-134a refrigerant which does not dam-
age to the ozone layer.
1. Start the engine. Push the air condi-
tioning button.
2. Set the mode to the position.
3. Set the air intake control to the outside air or recirculated air position.
4. Adjust the fan speed control and tem- perature control to maintain maximum
comfort.
When maximum cooling is desired, set the temperature control to the extreme
left position then set the fan speedcontrol to the highest speed.
✽✽ NOTICE
When using the air conditioning sys- tem, monitor the temperature gauge
closely while driving up hills or in
heavy traffic when outside tempera-
tures are high. Air conditioning sys-
tem operation may cause engine over-
heating. Continue to use the blower
fan but turn the air conditioning sys-
tem off if the temperature gauge indi-
cates engine overheating.
When opening the windows in humid weather air conditioning may create
water droplets inside the vehicle.
Since excessive water droplets may
cause damage to electrical equipment,
air conditioning should only be run
with the windows closed.Air conditioning system operation tips
If the vehicle has been parked in directsunlight during hot weather, open the
windows for a short time to let the hot
air inside the vehicle escape.
To help reduce moisture inside of win- dows on rainy or humid days, decrease
the humidity inside the vehicle by oper-ating the air conditioning system.
During air conditioning system opera- tion, you may occasionally notice aslight change in engine speed as the
air conditioning compressor cycles.
This is a normal system operation
characteristic.
Use the air conditioning system every month if only for a few minutes to
ensure maximum system performance.
When using the air conditioning sys- tem, you may notice clear water drip-
ping (or even puddling) on the ground
under the passenger side of the vehi-
cle. This is a normal system operation
characteristic.
Operating the air conditioning system in the recirculated air position provides
maximum cooling, however, continual
operation in this mode may cause the
air inside the vehicle to become stale.
During cooling operation, you may occasionally notice a misty air flow
because of rapid cooling and humid air
intake. This is a normal system opera-
tion characteristics.
Page 547 of 635
475
Features of your vehicle
D230300AFD
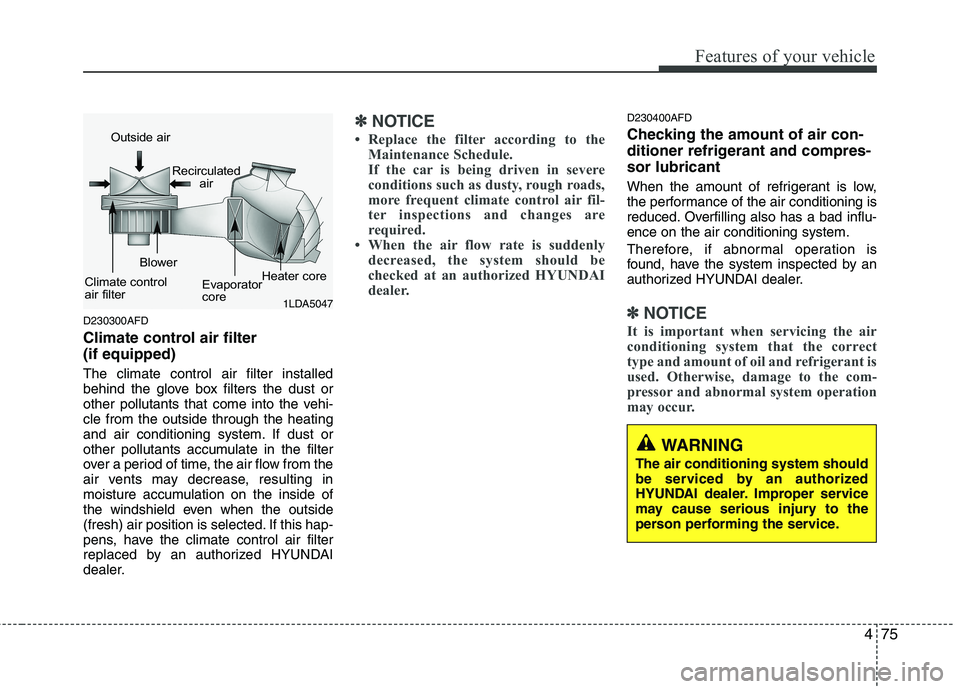
Climate control air filter (if equipped) The climate control air filter installed
behind the glove box filters the dust or
other pollutants that come into the vehi-cle from the outside through the heating
and air conditioning system. If dust or
other pollutants accumulate in the filter
over a period of time, the air flow from the
air vents may decrease, resulting in
moisture accumulation on the inside of
the windshield even when the outside
(fresh) air position is selected. If this hap-
pens, have the climate control air filter
replaced by an authorized HYUNDAI
dealer.
✽✽NOTICE
Replace the filter according to the Maintenance Schedule.
If the car is being driven in severe
conditions such as dusty, rough roads,
more frequent climate control air fil-
ter inspections and changes are
required.
When the air flow rate is suddenly
decreased, the system should be
checked at an authorized HYUNDAI
dealer.D230400AFD
Checking the amount of air con-
ditioner refrigerant and compres-sor lubricant
When the amount of refrigerant is low,
the performance of the air conditioning is
reduced. Overfilling also has a bad influ-ence on the air conditioning system.
Therefore, if abnormal operation is
found, have the system inspected by an
authorized HYUNDAI dealer.
✽✽ NOTICE
It is important when servicing the air
conditioning system that the correct
type and amount of oil and refrigerant is
used. Otherwise, damage to the com-
pressor and abnormal system operation
may occur. 1LDA5047
Outside air
Recirculatedair
Climate control
air filter Blower
Evaporator
coreHeater core
WARNING
The air conditioning system should
be serviced by an authorized
HYUNDAI dealer. Improper service
may cause serious injury to the
person performing the service.
Page 567 of 635
495
Features of your vehicle
D280601AUN
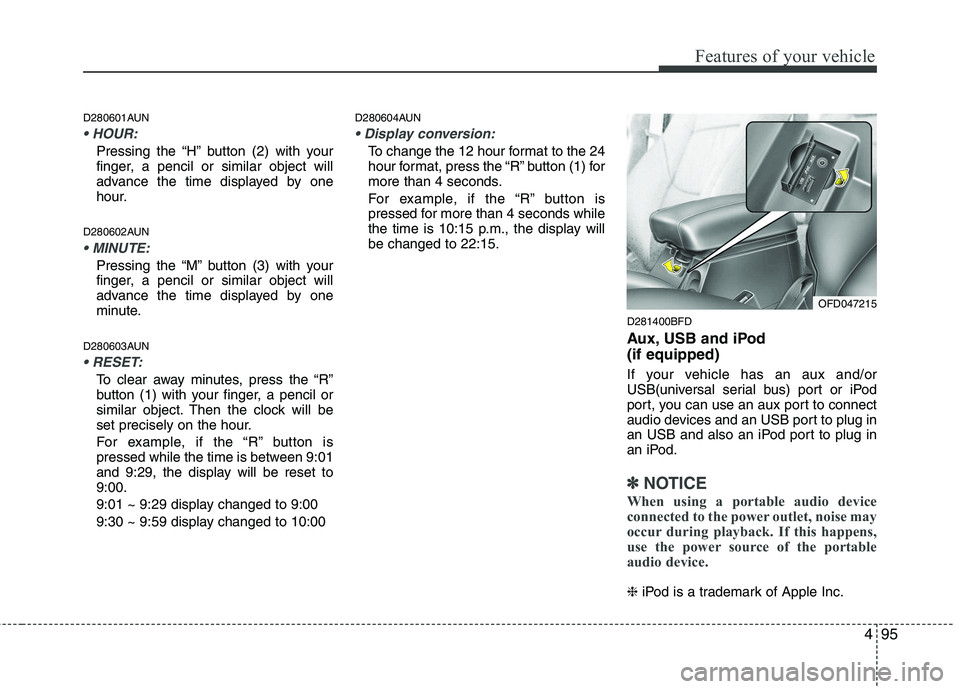
Pressing the “H” button (2) with your
finger, a pencil or similar object will
advance the time displayed by one
hour.
D280602AUN
Pressing the “M” button (3) with your
finger, a pencil or similar object will
advance the time displayed by one
minute.
D280603AUN
To clear away minutes, press the “R”
button (1) with your finger, a pencil or
similar object. Then the clock will be
set precisely on the hour.
For example, if the “R” button is
pressed while the time is between 9:01
and 9:29, the display will be reset to9:00.
9:01 ~ 9:29 display changed to 9:00
9:30 ~ 9:59 display changed to 10:00 D280604AUN
To change the 12 hour format to the 24
hour format, press the “R” button (1) for
more than 4 seconds.
For example, if the “R” button is
pressed for more than 4 seconds while
the time is 10:15 p.m., the display willbe changed to 22:15.
D281400BFD
Aux, USB and iPod (if equipped)
If your vehicle has an aux and/or
USB(universal serial bus) port or iPod
port, you can use an aux port to connect
audio devices and an USB port to plug in
an USB and also an iPod port to plug in
an iPod.
✽✽NOTICE
When using a portable audio device
connected to the power outlet, noise may
occur during playback. If this happens,
use the power source of the portable
audio device.
❈ iPod is a trademark of Apple Inc.
OFD047215
Page 585 of 635
4113
Features of your vehicle
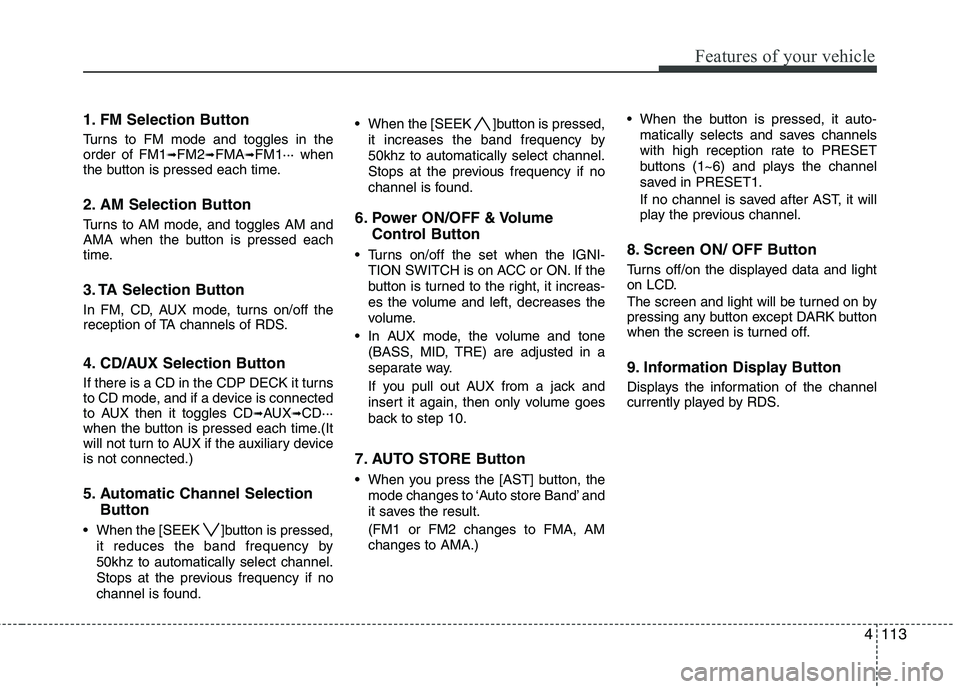
1. FM Selection Button
Turns to FM mode and toggles in the order of FM1➟FM2 ➟FMA ➟FM1··· when
the button is pressed each time.
2. AM Selection Button
Turns to AM mode, and toggles AM and
AMA when the button is pressed each
time.
3. TA Selection Button
In FM, CD, AUX mode, turns on/off the
reception of TA channels of RDS.
4. CD/AUX Selection Button
If there is a CD in the CDP DECK it turns
to CD mode, and if a device is connected
to AUX then it toggles CD ➟AUX ➟CD···
when the button is pressed each time.(It
will not turn to AUX if the auxiliary deviceis not connected.)
5. Automatic Channel Selection
Button
When the [SEEK ]button is pressed, it reduces the band frequency by 50khz to automatically select channel.
Stops at the previous frequency if no
channel is found. When the [SEEK ]button is pressed,
it increases the band frequency by50khz to automatically select channel.
Stops at the previous frequency if no
channel is found.
6. Power ON/OFF & Volume Control Button
Turns on/off the set when the IGNI- TION SWITCH is on ACC or ON. If the
button is turned to the right, it increas-
es the volume and left, decreases the
volume.
In AUX mode, the volume and tone (BASS, MID, TRE) are adjusted in a
separate way.
If you pull out AUX from a jack and
insert it again, then only volume goes
back to step 10.
7. AUTO STORE Button
When you press the [AST] button, the mode changes to ‘Auto store Band’ and
it saves the result. (FM1 or FM2 changes to FMA, AM changes to AMA.) When the button is pressed, it auto-
matically selects and saves channels
with high reception rate to PRESET
buttons (1~6) and plays the channel
saved in PRESET1.
If no channel is saved after AST, it will
play the previous channel.
8. Screen ON/ OFF Button
Turns off/on the displayed data and light
on LCD.
The screen and light will be turned on by
pressing any button except DARK button
when the screen is turned off.
9. Information Display Button
Displays the information of the channel
currently played by RDS.