Page 366 of 393

Maintenance
48 7
Instrument panel (Driver’s side fuse panel)
Description Fuse rating Protected component
P/WDW(LH) 30A Driver Power Window Module, Rear Power Window Module LH
P/WDW(RH) 30A Passenger Power Window Module, Rear Power Window Module RH
MODULE 2 10AConsole Switch LH/RH, ECS Control Module, Steering Angle Sensor, Key Lock Module,Tire Pressure
Monitoring Module
CURISE SW 10AMultifunction Switch, Crash Pad Switch, A/C Control Module, Instrument Cluster, Rear Seat Warmer
Module LH, Driver Seat Warmer Module Rear Seat Warmer Module RH, Passenger Seat Warmer
Module, Passenger CCS Control Module, Driver CCS Control Module, Generator
START 10A Transmission Range Switch
PDM 2 10A Fob Holder, Start Stop Button Switch
CLUSTER 10A Instrument Cluster (IND.)
A/CON(IG1) 10A A/C Control Module
KEY ILLUMINATION 10A Start Stop Button Switch, Door Warning Switch, Fob Holder, Key Solenoid
IG KEY SUPPLY 30AE/R Junction Box Fuse (INHIBITOR SW 15A, ECU-2 10A, EHPS 10A, CRUISE 10A, TCU 15A,
ESP 10A,STOP LP 10A, AFLS 10A)
INTELLIGENT
A/PEDAL10A Intelligent Accel Pedal Unit
DR LOCK DRV 10A Driver Door Module
STOP LP 10A Stop Lamp Switch
A/BAG IND 10A Instrument Cluster (Air Bag IND.)
AFLS 10AAuto Head Lamp Leveling Device Sensor, Adaptive Front Lighting Module, Head Lamp LH, Head
Lamp RH
PDM 1 10A PDM
SECURITY LP 10A Data Link Connector, Auto Light Sensor & Security Indicator, Rear Door Module LH/RH,Shift Lock
Page 368 of 393

Maintenance
50 7
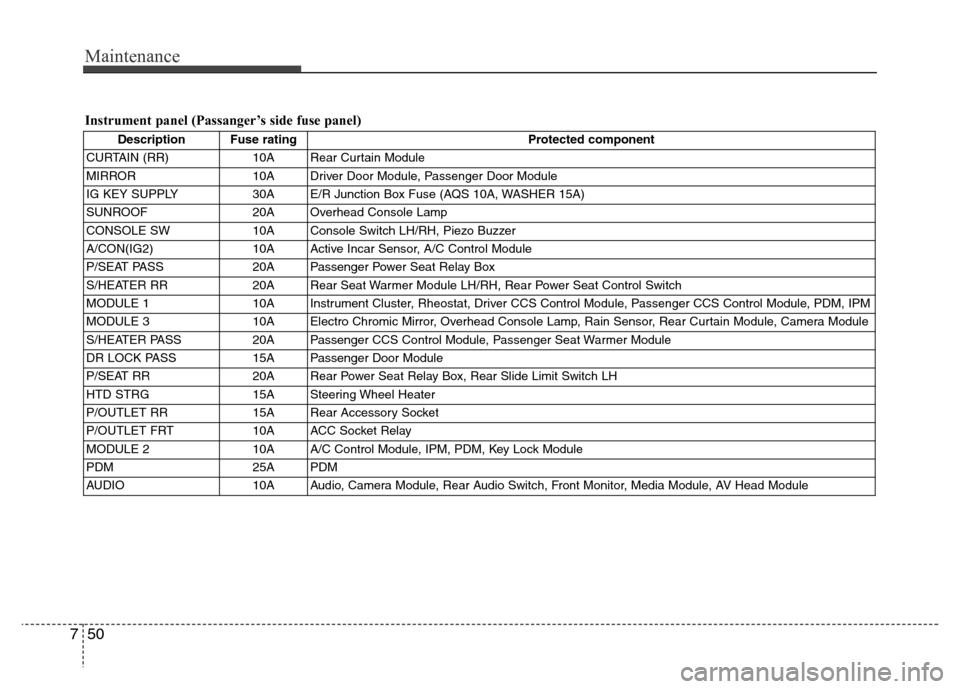
Instrument panel (Passanger’s side fuse panel)
Description Fuse rating Protected component
CURTAIN (RR) 10A Rear Curtain Module
MIRROR 10A Driver Door Module, Passenger Door Module
IG KEY SUPPLY 30A E/R Junction Box Fuse (AQS 10A, WASHER 15A)
SUNROOF 20A Overhead Console Lamp
CONSOLE SW 10A Console Switch LH/RH, Piezo Buzzer
A/CON(IG2) 10A Active Incar Sensor, A/C Control Module
P/SEAT PASS 20A Passenger Power Seat Relay Box
S/HEATER RR 20A Rear Seat Warmer Module LH/RH, Rear Power Seat Control Switch
MODULE 1 10A Instrument Cluster, Rheostat, Driver CCS Control Module, Passenger CCS Control Module, PDM, IPM
MODULE 3 10A Electro Chromic Mirror, Overhead Console Lamp, Rain Sensor, Rear Curtain Module, Camera Module
S/HEATER PASS 20A Passenger CCS Control Module, Passenger Seat Warmer Module
DR LOCK PASS 15A Passenger Door Module
P/SEAT RR 20A Rear Power Seat Relay Box, Rear Slide Limit Switch LH
HTD STRG 15A Steering Wheel Heater
P/OUTLET RR 15A Rear Accessory Socket
P/OUTLET FRT 10A ACC Socket Relay
MODULE 2 10A A/C Control Module, IPM, PDM, Key Lock Module
PDM 25A PDM
AUDIO 10A Audio, Camera Module, Rear Audio Switch, Front Monitor, Media Module, AV Head Module
Page 372 of 393

Maintenance
54 7
LIGHT BULBS
G220000AEN
Use only the bulbs of the specified
wattage.
✽NOTICE
After heavy, driving rain or washing,
headlight and taillight lenses could
appear frosty. This condition is caused by
the temperature difference between the
lamp inside and outside. This is similar
to the condensation on your windows
inside your vehicle during the rain and
doesn’t indicate a problem with your
vehicle. If the water leaks into the lamp
bulb circuitry, have the vehicle checked
by an authorized HYUNDAI dealer.
G220100ABH
Headlight, position light, turn sig-
nal light, front fog light bulb
replacement
(1) Headlight (High)
(2) Headlight (Low)
(3) Position light
(4) Front turn signal light
(5) Front fog light (if equipped)
WARNING - Working on
the lights
Prior to working on the light, firmly
apply the parking brake, ensure
that the ignition switch is turned to
the LOCK position and turn off the
lights to avoid sudden movement
of the vehicle and burning your fin-
gers or receiving an electric shock.
CAUTION
Be sure to replace the burned-out
bulb with one of the same wattage
rating. Otherwise, it may cause
damage to the fuse or electric
wiring system.
CAUTION
If you don’t have necessary tools,
the correct bulbs and the expertise,
consult an authorized HYUNDAI
dealer. In many cases, it is difficult
to replace vehicle light bulbs
because other parts of the vehicle
must be removed before you can
get to the bulb. This is especially
true if you have to remove the head-
light assembly to
get to the bulb(s).
Removing/installingthe headlight
assembly can result in damage to
the vehicle.OBH071053
Page 375 of 393

757
Maintenance
G220300ABH
Rear combination light bulb
replacement
(1) Back-up light
(2) Rear turn signal light
(3) Stop and tail light
(4) Tail light
(5) Rear fog light (if equipped)
Rear turn signal light
1. Open the trunk lid.
2. Remove the service cover by pulling out
the service cover.3. Remove the socket from the assembly
by turning the socket counterclockwise
until the tabs on the socket align with
the slots on the assembly.
4. Remove the bulb from the socket by
pressing it in and rotating it counter-
clockwise until the tabs on the bulb
align with the slots in the socket. Pull
the bulb out of the socket.
5. Insert a new bulb by inserting it into
the socket and rotating it until it locks
into place.
6. Install the socket in the assembly by
aligning the tabs on the socket with the
slots in the assembly. Push the socket
into the assembly and turn the socket
clockwise.
7. Install the service cover by putting it
into the service hole.
OBH071032
OBH071032 ■Type A
■Type B
OBH078033
OBH078034
Page 393 of 393
87
Specifications & Consumer information
H030000AUN
The tires supplied on your new vehicle
are chosen to provide the best perform-
ance for normal driving.
The tire label located on the driver's side
center pillar gives the tire pressures rec-
ommended for your car.
H04000AUN
The engine number is stamped on the
engine block as shown in the drawing.A compressor label informs you the type
of compressor your vehicle is equipped
with such as model, supplier part num-
ber, production number, refrigerant (1)
and refrigerant oil (2).
TIRE SPECIFICATION AND
PRESSURE LABEL
OBH088002
ENGINE NUMBER
OBH088003L
OBH081003
OBH088007N
3.0L/3.8L (GDI)
3.3L/3.8L (MPI)
4.6L (MPI)
AIR CONDITIONER
COMPRESSOR LABEL
OHC081001