Page 149 of 332

Features of your vehicle
88
4
D270000AUN
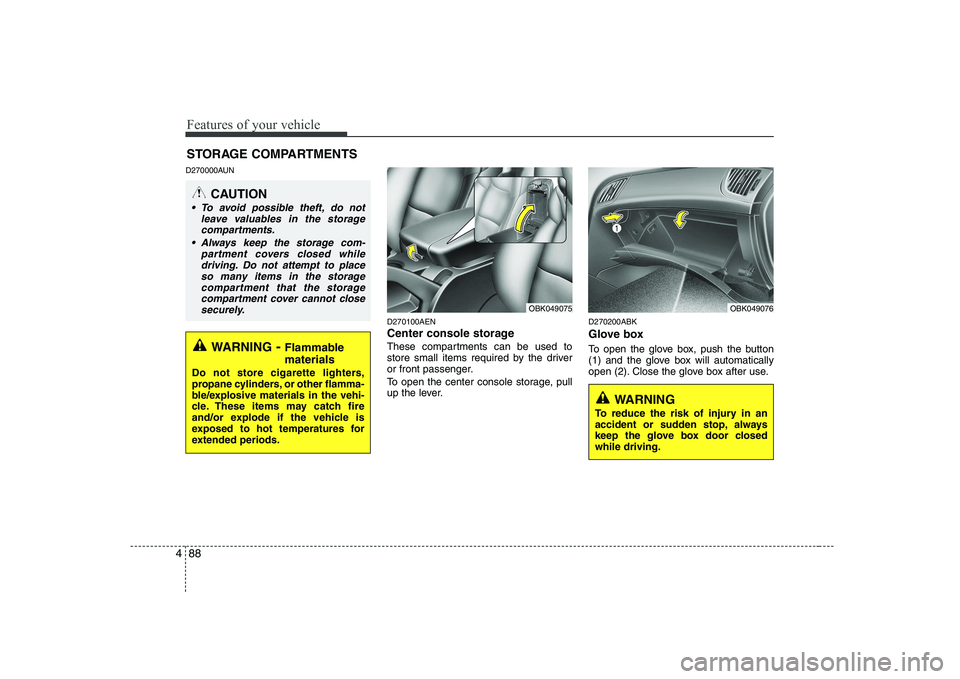
D270100AEN
Center console storage
These compartments can be used to
store small items required by the driver
or front passenger.
To open the center console storage, pull
up the lever.D270200ABK
Glove box
To open the glove box, push the button
(1) and the glove box will automatically
open (2). Close the glove box after use.
STORAGE COMPARTMENTS
WARNING
- Flammable
materials
Do not store cigarette lighters,
propane cylinders, or other flamma-
ble/explosive materials in the vehi-
cle. These items may catch fire
and/or explode if the vehicle is
exposed to hot temperatures for
extended periods.
CAUTION
To avoid possible theft, do not leave valuables in the storage
compartments.
Always keep the storage com- partment covers closed whiledriving. Do not attempt to placeso many items in the storage
compartment that the storagecompartment cover cannot closesecurely.
OBK049076OBK049075
WARNING
To reduce the risk of injury in an
accident or sudden stop, always
keep the glove box door closedwhile driving.
Page 276 of 332
Maintenance
26
7
G170100AEN Filter inspection The climate control air filter should be replaced according to the Maintenance
Schedule. If the vehicle is operated in
severely air-polluted cities or on dusty
rough roads for a long period, it shouldbe inspected more frequently and
replaced earlier. When you replace the
climate control air filter, replace it per-
forming the following procedure, and be
careful to avoid damaging other compo-
nents. G170200ABK Filter replacement
1. Open the glove box and remove the
support rod (1).CAUTION
Do not drive with the air cleaner
removed; this will result in exces-sive engine wear.
When removing the air cleaner fil- ter, be careful that dust or dirt
does not enter the air intake, ordamage may result.
Use a HYUNDAI genuine part. Use of non-genuine parts could dam-age the air flow sensor.
CLIMATE CONTROL AIR FIL-
TER (IF EQUIPPED)
OBK079014
Page 277 of 332
727
Maintenance
2. With the glove box open, remove thestoppers on both sides to allow the
glove box to hang freely on the hinges. 3. Remove the climate control air filter
case pulling out both sides of the
cover. 3. Replace the climate control air filter.
4. Reassemble in the reverse order of
disassembly.
✽✽ NOTICE
When replacing the climate control air
filter install it properly. Otherwise, the
system may produce noise and the effec-
tiveness of the filter may be reduced.
OBK079016OBK079017OBK079015
Page 300 of 332

Maintenance
50
7
Description Fuse rating Protected component
WIPER(FR) 25A Multifunction switch (Wiper), Front wiper motor, E/R junction box LH (WIPER (FR) relay)
IGN/ESCL 7.5A PDM, E/R junction box LH (H/LP(HI)/(LO) relay), Vacuum switch, Sunroof control module, Electro chromic mir- ror, Auto head lamp leveling device sensor, Head lamp leveling device actuator LH/RH
ESCL 25A PDM
P/WDW(LH) 25A Driver safety window module
P/WDW(RH) 25A Passenger safety window module
SEAT HTR(DRI) 10A Driver seat warmer switch
SEAT HTR(ASS) 10A Passenger seat warmer switch
MIRROR HTD 7.5A A/C control module, Power outside mirror LH/RH, Rear defogger (+)
T/LID OPEN 15A Trunk lid & Fuel filler door switch, T/LID relay
AMP 20A AMP
TAIL(LH) 7.5A Head lamp LH, Rear combination lamp LH, E/R junction box LH (FOG LP(FR) relay)
TAIL(RH) 10A Head lamp RH, Rear combination lamp RH, Front license lamp, Glove box lamp, Rheostat, Driver/Passenger seat warmer switch, ESP & Rear fog switch, Head lamp leveling device switch, Multimonitor, hazard switch,
Audio, Rear license lamp, Driver/Passenger power window switch, Sport mode switch, A/C control module,
USB/AUX jack, Instrument cluster (ILL.), Multifunction switch (Remocon)
P/CON AUDIO 15A Audio MEMORY 10A Trunk room lamp, Power outside mirror & Mirror folding switch, MAP lamp, Auto light & Photo sensor/Security indcator, Multimonitor, RF receiver Instrument cluster (MICOM, IND.), A/C control module, BCM, Rear parking
assist buzzer, Door warning switch, Vanity lamp LH/RH
Page 309 of 332
759
Maintenance
G220600ABK
Interior light bulb replacement
1. Using a flat-blade screwdriver, gentlypry the lens (map lamp) or lamp (lug-
gage lamp, glove box lamp and sunvi-
sor lamp) from the interior light hous-ing.
2. Remove the bulb by pulling it straight out. 3. Install a new bulb in the socket.
4. Align the lens tabs with the interior
light housing notches and snap the
lens into place.
CAUTION
Use care not to dirty or damage
lens, lens tab, and plastic housings.
OBK079033
OTD079035
Sunvisor lamp
Luggage lamp (if equipped)
OBK079032
OBK079049
Map lamp
Glove box lamp
WARNING
Prior to working on the Interior
Lights, ensure that the “OFF” but-
ton is depressed to avoid burning
your fingers or receiving an electric
shock.
Page 320 of 332
Specifications & Consumer information
2
8
Item mm (in)
Overall length 4,630 (182.2)
Overall width 1,865 (73.4)
Overall height 1,385 (54.5)
Front tread 1,603 (63.1) / 1,599 (62.9)* 1
Rear tread 1,619 (63.7) / 1,615 (63.6)* 1
Wheelbase 2,820 (111)
DIMENSIONS
Light Bulb Wattage
Headlights (Low) 55
Headlights (High) 55
Front turn signal lights 21
Front fog lights* 27
Rear fog light* 21
Stop and tail lights 21
Tail light* 5
Rear turn signal lights 21
Back-up lights 16
High mounted stop light* LED
License plate lights 5Map lamps 10
Luggage lamp* 5
Glove box lamp 5
Vanity mirror lamps* 5
Side repeater light* LED
BULB WATTAGE
* : If equipped
*
1
: with R19 tire
I010000ABH
I030000ABH