2012 Hyundai Elantra lock
[x] Cancel search: lockPage 11 of 384

Introduction
4
1
Use of MTBE
Fuels containing MTBE (Methyl Tertiary
Butyl Ether) over 15.0% vol. (Oxygen
Content 2.7% weight) should not be used
in your vehicle.
Fuel containing MTBE over 15.0% vol.
(Oxygen Content 2.7% weight) may
reduce vehicle performance and produce
vapor lock or hard starting.
Do not use methanol
Fuels containing methanol (wood alco-
hol) should not be used in your vehicle.
This type of fuel can reduce vehicle per-
formance and damage components ofthe fuel system.
Fuel Additives
HYUNDAI recommends that you use good quality petrol that meets Europe
Fuel standards (EN228) or equivalents.
For customers who do not use good
quality petrol including fuel additives reg-
ularly, and have problems starting or the
engine does not run smoothly, one bottle
of additives should be added to the fuel
tank at every 15,000km. Additives are
available from your authorised HYUNDAI
dealer along with information on how touse them.
Operation in foreign countries
If you are going to drive your vehicle in
another country, be sure to:
Observe all regulations regarding reg-
istration and insurance.
Determine that acceptable fuel is avail- able. No special run-in period is needed. By
following a few simple precautions for the
first 1,000 km (600 miles) you may add to
the performance, economy and life of
your vehicle.
Do not race the engine.
Whilst driving, keep your engine speed
(rpm, or revolutions per minute)
between 2,000 rpm and 4,000 rpm.
Do not maintain a single speed for long periods of time, either fast or slow.
Varying engine speed is needed to
properly run-in the engine.
Avoid hard stops, except in emergen- cies, to allow the brakes to seat prop-
erly.
Don't let the engine idle longer than 3
minutes at one time.
Don't tow a trailer during the first 2,000 km (1,200 miles) of operation.
CAUTION
Your New Vehicle Limited Warranty
may not cover damage to the fuelsystem and any performance prob-lems that are caused by the use of
fuels containing methanol or fuelscontaining MTBE (Methyl TertiaryButyl Ether) over 15.0% vol.(Oxygen Content 2.7% weight.)
VEHICLE RUN-IN PROCESS
Page 12 of 384

15
Introduction
INDICATOR SYMBOLS ON THE INSTRUMENT CLUSTER
Seat belt warning light
High beam indicator
Turn signal indicator
Anti-lock brake system (ABS)
warning light*
Parking brake & Brake fluid
warning light
Malfunction indicator
Immobiliser indicator*
Boot open warning light*
Charging system warning light
Door ajar warning light*
ESP (ESC*
1
) indicator*
ESP (ESC* 1
) OFF indicator*
Front fog light indicator*
Engine oil pressure warning lightElectric power steering (EPS)
system warning light
Air bag warning light*
Rear fog light indicator*
Cruise control SET indicator*
Cruise control indicator*
Light on indicator
Automatic transaxle shift posi-
tion indicator (Automatic
transaxle only)
Manual transaxle shift indicator
(Manual transaxle only)
Low fuel level warning light
❈ For more detailed explanations, refer to “Instrument cluster” in section 4. ECO indicator*ECO
Overspeed warning light*120km/h
* if equipped *
1
Some countries use the term ESC (Electronic stability control) instead of
ESP. Please refer to the term your
country uses.
Page 14 of 384
Your vehicle at a glance
2
2
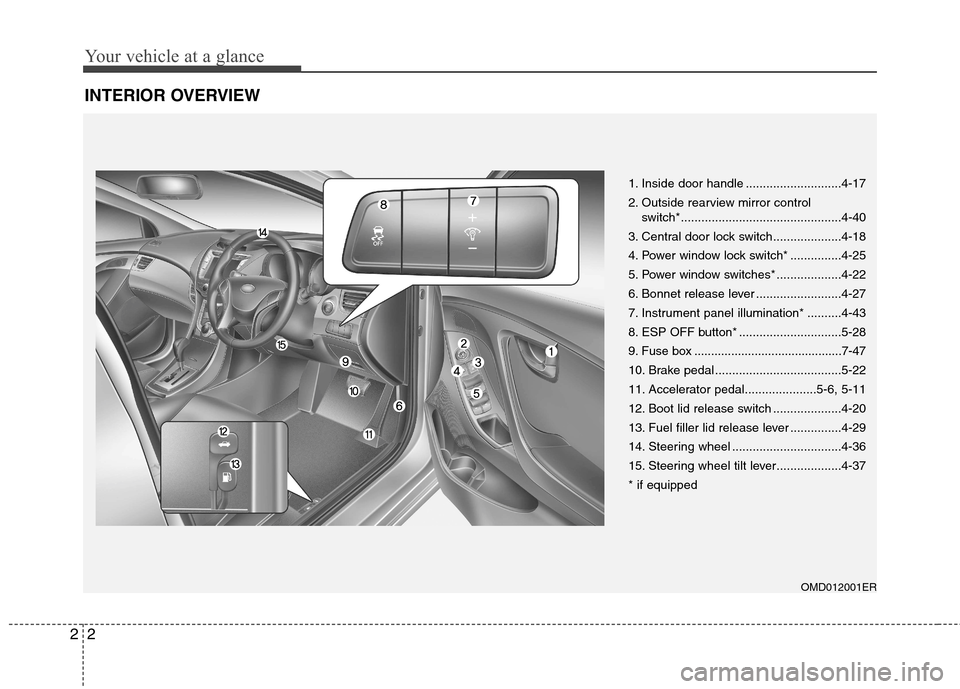
INTERIOR OVERVIEW
OMD012001ER
1. Inside door handle ............................4-17
2. Outside rearview mirror control
switch*...............................................4-40
3. Central door lock switch....................4-18
4. Power window lock switch* ...............4-25
5. Power window switches* ...................4-22
6. Bonnet release lever .........................4-27
7. Instrument panel illumination* ..........4-43
8. ESP OFF button* ..............................5-28
9. Fuse box ............................................7-47
10. Brake pedal .....................................5-22
11. Accelerator pedal.....................5-6, 5-11
12. Boot lid release switch ....................4-20
13. Fuel filler lid release lever ...............4-29
14. Steering wheel ................................4-36
15. Steering wheel tilt lever...................4-37* if equipped
Page 15 of 384

23
Your vehicle at a glance
INSTRUMENT PANEL OVERVIEW
OMD011002R
1. Instrument cluster.............................4-42
2. Horn .................................................4-38
3. Driver’s front air bag .........................3-44
4. Light control/Turn signals .................4-70
5. Wiper/Washer ...................................4-75
6. Ignition switch*/
Engine start/stop button ..............5-5, 5-8
7. Digital clock ....................................4-104
8. Audio controls* ....................4-112, 4-116
9. Hazard warning flasher switch ..4-69, 6-2
10. Climate control system .........4-81, 4-90
11. Shift lever ..............................5-13, 5-16
12. Parking brake .................................5-24
13. Passenger’s front air bag ...............3-44
14. Glove box .....................................4-103* if equipped❈ The actual instrument panel in the vehicle may differ from the illustration.
Page 19 of 384
33
Safety features of your vehicle
WARNING- Driver’s seat
Never attempt to adjust seat whilst the vehicle is moving. This
could result in loss of control,and an accident causing death,
serious injury, or property dam-
age.
Do not allow anything to interfere with the normal position of the
seatback. Storing items against a
seatback or in any other way
interfering with proper locking of
a seatback could result in serious
or fatal injury in a sudden stop orcollision.
seatback upright and the lap por-
tion of the seat belt snug and low
across the hips. This is the best
position to protect you in case ofan accident.
In order to avoid unnecessary and perhaps severe air bag
injuries, always sit as far back as
possible from the steering wheel
whilst maintaining comfortable
control of the vehicle. We recom-
mend that your chest be at least
250 mm (10 inches) away fromthe steering wheel.
WARNING - Uprighting seat
When you return the seatback to its
upright position, hold the seatback
and return it slowly and be surethere are no other occupants
around the seat. If the seatback isreturned without being held and
controlled, the back of the seat
could move forward or backward
resulting in accidental injury to a
person struck by the seatback.
WARNING - Driver respon-
sibility for passengers
Riding in a vehicle with seatback
reclined could lead to serious or
fatal injury in an accident. If a seat
is reclined during an accident, the
occupant’s hips may slide under
the lap portion of the seat belt
applying great force to the unpro-
tected abdomen. The protection of
your retraint system (seat belt and
air bags) is greatly reduced by
reclining your seat. Serious or fatal
internal injuries could result. The
driver must advise the passenger
to keep the seatback in an upright
position whenever the vehicle is inmotion.WARNING - Loose objects
Loose objects in the driver’s foot
area could interfere with the opera-
tion of the foot pedals, possibly
causing an accident. Do not place
anything under the front seats.
WARNING
Do not use a sitting cushion that reduces friction between the seat
and passenger. The passenger's
hips may slide under the lap por-tion of the seat belt during an acci-
dent or a sudden stop. Serious orfatal internal injuries could resultbecause the seat belt can't operate
normally.
Page 20 of 384
Safety features of your vehicle
4
3
(Continued)
To avoid the possibility of burns,
do not remove the carpet in the
cargo area. Emission control
devices beneath this floor gener-ate high temperatures.WARNING - Rear seatbacks
The rear seatback must be securely latched. If not, passen-
gers and objects could be thrown
forward resulting in serious
injury or death in the event of a
sudden stop or collision.
Luggage and other cargo should be laid flat in the cargo area. If
objects are large, heavy, or must
be piled, they must be secured.
Under no circumstances should
cargo be piled higher than the
seatbacks. Failure to follow thesewarnings could result in serious
injury or death in the event of a
sudden stop, collision or rollover.
No passenger should ride in the cargo area or sit or lie on folded
seatbacks whilst the vehicle is
moving. All passengers must be
properly seated in seats and
restrained properly whilst riding.
When resetting the seatback to the upright position, make sure it
is securely latched by pushing it
forward and backwards.
(Continued)
WARNING
After adjusting the seat, always
check that it is securely locked into
place by attempting to move the
seat forward or backward without
using the lock release lever.
Sudden or unexpected movement
of the driver's seat could cause you
to lose control of the vehicle result-ing in an accident.
WARNING
Do not adjust the seat whilst wearing seat belts. Moving the
seat cushion forward may cause
strong pressure on the abdomen.
Use extreme caution so that hands or other objects are not
caught in the seat mechanisms
whilst the seat is moving.
Do not put a cigarette lighter on the floor or seat. When you oper-
ate the seat, gas may gush out of
the lighter and cause fire.
Page 21 of 384
35
Safety features of your vehicle
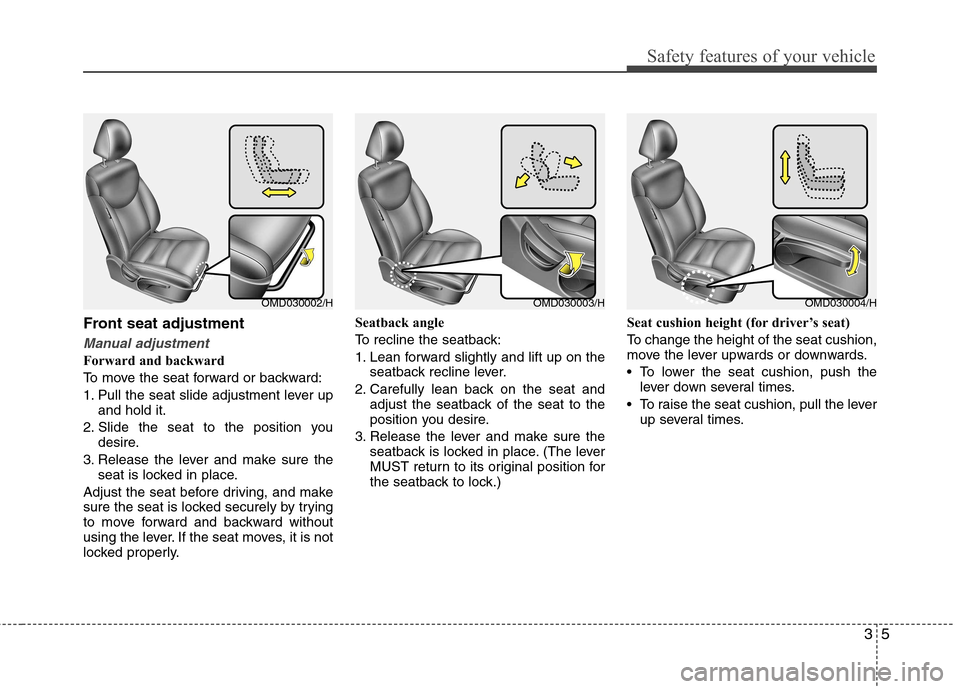
Front seat adjustment
Manual adjustment
Forward and backward
To move the seat forward or backward:
1. Pull the seat slide adjustment lever upand hold it.
2. Slide the seat to the position you desire.
3. Release the lever and make sure the seat is locked in place.
Adjust the seat before driving, and make
sure the seat is locked securely by trying
to move forward and backward without
using the lever. If the seat moves, it is not
locked properly. Seatback angle
To recline the seatback:
1. Lean forward slightly and lift up on the
seatback recline lever.
2. Carefully lean back on the seat and adjust the seatback of the seat to the
position you desire.
3. Release the lever and make sure the seatback is locked in place. (The lever
MUST return to its original position for
the seatback to lock.) Seat cushion height (for driver’s seat)
To change the height of the seat cushion,
move the lever upwards or downwards.
• To lower the seat cushion, push the
lever down several times.
To raise the seat cushion, pull the lever up several times.
OMD030003/HOMD030004/HOMD030002/H
Page 25 of 384
39
Safety features of your vehicle
Removal
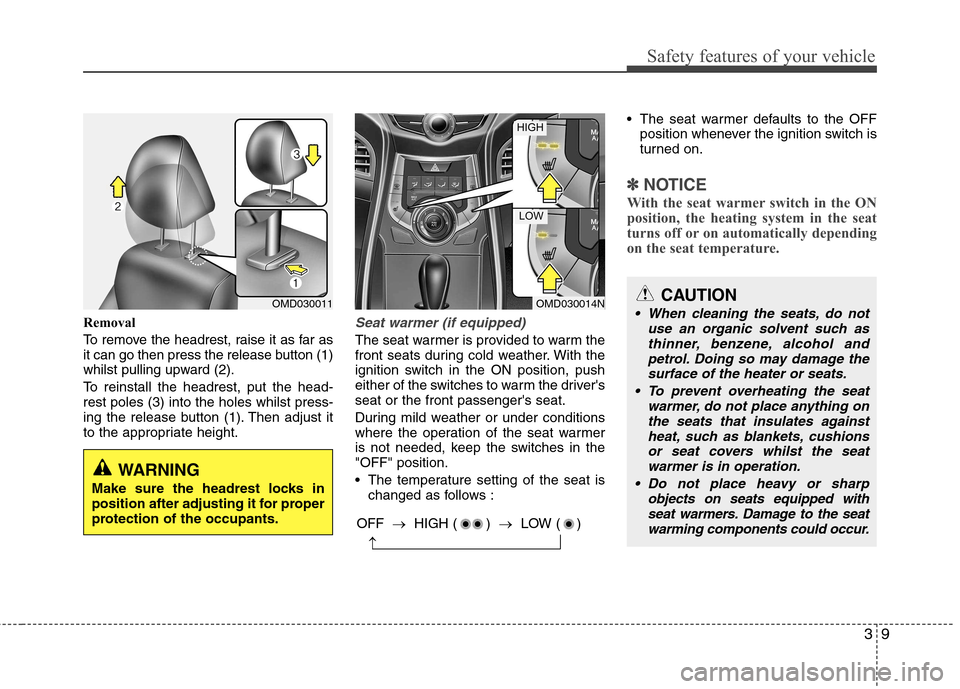
To remove the headrest, raise it as far as
it can go then press the release button (1)
whilst pulling upward (2).
To reinstall the headrest, put the head- rest poles (3) into the holes whilst press-
ing the release button (1). Then adjust it
to the appropriate height.Seat warmer (if equipped)
The seat warmer is provided to warm the
front seats during cold weather. With the
ignition switch in the ON position, push
either of the switches to warm the driver'sseat or the front passenger's seat.
During mild weather or under conditions
where the operation of the seat warmer
is not needed, keep the switches in the"OFF" position.
The temperature setting of the seat ischanged as follows : The seat warmer defaults to the OFF
position whenever the ignition switch is
turned on.
✽✽ NOTICE
With the seat warmer switch in the ON
position, the heating system in the seat
turns off or on automatically depending
on the seat temperature.
WARNING
Make sure the headrest locks in
position after adjusting it for proper
protection of the occupants.
OMD030011OMD030014N
HIGH
LOW
OFF �HIGH ( ) �LOW ( )
�
CAUTION
When cleaning the seats, do not
use an organic solvent such asthinner, benzene, alcohol andpetrol. Doing so may damage the
surface of the heater or seats.
To prevent overheating the seat warmer, do not place anything onthe seats that insulates againstheat, such as blankets, cushions
or seat covers whilst the seatwarmer is in operation.
Do not place heavy or sharp objects on seats equipped with
seat warmers. Damage to the seatwarming components could occur.