Page 146 of 391
469
Features of your vehicle
D220000AUN
✽
✽NOTICE
If you want to defrost and defog the
front windshield, refer to “Windshield
defrosting and defogging” in this sec-
tion.
D220100AEN
Rear window defroster
The defroster heats the window to
remove frost, fog and thin ice from the
rear window, while the engine is running.
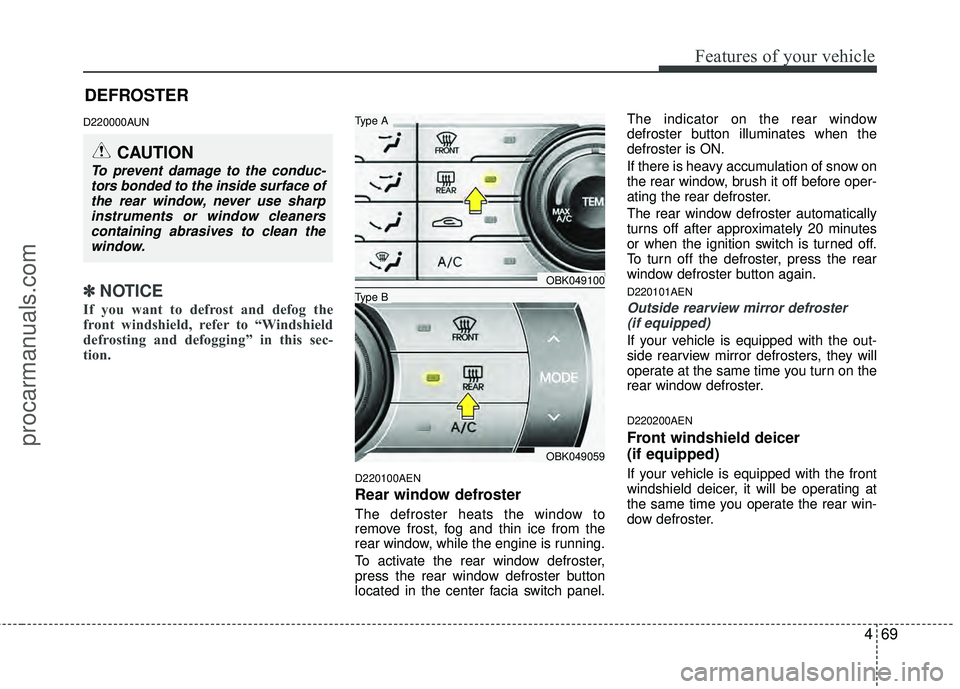
To activate the rear window defroster,
press the rear window defroster button
located in the center facia switch panel. The indicator on the rear window
defroster button illuminates when the
defroster is ON.
If there is heavy accumulation of snow on
the rear window, brush it off before oper-
ating the rear defroster.
The rear window defroster automatically
turns off after approximately 20 minutes
or when the ignition switch is turned off.
To turn off the defroster, press the rear
window defroster button again.
D220101AEN
Outside rearview mirror defroster
(if equipped)
If your vehicle is equipped with the out-
side rearview mirror defrosters, they will
operate at the same time you turn on the
rear window defroster.
D220200AEN
Front windshield deicer
(if equipped)
If your vehicle is equipped with the front
windshield deicer, it will be operating at
the same time you operate the rear win-
dow defroster.
CAUTION
To prevent damage to the conduc-tors bonded to the inside surface ofthe rear window, never use sharpinstruments or window cleanerscontaining abrasives to clean thewindow.
DEFROSTER
OBK049100
OBK049059
Type B
Type A
procarmanuals.com
Page 150 of 391
473
Features of your vehicle
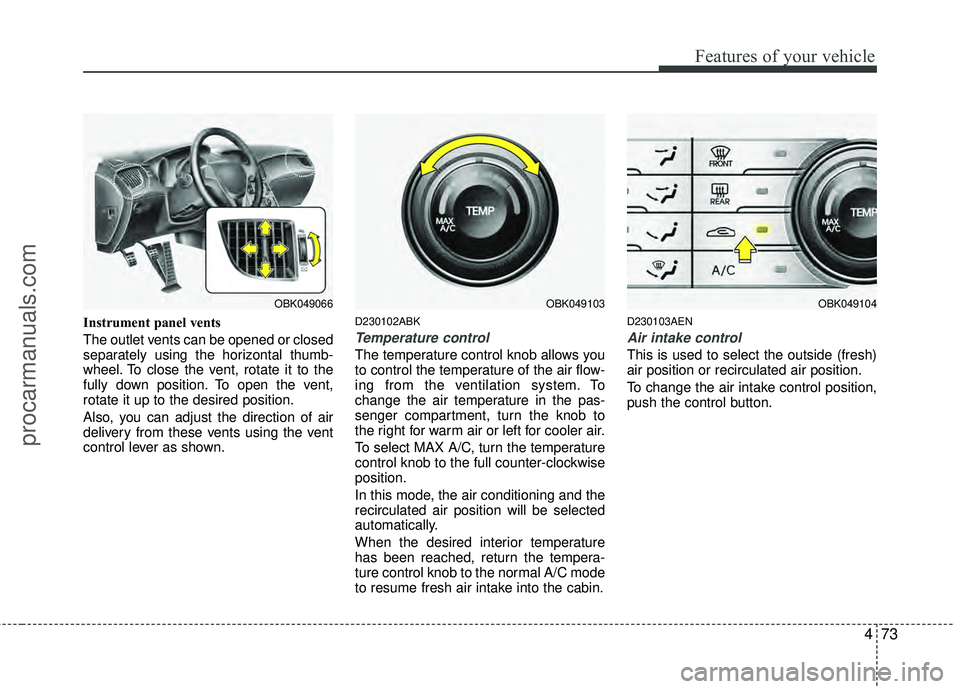
Instrument panel vents
The outlet vents can be opened or closed
separately using the horizontal thumb-
wheel. To close the vent, rotate it to the
fully down position. To open the vent,
rotate it up to the desired position.
Also, you can adjust the direction of air
delivery from these vents using the vent
control lever as shown.D230102ABK
Temperature control
The temperature control knob allows you
to control the temperature of the air flow-
ing from the ventilation system. To
change the air temperature in the pas-
senger compartment, turn the knob to
the right for warm air or left for cooler air.
To select MAX A/C, turn the temperature
control knob to the full counter-clockwise
position.
In this mode, the air conditioning and the
recirculated air position will be selected
automatically.
When the desired interior temperature
has been reached, return the tempera-
ture control knob to the normal A/C mode
to resume fresh air intake into the cabin.
D230103AEN
Air intake control
This is used to select the outside (fresh)
air position or recirculated air position.
To change the air intake control position,
push the control button.
OBK049103OBK049066OBK049104
procarmanuals.com
Page 157 of 391
Features of your vehicle
80
4
D240100ABK
Automatic heating and air condi-
tioning
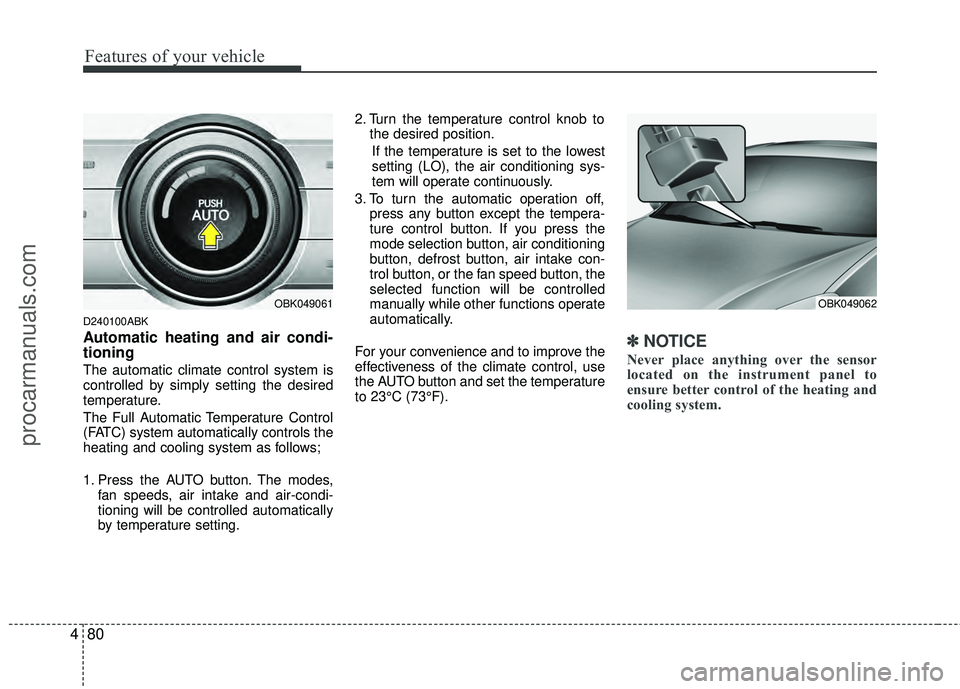
The automatic climate control system is
controlled by simply setting the desired
temperature.
The Full Automatic Temperature Control
(FATC) system automatically controls the
heating and cooling system as follows;
1. Press the AUTO button. The modes,
fan speeds, air intake and air-condi-
tioning will be controlled automatically
by temperature setting. 2. Turn the temperature control knob to
the desired position.
If the temperature is set to the lowest
setting (LO), the air conditioning sys-
tem will operate continuously.
3. To turn the automatic operation off, press any button except the tempera-
ture control button. If you press the
mode selection button, air conditioning
button, defrost button, air intake con-
trol button, or the fan speed button, the
selected function will be controlled
manually while other functions operate
automatically.
For your convenience and to improve the
effectiveness of the climate control, use
the AUTO button and set the temperature
to 23°C (73°F).
✽ ✽ NOTICE
Never place anything over the sensor
located on the instrument panel to
ensure better control of the heating and
cooling system.
OBK049062OBK049061
procarmanuals.com
Page 159 of 391
Features of your vehicle
82
4
Defrost-Level (A, D)
Most of the air flow is directed to the
windshield with a small amount of air
directed to the side window defrosters. Instrument panel vents
The outlet vents can be opened or closed
separately using the horizontal thumb-
wheel. To close the vent, rotate it to the
fully down position. To open the vent,
rotate it up to the desired position.
Also, you can adjust the direction of air
delivery from these vents using the vent
control lever as shown.D230102AUN
Temperature control
The temperature control knob allows you
to control the temperature of the air flow-
ing from the ventilation system. To
change the air temperature in the pas-
senger compartment, turn the knob to
the right position for warm and hot air or
left position for cooler air.
OBK049065OBK049066OBK049067
procarmanuals.com
Page 350 of 391
Maintenance
48
7
G210100ABK
Instrument panel fuse replace-
ment
1. Turn the ignition switch and all other
switches off.
2. Open the fuse panel cover. 3. Pull the suspected fuse straight out.
Use the removal tool provided in the
main fuse box in the engine compart-
ment.
4. Check the removed fuse; replace it if it is blown.
5. Push in a new fuse of the same rating, and make sure it fits tightly in the clips.
If it fits loosely, consult an authorized
HYUNDAI dealer.
If you do not have a spare, use a fuse of the same rating from a circuit you maynot need for operating the vehicle, suchas the cigarette lighter fuse.
If the headlights or other electrical com-
ponents do not work and the fuses are
OK, check the fuse panel in the engine
compartment. If a fuse is blown, it must
be replaced.
OBK079019
procarmanuals.com
Page 353 of 391
751
Maintenance
✽
✽NOTICE
Not all fuse panel descriptions in this
manual may be applicable to your vehi-
cle. It is accurate at the time of printing.
When you inspect the fuse panel in your
vehicle, refer to the fuse panel label.
G210300ABH
Fuse/relay panel description
Inside the fuse/relay panel covers, you can find the fuse/relay label describing fuse/relay name and capacity.
Instrument panel fuse panel
Engine compartment fuse panel
OBK079023/OBK079025/OBK079024
procarmanuals.com
Page 354 of 391
Maintenance
52
7
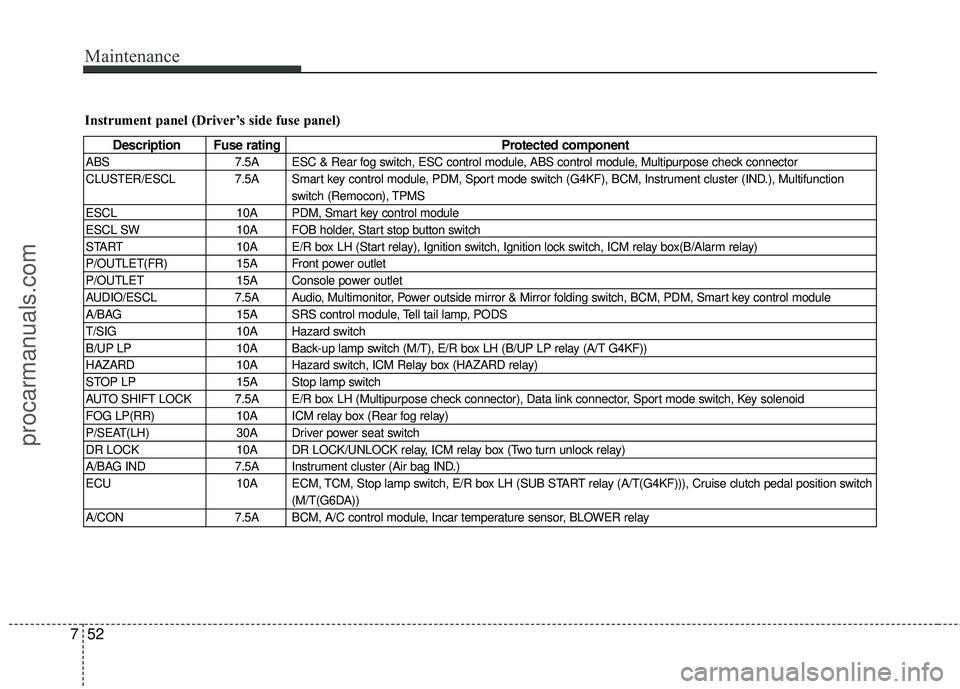
Instrument panel (Driver’s side fuse panel)
Description Fuse rating Protected component
ABS7.5A ESC & Rear fog switch, ESC control module, ABS control module, Multipurpose check connector
CLUSTER/ESCL 7.5A Smart key control module, PDM, Sport mode switch (G4KF), BCM, Instrument cluster (IND.), Multifunction switch (Remocon), TPMS
ESCL 10A PDM, Smart key control module
ESCL SW 10A FOB holder, Start stop button switch
START 10A E/R box LH (Start relay), Ignition switch, Ignition lock switch, ICM relay box(B/Alarm relay)
P/OUTLET(FR) 15A Front power outlet
P/OUTLET 15A Console power outlet
AUDIO/ESCL 7.5A Audio, Multimonitor, Power outside mirror & Mirror folding switch, BCM, PDM, Smart key control module
A/BAG 15A SRS control module, Tell tail lamp, PODS
T/SIG 10A Hazard switch
B/UP LP 10A Back-up lamp switch (M/T), E/R box LH (B/UP LP relay (A/T G4KF))
HAZARD 10A Hazard switch, ICM Relay box (HAZARD relay)
STOP LP 15A Stop lamp switch
AUTO SHIFT LOCK 7.5A E/R box LH (Multipurpose check connector), Data link connector, Sport mode switch, Key solenoid
FOG LP(RR) 10A ICM relay box (Rear fog relay)
P/SEAT(LH) 30A Driver power seat switch
DR LOCK 10A DR LOCK/UNLOCK relay, ICM relay box (Two turn unlock relay)
A/BAG IND 7.5A Instrument cluster (Air bag IND.)
ECU 10A ECM, TCM, Stop lamp switch, E/R box LH (SUB START relay (A/T(G4KF))), Cruise clutch pedal position switch
(M/T(G6DA))
A/CON 7.5A BCM, A/C control module, Incar temperature sensor, BLOWER relay
procarmanuals.com
Page 356 of 391
Maintenance
54
7
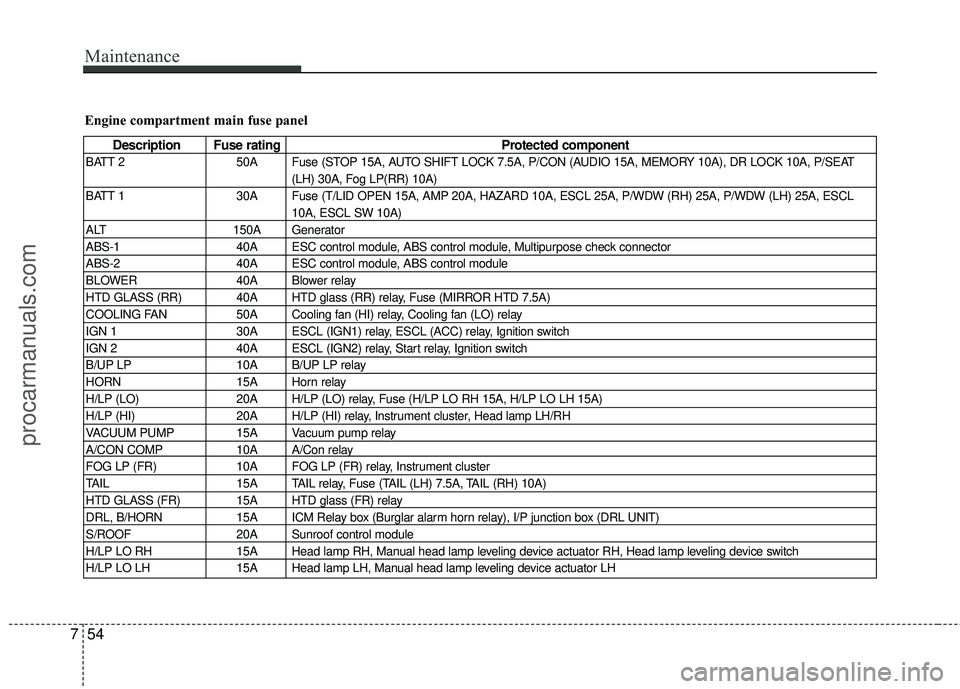
Engine compartment main fuse panel
Description Fuse rating Protected component
BATT 250A Fuse (STOP 15A, AUTO SHIFT LOCK 7.5A, P/CON (AUDIO 15A, MEMORY 10A), DR LOCK 10A, P/SEAT
(LH) 30A, Fog LP(RR) 10A)
BATT 1 30A Fuse (T/LID OPEN 15A, AMP 20A, HAZARD 10A, ESCL 25A, P/WDW (RH) 25A, P/WDW (LH) 25A, ESCL
10A, ESCL SW 10A)
ALT 150A Generator
ABS-1 40A ESC control module, ABS control module, Multipurpose check connector
ABS-2 40A ESC control module, ABS control module
BLOWER 40A Blower relay
HTD GLASS (RR) 40A HTD glass (RR) relay, Fuse (MIRROR HTD 7.5A)
COOLING FAN 50A Cooling fan (HI) relay, Cooling fan (LO) relay
IGN 1 30A ESCL (IGN1) relay, ESCL (ACC) relay, Ignition switch
IGN 2 40A ESCL (IGN2) relay, Start relay, Ignition switch
B/UP LP 10A B/UP LP relay
HORN 15A Horn relay
H/LP (LO) 20A H/LP (LO) relay, Fuse (H/LP LO RH 15A, H/LP LO LH 15A)
H/LP (HI) 20A H/LP (HI) relay, Instrument cluster, Head lamp LH/RH
VACUUM PUMP 15A Vacuum pump relay
A/CON COMP 10A A/Con relay
FOG LP (FR) 10A FOG LP (FR) relay, Instrument cluster
TAIL 15A TAIL relay, Fuse (TAIL (LH) 7.5A, TAIL (RH) 10A)
HTD GLASS (FR) 15A HTD glass (FR) relay
DRL, B/HORN 15A ICM Relay box (Burglar alarm horn relay), I/P junction box (DRL UNIT)
S/ROOF 20A Sunroof control module
H/LP LO RH 15A Head lamp RH, Manual head lamp leveling device actuator RH, Head lamp leveling device switch
H/LP LO LH 15A Head lamp LH, Manual head lamp leveling device actuator LH
procarmanuals.com