Page 102 of 403

Features of your vehicle
26 4
Opening the hood
1. Pull the release lever to unlatch the
hood. The hood should pop open
slightly.2. Go to the front of the vehicle, raise the
hood slightly, pull the secondary latch
(1) inside of the hood center and lift
the hood (2).
3. Raise the hood. It will raise completely
by itself after it has been raised about
halfway.
Closing the hood
1. Before closing the hood, check the fol-
lowing:
• All filler caps in engine compartment
must be correctly installed.
• Gloves, rags or any other com-
bustible material must be removed
from the engine compartment.
2. Lower the hood halfway and push
down to securely lock in place.
HOOD
OHG040024OHG040025WARNING
• Before closing the hood, ensure
that all obstructions are removed
from the hood opening. Closing
the hood with an obstruction
present in the hood opening may
result in property damage or
severe personal injury.
• Do not leave gloves, rags or any
other combustible material in the
engine compartment. Doing so
may cause a heat-induced fire.
WARNING
Open the hood after turning off the
engine on a flat surface, shift the
shift lever to the P(Park) position
and set the parking brake.
Page 103 of 403
427
Features of your vehicle
WARNING
• Always double check to be sure
that the hood is firmly latched
before driving away. If it is not
latched, the hood could fly open
while the vehicle is being driven,
causing a total loss of visibility,
which might result in an accident.
• Do not move the vehicle with the
hood raised. The view will be
blocked and the hood could fall
or be damaged.
Page 104 of 403

Features of your vehicle
28 4
Opening the fuel filler lid
The fuel filler lid must be opened from
inside the vehicle by pushing the fuel
filler lid opener button.
✽NOTICE
If the fuel filler lid will not open because
ice has formed around it, tap lightly or
push on the lid to break the ice and
release the lid. Do not pry on the lid. If
necessary, spray around the lid with an
approved de-icer fluid (do not use radi-
ator anti-freeze) or move the vehicle to a
warm place and allow the ice to melt.
1. Stop the engine.
2. To open the fuel filler lid, push the fuel
filler lid opener button.
3. Pull the fuel filler lid (1) out to fully
open.
4. To remove the cap, turn the fuel tank
cap (2) counterclockwise.
5. Refuel as needed.
Closing the fuel filler lid
1. To install the cap, turn it clockwise until
it “clicks”. This indicates that the cap is
securely tightened.
2. Close the fuel filler lid and push it light-
ly and make sure that it is securely
closed.
FUEL FILLER LID
OHG040026LOHG040027
WARNING - Refueling
• If pressurized fuel sprays out, it
can cover your clothes or skin
and thus subject you to the risk
of fire and burns. Always remove
the fuel cap carefully and slowly.
If the cap is venting fuel or if you
hear a hissing sound, wait until
the condition stops before com-
pletely removing the cap.
• Do not "top off" after the nozzle
automatically shuts off when
refueling.
• Always check that the fuel cap is
installed securely to prevent fuel
spillage in the event of an acci-
dent.
Page 113 of 403

437
Features of your vehicle
Power steering
Power steering uses energy from the
engine to assist you in steering the vehi-
cle. If the engine is off or if the power
steering system becomes inoperative,
the vehicle may still be steered, but it will
require increased steering effort.
Should you notice any change in the
effort required to steer during normal
vehicle operation, have the power steer-
ing checked by an authorized HYUNDAI
dealer.
✽NOTICE
If the power steering drive belt breaks
or if the power steering pump malfunc-
tions, the steering effort will greatly
increase.
✽NOTICE
If the vehicle is parked for extended
periods outside in cold weather (below -
10°C/14°F), the power steering may
require increased effort when the engine
is first started. This is caused by
increased fluid viscosity due to the cold
weather and does not indicate a mal-
function.
When this happens, increase the engine
RPM by depressing accelerator until the
RPM reaches 1,500 rpm then release or
let the engine idle for two or three min-
utes to warm up the fluid.
Tilt steering
Tilt steering allows you to adjust the
steering wheel before you drive. You can
also raise it to give your legs more room
when you exit and enter the vehicle.
The steering wheel should be positioned
so that it is comfortable for you to drive,
while permitting you to see the instru-
ment panel warning lights and gauges.
STEERING WHEEL
CAUTION
Never hold the steering wheel
against a stop (extreme right or left
turn) for more than 5 seconds with
the engine running. Holding the
steering wheel for more than 5 sec-
onds in either position may cause
damage to the power steering
pump.
WARNING
• Never adjust the angle of the
steering wheel while driving. You
may lose steering control and
cause severe personal injury,
death or accidents.
• After adjusting, push the steering
wheel both up and down to be
certain it is locked in position.
Page 114 of 403

Features of your vehicle
38 4
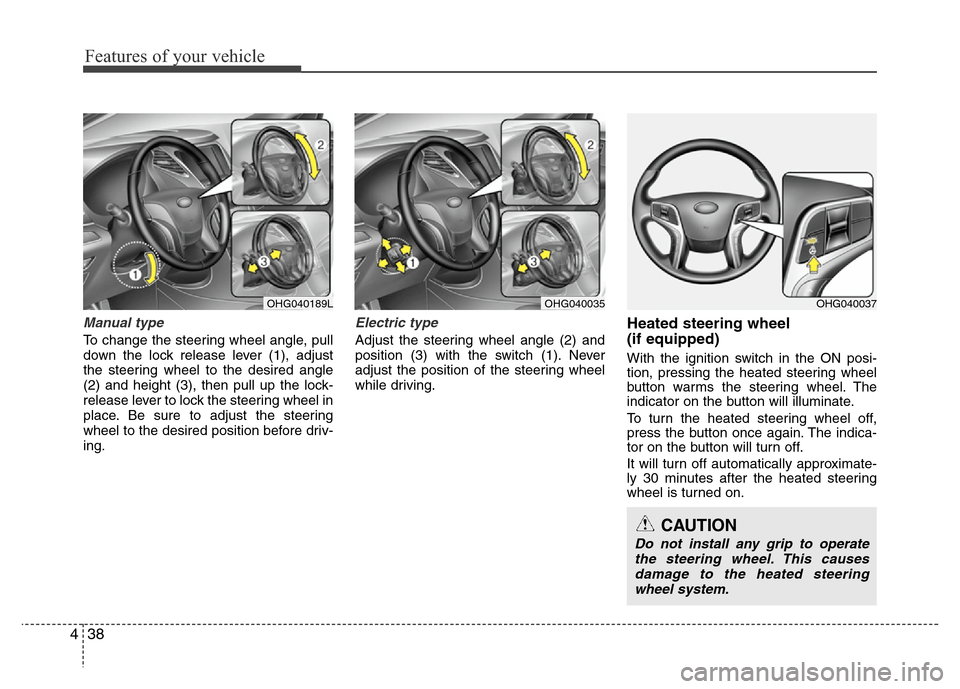
Manual type
To change the steering wheel angle, pull
down the lock release lever (1), adjust
the steering wheel to the desired angle
(2) and height (3), then pull up the lock-
release lever to lock the steering wheel in
place. Be sure to adjust the steering
wheel to the desired position before driv-
ing.
Electric type
Adjust the steering wheel angle (2) and
position (3) with the switch (1). Never
adjust the position of the steering wheel
while driving.
Heated steering wheel
(if equipped)
With the ignition switch in the ON posi-
tion, pressing the heated steering wheel
button warms the steering wheel. The
indicator on the button will illuminate.
To turn the heated steering wheel off,
press the button once again. The indica-
tor on the button will turn off.
It will turn off automatically approximate-
ly 30 minutes after the heated steering
wheel is turned on.
OHG040189LOHG040035OHG040037
CAUTION
Do not install any grip to operate
the steering wheel. This causes
damage to the heated steering
wheel system.
Page 118 of 403

Features of your vehicle
42 4
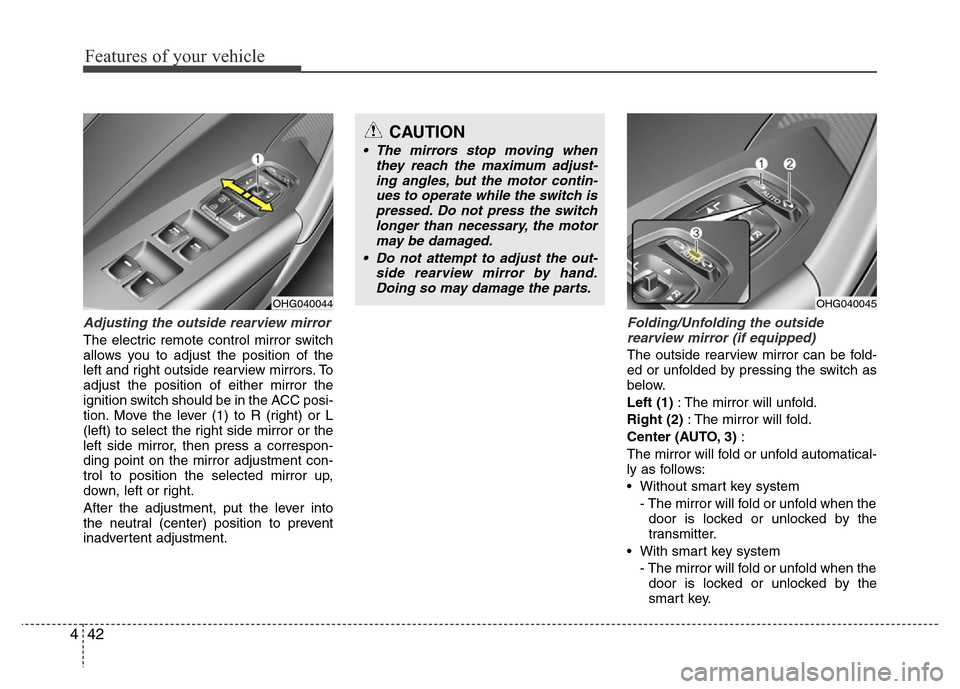
Adjusting the outside rearview mirror
The electric remote control mirror switch
allows you to adjust the position of the
left and right outside rearview mirrors. To
adjust the position of either mirror the
ignition switch should be in the ACC posi-
tion. Move the lever (1) to R (right) or L
(left) to select the right side mirror or the
left side mirror, then press a correspon-
ding point on the mirror adjustment con-
trol to position the selected mirror up,
down, left or right.
After the adjustment, put the lever into
the neutral (center) position to prevent
inadvertent adjustment.
Folding/Unfolding the outside
rearview mirror (if equipped)
The outside rearview mirror can be fold-
ed or unfolded by pressing the switch as
below.
Left (1): The mirror will unfold.
Right (2): The mirror will fold.
Center (AUTO, 3):
The mirror will fold or unfold automatical-
ly as follows:
• Without smart key system
- The mirror will fold or unfold when the
door is locked or unlocked by the
transmitter.
• With smart key system
- The mirror will fold or unfold when the
door is locked or unlocked by the
smart key.
OHG040044
CAUTION
• The mirrors stop moving when
they reach the maximum adjust-
ing angles, but the motor contin-
ues to operate while the switch is
pressed. Do not press the switch
longer than necessary, the motor
may be damaged.
• Do not attempt to adjust the out-
side rearview mirror by hand.
Doing so may damage the parts.
OHG040045
Page 119 of 403

443
Features of your vehicle
- The mirror will fold or unfold when the
door is locked or unlocked by the but-
ton on the outside door handle.
- The mirror will unfold when you
approach the vehicle (all doors
closed and locked) with a smart key
in possession. (if equipped)
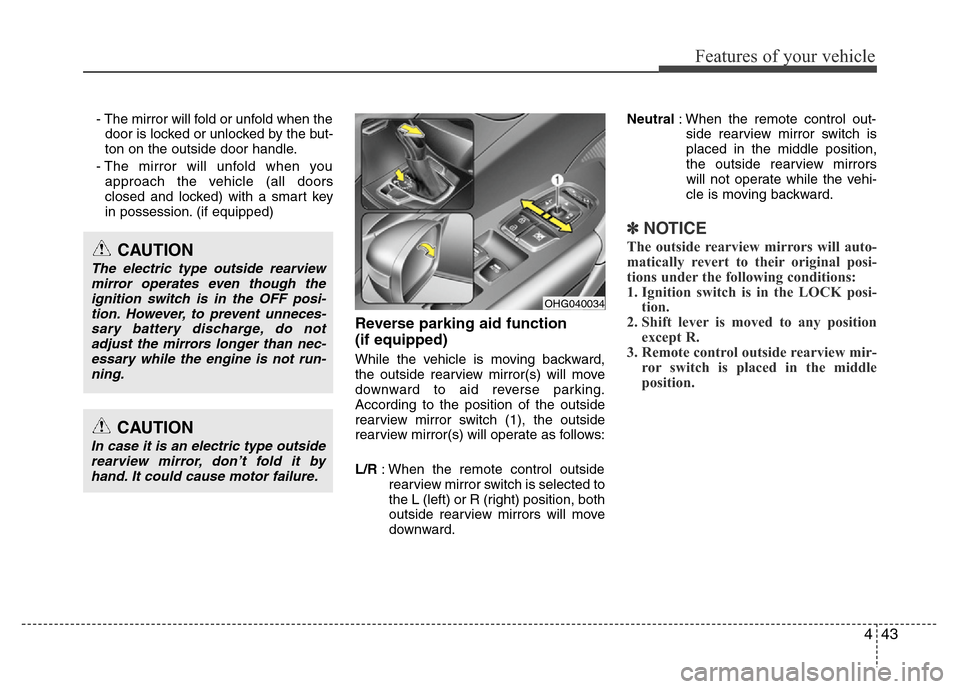
Reverse parking aid function
(if equipped)
While the vehicle is moving backward,
the outside rearview mirror(s) will move
downward to aid reverse parking.
According to the position of the outside
rearview mirror switch (1), the outside
rearview mirror(s) will operate as follows:
L/R: When the remote control outside
rearview mirror switch is selected to
the L (left) or R (right) position, both
outside rearview mirrors will move
downward.Neutral: When the remote control out-
side rearview mirror switch is
placed in the middle position,
the outside rearview mirrors
will not operate while the vehi-
cle is moving backward.
✽NOTICE
The outside rearview mirrors will auto-
matically revert to their original posi-
tions under the following conditions:
1. Ignition switch is in the LOCK posi-
tion.
2. Shift lever is moved to any position
except R.
3. Remote control outside rearview mir-
ror switch is placed in the middle
position.
CAUTION
In case it is an electric type outside
rearview mirror, don’t fold it by
hand. It could cause motor failure.
CAUTION
The electric type outside rearview
mirror operates even though the
ignition switch is in the OFF posi-
tion. However, to prevent unneces-
sary battery discharge, do not
adjust the mirrors longer than nec-
essary while the engine is not run-
ning.
OHG040034
Page 127 of 403

451
Features of your vehicle
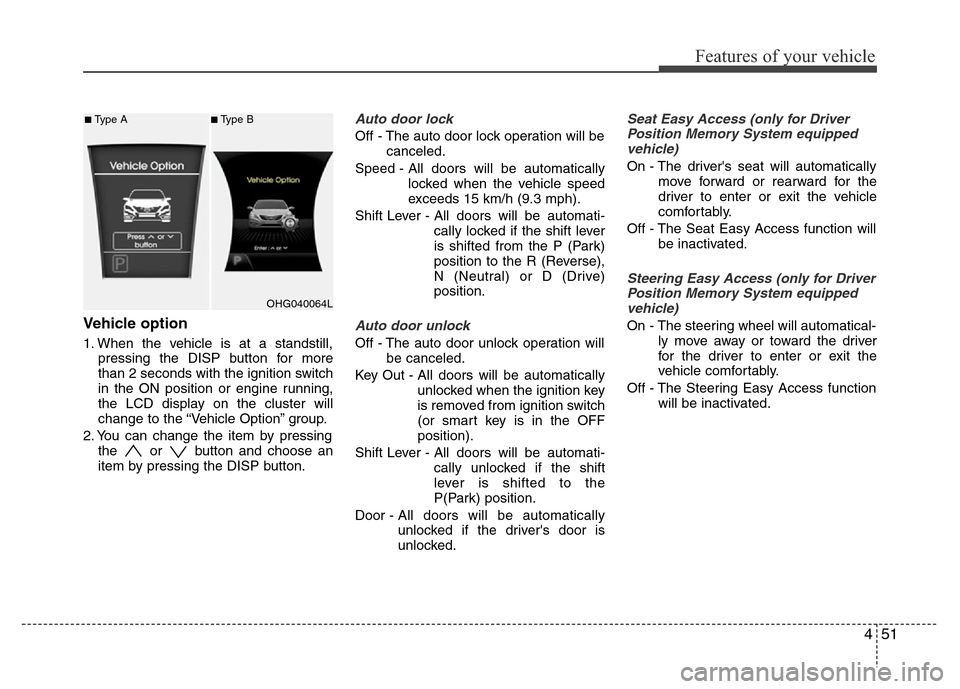
Vehicle option
1. When the vehicle is at a standstill,
pressing the DISP button for more
than 2 seconds with the ignition switch
in the ON position or engine running,
the LCD display on the cluster will
change to the “Vehicle Option” group.
2. You can change the item by pressing
the or button and choose an
item by pressing the DISP button.
Auto door lock
Off - The auto door lock operation will be
canceled.
Speed - All doors will be automatically
locked when the vehicle speed
exceeds 15 km/h (9.3 mph).
Shift Lever - All doors will be automati-
cally locked if the shift lever
is shifted from the P (Park)
position to the R (Reverse),
N (Neutral) or D (Drive)
position.
Auto door unlock
Off - The auto door unlock operation will
be canceled.
Key Out - All doors will be automatically
unlocked when the ignition key
is removed from ignition switch
(or smart key is in the OFF
position).
Shift Lever - All doors will be automati-
cally unlocked if the shift
lever is shifted to the
P(Park) position.
Door - All doors will be automatically
unlocked if the driver's door is
unlocked.
Seat Easy Access (only for Driver
Position Memory System equipped
vehicle)
On - The driver's seat will automatically
move forward or rearward for the
driver to enter or exit the vehicle
comfortably.
Off - The Seat Easy Access function will
be inactivated.
Steering Easy Access (only for Driver
Position Memory System equipped
vehicle)
On - The steering wheel will automatical-
ly move away or toward the driver
for the driver to enter or exit the
vehicle comfortably.
Off - The Steering Easy Access function
will be inactivated.
OHG040064L
■Type A■Type B