Page 373 of 403
761
Maintenance
No.Fuse ratingSymbol Protected component
MULTI
FUSE
F1 60ASmart Junction Box (Fuse - F20/F25/F28/F35, IPS 1, IPS 2, ARISU-LT 1)
F2 60ASmart Junction Box (Fuse - F26/F29/F32/F36)
F3 40AW/O Smart Key - Ignition Switch
With Smart Key - RLY. 2 (PDM 1 (ACC) Relay), LY. 9 (PDM 2 (IG1) Relay)
F440AESP Control Module, ABS Control Module
F540ARLY. 1 (RR HTD Relay)
F640ARLY. 14 (Blower Relay)
F760ASmart Junction Box (Fuse - F19/F24/F27/F30, IPS 3, IPS 4, ARISU-LT 2)
F880A-
FUSE
F910AA/C Control Module
F1010ARear Combination Lamp (IN) LH/RH, Electro Chromic Mirror , A/V & Navigation Head Unit
F1115ATransaxle Range Switch
F1210APCM
F1310AMultipurpose Check Connector
Engine compartment main fuse panel
Page 375 of 403

763
Maintenance
No.Fuse ratingSymbol Protected component
FUSE
F2820AICM Relay Box (Head Lamp Washer Relay)
F2930ADriver Lumbar Support Limit Switch(W/O Massage), Driver IMS Module,
Power Seat Relay Box LH, Driver Reclining Limit Switch
F3040ASmart Junction Box (Fuse - F37/F34, Leak Current Autocut Device (Leak Current Autocut Relay,
Leak Current Autocut Switch, IPS 5)), E/R Fuse & Relay Box (Fuse - F22)
No.Fuse ratingSymbol Protected component
F3120AIgnition Coil #1~#4, Condenser
F3210ACamshaft Position Sensor #1/#2, Oil Control Valve #1/#2,
E/R Fuse & Relay Box ( LY. 3 : C/FAN (HI) Relay)
F3310A-
F3410AEMS Box (RLY. 1 : Fuel Pump Relay), Injector #1~#4
F3515ACrankshaft Position Sensor, Oxygen Sensor(UP/DOWN), Purge Control Solenoid Valve,
PCM, Variable Intake Solenoid Valve
F3615APCM
F3720AEMS Box (RLY. 1 : Fuel Pump Relay)
F3815AEMS Box (RLY. 2 : Horn Relay), ICM Relay Box(Burglar Horn Relay)
F3930AEMS Box (RLY. 3 : Engine Control Relay)
Engine compartment main fuse panel (2.4L)
Page 376 of 403
Maintenance
64 7
No.Fuse ratingSymbol Protected component
F3120AIgnition Coil #1~#6, Condenser #1/#2
F3210ACamshaft Position Sensor #1~#4, E/R Fuse & Relay Box (RLY. 3 : C/FAN (HI) Relay)
F3310A-
F3410AEMS Box (RLY. 1 : Fuel Pump Relay), Injector #1 ~ #6
F3515AOxygen Sensor #1~#4, Purge Control Solenoid Valve, Variable Intake Solenoid Valve,
Oil Control Valve #1~#4, PCM
F3615APCM
F3720AEMS Box (RLY. 1 : Fuel Pump Relay)
F3815AEMS Box (RLY. 2 : Horn Relay), ICM Relay Box(Burglar Horn Relay)
F3930AEMS Box (RLY. 3 : Engine Control Relay)
Engine compartment main fuse panel (3.0L)
Page 379 of 403
767
Maintenance
✽NOTICE
HID lamps have superior performance
vs. halogen bulbs. HID lamps are esti-
mated by the manufacturer to last twice
as long or longer than halogen bulbs
depending on their frequency of use.
They will probably require replacement
at some point in the life of the vehicle.
Cycling the headlamps on and off more
than typical use will shorten HID lamps
life. HID lamps do not fail in the same
manner as halogen incandescent lamps.
If a headlamp goes out after a period of
operation but will immediately relight
when the headlamp switch is cycled it is
likely the HID lamp needs to be
replaced. HID lighting components are
more complex than conventional halo-
gen bulbs thus have higher replacement
cost.
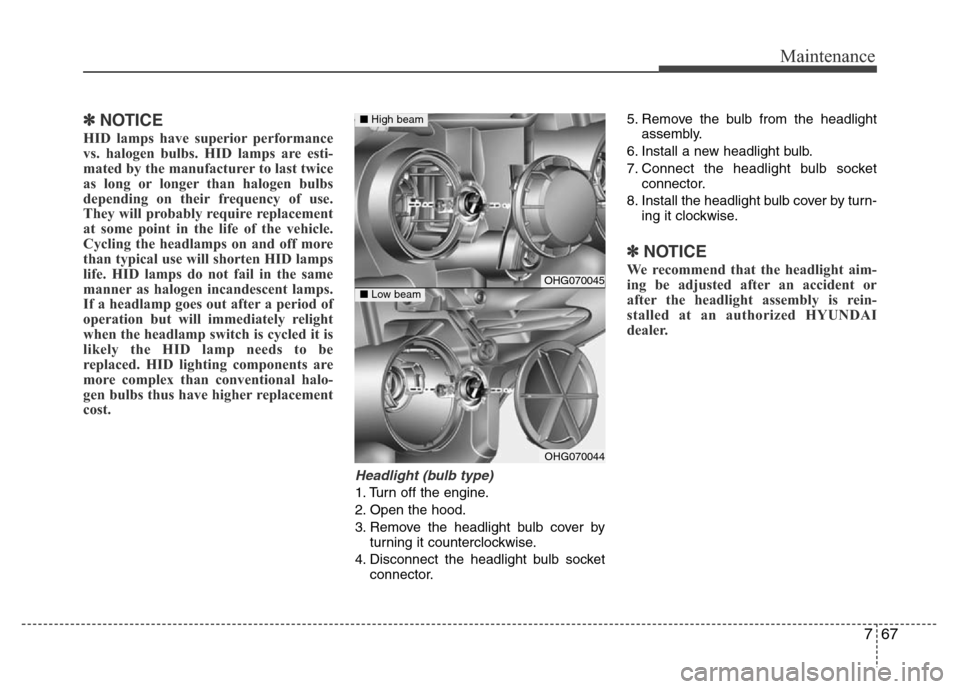
Headlight (bulb type)
1. Turn off the engine.
2. Open the hood.
3. Remove the headlight bulb cover by
turning it counterclockwise.
4. Disconnect the headlight bulb socket
connector.5. Remove the bulb from the headlight
assembly.
6. Install a new headlight bulb.
7. Connect the headlight bulb socket
connector.
8. Install the headlight bulb cover by turn-
ing it clockwise.
✽NOTICE
We recommend that the headlight aim-
ing be adjusted after an accident or
after the headlight assembly is rein-
stalled at an authorized HYUNDAI
dealer.OHG070045
OHG070044
■High beam
■Low beam
Page 380 of 403
Maintenance
68 7
Traffic Change (For Europe)
The low beam light distribution is asym-
metric.
If you go abroad to a country with oppo-
site traffic direction, this asymmetric part
will dazzle oncoming car driver. To pre-
vent dazzle, ECE regulation demand
several technical solutions (ex. automatic
change system, adhesive sheet, down
aiming). This headlamps are designed
not to dazzle opposite drivers. So, you do
not need to change your headlamps in a
country with opposite traffic direction.
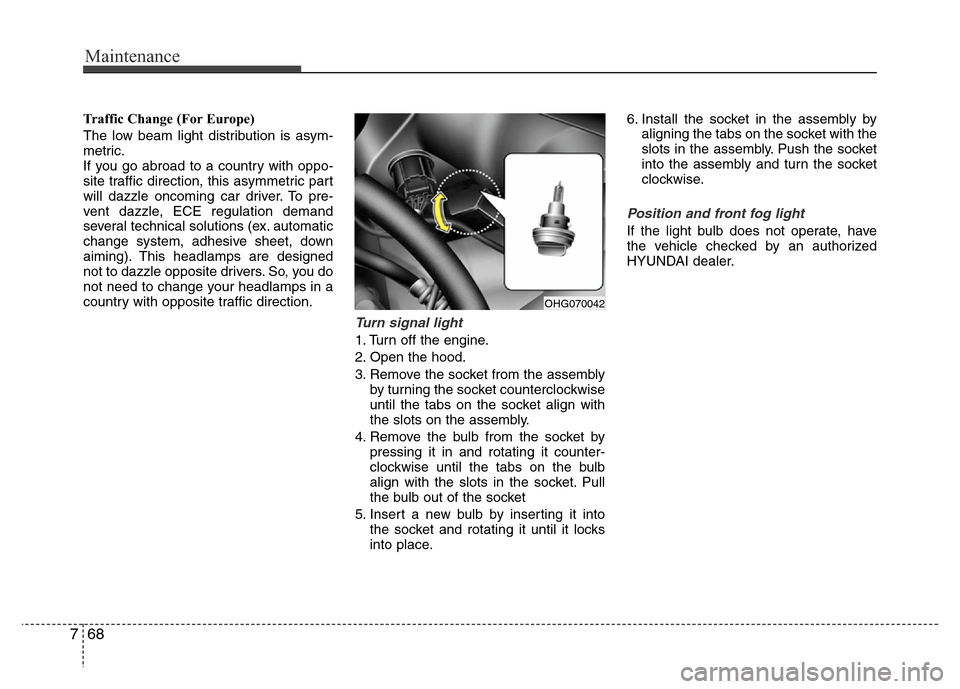
Turn signal light
1. Turn off the engine.
2. Open the hood.
3. Remove the socket from the assembly
by turning the socket counterclockwise
until the tabs on the socket align with
the slots on the assembly.
4. Remove the bulb from the socket by
pressing it in and rotating it counter-
clockwise until the tabs on the bulb
align with the slots in the socket. Pull
the bulb out of the socket
5. Insert a new bulb by inserting it into
the socket and rotating it until it locks
into place.6. Install the socket in the assembly by
aligning the tabs on the socket with the
slots in the assembly. Push the socket
into the assembly and turn the socket
clockwise.
Position and front fog light
If the light bulb does not operate, have
the vehicle checked by an authorized
HYUNDAI dealer.
OHG070042
Page 382 of 403
Maintenance
70 7
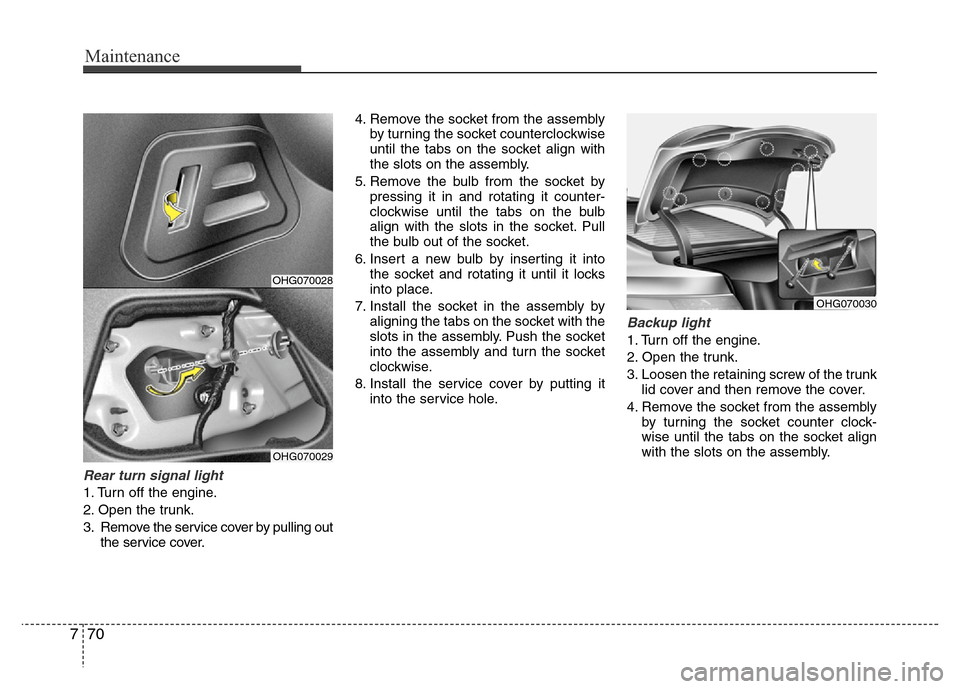
Rear turn signal light
1. Turn off the engine.
2. Open the trunk.
3. Remove the service cover by pulling out
the service cover.4. Remove the socket from the assembly
by turning the socket counterclockwise
until the tabs on the socket align with
the slots on the assembly.
5. Remove the bulb from the socket by
pressing it in and rotating it counter-
clockwise until the tabs on the bulb
align with the slots in the socket. Pull
the bulb out of the socket.
6. Insert a new bulb by inserting it into
the socket and rotating it until it locks
into place.
7. Install the socket in the assembly by
aligning the tabs on the socket with the
slots in the assembly. Push the socket
into the assembly and turn the socket
clockwise.
8. Install the service cover by putting it
into the service hole.
Backup light
1. Turn off the engine.
2. Open the trunk.
3. Loosen the retaining screw of the trunk
lid cover and then remove the cover.
4. Remove the socket from the assembly
by turning the socket counter clock-
wise until the tabs on the socket align
with the slots on the assembly.
OHG070028
OHG070029
OHG070030
Page 384 of 403
Maintenance
72 7
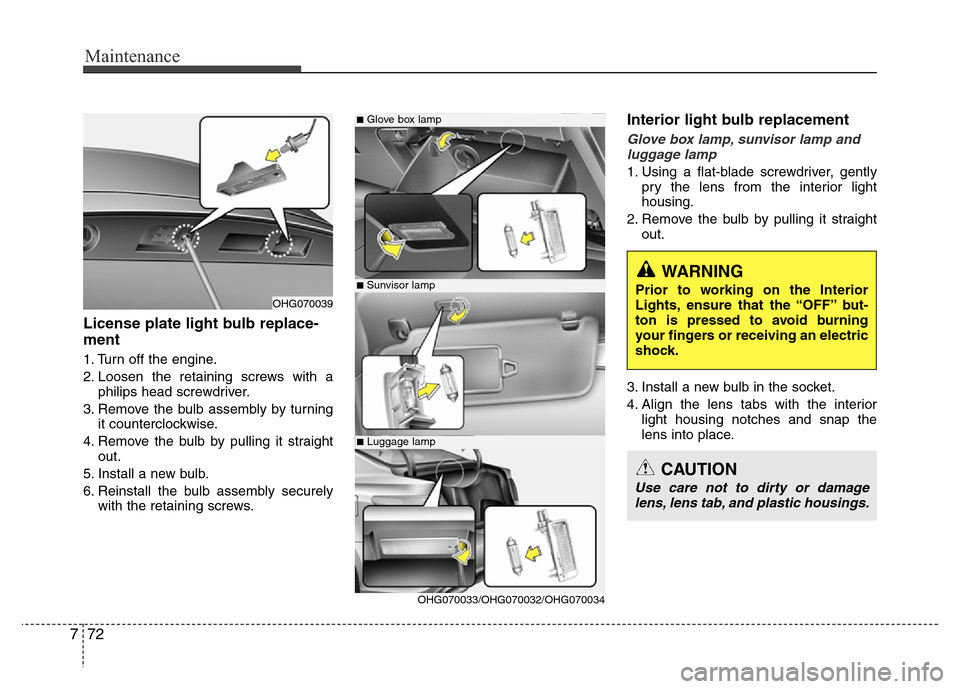
License plate light bulb replace-
ment
1. Turn off the engine.
2. Loosen the retaining screws with a
philips head screwdriver.
3. Remove the bulb assembly by turning
it counterclockwise.
4. Remove the bulb by pulling it straight
out.
5. Install a new bulb.
6. Reinstall the bulb assembly securely
with the retaining screws.
Interior light bulb replacement
Glove box lamp, sunvisor lamp and
luggage lamp
1. Using a flat-blade screwdriver, gently
pry the lens from the interior light
housing.
2. Remove the bulb by pulling it straight
out.
3. Install a new bulb in the socket.
4. Align the lens tabs with the interior
light housing notches and snap the
lens into place.
■Glove box lamp
■Sunvisor lamp
■Luggage lamp
OHG070039
OHG070033/OHG070032/OHG070034
WARNING
Prior to working on the Interior
Lights, ensure that the “OFF” but-
ton is pressed to avoid burning
your fingers or receiving an electric
shock.
CAUTION
Use care not to dirty or damage
lens, lens tab, and plastic housings.
Page 387 of 403
775
Maintenance
Waxing
Wax the vehicle when water will no
longer bead on the paint.
Always wash and dry the vehicle before
waxing. Use a good quality liquid or
paste wax, and follow the manufacturer’s
instructions. Wax all metal trim to protect
it and to maintain its luster.
Removing oil, tar, and similar materials
with a spot remover will usually strip the
wax from the finish. Be sure to re-wax
these areas even if the rest of the vehicle
does not yet need waxing.Finish damage repair
Deep scratches or stone chips in the
painted surface must be repaired
promptly. Exposed metal will quickly rust
and may develop into a major repair
expense.
✽NOTICE
If your vehicle is damaged and requires
any metal repair or replacement, be sure
the body shop applies anti-corrosion
materials to the parts repaired or
replaced.
CAUTION
• Wiping dust or dirt off the body
with a dry cloth will scratch the
finish.
• Do not use steel wool, abrasive
cleaners, or strong detergents
containing highly alkaline or
caustic agents on chrome-plated
or anodized aluminum parts. This
may result in damage to the pro-
tective coating and cause discol-
oration or paint deterioration.
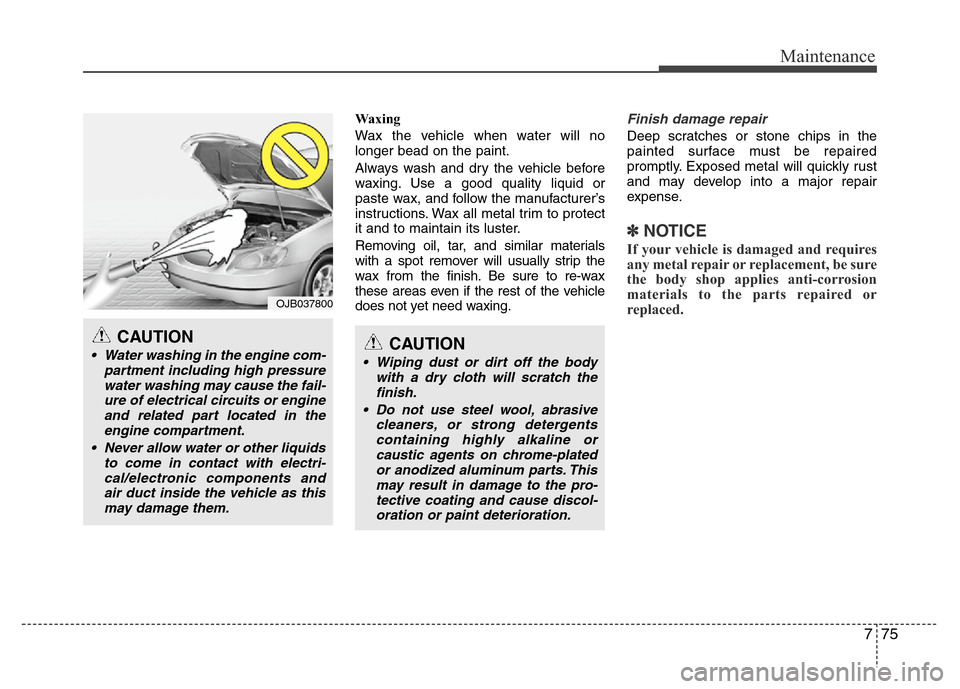
CAUTION
• Water washing in the engine com-
partment including high pressure
water washing may cause the fail-
ure of electrical circuits or engine
and related part located in the
engine compartment.
• Never allow water or other liquids
to come in contact with electri-
cal/electronic components and
air duct inside the vehicle as this
may damage them.
OJB037800