2012 Hyundai Azera reset
[x] Cancel search: resetPage 191 of 403
4115
Features of your vehicle
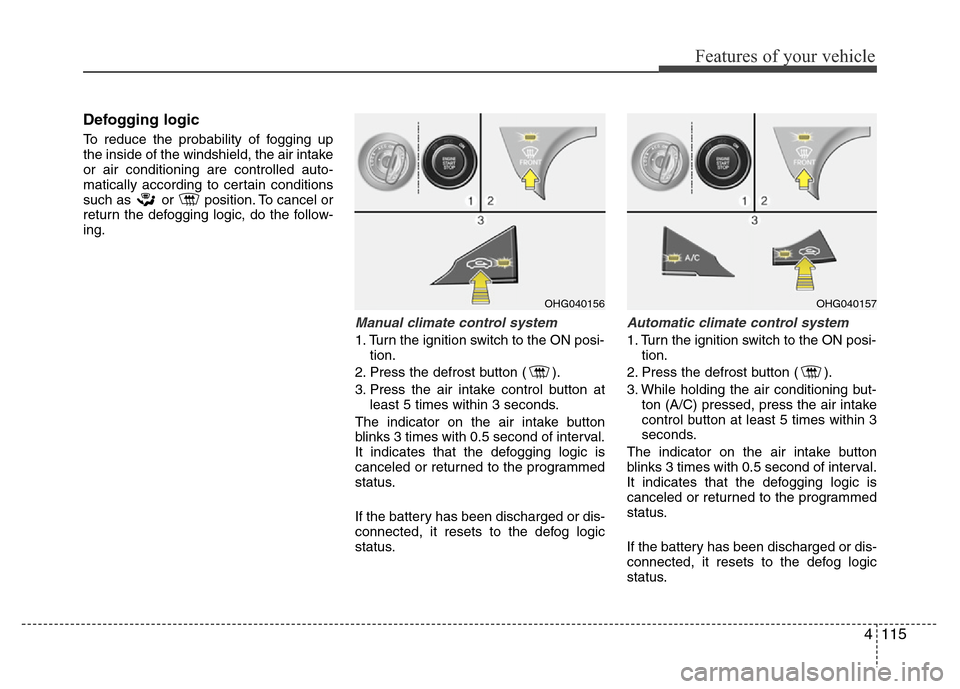
Defogging logic
To reduce the probability of fogging up
the inside of the windshield, the air intake
or air conditioning are controlled auto-
matically according to certain conditions
such as or position. To cancel or
return the defogging logic, do the follow-
ing.
Manual climate control system
1. Turn the ignition switch to the ON posi-
tion.
2. Press the defrost button ( ).
3. Press the air intake control button at
least 5 times within 3 seconds.
The indicator on the air intake button
blinks 3 times with 0.5 second of interval.
It indicates that the defogging logic is
canceled or returned to the programmed
status.
If the battery has been discharged or dis-
connected, it resets to the defog logic
status.
Automatic climate control system
1. Turn the ignition switch to the ON posi-
tion.
2. Press the defrost button ( ).
3. While holding the air conditioning but-
ton (A/C) pressed, press the air intake
control button at least 5 times within 3
seconds.
The indicator on the air intake button
blinks 3 times with 0.5 second of interval.
It indicates that the defogging logic is
canceled or returned to the programmed
status.
If the battery has been discharged or dis-
connected, it resets to the defog logic
status.
OHG040156OHG040157
Page 192 of 403

Features of your vehicle
116 4
Auto defogging system
(Only for automatic climate control
system, if equipped)
Auto defogging reduces the possibility of
fogging up the inside of the windshield by
automatically sensing the moisture of
inside the windshield.
The auto defogging system operates
when the heater or air conditioning is on.This indicator illuminates
when the auto defogging
system senses the moisture
of inside the windshield and
operates.
If more moisture is in the vehicle, higher
steps operate as follow. For example if
auto defogging does not defog inside the
windshield at step 1 Outside air position,
it tries to defog again at step 2 Blowing
air toward the windshield.
Step 1 : Outside air position
Step 2 : Blowing air toward the wind-
shield
Step 3 : Increasing air flow toward the
windshield
Step 4 : Operating the air conditioning
Step 5 : Maximizing the air conditioning
If your vehicle is equipped with the auto
defogging system, it is automatically acti-
vated when the conditions are met.
However, if you would like to cancel the
auto defogging system, press the front
defroster button 4 times within 2 seconds
while pressing the AUTO button. The
indicator of front defroster button will
blink 3 times to notify you that the system
is cancelled. To use the auto defogging
system again, follow the procedures
mentioned above.If the battery has been disconnected or
discharged, it resets to the auto defog-
ging status.
✽NOTICE
If the A/C off or recirculated air position
is manually selected while the auto
defogging system is on, the auto defog-
ging indicator will blink 3 times to give
notice that the A/C off or recirculated air
position operation cannot be selected.
OHG040158CAUTION
Do not remove the sensor cover
located on the upper end of the
driver side windshield glass.
Damage to the system parts could
occur and may not be covered by
your vehicle warranty.
Page 198 of 403

Features of your vehicle
122 4
Digital clock
Whenever the battery terminals or relat-
ed fuses are disconnected, you must
reset the time.
Detailed information on setting the clock
is described in Audio system section 4.
Clothes hanger (if equipped)
To use the hanger, pull down the upper
portion of hanger.
Floor mat anchor(s) (if equipped)
When using a floor mat on the front floor
carpet, make sure it attaches to the floor
mat anchor(s) in your vehicle. This keeps
the floor mat from sliding forward.
OCM039200N
CAUTION
Do not hang heavy clothes, since
those may damage the hook.
OUN026348
WARNING
Do not adjust the clock while driv-
ing. You may lose your steering
control and cause an accident that
results in severe personal injury or
death.
WARNING
Do not put a finger or a foreign ele-
ment (pin, etc.) into a power outlet
and do not touch with a wet hand.
You may get electrocuted or fire
may occur.
WARNING
Do not hang other objects except
clothes. In an accident it may cause
vehicle damage or personal injury.
Page 202 of 403
Features of your vehicle
126 4
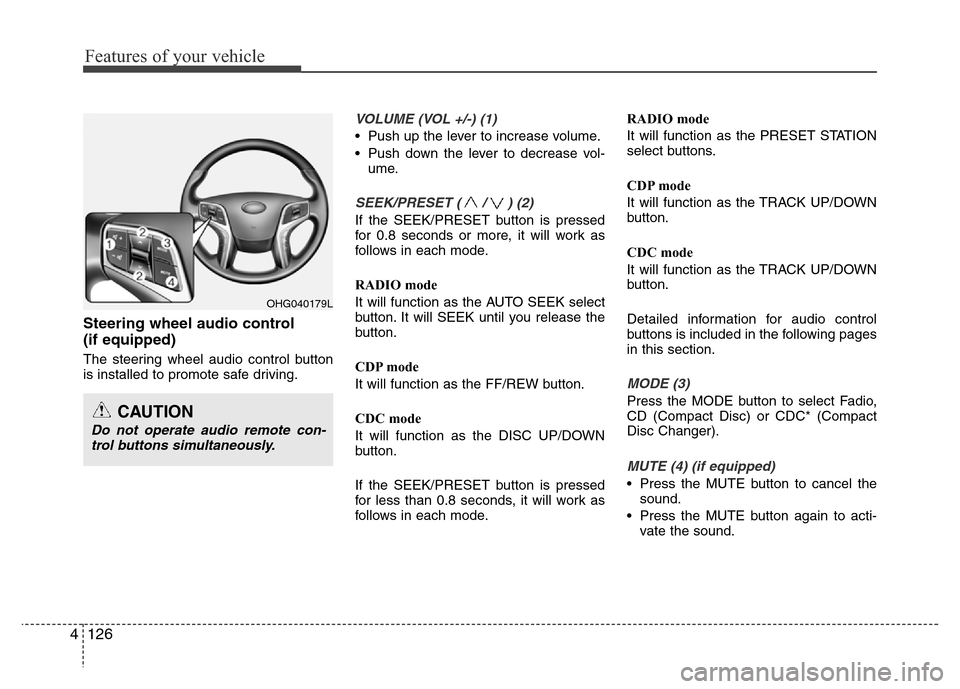
Steering wheel audio control
(if equipped)
The steering wheel audio control button
is installed to promote safe driving.
VOLUME (VOL +/-) (1)
• Push up the lever to increase volume.
• Push down the lever to decrease vol-
ume.
SEEK/PRESET ( / ) (2)
If the SEEK/PRESET button is pressed
for 0.8 seconds or more, it will work as
follows in each mode.
RADIO mode
It will function as the AUTO SEEK select
button. It will SEEK until you release the
button.
CDP mode
It will function as the FF/REW button.
CDC mode
It will function as the DISC UP/DOWN
button.
If the SEEK/PRESET button is pressed
for less than 0.8 seconds, it will work as
follows in each mode.RADIO mode
It will function as the PRESET STATION
select buttons.
CDP mode
It will function as the TRACK UP/DOWN
button.
CDC mode
It will function as the TRACK UP/DOWN
button.
Detailed information for audio control
buttons is included in the following pages
in this section.
MODE (3)
Press the MODE button to select Fadio,
CD (Compact Disc) or CDC* (Compact
Disc Changer).
MUTE (4) (if equipped)
• Press the MUTE button to cancel the
sound.
• Press the MUTE button again to acti-
vate the sound.
OHG040179L
CAUTION
Do not operate audio remote con-
trol buttons simultaneously.
Page 207 of 403

4131
Features of your vehicle
Using RADIO, SETUP, VOLUME
and AUDIO CONTROL
1. Button
Turns to FM mode and toggles FM1 and
FM2 when the button is pressed each
time.
2. Button
Pressing the button selects the
AM band. AM Mode is displayed on the
LCD.
3. Button
• When the button is pressed,
it increases the band frequency to
automatically select channel. Stops at
the previous frequency if no channel is
found.
• When the button is press-
ed, it reduces the band frequency to
automatically select channel. Stops at
the previous frequency if no channel is
found.
4. Button (AUTO STORE
Button)
When the button is pressed, it automati-
cally selects and saves channels with
high reception rate to PRESET buttons
~ and plays the channel
saved in PRESET1. If no channel is
saved after AST, it will play the previous
channel.
• When the button is pressed for longer
than 0.8 second, it automatically scans
the radio preset station upwards.
• Press the button again to stop
the scan feature and to listen to the
currently selected channel.
5. Knob
If the knob is turned clockwise/counter-
clockwise, the volume will increase
/decrease.
6. Button
■AC110/100/610/600HG
Press this button to turn to the SETUP
adjustment mode.
If no action is taken for 8 seconds after
pressing the button, it will return to the
play mode. (After entering SETUP mode,
select Manual , button
and push button)
The setup changes in the order of
Scroll ➟ SDVC ➟ Media ➟ Sound ➟
Phone ➟ Clock ➟ Scroll...
OK
TUNEFILE
SETUP
VOLUME
SCAN
61
AST
SEEK
TRACK
SEEK
TRACKSEEK
AM
AM
FM
AC110HG_CDP_BT
Page 210 of 403
Features of your vehicle
134 4
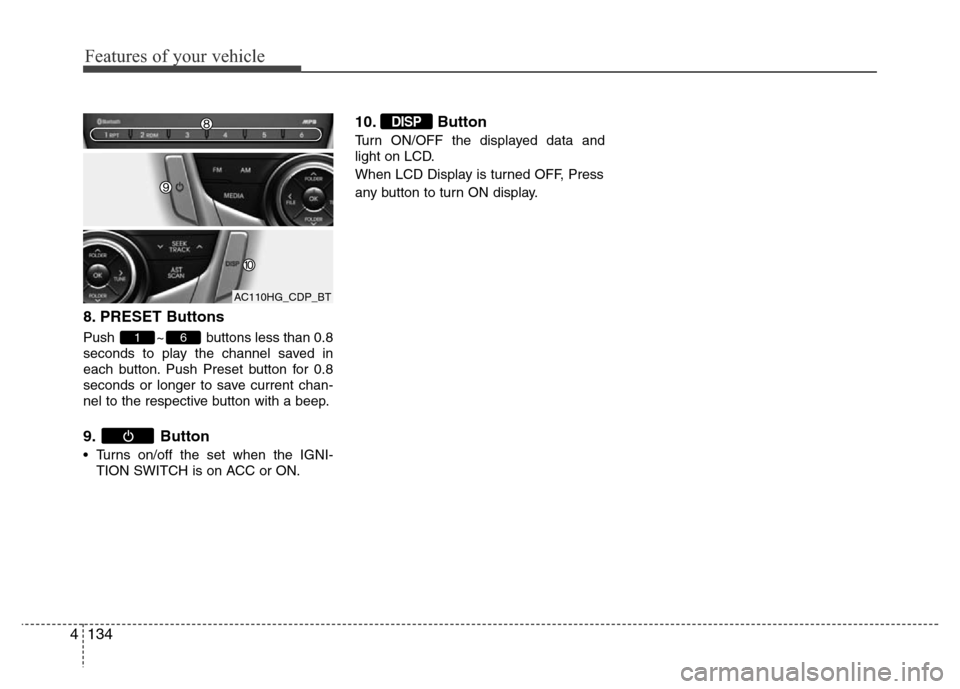
8. PRESET Buttons
Push ~ buttons less than 0.8
seconds to play the channel saved in
each button. Push Preset button for 0.8
seconds or longer to save current chan-
nel to the respective button with a beep.
9. Button
• Turns on/off the set when the IGNI-
TION SWITCH is on ACC or ON.
10. Button
Turn ON/OFF the displayed data and
light on LCD.
When LCD Display is turned OFF, Press
any button to turn ON display.
DISP
61
AC110HG_CDP_BT
Page 212 of 403
Features of your vehicle
136 4
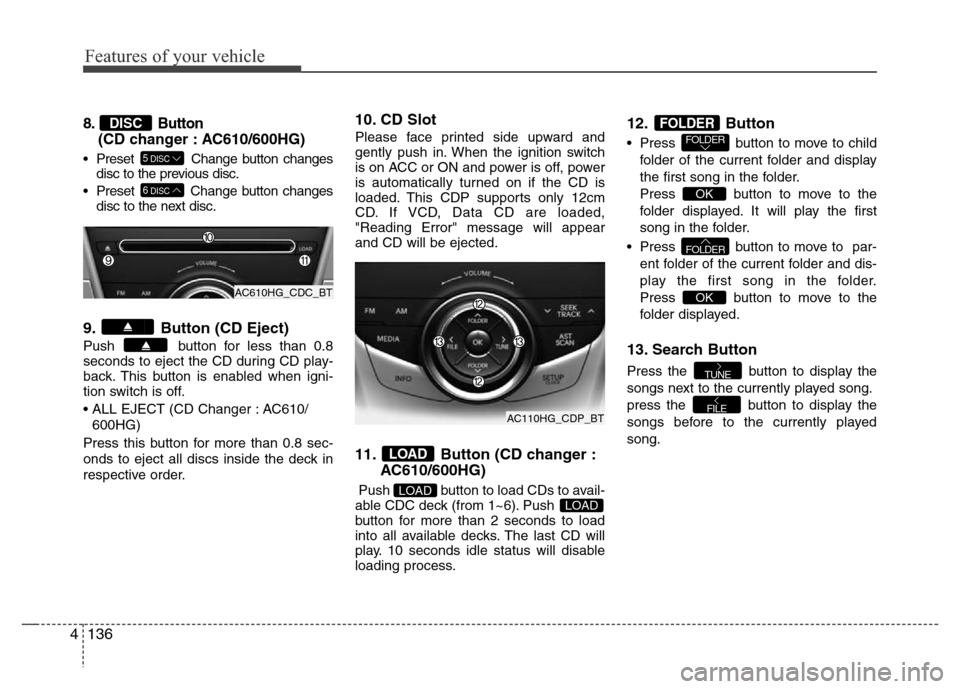
8. Button
(CD changer : AC610/600HG)
• Preset Change button changes
disc to the previous disc.
• Preset Change button changes
disc to the next disc.
9. Button (CD Eject)
Push button for less than 0.8
seconds to eject the CD during CD play-
back. This button is enabled when igni-
tion switch is off.
• ALL EJECT (CD Changer : AC610/
600HG)
Press this button for more than 0.8 sec-
onds to eject all discs inside the deck in
respective order.
10. CD Slot
Please face printed side upward and
gently push in. When the ignition switch
is on ACC or ON and power is off, power
is automatically turned on if the CD is
loaded. This CDP supports only 12cm
CD. If VCD, Data CD are loaded,
"Reading Error" message will appear
and CD will be ejected.
11. Button (CD changer :
AC610/600HG)
Push button to load CDs to avail-
able CDC deck (from 1~6). Push
button for more than 2 seconds to load
into all available decks. The last CD will
play. 10 seconds idle status will disable
loading process.
12. Button
• Press button to move to child
folder of the current folder and display
the first song in the folder.
Press button to move to the
folder displayed. It will play the first
song in the folder.
• Press button to move to par-
ent folder of the current folder and dis-
play the first song in the folder.
Press button to move to the
folder displayed.
13. Search Button
Press the button to display the
songs next to the currently played song.
press the button to display the
songs before to the currently played
song.
FILE
TUNE
OK
FOLDER
OK
FOLDERFOLDER
LOADLOAD
LOAD
6DISC
5DISC
DISC
AC610HG_CDC_BT
AC110HG_CDP_BT
Page 218 of 403
Features of your vehicle
142 4
✽NOTICE FOR USING THE
iPod®DEVICE
• Some iPod®models might not support
the communication protocol and the
files will not be played.
Supported iPod
®models:
- iPod®Mini
- iPod®4th (Photo) ~ 6th (Classic) gen-
eration
- iPod
®Nano 1st~4th generation
- iPod®Touch 1st~2nd generation
• The order of search or playback of
songs in the iPod
®can be different
from the order searched in the audio
system.
• If the iPod
®disabled due to its own
malfunction, reset the iPod®. (Reset:
Refer to iPod®manual)
• An iPod®may not operate normally
on low battery.
• Some iPod
®devices, such as the
iPhone, can be connected through the
Bluetooth
®Wireless Technology inter-
face. The device must have audio
Bluetooth
®Wireless Technology capa-
bility (such as for stereo headphone
Bluetooth
®Wireless Technology). The
device can play, but it will not be con-
trolled by the audio system.
CAUTION IN USING THE
iPod®DEVICE
• The Hyundai iPod®Power Cable is
needed in order to operate iPod®
with the audio buttons on the
audio system. The USB cable pro-
vided by Apple may cause mal-
function and should not be used
for Hyundai vehicles.
❋ The Hyundai iPod®Power Cable
may be purchased through your
Hyundai Dealership.
• When connecting iPod
®with the
iPod®Power Cable, insert the con-
nector to the multimedia socket
completely. If not inserted com-
pletely, communications between
iPod
®and audio may be interrupt-
ed.
• When adjusting the sound effects of
the iPod
®and the audio system, the
sound effects of both devices will
overlap and might reduce or distort
the quality of the sound.
• Deactivate (turn off) the equalizer
function of an iPod
®when adjust-
ing the audio system’s volume,
and turn off the equalizer of the
audio system when using the
equalizer of an iPod
®.
(Continued)
(Continued)
• When the iPod®cable is connect-
ed, the system can be switched to
AUX mode even without iPod
®
device and may cause noise.
Disconnect the iPod®cable when
you are not using the iPod®
device.
• When not using iPod®with car
audio, detach the iPod®cable from
iPod. Otherwise, iPod®may remain
in accessory mode, and may not
work properly.
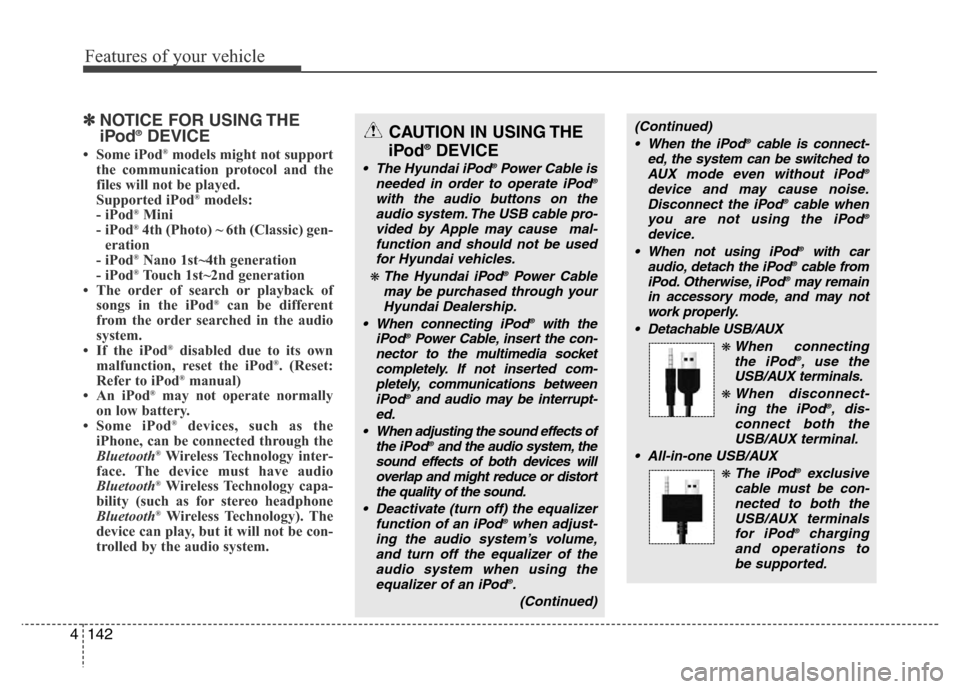
• Detachable USB/AUX
❋ When connecting
the iPod®, use the
USB/AUX terminals.
❋ When disconnect-
ing the iPod®, dis-
connect both the
USB/AUX terminal.
• All-in-one USB/AUX
❋ The iPod®exclusive
cable must be con-
nected to both the
USB/AUX terminals
for iPod
®charging
and operations to
be supported.