2012 Hyundai Azera lock
[x] Cancel search: lockPage 299 of 403
What to do in an emergency
12 6
10. To reinstall the wheel, hold it on
the studs, put the wheel nuts on
the studs and tighten them finger
tight. The nuts should be installed
with their tapered small diameter
ends directed inward. Jiggle the
tire to be sure it is completely
seated, then tighten the nuts as
much as possible with your fin-
gers again.
11. Lower the car to the ground by
turning the wheel nut wrench
counterclockwise.
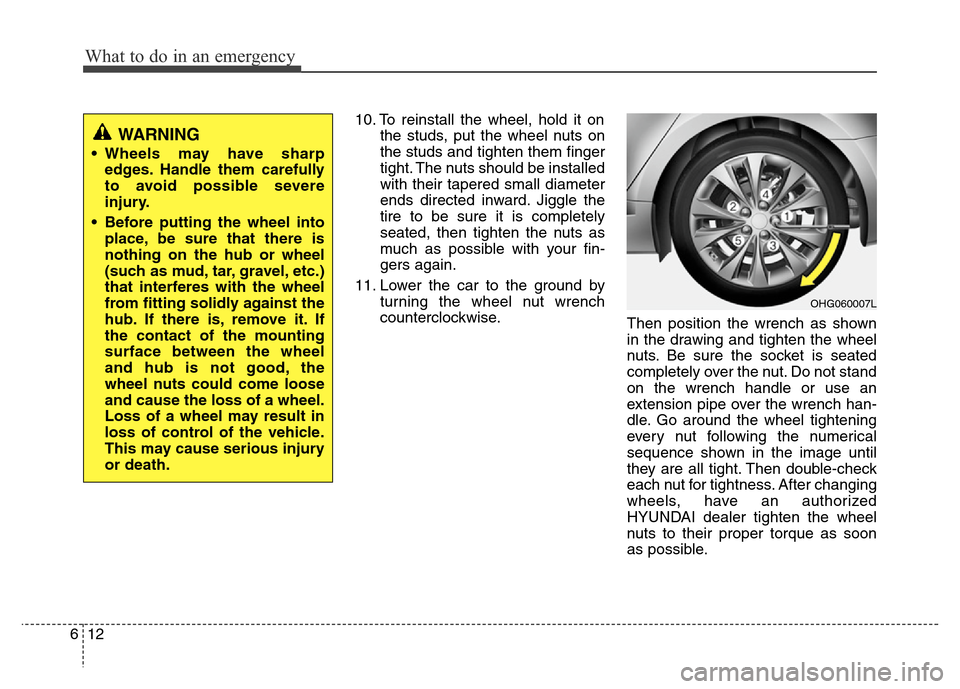
Then position the wrench as shown
in the drawing and tighten the wheel
nuts. Be sure the socket is seated
completely over the nut. Do not stand
on the wrench handle or use an
extension pipe over the wrench han-
dle. Go around the wheel tightening
every nut following the numerical
sequence shown in the image until
they are all tight. Then double-check
each nut for tightness. After changing
wheels, have an authorized
HYUNDAI dealer tighten the wheel
nuts to their proper torque as soon
as possible.
OHG060007L
WARNING
• Wheels may have sharp
edges. Handle them carefully
to avoid possible severe
injury.
• Before putting the wheel into
place, be sure that there is
nothing on the hub or wheel
(such as mud, tar, gravel, etc.)
that interferes with the wheel
from fitting solidly against the
hub. If there is, remove it. If
the contact of the mounting
surface between the wheel
and hub is not good, the
wheel nuts could come loose
and cause the loss of a wheel.
Loss of a wheel may result in
loss of control of the vehicle.
This may cause serious injury
or death.
Page 309 of 403
What to do in an emergency
22 6
When towing your vehicle in an emer-
gency without wheel dollies :
1. Set the ignition switch in the ACC posi-
tion.
2. Place the shift lever in N (Neutral).
3. Release the parking brake.
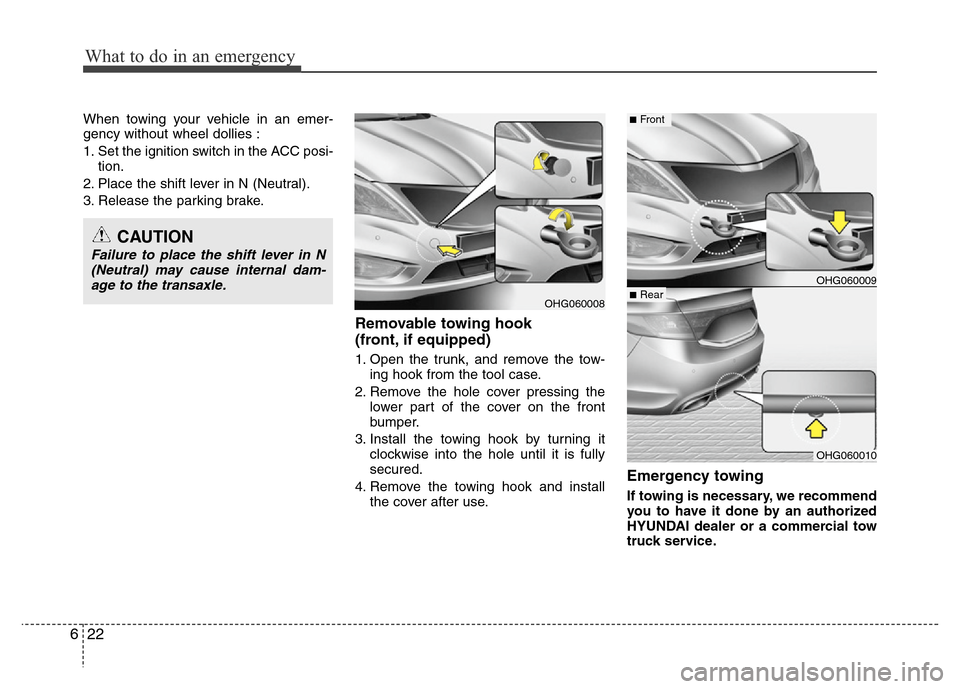
Removable towing hook
(front, if equipped)
1. Open the trunk, and remove the tow-
ing hook from the tool case.
2. Remove the hole cover pressing the
lower part of the cover on the front
bumper.
3. Install the towing hook by turning it
clockwise into the hole until it is fully
secured.
4. Remove the towing hook and install
the cover after use.
Emergency towing
If towing is necessary, we recommend
you to have it done by an authorized
HYUNDAI dealer or a commercial tow
truck service.
OHG060008
OHG060009■Rear
CAUTION
Failure to place the shift lever in N
(Neutral) may cause internal dam-
age to the transaxle.
■Front
OHG060010
Page 311 of 403
What to do in an emergency
24 6
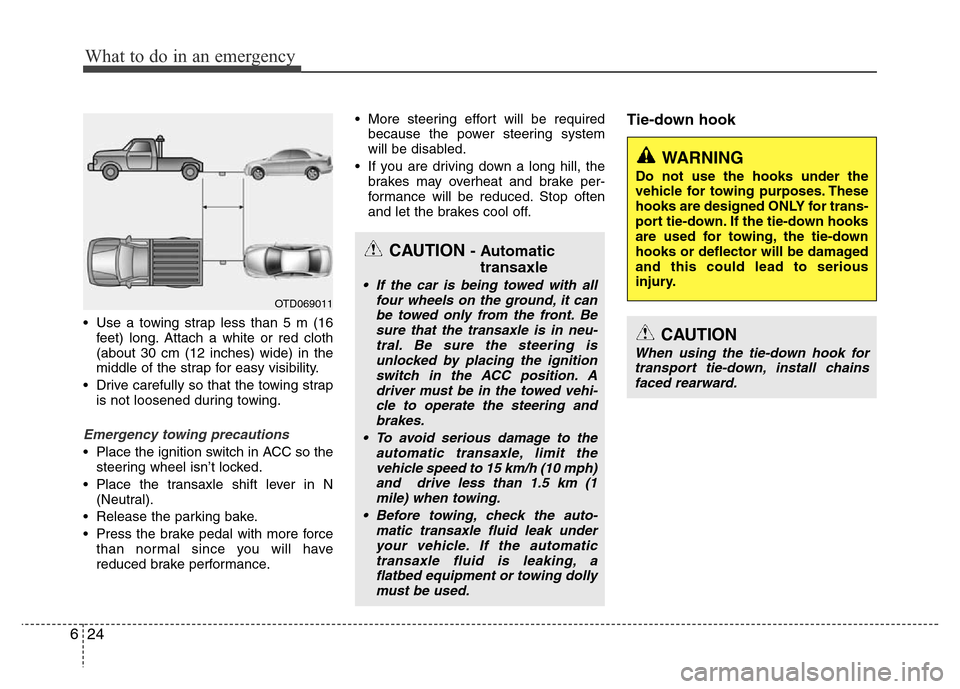
• Use a towing strap less than 5 m (16
feet) long. Attach a white or red cloth
(about 30 cm (12 inches) wide) in the
middle of the strap for easy visibility.
• Drive carefully so that the towing strap
is not loosened during towing.
Emergency towing precautions
• Place the ignition switch in ACC so the
steering wheel isn’t locked.
• Place the transaxle shift lever in N
(Neutral).
• Release the parking bake.
• Press the brake pedal with more force
than normal since you will have
reduced brake performance.• More steering effort will be required
because the power steering system
will be disabled.
• If you are driving down a long hill, the
brakes may overheat and brake per-
formance will be reduced. Stop often
and let the brakes cool off.
Tie-down hook
CAUTION - Automatic
transaxle
• If the car is being towed with all
four wheels on the ground, it can
be towed only from the front. Be
sure that the transaxle is in neu-
tral. Be sure the steering is
unlocked by placing the ignition
switch in the ACC position. A
driver must be in the towed vehi-
cle to operate the steering and
brakes.
• To avoid serious damage to the
automatic transaxle, limit the
vehicle speed to 15 km/h (10 mph)
and drive less than 1.5 km (1
mile) when towing.
• Before towing, check the auto-
matic transaxle fluid leak under
your vehicle. If the automatic
transaxle fluid is leaking, a
flatbed equipment or towing dolly
must be used.
OTD069011
WARNING
Do not use the hooks under the
vehicle for towing purposes. These
hooks are designed ONLY for trans-
port tie-down. If the tie-down hooks
are used for towing, the tie-down
hooks or deflector will be damaged
and this could lead to serious
injury.
CAUTION
When using the tie-down hook for
transport tie-down, install chains
faced rearward.
Page 317 of 403
75
Maintenance
Owner maintenance schedule
When you stop for fuel:
• Check the engine oil level.
• Check coolant level in coolant reser-
voir.
• Check the windshield washer fluid
level.
• Look for low or under-inflated tires.
• Check the radiator and condenser.
Check if the front of the radiator and
condenser are clean and not blocked
with leaves, dirt or insects etc.
If any of the above parts are extremely
dirty or you are not sure of their condi-
tion, take your vehicle to an authorized
HYUNDAI dealer.
While operating your vehicle:
• Note any changes in the sound of the
exhaust or any smell of exhaust fumes
in the vehicle.
• Check for vibrations in the steering
wheel. Notice any increased steering
effort or looseness in the steering
wheel, or change in its straight-ahead
position.
• Notice if your vehicle constantly turns
slightly or “pulls” to one side when trav-
eling on smooth, level road.
• When stopping, listen and check for
unusual sounds, pulling to one side,
increased brake pedal travel or “hard-
to-push” brake pedal.
• If any slipping or changes in the oper-
ation of your transaxle occurs, check
the transaxle fluid level.
• Check automatic transaxle P (Park)
function.
• Check parking brake.
• Check for fluid leaks under your vehicle
(water dripping from the air condition-
ing system during or after use is nor-
mal).
At least monthly:
• Check coolant level in the engine
coolant reservoir.
• Check the operation of all exterior
lights, including the stoplights, turn sig-
nals and hazard warning flashers.
• Check the inflation pressures of all
tires including the spare.
At least twice a year
(i.e., every Spring and Fall):
• Check radiator, heater and air condi-
tioning hoses for leaks or damage.
• Check windshield washer spray and
wiper operation. Clean wiper blades
with clean cloth dampened with wash-
er fluid.
• Check headlight alignment.
• Check muffler, exhaust pipes, shields
and clamps.
• Check the lap/shoulder belts for wear
and function.
• Check for worn tires and loose wheel
lug nuts.
WARNING
Be careful when checking your
engine coolant level when the
engine is hot. Scalding hot coolant
and steam may blow out under
pressure. This could cause burns
or other serious injury.
Page 318 of 403
Maintenance
6 7
SCHEDULED MAINTENANCE SERVICE
At least once a year:
• Clean body and door drain holes.
• Lubricate door hinges and checks, and
hood hinges.
• Lubricate door and hood locks and
latches.
• Lubricate door rubber weatherstrips.
• Check the air conditioning system.
• Check the power steering fluid level.
• Inspect and lubricate automatic
transaxle linkage and controls.
• Clean battery and terminals.
• Check the brake fluid level.Follow Normal Maintenance Schedule if
the vehicle is usually operated where
none of the following conditions apply. If
any of the following conditions apply, fol-
low Maintenance Under Severe Usage
Conditions.
• Repeated short distance driving.
• Driving in dusty conditions or sandy
areas.
• Extensive use of brakes.
• Driving in areas where salt or other
corrosive materials are being used.
• Driving on rough or muddy roads.
• Driving in mountainous areas.
• Extended periods of idling or low
speed operation.
• Driving for a prolonged period in cold
temperatures and/or extremely humid
climates.
• More than 50% driving in heavy city
traffic during hot weather above 32°C
(90°F).
If your vehicle is operated under the
above conditions, you should inspect,
replace or refill more frequently than the
following Normal Maintenance Schedule.
After the periods or distance shown in
the chart, continue to follow the pre-
scribed maintenance intervals.
Page 336 of 403
Maintenance
24 7
EXPLANATION OF SCHEDULED MAINTENANCE ITEMS
Engine oil and filter
The engine oil and filter should be
changed at the intervals specified in the
maintenance schedule. If the car is being
driven in severe conditions, more fre-
quent oil and filter changes are required.
Drive belts
Inspect all drive belts for evidence of
cuts, cracks, excessive wear or oil satu-
ration and replace if necessary. Drive
belts should be checked periodically for
proper tension and adjusted as neces-
sary.
Fuel filter
A clogged filter can limit the speed at
which the vehicle may be driven, damage
the emission system and cause multiple
issues such as hard starting. If an exces-
sive amount of foreign matter accumu-
lates in the fuel tank, the filter may
require replacement more frequently.
After installing a new filter, run the engine
for several minutes, and check for leaks
at the connections. Fuel filters should be
installed by an authorized HYUNDAI
dealer.
Fuel lines, fuel hoses and con-
nections
Check the fuel lines, fuel hoses and con-
nections for leakage and damage. Have
an authorized HYUNDAI dealer replace
any damaged or leaking parts immedi-
ately.
Vapor hose and fuel filler cap
The vapor hose and fuel filler cap should
be inspected at those intervals specified
in the maintenance schedule. Make sure
that a new vapor hose or fuel filler cap is
correctly replaced.
Vacuum crankcase ventilation
hoses (if equipped)
Inspect the surface of hoses for evidence
of heat and/or mechanical damage. Hard
and brittle rubber, cracking, tears, cuts,
abrasions, and excessive swelling indi-
cate deterioration. Particular attention
should be paid to examine those hose
surfaces nearest to high heat sources,
such as the exhaust manifold.
Inspect the hose routing to assure that
the hoses do not come in contact with
any heat source, sharp edges or moving
component which might cause heat dam-
age or mechanical wear. Inspect all hose
connections, such as clamps and cou-
plings, to make sure they are secure, and
that no leaks are present. Hoses should
be replaced immediately if there is any
evidence of deterioration or damage.
CAUTION
When you are inspecting the belt,
place the ignition switch in the
LOCK/OFF or ACC position.
Page 340 of 403
Maintenance
28 7
Changing the engine oil and filter
Have engine oil and filter changed by an
authorized HYUNDAI dealer according to
the Maintenance Schedule at the begin-
ning of this section.The high-pressure cooling system has a
reservoir filled with year-round antifreeze
coolant. The reservoir is filled at the fac-
tory.
Check the antifreeze protection and
coolant level at least once a year, at the
beginning of the winter season, and
before traveling to a colder climate.
Checking the coolant level
WARNING
Used engine oil may cause irrita-
tion or cancer of the skin if left in
contact with the skin for prolonged
periods of time. Used engine oil
contains chemicals that have
caused cancer in laboratory ani-
mals. Always protect your skin by
washing your hands thoroughly
with soap and warm water as soon
as possible after handling used oil.
ENGINE COOLANT
WARNING
Removing radiator
cap
• Never attempt to remove the radi-
ator cap while the engine is oper-
ating or hot. Doing so might lead
to cooling system and engine
damage and could result in seri-
ous personal injury from escap-
ing hot coolant or steam.
• Turn the engine off and wait until
it cools down. Use extreme care
when removing the radiator cap.
Wrap a thick towel around it, and
turn it counterclockwise slowly to
the first stop. Step back while the
pressure is released from the
cooling system. When you are
sure all the pressure has been
released, press down on the cap,
using a thick towel, and continue
turning counterclockwise to
remove it.
(Continued)
CAUTION
• When the engine overheats from
low engine coolant, suddenly
adding engine coolant may cause
cracks in the engine. To prevent
damage, add engine coolant
slowly in small quantities.
• Do not drive with no engine
coolant. It may cause water pump
failure and engine seizure, etc.
Page 346 of 403

Maintenance
34 7
AIR CLEANER
Filter replacement
It must be replaced when necessary, and
should not be washed.
You can clean the filter when inspecting
the air cleaner element.
Clean the filter by using compressed air.1. Loosen the air cleaner cover attaching
clips and open the cover.2. Wipe the inside of the air cleaner.
3. Replace the air cleaner filter.
4. Lock the cover with the cover attaching
clips.
Replace the filter according to the
Maintenance Schedule.
If the vehicle is operated in extremely
dusty or sandy areas, replace the
element more often than the usual
recommended intervals. (Refer to
“Maintenance under severe usage condi-
tions” in this section.)
OHG070009OHG070010OVG079012