Page 137 of 370

459
Features of your vehicle
In the DOOR position, the light comes on
when any door is opened regardless of
the ignition switch position.
When doors are unlocked by the trans-
mitter, the light comes on for approxi-
mately 30 seconds as long as any door is
not open. The light goes out gradually
after approximately 30 seconds if the
door is closed. However, if the ignition
switch is ON or all doors are locked, the
light will turn off immediately.
If a door is opened with the ignition
switch in the ACC or LOCK position, the
light stays on for about 20 minutes.
However, if a door is opened with the
ignition switch in the ON position, the
light stays on continuously.
In the OFF position, the light stays off at
all times even when a door is open.
Luggage room lamp
The luggage room lamp comes on when
the trunk lid/tailgate is opened.
ORB041402
5 DoorORBC040059
4 DoorCAUTION
The luggage room lamp comes onas long as the trunk lid/tailgateopens. To prevent unnecessary charging system drain, close thetrunk lid/tailgate securely afterusing the luggage room.
Page 159 of 370
481
Features of your vehicle
Glove box
To open the glove box, push the button
and the glove box will automatically
open. Close the glove box after use.
Sunglass holder (if equipped)
To open the sunglass holder, press the
cover and the holder will slowly open.
Place your sunglasses in the compart-
ment door with the lenses facing out.
Push to close.
WARNING
Do not keep objects except sun-glasses inside the sunglass hold-
er. Such objects can be thrown
from the holder in the event of a
sudden stop or an accident, pos-
sibly injuring the passengers in
the vehicle.
Do not open the sunglass holder while the vehicle is moving. The
rear view mirror of the vehicle
can be blocked by an open sun-
glass holder.
WARNING
To reduce the risk of injury in an
accident or sudden stop, always
keep the glove box door closed
while driving.
CAUTION
Do not keep food in the glove boxfor a long time.
ORB040081ORB040080
Page 202 of 370

Driving your vehicle
45
Before starting
Close and lock all doors.
Position the seat so that all controls areeasily reached.
Adjust the inside and outside rearview mirrors.
Be sure that all lights work.
Check all gauges.
Check the operation of warning lights when the ignition switch is turned to
the ON position.
Release the parking brake and make sure the brake warning light goes out.
For safe operation, be sure you are famil-
iar with your vehicle and its equipment.WARNING
Always check the surrounding
areas near your vehicle for people,
especially children, before putting a
car into D (Drive) or R (Reverse).
WARNING- Driving under
the influence of alcohol or
drugs
Drinking and driving is dangerous.
Drunk driving is the number one
contributor to the highway death
toll each year. Even a small amount
of alcohol will affect your reflexes,
perceptions and judgment. Driving
while under the influence of drugs
is as dangerous or more dangerous
than driving drunk.
You are much more likely to have a
serious accident if you drink or
take drugs and drive.
If you are drinking or taking drugs,
don’t drive. Do not ride with a driv-
er who has been drinking or taking
drugs. Choose a designated driver
or call a cab.
WARNING
When you intend to park or stop
the vehicle with the engine on, be
careful not to depress the accel-
erator pedal for a long period of
time. It may overheat the engine
or exhaust system and cause fire.
When you make a sudden stop or turn the steering wheel rapidly,
loose objects may drop on the
floor and it could interfere with
the operation of the foot pedals,
possibly causing an accident.
Keep all things in the vehicle
safely stored.
If you do not focus on driving, it may cause an accident. Be care-
ful when operating items that
may distract from such as audio
or heater controls. It is the
responsibility of the driver to
always drive safely with full atten-
tion to the task of driving.
WARNING
All passengers must be properly
belted whenever the vehicle is mov-
ing. Refer to “Seat belts” in section
3 for more information on their
proper use.
Page 280 of 370

75
Maintenance
While operating your vehicle:
Note any changes in the sound of theexhaust or any smell of exhaust fumes
in the vehicle.
Check for vibrations in the steering wheel. Notice any increased steering
effort or looseness in the steering
wheel, or change in its straight-ahead
position.
Notice if your vehicle constantly turns slightly or “pulls” to one side when trav-
eling on smooth, level road.
When stopping, listen and check for unusual sounds, pulling to one side,
increased brake pedal travel or “hard-
to-push” brake pedal.
If any slipping or changes in the oper- ation of your transaxle occurs, check
the transaxle fluid level.
Check automatic transaxle P (Park) function.
Check parking brake.
Check for fluid leaks under your vehicle (water dripping from the air condition-
ing system during or after use is nor-
mal).
At least monthly:
Check coolant level in the enginecoolant reservoir.
Check the operation of all exterior lights, including the stoplights, turn sig-
nals and hazard warning flashers.
Check the inflation pressures of all tires including the spare.
At least twice a year (i.e., every Spring and Fall):
Check radiator, heater and air condi- tioning hoses for leaks or damage.
Check windshield washer spray and wiper operation. Clean wiper blades
with clean cloth dampened with wash-
er fluid.
Check headlight alignment.
Check muffler, exhaust pipes, shields and clamps.
Check the lap/shoulder belts for wear and function.
Check for worn tires and loose wheel lug nuts.
At least once a year:
Clean body and door drain holes.
Lubricate door hinges and checks, andhood hinges.
Lubricate door and hood locks and latches.
Lubricate door rubber weatherstrips.
Check the air conditioning system.
Inspect and lubricate automatic transaxle linkage and controls.
Clean battery and terminals.
Check the brake fluid level.
Page 331 of 370

Maintenance
56
7
Description Fuse rating Protected component
SPARE 3 10A Not Used
TCU 15A Vehicle Speed Sensor, Transaxle Range Switch
IGN COIL 15A Ignition Coil #1~#4, Condenser
IG2 10APower Window Relay, A/C Control Module, Instrument Cluster (MICOM) BCM,
Sunroof Motor, E/R Fuse & Relay Box (Blower Relay)
WIPER FRT 25A Multifunction Switch (Wiper), Front Wiper Motor
DR LOCK 20A Door Lock/Unlock Relay, Two Turn Unlock Relay Driver Door Lock Actuator
SPARE 4 25A Not Used
S/HEATER 15A Driver/Passenger Seat Heater Module
SPARE 5 10A Not Used
ROOM LP 1 10AInstrument Cluster (IND.,ILL.), Tire Pressure Monitoring Module, BCM A/C Control Module,
Luggage Room Lamp, Trunk Room Lamp Center Room Lamp, Overhead Console Lamp, Map Lamp
AUDIO 20A Audio
TAIL LP LH 10ARear Combination Lamp LH, Head Lamp LH, Front Turn Signal Lamp LH
License Lamp LH/RH (4Door), License Lamp (5Door)
TAIL LP RH 10AHead Lamp RH, Rear Combination Lamp RH, Rheostat, Audio Front Turn Signal Lamp RH,
Hazard Switch, Instrument Cluster (ILL.+) AUX & USB Jack, ESC Off Switch, A/C Switch,
ECO Switch Multifunction Switch (Remote Control), A/C Control Module R\
ear Defogger Switch,
Front Deicer Switch, ATM Shift Lever Switch ILL.
START 10A Transaxle Range Switch, Ignition Lock Switch
H/LP RH 10A Instrument Cluster (High Beam IND.), Head Lamp RH
P/WDW LH 25A Power Window Main Switch, Rear Power Window Switch LH
P/WDW RH 25A Power Window Main Switch, Rear Power Window Switch RHPassenger Power Window Switch
HTD MIRR 10AECM, PCM, Rear Defogger Switch, Driver Power Outside Mirror
Passenger Power Outside Mirror
A/CON 10A A/C Control Module (Auto A/C)
BLOWER 10A ECM, PCM, Blower Switch, Blower Resistor A/C Control Module (Manual A/C)
Page 338 of 370
763
Maintenance
1. Open the trunk lid.
2. Remove the service cover by pullingout the service cover. 3. Remove the socket from the assembly
by turning the socket counterclockwise
until the tabs on the socket align with
the slots on the assembly.
4. Remove the bulb from the socket by pressing it in and rotating it counter-
clockwise until the tabs on the bulb
align with the slots in the socket. Pull
the bulb out of the socket.
5. Insert a new bulb by inserting it into the socket and rotating it until it locks
into place.
6. Install the socket in the assembly by aligning the tabs on the socket with the
slots in the assembly. Push the socket
into the assembly and turn the socket
clockwise.
7. Install the service cover by putting it into the service hole.Rear combination light bulb
replacement (5 Door)
(1) Tail light
(2) Rear turn signal light
(3) Back-up light
(4) Stop and tail light
(5) Side marker
ORBC070034ORB071051NORB071033
Page 340 of 370
765
Maintenance
High mounted stop light bulb
replacement (if equipped)
� �4 Door
1. Open the trunk lid.
2. Remove the socket by turning it coun- terclockwise.
3. Replace the bulb from the socket.
4. Install the socket by turning it clock- wise. � �
5 Door
If the light is not operating, have the vehi-
cle checked by an authorized HYUNDAI
dealer.
License plate light bulb replace-
ment
� � 4 Door
1. Remove the trunk trim.
2. Remove the socket by turning it coun- terclockwise.
3. Remove the bulb by pulling it straight out.
ORBC070043
ORBC070036
ORBC070041
ORBC070042
ORB071043
Type (LED/Bulb)
Page 341 of 370
Maintenance
66
7
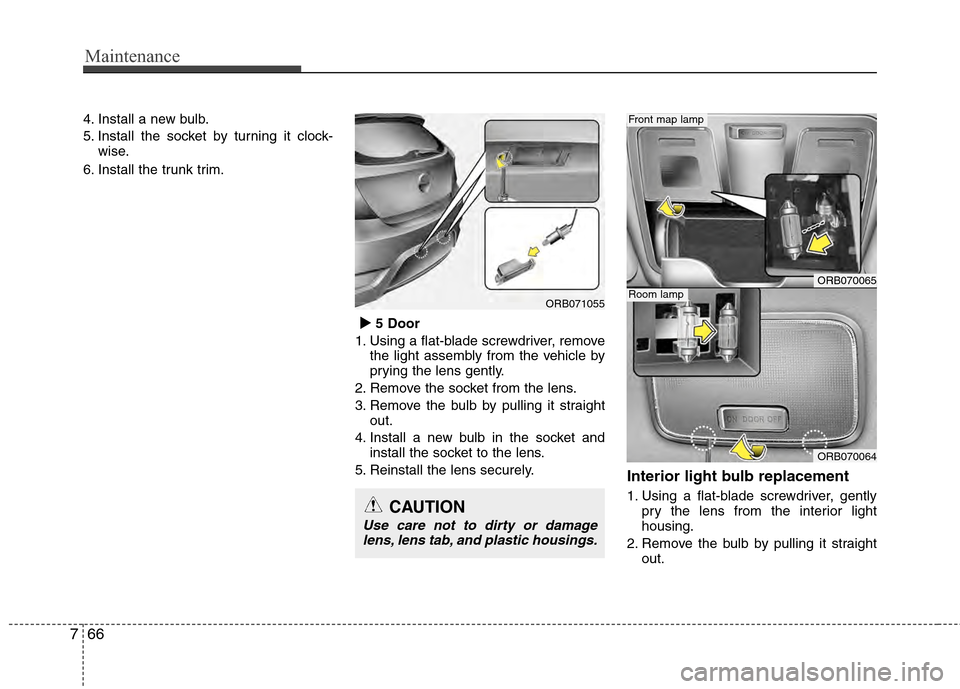
4. Install a new bulb.
5. Install the socket by turning it clock-
wise.
6. Install the trunk trim.
� �5 Door
1. Using a flat-blade screwdriver, remove the light assembly from the vehicle by
prying the lens gently.
2. Remove the socket from the lens.
3. Remove the bulb by pulling it straight out.
4. Install a new bulb in the socket and install the socket to the lens.
5. Reinstall the lens securely.
Interior light bulb replacement
1. Using a flat-blade screwdriver, gently pry the lens from the interior light
housing.
2. Remove the bulb by pulling it straight out.
ORB070065
ORB070064
Front map lamp
Room lampORB071055
CAUTION
Use care not to dirty or damagelens, lens tab, and plastic housings.

To open the sungl")