Page 404 of 681
On vehicles with navigation system
Press and release the REAR
SOURCE button. The indicator on
the REAR SOURCE button will come
on. The f ront screen shows the same
screen as the rear screen does. Push
the interf ace selector down. The
screen changes to the rear menu.
Turn the interface dial to the ‘‘Rear
Setup,
Page 405 of 681
Rear Entertainment System
398
OVERHEAD SCREEN UNIT
On vehicles without navigation system
REAR SOURCE
BUTTON REAR SOURCE
BUTTON
On vehicles with navigation system
CD SLOT
DVD/CD SLOT
REAR POWER
BUTTON REAR POWER
BUTTON
DVD/CD SLOT
CD SLOT
Main MenuTable of Contents
Page 407 of 681
�µ�µ
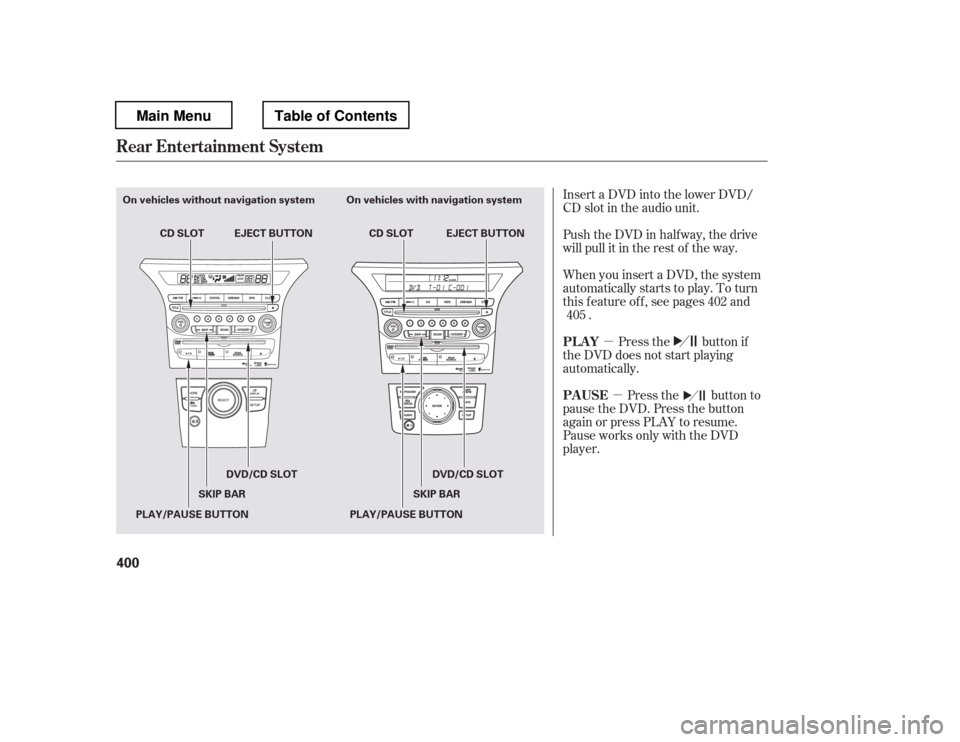
Insert a DVD into the lower DVD/
CD slot in the audio unit.
Push the DVD in half way, the drive
will pull it in the rest of the way.
When you insert a DVD, the system
automatically starts to play. To turn
this f eature of f , see pages and
.
Press the button if
the DVD does not start playing
automatically.
Press the button to
pause the DVD. Press the button
again or press PLAY to resume.
Pause works only with the DVD
player. 402
405
Rear Entertainment System
PL A Y
PAUSE
400
On vehicles without navigation system On vehicles with navigation syste m
EJECT BUTTON
CD SLOT
DVD/CD SLOT
SKIP BAR
PLAY/PAUSE BUTTON EJECT BUTTON
CD SLOT
PLAY/PAUSE BUTTON SKIP BAR
DVD/CD SLOT
Main MenuTable of Contents
Page 413 of 681
 of th e TU N E/S K IP
bar to scroll up/down and select
channels within a cat")
Press the FM/AM button to listen to
the radio.Press the XM button to listen to the
XM Radio. You can press either side(or) of th e TU N E/S K IP
bar to scroll up/down and select
channels within a category (in
CATEGORY mode), or to scroll up/
down and select f rom among all
available channels (in CH mode). Press the MENU button to display
theaudiomenuontheoverhead
screen. You can enter the
highlighted f unction by pressing the
ENTER button. These f unctions
have the same features as those of
the f ront audio system.
Pressing and holding the TITLE/
SCROLL button f or 5 seconds
enables you to switch between
search modes.
U
se th e,,, or
button to highlight SEEK,
TUNE, AUTO SELECT, SCAN, or
one of the preset radio stations on
the overhead screen. You can enter
the highlighted f unction by pressing
the ENT button. These f unctions
have the same features as those of
the f ront audio system. You can also
use the or buttons to seek
up/down and or to tune
up/down.
To Play the Radio f rom the Rear
Control Panel
To Play the XM Radio f rom the
Rear Control Panel
Rear Entertainment System
406
OVERHEADSCREEN REAR CONTROL PANEL
OPEN BUTTON
REAR CONTROL PANEL
On vehicles without navigation system
On vehicles with navigation system
Main MenuTable of Contents
Page 431 of 681

Insert a dif f erent disc. If the new
disc plays, there is a problem with
the f irst disc. If the error message
cycle repeats and you cannot clear it,
take your vehicle to a dealer.
Theaudiosystemwilltrytoplaythe
disc. If there is still a problem, the
error message will reappear. Press
the eject button, and pull out the disc.
If you see an error message in the
display while playing a disc, press
the eject button. After ejecting the
disc, check it for damage or
deformation. If there is no damage,
insert the disc again.
Thechartontherightexplainsthe
error messages you may see in the
display while playing a disc.
Solution
Error Message Cause
On vehicles without navigation system
Press the disc eject button, and remove the disc.
Check for an error indication. Insert the disc
again. If the code does not disappear or the disc
cannot be removed, consult your dealer.
The disc is not playable in this unit. Eject the
disc, and insert a disc compatible with this
system.
FOCUS Error
Mechanical Error
Invalid region code
DVD f ormat not
supported
DVD Player Error Messages
Rear Entertainment System
424 CHECK DISC
PUSH EJECT
CHECK REGION
UNSUPPORTED FILE
Main MenuTable of Contents
Page 440 of 681

The compass may need to be
manually calibrated af ter exposure to
a strong magnetic field. If the
compassseemstobecontinually
showing the wrong direction and is
not self -calibrating, or the compass
display is blinking with the CAL
indicator on, do the f ollowing
procedure.Do this procedure in an open
area, away f rom buildings, power
lines, and other vehicles.
Turn the ignition switch to the ON
(II) position.
Press and hold the SETUP button
f or about 5 seconds. The display
shows you the compass setting
menu items.
When you turn the ignition switch to
the ON (II) position, the compass is
self-calibrating, then the compass
display is shown in the display.
Compass operation can be af f ected
by driving near power lines or
stations, across bridges, through
tunnels, over railroad crossings, past
large vehicles, or driving near large
objects that can cause a magnetic
disturbance. It can also be af f ected
by accessories such as antennas and
roof racks that are mounted by
magnets.
1. 2.
CONT INUED
On EX, EX-L, and Canadian LX modelswithout navigation systemCompass Calibration
Compass Operation
Compass
Features
433
NOTE:
EX-L and Canadian EX models EX-L and Canadian EX models
U.S. EX and Canadian LX models U.S. EX and Canadian LX models
Main MenuTable of Contents
Page 448 of 681

allows you to place and receive
phone calls using voice commands,
without handling your cell phone.
To use HFL, you need a")
Bluetoothhandsf reelink.honda.
com
www.handsfreelink.ca,HandsFreeLink(HFL)
allows you to place and receive
phone calls using voice commands,
without handling your cell phone.
To use HFL, you need a Bluetooth-
compatible cell phone. For a list of
compatible phones, pairing
procedures, and special f eature
capabilities:
In the U.S., visit or call (888) 528-7876.
Use the selector knob to make menu
or list selections. Press the PHONE button or PICK-
UPbuttontogotothePhonescreen.
Press the RETURN button to go
back to the previous screen.
To select an item on the screen, turn
the selector knob lef t or right to
highlight it, and then push the
selector knob.
In Canada, visit
or call (888) 528-7876.
CONT INUED
Using HFL
Select or K nob
BluetoothHandsFreeL ink(Models without navigation syst em)
Features
441
Without rear entertainment system
With rear entertainment system
SELECTOR KNOB
SELECTOR KNOB
RETURN
BUTTON PHONE BUTTON
RETURN BUTTON
PHONE BUTTON
EX-L and Canadian EX models
U.S. EX and Canadian LX models
Main MenuTable of Contents
Page 449 of 681

�µ�µ
�µ
�µ To change the volume level of
HFL, use the audio system volume
knob or the steering wheel volume
controls.
Try to reduce all background
noise. If the microphone picks up
voices other than yours,
commands may be misinterpreted.
Press and
release to answer a call, or press to
go directly to the Phone screen. Press and
release to end or decline a call. Airorwindnoisefromthe
dashboard and side vents and all
windows may interfere with the
microphone. Adjust or close them
as necessary.You can change the system language
to English, French, or Spanish (see
page ).
Press and release
to call a number with a stored voice
tag. Press and release
to cancel a command. Press and release the Talk button
when you want to call a number
using a stored voice tag. Af ter the
beep, speak in a clear, natural tone. 297
Voice Cont rol T ips
HFL Buttons
L anguage Select ion
BluetoothHandsFreeL ink(Models without navigation syst em)
PICK -UP Button
HANG-UP Button
TALK Button
BACK Button
442
BACK BUTTON
TALK BUTTON PICK-UP BUTTON
HANG-UP BUTTON MICROPHONE
EX-L model shown.
Main MenuTable of Contents