2012 HONDA ODYSSEY Wire
[x] Cancel search: WirePage 1 of 441

ContentsThis owner’s manual should be considered a permanent part of the
vehicle and should remain with the vehicle when it is sold.
This owner’s manual covers all models of your vehicle. You may find
descriptions of equipment and features that are not on your
particular model.
Images throughout this owner’s manual (including the front cover)
represent features and equipment that are available on some, but
not all, models. Your particular model may not have some of these
features.
This owner’s manual is for vehicles sold in the United States and
Canada.
The information and specifications included in this publication were
in effect at the time of approval for printing. Honda Motor Co., Ltd.
reserves the right, however, to discontinue or change specifications
or design at any time without notice and without incurring any
obligation.
2Safe Driving P. 25For Safe Driving P. 26 Seat Belts P. 30 Airbags P. 392Instrument Panel P. 71Indicators P. 72 Gauges and Displays P. 862Controls P. 107Setting the Clock P. 108 Locking and Unlocking the Doors P. 110
Security System P. 134 Opening and Closing the Windows P. 137
Adjusting the Mirrors P. 152
Heating and Cooling
* P. 183
2Features P. 193Audio System P. 194 Audio System Basic Operation P. 197
Rear Entertainment System
* P. 241 HomeLink
® Universal Transceiver
* P. 257
2Driving P. 285Before Driving P. 286 Towing a Trailer P. 291
Rearview Camera
* P. 323 Refueling P. 325
2Maintenance P. 331Before Performing Maintenance P. 332 Maintenance Minder™ P. 335
Checking and Maintaining Wiper Blades P. 366
Remote Control and Wireless Headphone Care
* P. 382
2Handling the Unexpected P. 389Tools P. 390 If a Tire Goes Flat P. 391
Overheating P. 404 Indicator, Coming On/Blinking P. 406
When You Cannot Open or Close the Tailgate P. 4182Information P. 419Specifications P. 420 Identification Numbers P. 422
Warranty Coverages P. 427 Authorized Manuals P. 429
Page 149 of 441

148
uuOperating the Switches Around the Steering WheeluRear Defogger/Heated Door Mirror
* Button
Controls
Rear Defogger/Heated Door Mirror
* Button
Press the rear defogger and heated door
mirror button to defog the rear window and
mirrors when the ignition switch is in ON
(w
.
The rear defogger and heated door mirrors*
automatically switch off after 20 minutes.
The rear defogger and heated door mirrors
automatically switch off after 10-30 minutes
depending on the outside temperature.
However, if the outside temperature is 32°F
(0°C) or below, they do not automatically
switch off.
1Rear Defogger/Heated Door Mirror Button
NOTICEWhen cleaning the inside of the rear window, be
careful not to damage the heating wires.
It is critical to wipe the window from side to side
along the defogger heating wires.
This system consumes a lot of power, so turn it off
when the window has been defogged.
Also, do not use the system for a long period when
the engine is idling. This may weaken the battery,
making it difficult to start the engine.
If the outside temperature is below 41°F (5°C), the
heated mirror function will come on automatically for
10 minutes when you turn the ignition switch to ON (w
.
Models with heating and cooling systemModels with climate control system
* Not available on all models
Page 242 of 441

241
Continued
Features
Rear Entertainment System
*
For models with the navigation system, see the Navigation System Manual for how
to operate the rear entertainment system.
Allows the rear passengers to enjoy a different entertainment source, such as DVD,
CD, CD Library, and radio, than the front passengers.
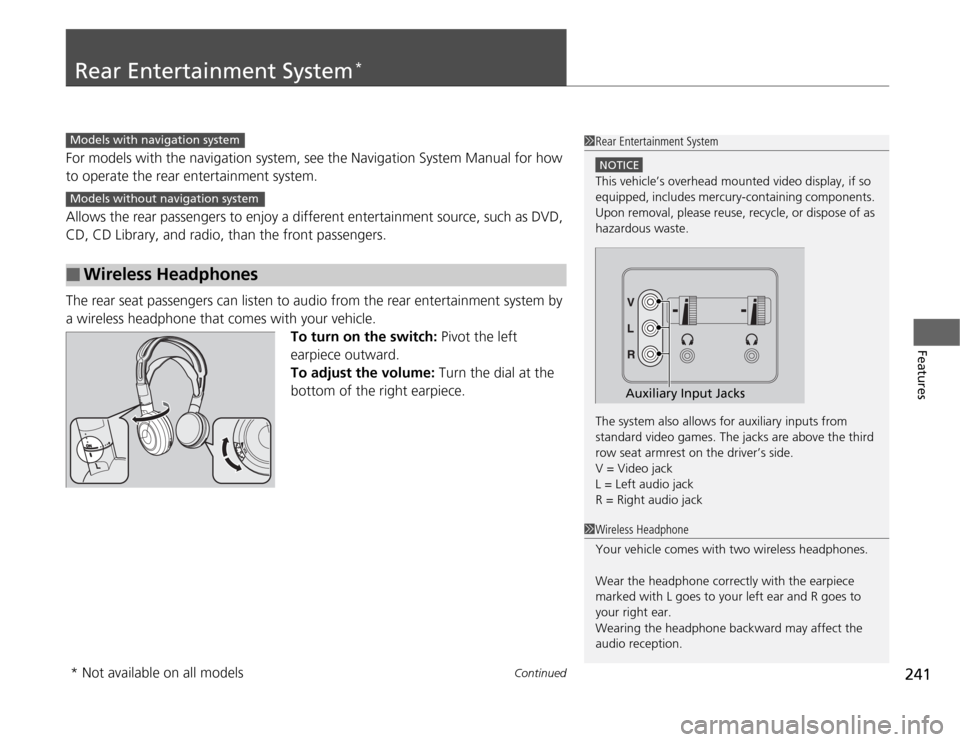
The rear seat passengers can listen to audio from the rear entertainment system by
a wireless headphone that comes with your vehicle.
To turn on the switch: Pivot the left
earpiece outward.
To adjust the volume: Turn the dial at the
bottom of the right earpiece.■
Wireless Headphones
1Rear Entertainment System
NOTICEThis vehicle’s overhead mounted video display, if so
equipped, includes mercury-containing components.
Upon removal, please reuse, recycle, or dispose of as
hazardous waste.
The system also allows for auxiliary inputs from
standard video games. The jacks are above the third
row seat armrest on the driver’s side.
V = Video jack
L = Left audio jack
R = Right audio jack
Auxiliary Input Jacks
Models with navigation systemModels without navigation system
1Wireless Headphone
Your vehicle comes with two wireless headphones.
Wear the headphone correctly with the earpiece
marked with L goes to your left ear and R goes to
your right ear.
Wearing the headphone backward may affect the
audio reception.
* Not available on all models
Page 261 of 441

uuBluetooth
® HandsFreeLink
®*uUsing HFL
260Features
The multi-information display notifies you
when there is an incoming call.
■
HFL Status Display
1Bluetooth
® HandsFreeLink
®
Bluetooth
® Wireless Technology
Bluetooth® name and logos are registered
trademarks owned by Bluetooth SIG, Inc., and any
use of such marks by Honda Motors Co., Ltd., is
under license. Other trademarks and trade names are
those of their respective owners.
HFL Limitations
An incoming call on HFL will interrupt the audio
system when it is playing. It will resume when the call
is ended.
Signal Strength
HFL Mode
Battery Level
Status Roam Status
Call NameBluetooth IndicatorComes on when your
phone is connected to
HFL.
1HFL Status Display
The information that appears on the multi-
information display varies between phone models.
You can change the system language to English,
French, or Spanish.
2Customized Features P. 101
Page 332 of 441

331
Maintenance
This chapter discusses basic maintenance.
Before Performing Maintenance
Inspection and Maintenance ............ 332
Safety When Performing Maintenance..... 333Parts and Fluids Used in Maintenance
Service ........................................... 334
Maintenance Minder™.................... 335
Maintenance Under the HoodMaintenance Items Under the Hood ..... 343Opening the Hood ........................... 344
Recommended Engine Oil ................ 345
Oil Check ......................................... 346
Adding Engine Oil ............................ 347Changing the Engine Oil and Oil Filter ..... 348
Engine Coolant ................................ 350
Transmission Fluid ............................ 352
Brake Fluid ....................................... 353
Power Steering Fluid Check.............. 354
Refilling Window Washer Fluid......... 354
Replacing Light Bulbs....................... 355
Checking and Maintaining Wiper Blades
.... 366
Checking and Maintaining Tires
Checking Tires ................................. 370
Tire and Loading Information Label ...... 371Tire Labeling .................................... 371DOT Tire Quality Grading (U.S. Vehicles)....... 373Wear Indicators................................ 375Tire Service Life ................................ 375
Tire and Wheel Replacement ........... 376
Tire Rotation .................................... 377
Winter Tires ..................................... 378
Battery............................................... 379
Remote Transmitter Care................. 380
Remote Control and Wireless
Headphone Care
*........................... 382
Heating and Cooling System
*/Climate
Control System
* Maintenance....... 384
Cleaning
Interior Care .................................... 385
Exterior Care.................................... 387
* Not available on all models
Page 383 of 441

382Maintenance
Remote Control and Wireless Headphone Care
*
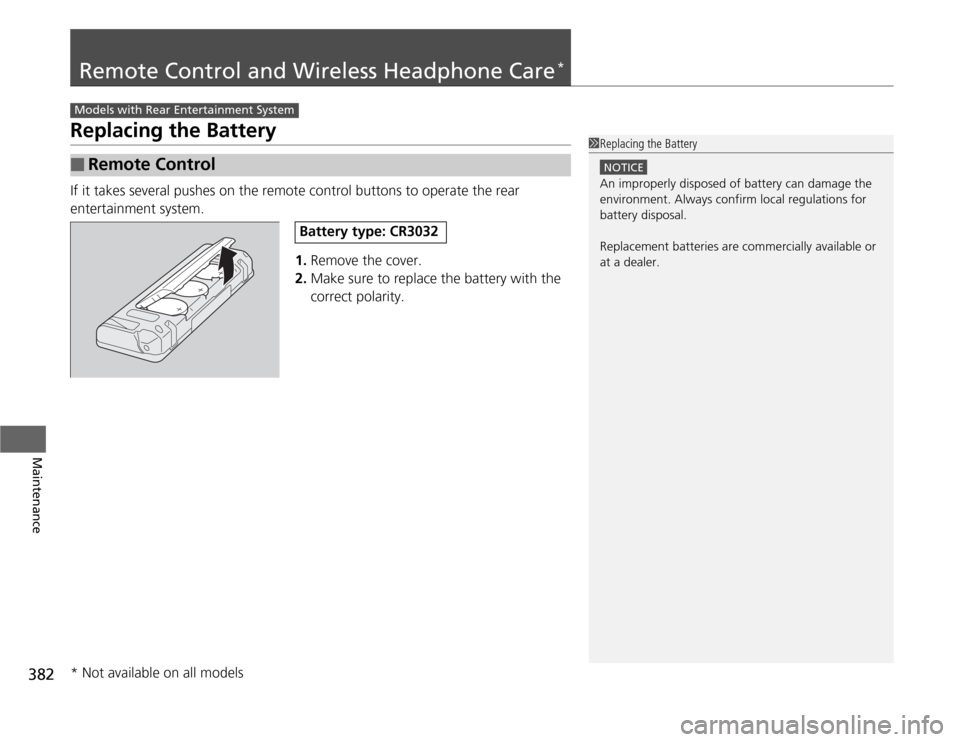
Replacing the BatteryIf it takes several pushes on the remote control buttons to operate the rear
entertainment system.
1.Remove the cover.
2.Make sure to replace the battery with the
correct polarity.■
Remote Control
Models with Rear Entertainment System
1Replacing the Battery
NOTICEAn improperly disposed of battery can damage the
environment. Always confirm local regulations for
battery disposal.
Replacement batteries are commercially available or
at a dealer.
Battery type: CR3032
* Not available on all models
Page 384 of 441

383
uuRemote Control and Wireless Headphone Care
*uReplacing the Battery
Maintenance
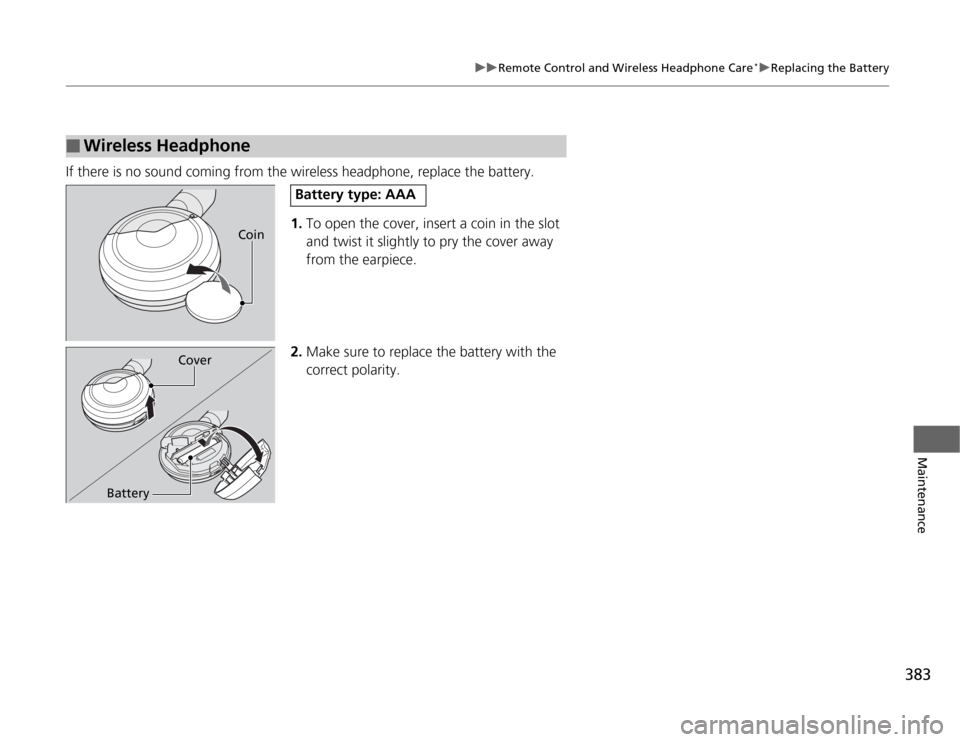
If there is no sound coming from the wireless headphone, replace the battery.
1.To open the cover, insert a coin in the slot
and twist it slightly to pry the cover away
from the earpiece.
2.Make sure to replace the battery with the
correct polarity.■
Wireless Headphone
Coin
Battery type: AAA
Cover
Battery
Page 389 of 441

uuCleaninguExterior Care
388Maintenance
A good coat of automotive body wax helps protect your vehicle’s paint from the
elements. Wax will wear off over time and expose your vehicle’s paint to the
elements, so reapply as necessary.
If you get gasoline, oil, engine coolant, or battery fluid on resin coated parts, they
may be stained or the coating may peel. Promptly wipe it away using a soft cloth and
clean water.
Wipe using a glass cleaner.
Aluminum is susceptible to deterioration caused by salt and other road
contaminants. Use a sponge and mild detergent to wipe away promptly.
Be careful not to use harsh chemicals (including some commercial wheel cleaners) or
a stiff brush. They can damage the clear coat of the aluminum alloy wheels that
helps keep the aluminum from corroding and tarnishing.■
Applying Wax
■
Maintaining the Bumpers and Other Resin Coated Parts
■
Cleaning the Window
■
Maintaining Aluminum Wheels
*
1Applying Wax
NOTICEChemical solvents and strong cleaners can damage
the paint, metal, and plastic on your vehicle. Wipe up
spills immediately.1Maintaining the Bumpers and Other Resin Coated Parts
Ask a dealer about the correct coating material when
you want to repair the painted surface of the parts
made of resin.1Cleaning the Window
Wires are mounted to the inside of the rear window.
Wipe along the same direction as the wires with a
soft cloth so as not to damage them.
* Not available on all models