Page 152 of 441

151
uuOperating the Switches Around the Steering WheeluAdjusting the Steering Wheel
Controls
Adjusting the Steering WheelThe steering wheel height and distance from your body can be adjusted so that you
can comfortably grip the steering wheel in an appropriate driving posture.
1.Push the steering wheel adjustment lever
down.
uThe steering wheel adjustment lever is
under the steering column.
2.Move the steering wheel up or down, and
in or out.
uMake sure you can see the instrument
panel gauges and indicators.
3.Pull the steering wheel adjustment lever up
to lock the steering wheel in position.
uAfter adjusting the position, make sure
you have securely locked the steering
wheel in place by trying to move it up,
down, in, and out.
1Adjusting the Steering Wheel
Make any steering wheel adjustments before you
start driving.
3
WARNING
Adjusting the steering wheel position while
driving may cause you to lose control of the
vehicle and be seriously injured in a crash.
Adjust the steering wheel only when the
vehicle is stopped.
To adjustTo lock
Lever
Page 155 of 441

154Controls
Adjusting the SeatsAdjusting the Seat Positions
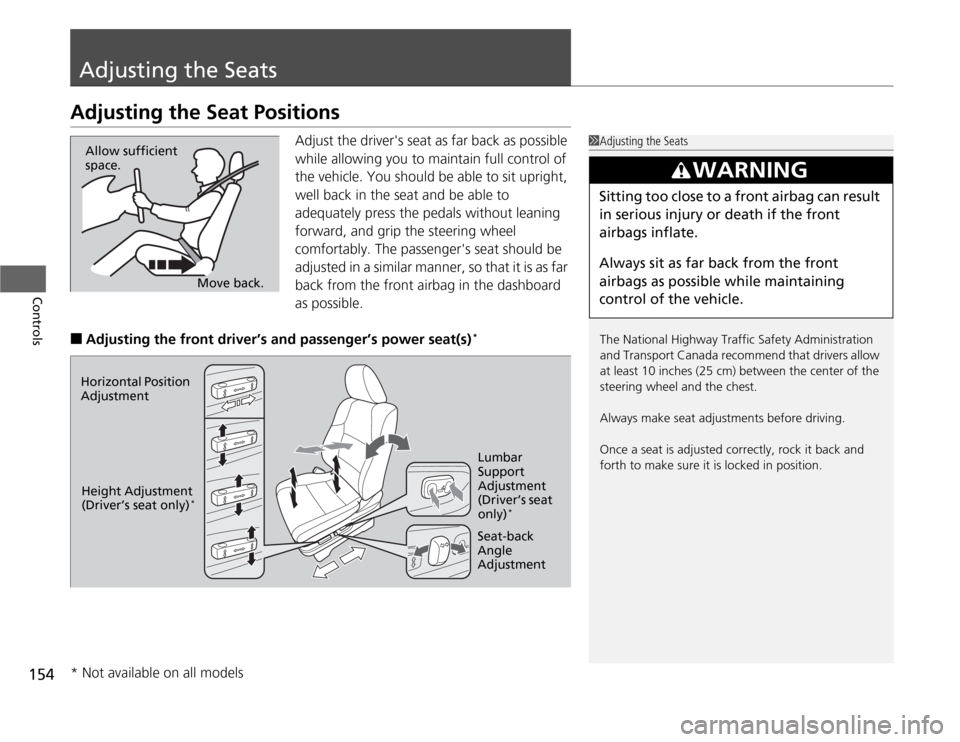
Adjust the driver's seat as far back as possible
while allowing you to maintain full control of
the vehicle. You should be able to sit upright,
well back in the seat and be able to
adequately press the pedals without leaning
forward, and grip the steering wheel
comfortably. The passenger's seat should be
adjusted in a similar manner, so that it is as far
back from the front airbag in the dashboard
as possible.
■
Adjusting the front driver’s and passenger’s power seat(s)
*
1Adjusting the Seats
The National Highway Traffic Safety Administration
and Transport Canada recommend that drivers allow
at least 10 inches (25 cm) between the center of the
steering wheel and the chest.
Always make seat adjustments before driving.
Once a seat is adjusted correctly, rock it back and
forth to make sure it is locked in position.
3
WARNING
Sitting too close to a front airbag can result
in serious injury or death if the front
airbags inflate.
Always sit as far back from the front
airbags as possible while maintaining
control of the vehicle.
Move back. Allow sufficient
space.
Horizontal Position
Adjustment
Height Adjustment
(Driver’s seat only)
*
Seat-back
Angle
AdjustmentLumbar
Support
Adjustment
(Driver’s seat
only)
*
* Not available on all models
Page 160 of 441

Continued
159
uuAdjusting the SeatsuAdjusting the Seat Positions
Controls
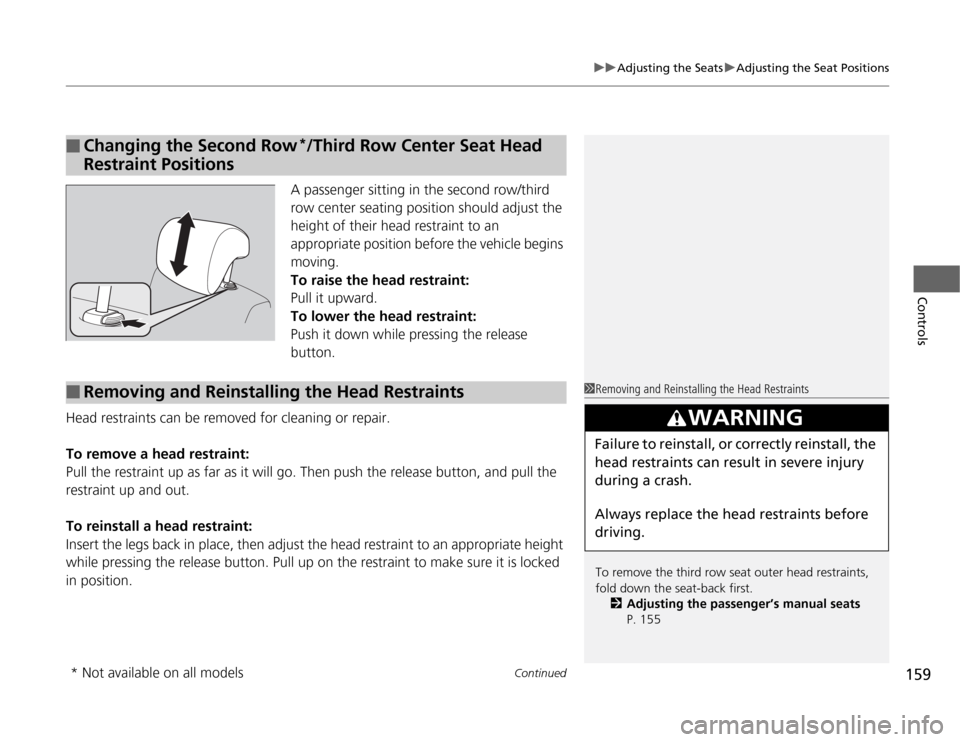
A passenger sitting in the second row/third
row center seating position should adjust the
height of their head restraint to an
appropriate position before the vehicle begins
moving.
To raise the head restraint:
Pull it upward.
To lower the head restraint:
Push it down while pressing the release
button.
Head restraints can be removed for cleaning or repair.
To remove a head restraint:
Pull the restraint up as far as it will go. Then push the release button, and pull the
restraint up and out.
To reinstall a head restraint:
Insert the legs back in place, then adjust the head restraint to an appropriate height
while pressing the release button. Pull up on the restraint to make sure it is locked
in position.
■
Changing the Second Row
*/Third Row Center Seat Head
Restraint Positions
■
Removing and Reinstalling the Head Restraints
1Removing and Reinstalling the Head Restraints
To remove the third row seat outer head restraints,
fold down the seat-back first.
2Adjusting the passenger’s manual seats
P. 155
3
WARNING
Failure to reinstall, or correctly reinstall, the
head restraints can result in severe injury
during a crash.
Always replace the head restraints before
driving.
* Not available on all models
Page 164 of 441
Continued
163
uuAdjusting the SeatsuRear Seats
Controls
1.Lower the head restraint to its lowest
position.
2.Move the seat to it’s rear most position.
3.Fold the seat-back down.
4.Pull the lock release lever, and lift the rear
of the seat.
uTo lift the seat, grab the handle under
the rear side of the seat cushion.
5.Pull the seat-back slightly, then pivot it
upward.
uThis unhooks the front of the seat from
the floor.
■
Removing a Second Row Outer Seat
1Removing a Second Row Outer Seat
Do not remove the seat while driving.
To reinstall the seat, hook the front of the seat to the
floor first. Pushing the rear of the seat-back locks the
seat in place. Make sure the seat is latched before
driving.
Handle
Seat-back Angle
adjustment LeverLock Release Lever
Page 165 of 441
uuAdjusting the SeatsuRear Seats
164Controls
1.Lower the head restraint to its lowest
position.
2.Move the seat to it’s rear most position.
3.Fold the seat-back down.
4.Pull the lock release lever, and lift the rear
of the seat.
uTo lift the seat, grab the handle under
the rear side of the seat cushion.
5.With the front of the seat hooked to the
floor, slide the seat laterally to the outer
position until it stops.
6.Lower the seat and push the rear of the
seat-back until it locks. Make sure the seat
is latched before driving.
■
Sliding the Second Row Outer Seats Outward
1Sliding the Second Row Outer Seats Outward
When the second row outer seats are in the original
(center) position, passengers have easier access to the
third row seats. When they are in the outer position,
you can install two or three child seats in the second
row seats.
Handle
Slide
Page 166 of 441

Continued
165
uuAdjusting the SeatsuRear Seats
Controls
Your vehicle’s multi-functional second row center seat is removable.
1.Store the center seat belt first. Insert a key
into the slot on the side of the anchor
buckle.
2.Retract the seat belt into the holder on the
ceiling.
2Seat Belt with Detachable Anchor P. 35
3.Pull up the adjustment strap, and fold down
the seat-back.
4.Pull the lock release strap under the seat
cushion, and lift the rear of the seat.
uTo lift the seat, hold the seat-back.
5.Pull the seat-back slightly, then pivot it
upward.
uThis unhooks the front of the seat from
the floor.
■
Removing the Second Row Center Seat
*
1Removing the Second Row Center Seat
Do not remove the seat while driving.
The multi-functional center seat can be used as the
beverage holder when folded down.
2Beverage Holders P. 174
To reinstall the seat, hook the front of the seat to the
floor first. Pushing the rear of the seat-back locks the
seat in place. Make sure the seat is latched before
driving.
Adjustment Strap
Lock Release
Strap* Not available on all models
Page 167 of 441
uuAdjusting the SeatsuRear Seats
166Controls
1.Store the center seat belt first. Insert a key
into the slot on the side of the anchor
buckle.
2.Retract the seat belt into the holder on the
ceiling.
2Seat Belt with Detachable Anchor P. 35
3.Lower the head restraints to their lowest
position.
4.The right and left halves can be tucked
away separately. Pull either strap to release
the front leg lock of the third row seat.
5.Continue pulling the strap to tuck the seat
and strap away into the cargo area.
■
Tucking away the One-Motion Third row magic Seat
®
1Tucking away the One-Motion Third Row Magic Seat
Remove any items from the cargo area before you
tuck away the third row seat.
The instruction label is attached at the back of the
third row seat-back.
When you tuck away one side of the third row seats
and use the non-recessed part of the cargo area,
make sure to secure the cargo. Loose items can fly
forward and cause injury if you have to brake hard.
Straps
Page 170 of 441

169
Continued
Controls
Interior Lights/Interior Convenience ItemsInterior Lights
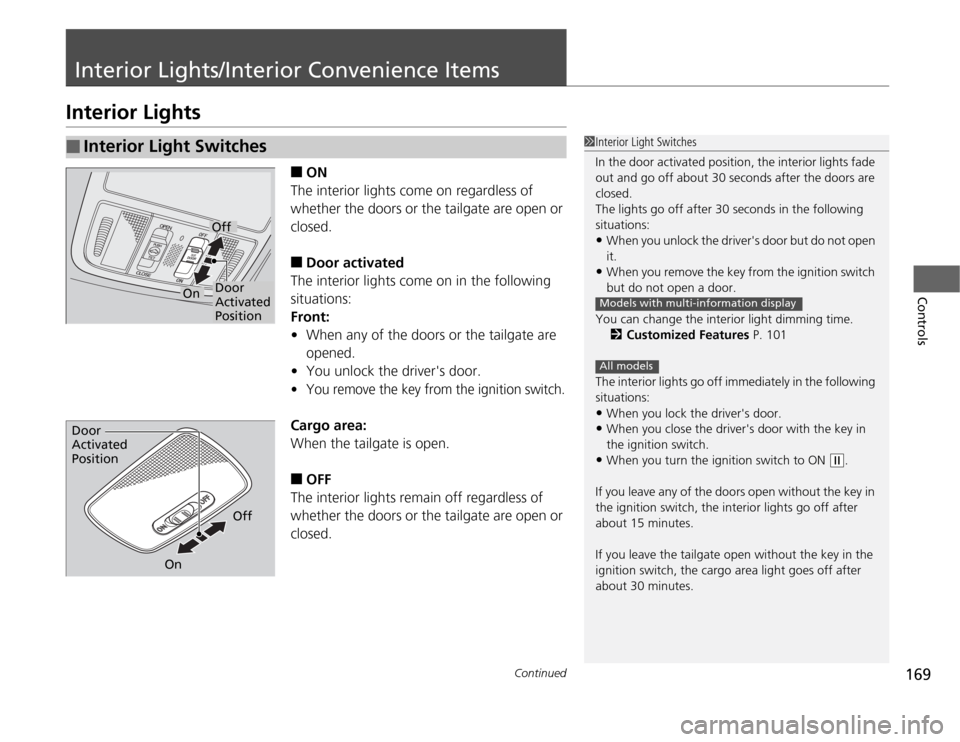
■
ON
The interior lights come on regardless of
whether the doors or the tailgate are open or
closed.
■
Door activated
The interior lights come on in the following
situations:
Front:
•When any of the doors or the tailgate are
opened.
•You unlock the driver's door.
•
You remove the key from the ignition switch.
Cargo area:
When the tailgate is open.■
OFF
The interior lights remain off regardless of
whether the doors or the tailgate are open or
closed.
■
Interior Light Switches
1Interior Light Switches
In the door activated position, the interior lights fade
out and go off about 30 seconds after the doors are
closed.
The lights go off after 30 seconds in the following
situations:•When you unlock the driver's door but do not open
it.•When you remove the key from the ignition switch
but do not open a door.
You can change the interior light dimming time.
2Customized Features P. 101
The interior lights go off immediately in the following
situations:•When you lock the driver's door.•When you close the driver's door with the key in
the ignition switch.•When you turn the ignition switch to ON
(w
.
If you leave any of the doors open without the key in
the ignition switch, the interior lights go off after
about 15 minutes.
If you leave the tailgate open without the key in the
ignition switch, the cargo area light goes off after
about 30 minutes.
Models with multi-information displayAll models
Door
Activated
PositionOff
On
Door
Activated
Position
Off
On