Page 203 of 441
202Features
Audio System Basic OperationTo use the audio system function, the ignition switch must be in ACCESSORY
(q
or
ON
(w
.
Use the selector knob or SETUP button to
access some audio functions.
Press to switch between the normal and
extended display for some functions.
Selector knob: Rotate left or right to scroll
through the available choices. Press to set
your selection.
SETUP button: Press to select any mode such
as the Auto Select, Sound Settings, Play
Mode, Resume/Pause, or compass.
RETURN button: Press to go back to the
previous display.
Models with audio/information screen
1Audio System Basic Operation
These indications are used to show how to operate
the selector knob.
Rotate to select.
Press to enter.
Selector Knob
SETUP
Button
RETURN
Button
Page 219 of 441

uuAudio System Basic OperationuPlaying CD Library
218Features
■
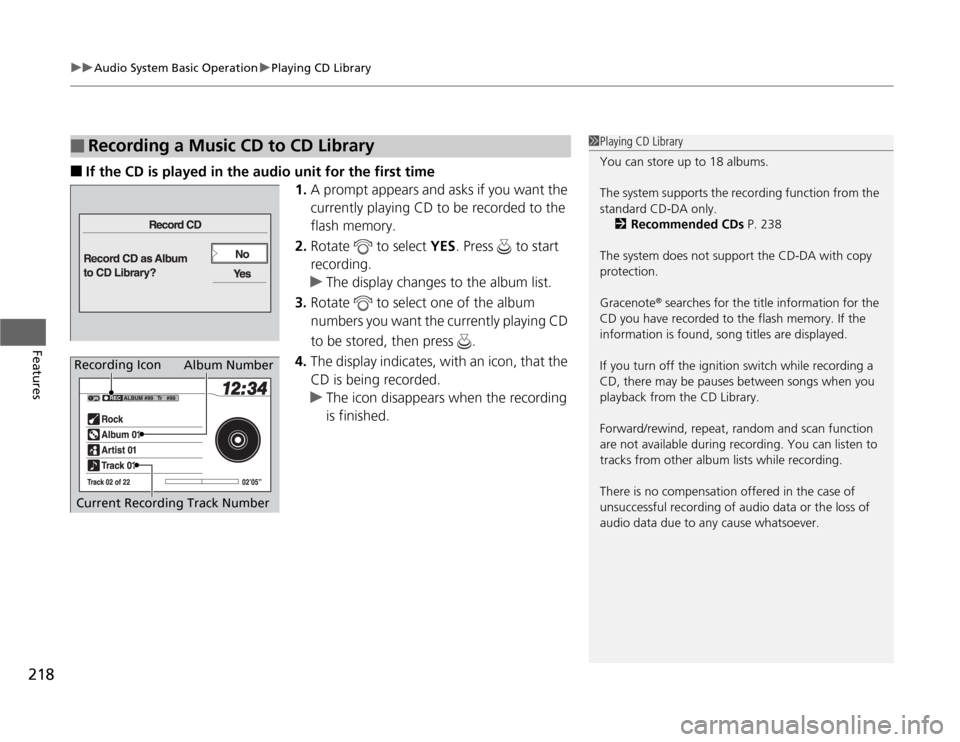
If the CD is played in the audio unit for the first time
1.A prompt appears and asks if you want the
currently playing CD to be recorded to the
flash memory.
2.Rotate to select YES. Press to start
recording.
uThe display changes to the album list.
3.Rotate to select one of the album
numbers you want the currently playing CD
to be stored, then press .
4.The display indicates, with an icon, that the
CD is being recorded.
uThe icon disappears when the recording
is finished.
■
Recording a Music CD to CD Library
1Playing CD Library
You can store up to 18 albums.
The system supports the recording function from the
standard CD-DA only.
2Recommended CDs P. 238
The system does not support the CD-DA with copy
protection.
Gracenote
® searches for the title information for the
CD you have recorded to the flash memory. If the
information is found, song titles are displayed.
If you turn off the ignition switch while recording a
CD, there may be pauses between songs when you
playback from the CD Library.
Forward/rewind, repeat, random and scan function
are not available during recording. You can listen to
tracks from other album lists while recording.
There is no compensation offered in the case of
unsuccessful recording of audio data or the loss of
audio data due to any cause whatsoever.
Album Number
Current Recording Track Number
Recording Icon
Page 243 of 441

uuRear Entertainment System
*uOperating the System
242Features
Pull down the screen to the first or second
detent until it latches.
Operating the SystemTo operate the system, turn the ignition switch to ON
(w
or ACCESSORY
(q
. Press
the button to turn on the system (indicator on).
■
button on the front panel
When you press the button (indicator
on), the beeper sounds three times, and the
front display changes to what is displayed on
the rear overhead screen.
The audio from the front speakers switches to
the audio played in the rear.
■
Overhead Screen
1 Overhead Screen
NOTICEThis vehicle’s overhead mounted video display, if so
equipped, includes mercury-containing components.
Upon removal, please reuse, recycle, or dispose of as
hazardous waste.
You can use the rear control panel as a remote. Press
the lock tab to detach it.
Overhead
Screen
1 Operation the System
If you do not operate the system from the front panel
for more than 20 seconds, the indicator in the
button goes off, and the front display returns to what
has previously been displayed.
REAR POWER
ButtonREAR SOURCE
Button
Page 262 of 441
261
uuBluetooth
® HandsFreeLink
®*uHFL Menus
Continued
Features
HFL MenusThe ignition switch must be in ACCESSORY
(q
or ON
(w
to use HFL.
*1: Appears only when a phone is connected to HFL.
1HFL Menus
To use HFL, you must first pair your Bluetooth-
compatible cell phone to the system while the vehicle
is parked.
Display your speed dial entry lists.
(up to 20 entries per paired phone)
Display the last 20
incoming, outgoing,
or missed calls.
Display the last 20
incoming calls.
Display the last 20
outgoing calls.
Enter a phone number to dial.
or
PHONE
Phone
Speed DialCall History
*1
Phone Book
*1
Dial
All CallsReceived CallsDialed Calls
Display the last 20
missed calls.
Missed Calls
Display the menu for
an alphabetical
search in the paired
phone’s phonebook.
Alphabet Search
Display the paired
phone’s phonebook.
All Listings
Page 283 of 441

282Features
Compass
*
When you turn the ignition switch to ON
(w
, the compass self-calibrates, and the
compass display appears.
Compass CalibrationIf the compass indicates the wrong direction, or the compass display blinks, you
need to manually calibrate the system.
1.Turn the ignition switch to ON
(w
.
2.Press and hold the SETUP button until the
display shows the compass setting menu
list.
3.Rotate to select Calibration, then press
.
4.When the display changes to Start
Calibration, press .
5.Drive the vehicle slowly in two circles.
uThe compass starts to show a direction
after the calibration. The CAL indicator
goes off.
1Compass
Compass calibration can be affected under the
following conditions:•Driving near power lines or stations•Crossing a bridge•Passing a large vehicle, or driving near a large
object that can cause a magnetic disturbance•When accessories such as antennas and roof racks
are mounted by magnets
1Compass Calibration
C al i b r a t e t h e c o m p as s i n a n o p en ar ea .
While setting the compass:•The RETURN button returns to the previous screen.•The SETUP button cancels the setting mode.
* Not available on all models
Page 284 of 441
283
uuCompass
*uCompass Zone Selection
Features
Compass Zone Selection
1.Turn the ignition switch to ON
(w
.
2.Press and hold the SETUP button until the
display shows the compass setting menu
list.
3.Rotate to select Zone Adjust, then
press . The display shows the current
zone number.
4.Rotate to select the zone number of
your area (See Zone Map), then press .
1Compass Zone SelectionThe zone selection is done to compensate the variation
between magnetic north and true north. If the calibration starts while the audio system is in
use, the display returns to normal after the calibration
is completed,
Zone Number
Zone Map
Guam Island: Zone 8
Puerto Rico: Zone11
Page 299 of 441

uuWhen DrivinguStarting the Engine
298Driving
3.Turn the ignition switch to START
(e
without depressing the accelerator pedal.
1.Keeping your right foot on the brake pedal, release the parking brake. Check that
the brake system indicator has gone off.
2Parking Brake P. 314
2.Put the shift lever in
(D
. Select
(R
when reversing.
3.Gradually release the brake pedal and gently depress the accelerator pedal to pull
away.
1Starting the Engine
Do not hold the key in START
(e
for more than 15
seconds.
•If the engine does not start right away, wait for at
least 10 seconds before trying again.•If the engine starts, but then immediately stops,
wait at least 10 seconds before repeating step 3
while gently depressing the accelerator pedal.
Release the accelerator pedal once the engine
starts.
The immobilizer system protects your vehicle from
theft. If an improperly coded key (or other device) is
used, the engine's fuel system is disabled.
2Immobilizer System P. 134
■
Starting to Drive
Page 300 of 441

299
uuWhen DrivinguPrecautions While Driving
Driving
Precautions While DrivingAvoid driving in deep water and on flooded roads. This can damage the engine or
cause electrical component failure.
If there is a strong impact with something under the vehicle, stop in a safe location.
Check the underside of the vehicle for damage or any fluid leaks.■
In Rain
■
Other Precautions
1Precautions While Driving
NOTICEDo not operate the shift lever while pressing the
accelerator pedal. You could damage the
transmission.
If the ignition switch is turned to ACCESSORY
(q
or
LOCK
(0
while driving, the engine will shut down
and all steering and brake power assist functions will
stop, making it difficult to control the vehicle.
Do not put the shift lever in
(N
, as you will lose
engine braking (and acceleration) performance.
During the first 600 miles (1,000 km) of operation,
avoid sudden acceleration or full throttle operation so
as to not damage the engine or powertrain.
Avoid hard braking for the first 200 miles (300 km).
You should also follow this when the brake pads are
replaced.