Page 295 of 441
294
uuTowing a TraileruTowing Preparation
Driving
■
Automatic transmission cooler
Install an additional ATF (automatic transmission fluid) cooler to help prevent the
transmission from overheating, and damaging. You can get the additional ATF
cooler at a dealer.
■
Trailer mirrors
Many states, provinces and territories require special exterior mirrors when towing a
trailer. Install special mirrors whenever you cannot clearly see behind you, or if the
trailer creates a blind spot.
Page 296 of 441

295
uuTowing a TraileruDriving Safely with a Trailer
Continued
Driving
Driving Safely with a Trailer•Have the trailer properly serviced and keep it in good condition.
•Make sure that all the weights and load in the vehicle and trailer are within limits.
2Towing Load Limits P. 291
•Securely attach the hitch, safety chains, and other necessary parts to the trailer.
•Securely store all the items in and on the trailer so that they do not shift while
driving.
•Check if the lights and brakes on the trailer are working properly.
•Check the pressure of the trailer tires, including the spare.
•Drive slower than normal.
•Obey posted speed limits for vehicles with trailer.
•Use the
(D
when towing a trailer on level roads.
•Turn more slowly and with a wider turning arc than normal.
•Allow more time and distance for braking.
•Do not brake or turn suddenly.
■
Things You Need To Know Before Towing a Trailer
■
Towing Speeds and Gears
■
Turning and Braking
1Driving Safely with a Trailer
Parking
In addition to the normal precautions, place wheel
chocks at each of the trailer’s tires.
When towing a trailer, we recommend that you carry
a full-size spare wheel and tire for your vehicle and
trailer. If you use the compact spare tire that came
with your vehicle, it could adversely affect vehicle
handling.
2Specifications P. 421
2Changing a Flat Tire P. 391
Remember to unhitch the trailer before changing a
flat tire. Ask the trailer sales or rental agency where
and how to store the trailer’s spare tire.
Page 297 of 441
296
uuTowing a TraileruTowing Your Vehicle
Driving
•Monitor your temperature gauge. If it nears the red (Hot) mark, turn off the
heating and cooling system
*/climate control system
* and reduce speed. Pull to the
side of the road safely to cool down the engine if necessary.
•Shift to the
(d
or position (depending on models) if the transmission shifts
frequently.
Towing Your VehicleYour vehicle is not designed to be towed behind a motor home. If your vehicle needs
to be towed in an emergency, refer to the emergency towing information.
2Emergency Towing P. 417
■
Driving in Hilly Terrain
D4
* Not available on all models
Page 302 of 441

301
uuWhen DrivinguShifting
Continued
Driving
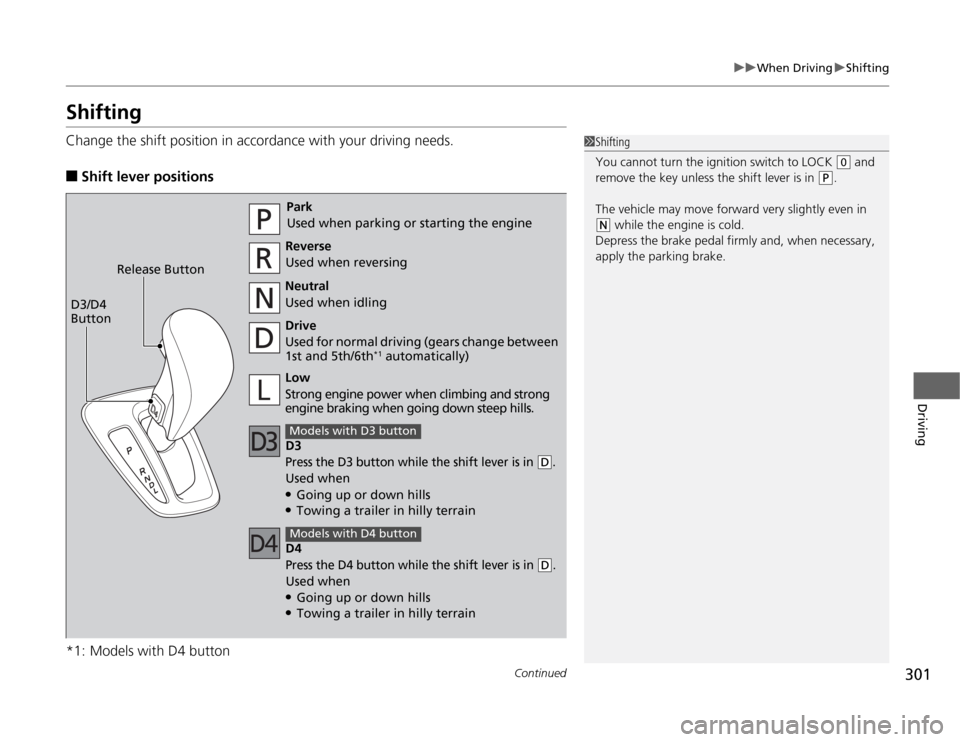
ShiftingChange the shift position in accordance with your driving needs.■
Shift lever positions
*1: Models with D4 button
1Shifting
You cannot turn the ignition switch to LOCK
(0
and
remove the key unless the shift lever is in
(P
.
The vehicle may move forward very slightly even in
(N
while the engine is cold.
Depress the brake pedal firmly and, when necessary,
apply the parking brake.
Park
Used when parking or starting the engine
Reverse
Used when reversing
Neutral
Used when idling
Drive
Used for normal driving (gears change between
1st and 5th/6th
*1 automatically)
D3
Press the D3 button while the shift lever is in
(D
.
Used when●Going up or down hills●Towing a trailer in hilly terrainModels with D3 buttonLow
Strong engine power when climbing and strong
engine braking when going down steep hills. Release Button
D3/D4
Button
D4Press the D4 button while the shift lever is in
(D
.
Used when●Going up or down hills●Towing a trailer in hilly terrainModels with D4 button
Page 314 of 441

313
uuWhen DrivinguBSI (Blind Spot Information) System
*
Driving
Press the BSI OFF button until you hear a beep to turn on and off the system. A
message on the multi-information display appears for five seconds and indicates
that the system is on or off.
When BSI is off, the BSI indicator in the instrument panel stays on.
BSI is in the previously selected on or off setting each time you start the engine.■
BSI On and Off
1BSI (Blind Spot Information) System
Turn the system off when towing a trailer. The system
does not work properly for the following reasons:•The added mass tilts the vehicle and changes the
radar coverage.•The trailer itself can be detected by the radar
sensors, causing the BSI alert indicators to come
on.
BSI may be adversely affected when:•Objects (guard rails, poles, trees, etc,.) are
detected.•An object that does not reflect radio waves well,
such as a motorcycle, is in the alert zone.•Driving on a curved road.•A vehicle is moving from a far lane to the adjacent
lane.•The system picks up external electrical interference.•The rear bumper or the sensors have been
improperly repaired or the rear bumper has been
deformed.•The orientation of the sensors has been changed.•In bad weather (Heavy rain, snow, and fog).
For a proper BSI use:•Always keep the rear bumper corner area clean.•Do not cover the rear bumper corner area with
labels or stickers of any kind. •Take your vehicle to a dealer if you need the rear
bumper corner area or the radar sensors to be
repaired, or the rear bumper corner area is strongly
impacted.
BSI
IndicatorMulti-information
display
BSI OFF Button
Page 345 of 441

344
uuMaintenance Under the HooduOpening the Hood
Maintenance
Opening the Hood
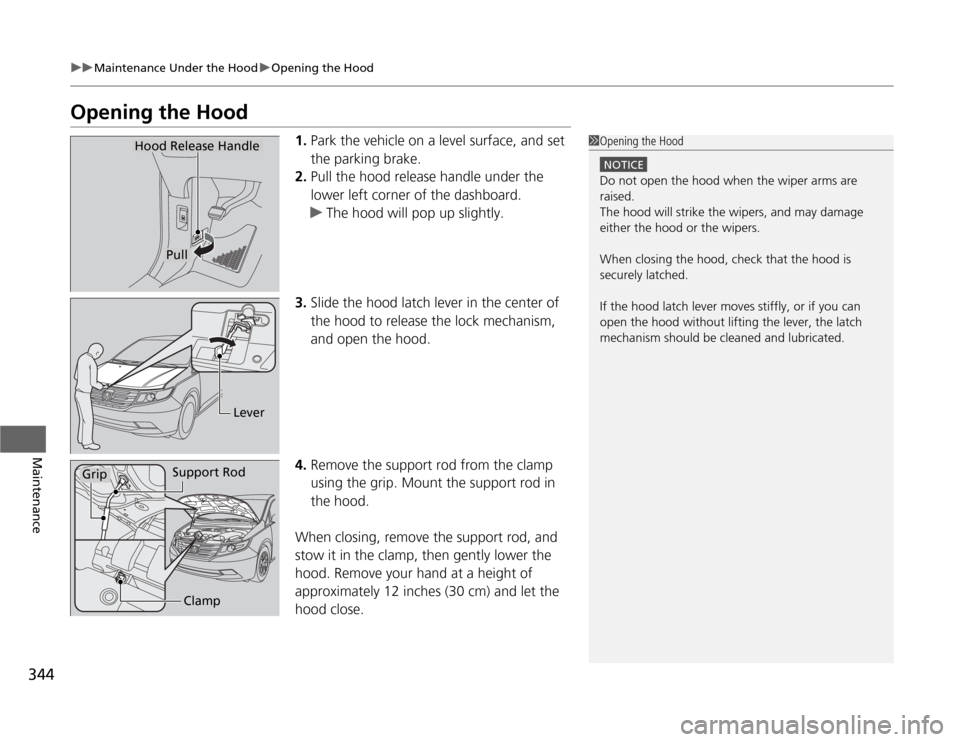
1.Park the vehicle on a level surface, and set
the parking brake.
2.Pull the hood release handle under the
lower left corner of the dashboard.
uThe hood will pop up slightly.
3.Slide the hood latch lever in the center of
the hood to release the lock mechanism,
and open the hood.
4.Remove the support rod from the clamp
using the grip. Mount the support rod in
the hood.
When closing, remove the support rod, and
stow it in the clamp, then gently lower the
hood. Remove your hand at a height of
approximately 12 inches (30 cm) and let the
hood close.
1Opening the Hood
NOTICEDo not open the hood when the wiper arms are
raised.
The hood will strike the wipers, and may damage
either the hood or the wipers.
When closing the hood, check that the hood is
securely latched.
If the hood latch lever moves stiffly, or if you can
open the hood without lifting the lever, the latch
mechanism should be cleaned and lubricated.
Hood Release Handle
Pull
Lever
Support Rod
Grip
Clamp
Page 347 of 441
346
uuMaintenance Under the HooduOil Check
Maintenance
Oil CheckWe recommend that you check the engine oil level every time you refuel.
Park the vehicle on level ground.
Wait approximately three minutes after turning the engine off before you check the
oil.
1.Remove the dipstick (orange loop).
2.Wipe the dipstick with a clean cloth or
paper towel.
3.Insert the dipstick back all the way into its
hole.
4.Remove the dipstick again, and check the
level. It should be between the upper and
lower marks. Add oil if necessary.
1Oil Check
If the oil level is near or below the lower mark, slowly
add oil being careful not to overfill.
Upper Mark
Lower Mark
Page 356 of 441

355
Continued
Maintenance
Replacing Light BulbsHeadlight BulbsWhen replacing, use the following bulbs.
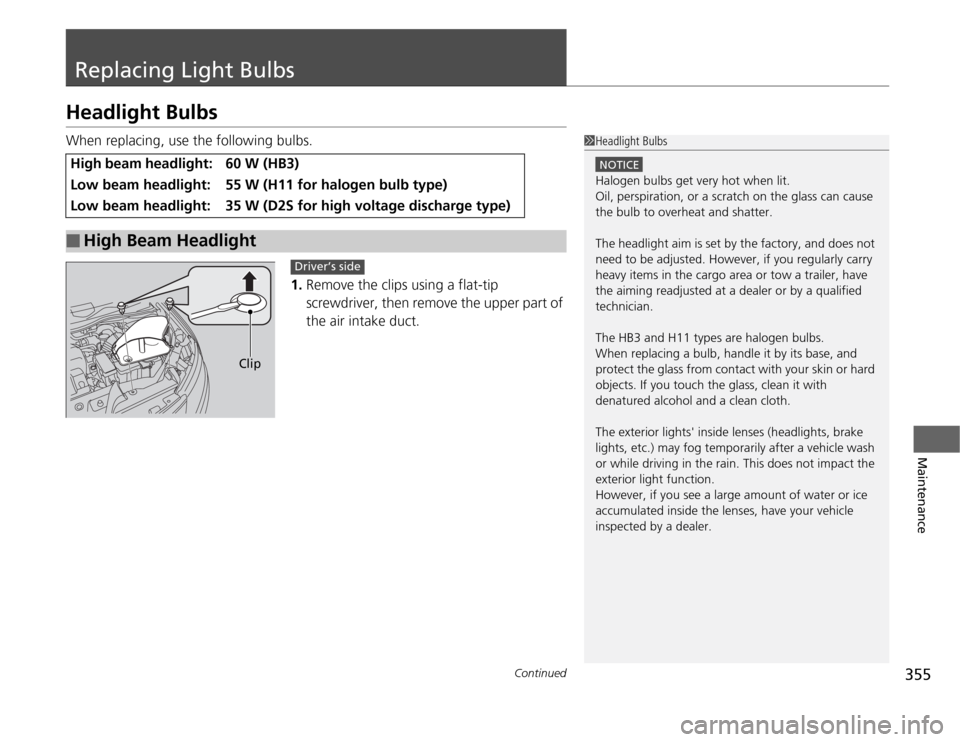
1.Remove the clips using a flat-tip
screwdriver, then remove the upper part of
the air intake duct.High beam headlight:
60 W (HB3)
Low beam headlight:
55 W (H11 for halogen bulb type)
Low beam headlight:
35 W (D2S for high voltage discharge type)
■
High Beam Headlight
1Headlight Bulbs
NOTICEHalogen bulbs get very hot when lit.
Oil, perspiration, or a scratch on the glass can cause
the bulb to overheat and shatter.
The headlight aim is set by the factory, and does not
need to be adjusted. However, if you regularly carry
heavy items in the cargo area or tow a trailer, have
the aiming readjusted at a dealer or by a qualified
technician.
The HB3 and H11 types are halogen bulbs.
When replacing a bulb, handle it by its base, and
protect the glass from contact with your skin or hard
objects. If you touch the glass, clean it with
denatured alcohol and a clean cloth.
The exterior lights' inside lenses (headlights, brake
lights, etc.) may fog temporarily after a vehicle wash
or while driving in the rain. This does not impact the
exterior light function.
However, if you see a large amount of water or ice
accumulated inside the lenses, have your vehicle
inspected by a dealer.
Clip
Driver’s side