Page 238 of 441
237
Features
General Information on the Audio SystemXM
® Radio Service
*
1.You need your radio ID ready before registering for subscription.
To see the ID on the display: Turn the selector knob until 0 appears.
2.Have your radio ID and credit card number ready, and either call or visit the XM
®
website to subscribe.
Press the (XM
®) button and stay in this mode for about 30 minutes until the
service is activated. Make sure your vehicle is in an open area with good reception.
LOADING: XM
® is loading the audio or program information.
OFF AIR: The channel is not currently broadcasting.
UNAUTHORIZED: The encryption code is being updated. Channels 0 and 1 still
work normally.
NO SIGNAL: The signal is too weak in the current location.
UNAVAILABLE: No such channel exists, the channel is not part of your subscription,
or the artist or title information is unavailable.
CHECK ANTENNA: There is a problem with the XM
® antenna. Contact a dealer.
■
Subscribing to XM
® Radio
■
Receiving XM
® Radio
■
XM
® Radio Display Messages
1Subscribing to XM
® Radio
Contact Information for XM
® Radio:
US: XM
® Radio at www.siriusxm.com or (800) 852-
9696
Canada: XM
® Canada at www.xmradio.ca, or (877)
209-0079
1Receiving XM
® Radio
The XM
® satellites are in orbit over the equator,
therefore, objects south of the vehicle may cause
satellite reception interruptions. Satellite signals are
more likely to be blocked by tall buildings and
mountains the farther north you travel from the
equator.
You may experience reception problems under the
following circumstances:•In a location with an obstruction to the south of
your vehicle.•In tunnels•On the lower level of a multi-tiered road•Large items carried on the roof rack
* Not available on all models
Page 242 of 441
241
Continued
Features
Rear Entertainment System
*
For models with the navigation system, see the Navigation System Manual for how
to operate the rear entertainment system.
Allows the rear passengers to enjoy a different entertainment source, such as DVD,
CD, CD Library, and radio, than the front passengers.
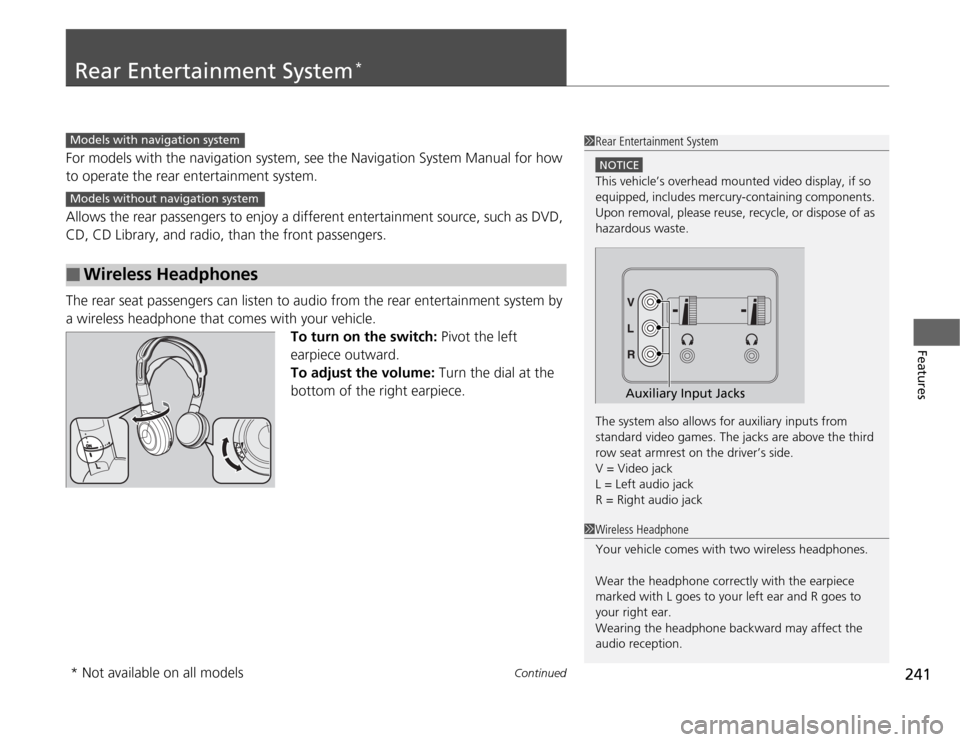
The rear seat passengers can listen to audio from the rear entertainment system by
a wireless headphone that comes with your vehicle.
To turn on the switch: Pivot the left
earpiece outward.
To adjust the volume: Turn the dial at the
bottom of the right earpiece.■
Wireless Headphones
1Rear Entertainment System
NOTICEThis vehicle’s overhead mounted video display, if so
equipped, includes mercury-containing components.
Upon removal, please reuse, recycle, or dispose of as
hazardous waste.
The system also allows for auxiliary inputs from
standard video games. The jacks are above the third
row seat armrest on the driver’s side.
V = Video jack
L = Left audio jack
R = Right audio jack
Auxiliary Input Jacks
Models with navigation systemModels without navigation system
1Wireless Headphone
Your vehicle comes with two wireless headphones.
Wear the headphone correctly with the earpiece
marked with L goes to your left ear and R goes to
your right ear.
Wearing the headphone backward may affect the
audio reception.
* Not available on all models
Page 252 of 441
251
uuRear Entertainment System
*uOperating the System
Continued
Features
■
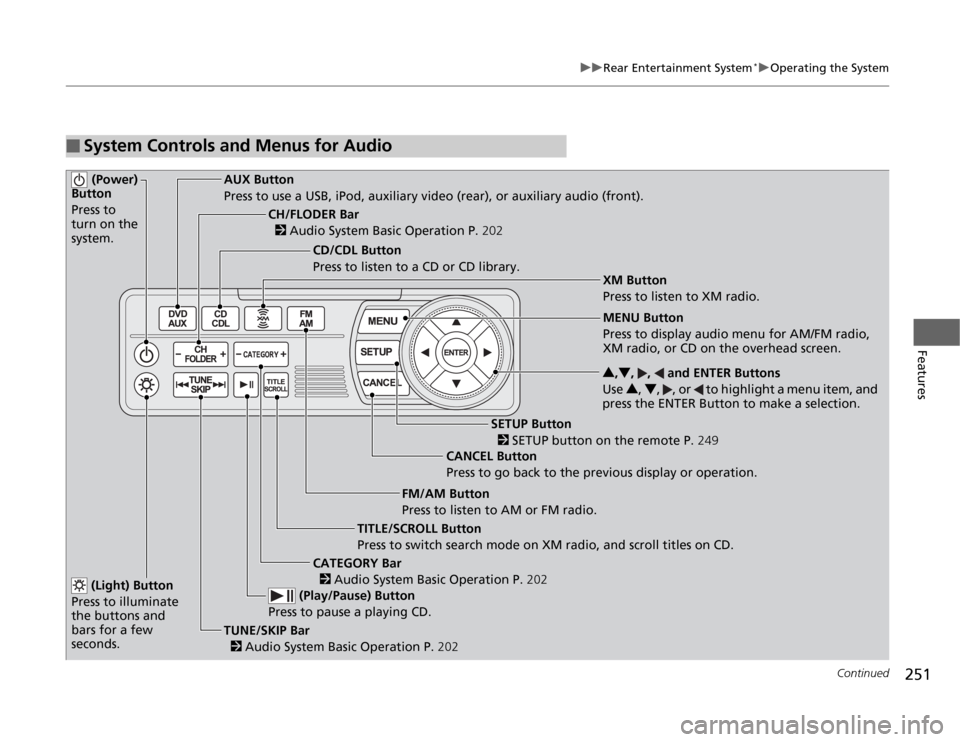
System Controls and Menus for Audio (Power)
Button
Press to
turn on the
system.
AUX Button
Press to use a USB, iPod, auxiliary video (rear), or auxiliary audio (front).
(Light) Button
Press to illuminate
the buttons and
bars for a few
seconds.TUNE/SKIP Bar
2 Audio System Basic Operation P.202 (Play/Pause) Button
Press to pause a playing CD.
TITLE/SCROLL Button
Press to switch search mode on XM radio, and scroll titles on CD.CANCEL Button
Press to go back to the previous display or operation.3,4, , and ENTER Buttons
Use 3, 4, , or to highlight a menu item, and
press the ENTER Button to make a selection.
CATEGORY Bar
2 Audio System Basic Operation P.202
CH/FLODER Bar
2 Audio System Basic Operation P.202
CD/CDL Button
Press to listen to a CD or CD library.
FM/AM Button
Press to listen to AM or FM radio.
SETUP Button
2 SETUP button on the remote P.249 XM Button
Press to listen to XM radio.
MENU Button
Press to display audio menu for AM/FM radio,
XM radio, or CD on the overhead screen.
Page 253 of 441
uuRear Entertainment System
*uOperating the System
252Features
■
Playing AM/FM radio in the rear
Press the AM/FM button.
When you press the MENU button while the radio is playing, the audio menu
appears on the overhead screen. The available functions are the same as those of
the front audio system. The TUNE/SKIP bar on the control panel works the same as
the TUNE or SKIP bar on the front panel for AM/FM radio operation.2Playing the AM/FM Radio P. 205
■
Playing XM radio in the rear
Press the XM button.
When you press the MENU button while the radio is playing, the audio menu
appears on the overhead screen. The available functions are the same as those of
the front audio system. The TUNE/SKIP bar on the control panel works the same as
the TUNE or SKIP bar on the front panel for XM radio operation.2Playing the XM
® Radio P. 209
To change the mode between category and channel, press and hold the TITLE/
SCROLL button for five seconds.
1System Controls and Menus for Audio
If you press the button on the front panel, you
can operate the rear entertainment system from the
front display.
2 button on the front panel P. 242
Page 255 of 441
254
uuRear Entertainment System
*uAudio Sources for Front and Rear Seats
Features
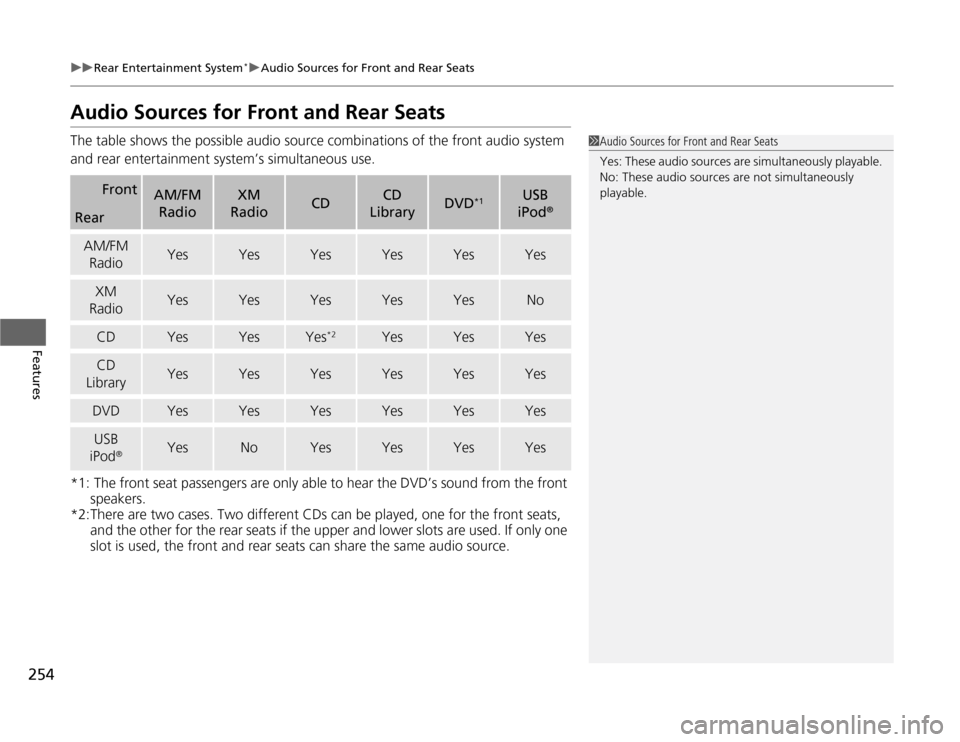
Audio Sources for Front and Rear SeatsThe table shows the possible audio source combinations of the front audio system
and rear entertainment system’s simultaneous use.
*1: The front seat passengers are only able to hear the DVD’s sound from the front
speakers.
*2:There are two cases. Two different CDs can be played, one for the front seats,
and the other for the rear seats if the upper and lower slots are used. If only one
slot is used, the front and rear seats can share the same audio source.
Front
AM/FM
Radio
XM
Radio
CD
CD
Library
DVD
*1
USB
iPod
®
RearAM/FM
Radio
Yes
Yes
Yes
Yes
Yes
Yes
XM
Radio
Yes
Yes
Yes
Yes
Yes
No
CD
Yes
Yes
Yes
*2
Yes
Yes
Yes
CD
Library
Yes
Yes
Yes
Yes
Yes
Yes
DVD
Yes
Yes
Yes
Yes
Yes
Yes
USB
iPod
®
Yes
No
Yes
Yes
Yes
Yes
1Audio Sources for Front and Rear Seats
Yes: These audio sources are simultaneously playable.
No: These audio sources are not simultaneously
playable.
Page 314 of 441

313
uuWhen DrivinguBSI (Blind Spot Information) System
*
Driving
Press the BSI OFF button until you hear a beep to turn on and off the system. A
message on the multi-information display appears for five seconds and indicates
that the system is on or off.
When BSI is off, the BSI indicator in the instrument panel stays on.
BSI is in the previously selected on or off setting each time you start the engine.■
BSI On and Off
1BSI (Blind Spot Information) System
Turn the system off when towing a trailer. The system
does not work properly for the following reasons:•The added mass tilts the vehicle and changes the
radar coverage.•The trailer itself can be detected by the radar
sensors, causing the BSI alert indicators to come
on.
BSI may be adversely affected when:•Objects (guard rails, poles, trees, etc,.) are
detected.•An object that does not reflect radio waves well,
such as a motorcycle, is in the alert zone.•Driving on a curved road.•A vehicle is moving from a far lane to the adjacent
lane.•The system picks up external electrical interference.•The rear bumper or the sensors have been
improperly repaired or the rear bumper has been
deformed.•The orientation of the sensors has been changed.•In bad weather (Heavy rain, snow, and fog).
For a proper BSI use:•Always keep the rear bumper corner area clean.•Do not cover the rear bumper corner area with
labels or stickers of any kind. •Take your vehicle to a dealer if you need the rear
bumper corner area or the radar sensors to be
repaired, or the rear bumper corner area is strongly
impacted.
BSI
IndicatorMulti-information
display
BSI OFF Button
Page 412 of 441
411
Continued
Handling the Unexpected
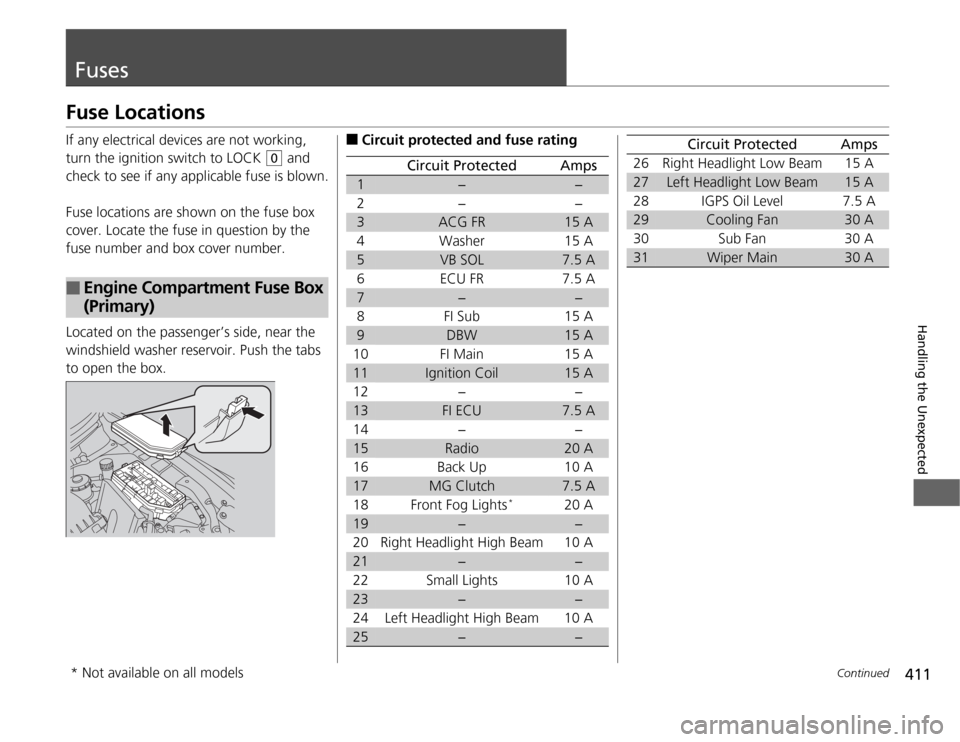
FusesFuse LocationsIf any electrical devices are not working,
turn the ignition switch to LOCK
(0
and
check to see if any applicable fuse is blown.
Fuse locations are shown on the fuse box
cover. Locate the fuse in question by the
fuse number and box cover number.
Located on the passenger’s side, near the
windshield washer reservoir. Push the tabs
to open the box.
■
Engine Compartment Fuse Box
(Primary)
■
Circuit protected and fuse rating
Circuit Protected
Amps
1
−
−
2− −
3
ACG FR
15 A
4Washer 15 A
5
VB SOL
7.5 A
6 ECU FR 7.5 A
7
−
−
8FI Sub 15A
9
DBW
15 A
10 FI Main 15 A11
Ignition Coil
15 A
12 − −13
FI ECU
7.5 A
14 − −15
Radio
20 A
16 Back Up 10 A17
MG Clutch
7.5 A
18 Front Fog Lights
*
20 A
19
−
−
20 Right Headlight High Beam 10 A
21
−
−
22 Small Lights 10 A
23
−
−
24 Left Headlight High Beam 10 A
25
−
−
26 Right Headlight Low Beam 15 A27
Left Headlight Low Beam
15 A
28 IGPS Oil Level 7.5 A
29
Cooling Fan
30 A
30 Sub Fan 30 A
31
Wiper Main
30 A
Circuit Protected
Amps
* Not available on all models
Page 420 of 441
419
Information
This chapter includes your vehicle's specifications, locations of identification numbers, and other
information required by regulation.
Specifications.................................... 420
Identification Numbers
Vehicle Identification Number (VIN)...... 422Engine Number and Transmission
Number...................................... 422
Devices that Emit Radio Waves....... 423
Reporting Safety Defects................. 424Emissions Testing
Testing of Readiness Codes.............. 425
Warranty Coverages........................ 427
Authorized Manuals......................... 429
Customer Service Information......... 430
Gracenote
® End User License
Agreement................................... 431