2012 HONDA ODYSSEY navigation system
[x] Cancel search: navigation systemPage 195 of 441

194Features
Audio SystemAbout Your Audio SystemOn models with navigation system, see the Navigation System Manual for operation
of the audio system, Bluetooth
®HandsFreeLink
®, and voice commands for these
features.
The audio system features AM/FM radio and the XM
® Radio Service
*. It can also play
audio CDs, WMA/MP3/AAC files, iPods
®*
, USB flash drives
*, and Bluetooth
®*
devices.
You can operate the audio system from the buttons and switches on the panel, or
the remote controls on the steering wheel
*.
1About Your Audio System
XM
® Radio is available on a subscription basis only.
For more information on XM
® Radio, contact a
dealer.
2General Information on the Audio System
P. 237
XM
® Radio is available in the United States and
Canada, except Hawaii, Alaska, and Puerto Rico.
XM® Radio is a registered trademark of Sirius XM
Radio, Inc.
Video CDs, DVDs, and 3-inch (8-cm) mini CDs are not
supported.
iPod® is a registered trademark owned by Apple Inc.
MP3 and AAC are standard audio compression
formats. WMA is an audio compression format
developed by Microsoft Corporation.
Remote Control
iPod
®
USB Flash
DriveXM
® Radio
* Not available on all models
Page 242 of 441

241
Continued
Features
Rear Entertainment System
*
For models with the navigation system, see the Navigation System Manual for how
to operate the rear entertainment system.
Allows the rear passengers to enjoy a different entertainment source, such as DVD,
CD, CD Library, and radio, than the front passengers.
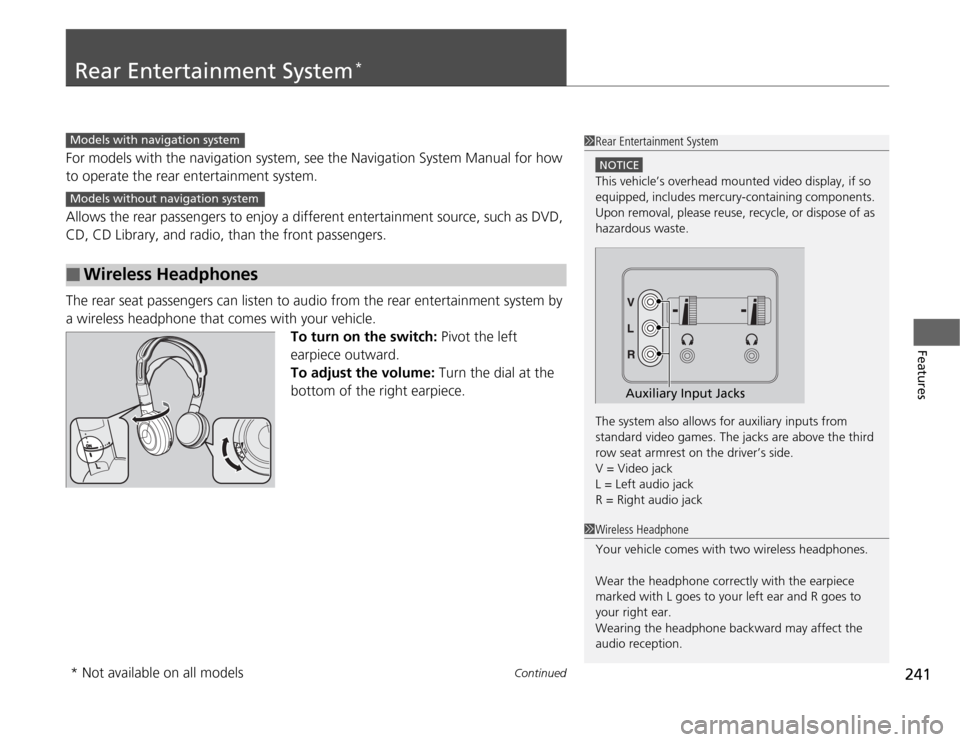
The rear seat passengers can listen to audio from the rear entertainment system by
a wireless headphone that comes with your vehicle.
To turn on the switch: Pivot the left
earpiece outward.
To adjust the volume: Turn the dial at the
bottom of the right earpiece.■
Wireless Headphones
1Rear Entertainment System
NOTICEThis vehicle’s overhead mounted video display, if so
equipped, includes mercury-containing components.
Upon removal, please reuse, recycle, or dispose of as
hazardous waste.
The system also allows for auxiliary inputs from
standard video games. The jacks are above the third
row seat armrest on the driver’s side.
V = Video jack
L = Left audio jack
R = Right audio jack
Auxiliary Input Jacks
Models with navigation systemModels without navigation system
1Wireless Headphone
Your vehicle comes with two wireless headphones.
Wear the headphone correctly with the earpiece
marked with L goes to your left ear and R goes to
your right ear.
Wearing the headphone backward may affect the
audio reception.
* Not available on all models
Page 260 of 441

259
Continued
Features
Bluetooth
® HandsFreeLink
®*
For models with the navigation system, see Navigation System Manual for how to
operate the Bluetooth
® HandsFreeLink
®.
Bluetooth
® HandsFreeLink
® (HFL) allows you to place and receive phone calls using
your vehicle's audio system, without handling your cell phone.
Using HFL
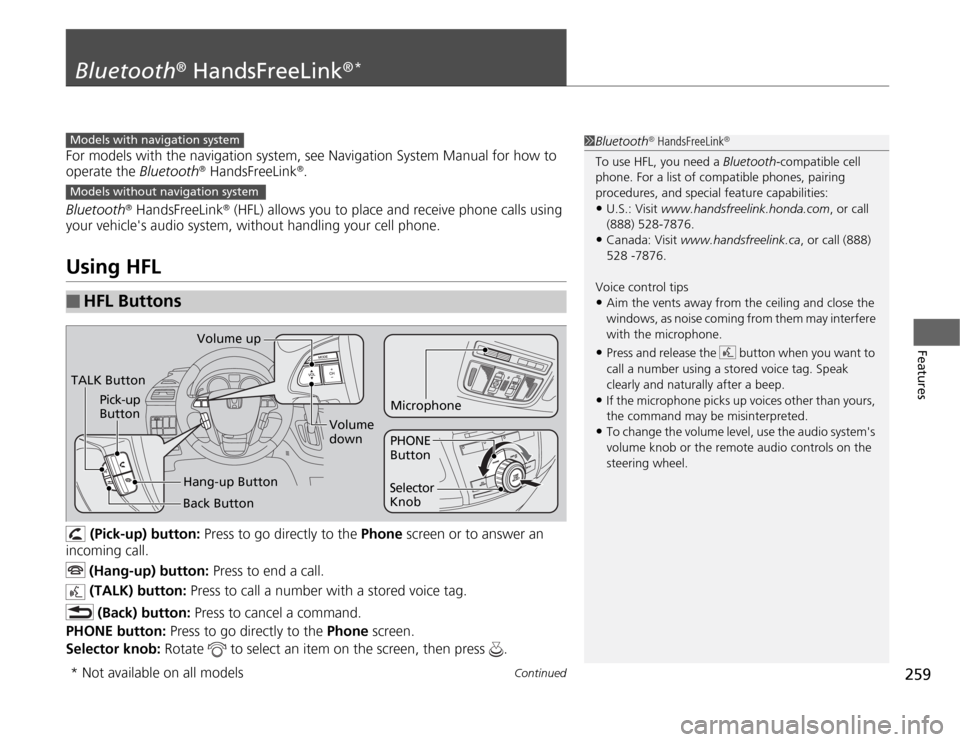
(Pick-up) button: Press to go directly to the Phone screen or to answer an
incoming call.
(Hang-up) button: Press to end a call.
(TALK) button: Press to call a number with a stored voice tag.
(Back) button: Press to cancel a command.
PHONE button: Press to go directly to the Phone screen.
Selector knob: Rotate to select an item on the screen, then press .
■
HFL Buttons
1Bluetooth
® HandsFreeLink
®
To use HFL, you need a Bluetooth-compatible cell
phone. For a list of compatible phones, pairing
procedures, and special feature capabilities:•U.S.: Visit www.handsfreelink.honda.com, or call
(888) 528-7876.•Canada: Visit www.handsfreelink.ca, or call (888)
528 -7876.
Voice control tips•Aim the vents away from the ceiling and close the
windows, as noise coming from them may interfere
with the microphone.•Press and release the button when you want to
call a number using a stored voice tag. Speak
clearly and naturally after a beep.•If the microphone picks up voices other than yours,
the command may be misinterpreted.•To change the volume level, use the audio system's
volume knob or the remote audio controls on the
steering wheel.
Models with navigation systemModels without navigation systemTALK ButtonVolume up
Microphone
Hang-up Button Pick-up
Button
Volume
down
Selector
KnobPHONE
Button
Back Button
* Not available on all models
Page 322 of 441

321
uuParking Your VehicleuParking Sensor System
*
Continued
Driving
■
When the distance between your vehicle and obstacles behind becomes shorter
*1: At this stage, only the center sensors detect obstacles.Length of the
intermittent
beep
Distance between the Bumper and
Obstacle
Appropriate Indicator
Audio/
navigation
screen
indicator color
Corner Sensors
Center Sensors
Long
—
About 43-28 in
(110-70 cm)
Yellow
Short
About 24-18 in
(60-45 cm)
About 28-22 in
(70-55 cm)
Amber
Very short
About 18-14 in
(45-35 cm)
About 22-18 in
(55-45 cm)
Amber
Continuous
About 14 in (35 cm)
or less
About 18 in (45 cm)
or less
Red
Instrument
panel
Stays on
Multi-
information
display
Stays on
Audio/
navigation
screen
Blinks
Page 323 of 441

uuParking Your VehicleuParking Sensor System
*
322Driving
■
The parking sensor system on audio/navigation screen
•An appropriate indicator blinks when there
are any obstacles around the parking
sensors. The color of the indicator changes
in accordance with the distance between
your vehicle and obstacles.
•An appropriate indicator stays on in red
when there is a problem with the
corresponding parking sensor.
2Parking Sensor Indicator
* P. 77
2Multi-Information Display Warning
and Information Messages* P. 85
1.Make sure that the parking sensor system is not activated. Turn the ignition
switch to LOCK
(0
.
2.Press and hold the parking sensor system button, and turn the ignition switch to
ON
(w
.
3.Keep pressing the button for ten seconds. Release the button when the indicator
in the button flashes.
4.Press the button again. The indicator in the button goes off.
uThe beeper sounds twice. The rear sensors are now turned off.
To turn the rear sensors on again, follow the above procedure. The beeper sounds
three times when the rear sensors come back on.
Models without navigation systemModels without navigation system
■
Turning off All Rear Sensors
1Turning off all Rear Sensors
When you shift to
(R
, the indicator in the parking
sensor system button blinks as a reminder that the
rear sensors have been turned off.
* Not available on all models
Page 324 of 441

323
Driving
Rearview Camera
*
About Your Rearview CameraFor models with the navigation system, see the Navigation System Manual.
The audio/information screen can display your vehicle’s rear view.
The display automatically changes to a rear view when the shift lever is moved to (R
.
The rearview camera has a unique lens that makes objects appear closer or further
than they actually are.
■
Rearview Camera Display Area
1About Your Rearview Camera
The rearview the camera is view restricted. You
cannot see the corner ends of the bumper or what is
underneath the bumper. Its unique lens also makes
closer or farther than they actually are.
Visually confirm that it is safe to drive on before
backing up. Do not rely on the rearview display which
does not give you all information about conditions at
the back of your vehicle.
Certain conditions (such as weather, lighting, and
high temperatures) may also restrict the rear view.
Use a soft, moist cloth to keep the lens clean and free
of debris.
To turn the guide lines on or off, press and hold the
RETURN button for about three seconds.
If you turn the guide lines off, they remain off until
you turn them back on.
Rotate to adjust the brightness of the rearview
camera.
Models with navigation systemModels without navigation systemScreen display
Bumper Guidelines
Approx. 118 in (3 m)
Approx. 79 in (2 m)
Approx. 39 in (1 m)
Approx. 20 in (0.5 m)
Approx. 118 in (3 m) Approx. 79 in (2 m) Approx. 39 in (1 m)Camera* Not available on all models
Page 380 of 441

379
Maintenance
BatteryChecking the Battery
The battery condition is being monitored by
the sensor on the negative terminal. If there is
a problem with the sensor, the warning
message on information display
*/multi-
information display
* will let you know. Have
your vehicle checked by a dealer.
Check the battery terminals for corrosion
monthly.
If your vehicle's battery is disconnected or goes dead:
•The audio system is disabled.
2Reactivating the audio system P. 196
•The clock resets.
2Setting the Clock P. 108
•The navigation system
* is disabled.
2Refer to the navigation system manual
Charging the BatteryDisconnect both battery cables to prevent damaging your vehicle's electrical system.
Always disconnect the negative (–) cable first, and reconnect it last.
1BatteryWARNING: Battery post, terminals,
and related accessories contain lead
and lead compounds.
Wash your hands after handling.When you find corrosion, clean the battery terminals
by applying a baking powder and water solution.
Rinse the terminals with water. Cloth/towel dry the
battery. Coat the terminals with grease to help
prevent future corrosion.
3
WARNING
The battery gives off explosive hydrogen
gas during normal operation.
A spark or flame can cause the battery to
explode with enough force to kill or
seriously hurt you.
When conducting any battery
maintenance, wear protective clothing and
a face shield, or have a skilled technician do
it.
* Not available on all models
Page 430 of 441

429
Information
Authorized ManualsThe publications listed below can be purchased from Helm Incorporated. You can
order a manual by phone at (800) 782-4356 (credit card orders only), or online at
www.helminc.com.
Make an inquiry to Helm Inc. at (800) 782-4356 if you are interested in ordering
other models' or other years' manuals.
Publication
Form Number
Form Description
61TK801
2012 Honda Odyssey Service Manual
61TK801EL
2012 Honda Odyssey Electrical Troubleshooting Manual
61TK830
2011 Model Series Honda Odyssey Body Repair Manual
31TK8610
2012 Honda Odyssey Owner’s Manual
31TK8810
2012 Honda Odyssey Navigation System Owner’s Manual
31TK8M10
2012 Honda Odyssey Service History
31TK8A10
2012 Honda Odyssey Technology Reference Guide (LX/EX)
31TK8B10
2012 Honda Odyssey Technology Reference Guide (EX-L/EX-L RES)
31TK8C10
2012 Honda Odyssey Technology Reference Guide (EX-L Navi)
31TK8D10
2012 Honda Odyssey Technology Reference Guide
(Touring/Touring Elite)
HON-ROrder Form for Previous Years-
Indicate Year and Model Desired
1Authorized Manuals
Service Manual:
Covers maintenance and recommended procedures
for repair to engine and chassis components. It is
written for the journeyman technician, but it is simple
enough for most mechanically inclined owners to
understand.
Electrical Troubleshooting Manual:
Complements the Service Manual by providing in-
depth troubleshooting information for each electrical
circuit in your vehicle.
Body Repair Manual:
Describes the procedures involved in the replacement
of damaged body parts.For Canadian Owners:
Si vous avez besoin d'un Manuel du Conducteur en
français, veuillez demander à votre concessionnaire
de commander le numéro de pièce 33TK8C10