Page 60 of 441
59
uuChild SafetyuSafety of Infants and Small Children
Continued
Safe Driving
A LATCH-compatible child seat can be installed in each of the second and third row
seats. A child seat is attached to the lower anchors with either the rigid or flexible
type of connectors.
1.Locate the lower anchors under the marks.■
Installing a LATCH-Compatible Child SeatMarks
Marks
Third row seatSecond row seat
Page 61 of 441
uuChild SafetyuSafety of Infants and Small Children
60Safe Driving
2.Place the child seat on the vehicle seat then
attach the child seat to the lower anchors
according to the instructions that came
with the child seat.
uWhen installing the child seat, make sure
that the lower anchors are not
obstructed by the seat belt or any other
object.
To install a LATCH-compatible child seat in
the second row center seat, remove the
covers on each lower end of the seat -back
by pulling on the handles.
1Installing a LATCH-compatible Child Seat
For your child's safety, when using a child seat
installed using the LATCH system, make sure that the
seat is properly secured to the vehicle. A child seat
that is not properly secured will not adequately
protect a child in a crash and may cause injury to the
child or other vehicle occupants.
Rigid Type
Lower Anchors
Flexible Type
Lower Anchors
Handle Marks Cover
Second row center seat
Page 63 of 441

uuChild SafetyuSafety of Infants and Small Children
62Safe Driving
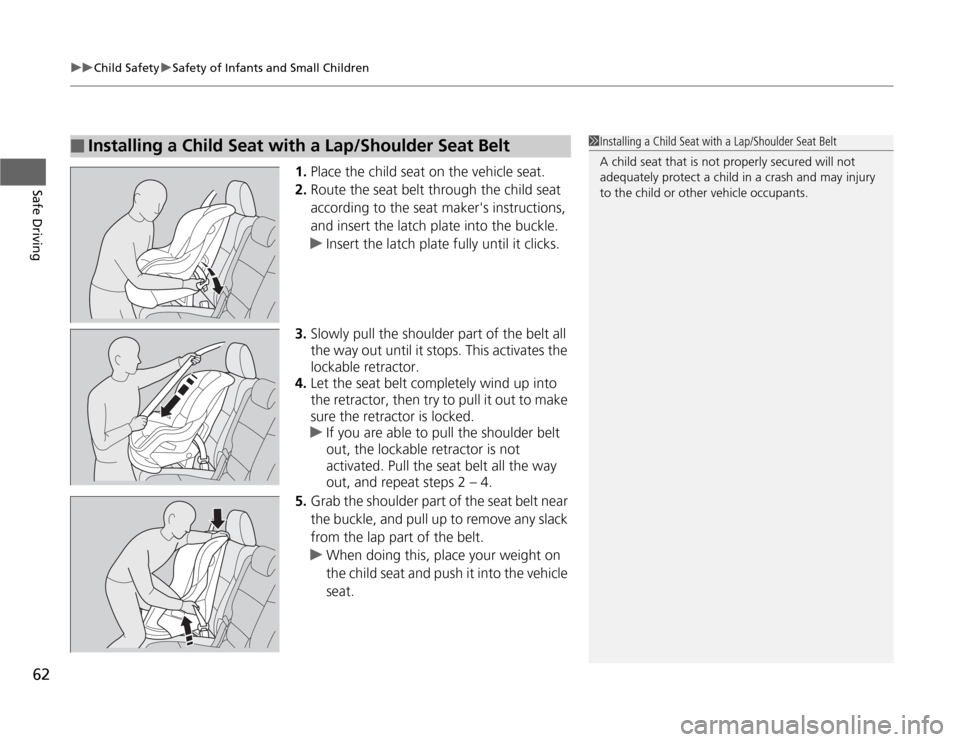
1.Place the child seat on the vehicle seat.
2.Route the seat belt through the child seat
according to the seat maker's instructions,
and insert the latch plate into the buckle.
uInsert the latch plate fully until it clicks.
3.Slowly pull the shoulder part of the belt all
the way out until it stops. This activates the
lockable retractor.
4.Let the seat belt completely wind up into
the retractor, then try to pull it out to make
sure the retractor is locked.
uIf you are able to pull the shoulder belt
out, the lockable retractor is not
activated. Pull the seat belt all the way
out, and repeat steps 2 – 4.
5.Grab the shoulder part of the seat belt near
the buckle, and pull up to remove any slack
from the lap part of the belt.
uWhen doing this, place your weight on
the child seat and push it into the vehicle
seat.
■
Installing a Child Seat with a Lap/Shoulder Seat Belt
1Installing a Child Seat with a Lap/Shoulder Seat Belt
A child seat that is not properly secured will not
adequately protect a child in a crash and may injury
to the child or other vehicle occupants.
Page 126 of 441

125
uuOpening and Closing the TailgateuOpening/Closing the Power Tailgate
*
Controls
If you manually close the power tailgate, it latches automatically.
The power tailgate fail-safe mode detects if there is an extra load on the tailgate (for
example, it is covered with snow). If an extra load is detected, the tailgate opens
completely then lowers to the close position.■
Auto-Closer
■
Power Tailgate Fail-safe Mode
1Auto-Closer
The auto-closer feature does not activate if you push
the tailgate release button while the power tailgate is
closing.
Do not put any force on the tailgate while the power
tailgate is latching.
Keep your hands away from the tailgate when you
manually close the tailgate and let it latch
automatically. It is dangerous to put your hands
around the tailgate as it starts to latch itself.1Power Tailgate Fail-safe Mode
If you try to manually close the power tailgate
immediately after it fully opens, the power tailgate
fail-safe mode may activate.
Once the power tailgate fail-safe mode activates,
wait until the power tailgate fully closes. Keep away
from the power tailgate when it is in motion.
If the power tailgate fail-safe mode constantly
activates, consult at a dealer.
Page 134 of 441
133
uuOpening and Closing the Sliding DoorsuAuto-Closer
Controls
Auto-CloserIf you manually close the power sliding door, it latches automatically.
The auto-closer feature activates with or without the main switch ON. The only
exception is when the fuel fill door is open with the main switch ON.
1Auto-Closer
Keep your hands away from the power sliding door.
The manually closed door latches automatically when
it is half-shut.
The auto-closer feature does not activate if you keep
pulling the inner or outer handle and while the sliding
door is closing.
Do not put any force on the power sliding door while
the door is latching.
Models with power sliding door
Page 164 of 441
Continued
163
uuAdjusting the SeatsuRear Seats
Controls
1.Lower the head restraint to its lowest
position.
2.Move the seat to it’s rear most position.
3.Fold the seat-back down.
4.Pull the lock release lever, and lift the rear
of the seat.
uTo lift the seat, grab the handle under
the rear side of the seat cushion.
5.Pull the seat-back slightly, then pivot it
upward.
uThis unhooks the front of the seat from
the floor.
■
Removing a Second Row Outer Seat
1Removing a Second Row Outer Seat
Do not remove the seat while driving.
To reinstall the seat, hook the front of the seat to the
floor first. Pushing the rear of the seat-back locks the
seat in place. Make sure the seat is latched before
driving.
Handle
Seat-back Angle
adjustment LeverLock Release Lever
Page 165 of 441
uuAdjusting the SeatsuRear Seats
164Controls
1.Lower the head restraint to its lowest
position.
2.Move the seat to it’s rear most position.
3.Fold the seat-back down.
4.Pull the lock release lever, and lift the rear
of the seat.
uTo lift the seat, grab the handle under
the rear side of the seat cushion.
5.With the front of the seat hooked to the
floor, slide the seat laterally to the outer
position until it stops.
6.Lower the seat and push the rear of the
seat-back until it locks. Make sure the seat
is latched before driving.
■
Sliding the Second Row Outer Seats Outward
1Sliding the Second Row Outer Seats Outward
When the second row outer seats are in the original
(center) position, passengers have easier access to the
third row seats. When they are in the outer position,
you can install two or three child seats in the second
row seats.
Handle
Slide
Page 166 of 441

Continued
165
uuAdjusting the SeatsuRear Seats
Controls
Your vehicle’s multi-functional second row center seat is removable.
1.Store the center seat belt first. Insert a key
into the slot on the side of the anchor
buckle.
2.Retract the seat belt into the holder on the
ceiling.
2Seat Belt with Detachable Anchor P. 35
3.Pull up the adjustment strap, and fold down
the seat-back.
4.Pull the lock release strap under the seat
cushion, and lift the rear of the seat.
uTo lift the seat, hold the seat-back.
5.Pull the seat-back slightly, then pivot it
upward.
uThis unhooks the front of the seat from
the floor.
■
Removing the Second Row Center Seat
*
1Removing the Second Row Center Seat
Do not remove the seat while driving.
The multi-functional center seat can be used as the
beverage holder when folded down.
2Beverage Holders P. 174
To reinstall the seat, hook the front of the seat to the
floor first. Pushing the rear of the seat-back locks the
seat in place. Make sure the seat is latched before
driving.
Adjustment Strap
Lock Release
Strap* Not available on all models