Page 378 of 441
377
uuChecking and Maintaining TiresuTire Rotation
Maintenance
Tire RotationRotating tires according to the maintenance messages on the information display
*/
multi-information display
* helps to distribute wear more evenly and increase tire life.
■
Tires without rotation marks
Rotate the tires as shown here.
■
Tires with rotation marks
Rotate the tires as shown here.
1Tire Rotation
Tires with directional tread patterns should only be
rotated front to back (not from one side to the other).
Directional tires should be mounted with the rotation
indication mark facing forward, as shown below.
FRONT
Rotation Mark
FrontFront* Not available on all models
Page 379 of 441

378
uuChecking and Maintaining TiresuWinter Tires
Maintenance
Winter TiresIf driving on snowy or frozen roads, mount all season marked ”M+S” tires, snow
tires, or tire chains; reduce speed; and maintain sufficient distance between vehicles
when driving.
Be particularly careful when operating the steering wheel or brakes to prevent
skidding.
Use tire chains, snow tires, or all season tires when necessary or according to the law.
When mounting, refer to the following points.
For winter tires:
•Select the size and load ranges that are the same as the original tires.
•Mount the tires to all four wheels.
For tire chains:
•Install them on the front tires only.
•Because your vehicle has limited tire clearance, we strongly recommend using the
chains listed below:
•Follow the chain manufacturer's instruction when installing. Mount them as
tightly as you can.
•Check that the chains do not touch the brake lines or suspension.
•Drive slowly.
Cable-type: SCC Super Z-6# SZ-429
1Winter Tires
NOTICETraction devices that are the wrong size or improperly
installed can damage your vehicle's brake lines,
suspension, body, and wheels. Stop driving if they are
hitting any part of the vehicle.
When tire chains are mounted, follow the chain
manufacturer's instructions regarding vehicle
operational limits.
If your vehicle is equipped with summer tires, be
aware that these tires are not designed for winter
driving conditions. For more information, contact a
dealer.
3
WARNING
Using the wrong chains, or not properly
installing chains, can damage the brake
lines and cause a crash in which you can be
seriously injured or killed.
Follow all instructions in this owner's
manual regarding the selection and use of
tire chains.
Page 387 of 441

uuCleaninguInterior Care
386Maintenance
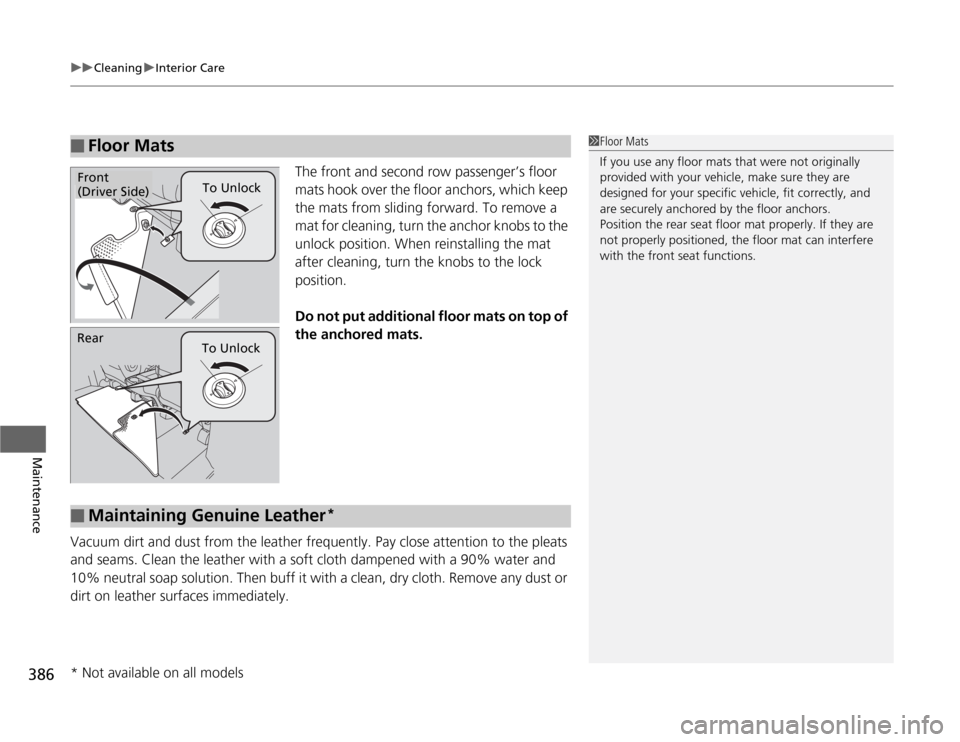
The front and second row passenger’s floor
mats hook over the floor anchors, which keep
the mats from sliding forward. To remove a
mat for cleaning, turn the anchor knobs to the
unlock position. When reinstalling the mat
after cleaning, turn the knobs to the lock
position.
Do not put additional floor mats on top of
the anchored mats.
Vacuum dirt and dust from the leather frequently. Pay close attention to the pleats
and seams. Clean the leather with a soft cloth dampened with a 90% water and
10% neutral soap solution. Then buff it with a clean, dry cloth. Remove any dust or
dirt on leather surfaces immediately.
■
Floor Mats
1Floor Mats
If you use any floor mats that were not originally
provided with your vehicle, make sure they are
designed for your specific vehicle, fit correctly, and
are securely anchored by the floor anchors.
Position the rear seat floor mat properly. If they are
not properly positioned, the floor mat can interfere
with the front seat functions.
To Unlock
Front
(Driver Side)
Rear
To Unlock■
Maintaining Genuine Leather
*
* Not available on all models
Page 392 of 441

391
Continued
Handling the Unexpected
If a Tire Goes FlatChanging a Flat TireIf a tire goes flat while driving, grasp the steering wheel firmly, and brake gradually
to reduce speed. Then, stop in a safe place. Replace the flat tire with a compact
spare tire. Go to a dealer as soon as possible to have the full-size tire repaired or
replaced.
1.Park the vehicle on firm, level, and non-slippery ground.
2.Put the shift lever in
(P
.
3.Set the parking brake.
4.Turn on the hazard warning lights and turn the ignition switch to LOCK
(0
.
1Changing a Flat Tire
Periodically check the tire pressure of the compact
spare. It should be set to the specified pressure.
Specified Pressure: 60 psi (420 kPa, 4.2 kgf/cm
2)
When driving with the compact spare tire, keep the
vehicle speed under 50 mph (80 km/h). Replace with
a full-size tire as soon as possible.
The compact spare tire and wheel in your vehicle are
specifically for this model.
Do not use them with another vehicle.
Do not use another type of compact spare tire or
wheel with your vehicle.
Do not mount tire chains on a compact spare tire.
If a chain-mounted front tire goes flat, remove one of
the full-size rear tires and replace it with the compact
spare tire. Remove the flat front tire and replace it
with the full-size tire that was removed from the rear.
Mount the tire chains on the front tire.
Do not use a puncture-repairing agent on a flat tire,
as it can damage the tire pressure sensor.
U.S. models only
Page 393 of 441
392
uuIf a Tire Goes FlatuChanging a Flat Tire
Handling the Unexpected
1.Remove the floor mat under the second
row seat.
2Floor Mats P. 386
2.Pull up the floor carpet.
3.Lift up the floor lid using the handle and
remove it.
4.Take the tool case out of the spare tire well.
Take the jack and wheel nut wrench out of
the tool case.
5.Unscrew the wing bolt, and remove the
spacer cone. Then, remove the spare tire.
6.Place a wheel block or rock in front and rear
of the wheel diagonal to the flat tire.
■
Getting Ready to Replace the Flat TireFloor Carpet
Handle
Floor Lid
Spare Tire
Tool Case
Wheel
Blocks
The tire to be replaced.
Page 412 of 441

411
Continued
Handling the Unexpected
FusesFuse LocationsIf any electrical devices are not working,
turn the ignition switch to LOCK
(0
and
check to see if any applicable fuse is blown.
Fuse locations are shown on the fuse box
cover. Locate the fuse in question by the
fuse number and box cover number.
Located on the passenger’s side, near the
windshield washer reservoir. Push the tabs
to open the box.
■
Engine Compartment Fuse Box
(Primary)
■
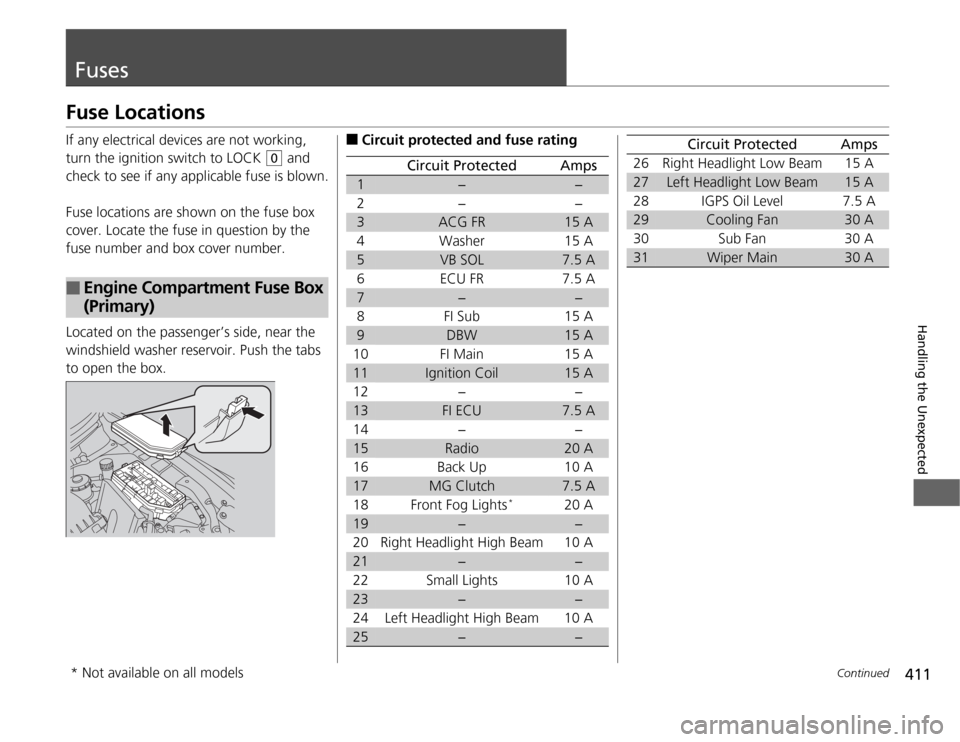
Circuit protected and fuse rating
Circuit Protected
Amps
1
−
−
2− −
3
ACG FR
15 A
4Washer 15 A
5
VB SOL
7.5 A
6 ECU FR 7.5 A
7
−
−
8FI Sub 15A
9
DBW
15 A
10 FI Main 15 A11
Ignition Coil
15 A
12 − −13
FI ECU
7.5 A
14 − −15
Radio
20 A
16 Back Up 10 A17
MG Clutch
7.5 A
18 Front Fog Lights
*
20 A
19
−
−
20 Right Headlight High Beam 10 A
21
−
−
22 Small Lights 10 A
23
−
−
24 Left Headlight High Beam 10 A
25
−
−
26 Right Headlight Low Beam 15 A27
Left Headlight Low Beam
15 A
28 IGPS Oil Level 7.5 A
29
Cooling Fan
30 A
30 Sub Fan 30 A
31
Wiper Main
30 A
Circuit Protected
Amps
* Not available on all models
Page 413 of 441
412
uuFusesuFuse Locations
Handling the Unexpected
Located near the battery. Push the tabs to
open the box.■
Engine Compartment Fuse Box
(Secondary)
■
Circuit protected and fuse rating
Circuit Protected
Amps
1
Battery
125 A
2-1
Fan Main 60 A
2-2
Passenger’s Side Fuse Box 2 50 A
2-3
Rear Blower 30 A
2-4
FI Main 30 A
2-5
VSA Motor 40 A
2-6
Stop & Horn, Hazard 30 A
2-7
VSA FSR 30 A
2-8
Battery Management
System Main30 A
3-1
Driver’s Side Fuse Box 2
50 A
3-2
IG1 Main
50 A
3-3
Rear Fuse Box 1
60 A
3-4
Passenger’s Side Fuse Box 1
50 A
3-5
Driver’s Side Fuse Box 1
50 A
3-6
Primary Under-hood Fuse
Box Main
60 A
3-7
Front Blower
40 A
3-8
Passenger’s Side Power
Slide Door Motor
*
40 A
4
−−
5
−
−
6 Rear Window Defogger 40 A
7
−
−
8Battery Management
System7.5 A
9
Stop & Horn
20 A
10 Hazard 15 A
11
Interior Lights
7.5 A
Circuit Protected
Amps
* Not available on all models
Page 415 of 441
414
uuFusesuFuse Locations
Handling the Unexpected
Located on the lower side panel. Take off
the cover to open.
Fuse locations are shown on the fuse box
cover.
Locate the fuse in question by the fuse
number and box cover number.■
Passenger Side Fuse Box
■
Circuit protected and fuse rating
Circuit Protected
Amps
1
Premium Amp
*
30 A
2
Rear Right Power Window
20 A
3
ACM
10 A
4
−
−
5
Seat Heaters
*
20 A
6
−
−
7
Front Passenger’s Power
Seat Sliding
*
20 A
8
Front Passenger’s Power
Seat Reclining
*
20 A
9
−
−
10 − −
11
−
−
12 − −
13
Passenger’s Side Power
Slide Door Closer
*
20 A
14Rear Accessory Power
Socket15 A
15
Front Accessory Power
Socket
*
15 A
16 − −
17
−
−
18Front Passenger’s Power
Window20 A
19
SRS
10 A
20 ECU AS 7.5 A
21
Auto Leveling Headlight
*
7.5 A
22 − −
23
OPDS
7.5 A
24 − −
25
Instrument Panel
Illumination
7.5 A
26 − −
27
Front Accessory Power
Socket
15 A
28 − −
Circuit Protected
Amps
* Not available on all models