Page 417 of 441

416
uuFusesuInspecting and Changing Fuses
Handling the Unexpected
Inspecting and Changing Fuses
1.Turn the ignition switch to LOCK
(0
. Turn
headlights and all accessories off.
2.Remove the fuse box cover.
3.Check the large fuse in the engine
compartment.
uIf the fuse is blown, use a Phillips-head
screwdriver to remove the screw and
replace it with a new one.
4.Inspect the small fuses in the engine
compartment and the vehicle interior.
uIf there is a burned out fuse, remove it
with the fuse puller and replace it with a
new one.
1Inspecting and Changing Fuses
NOTICEReplacing a fuse with one that has a higher rating
greatly increases the chances of damaging the
electrical system.
Replace fuse with a spare fuse of the same specified
amperage.
Use the charts to locate the fuse in question and
confirm the specified amperage on the fuse label.
2Fuse Locations P. 411
There is a fuse puller on the back of the engine
compartment fuse box (primary) cover.
Blown FuseBlown
FuseFuse Puller
Page 420 of 441
419
Information
This chapter includes your vehicle's specifications, locations of identification numbers, and other
information required by regulation.
Specifications.................................... 420
Identification Numbers
Vehicle Identification Number (VIN)...... 422Engine Number and Transmission
Number...................................... 422
Devices that Emit Radio Waves....... 423
Reporting Safety Defects................. 424Emissions Testing
Testing of Readiness Codes.............. 425
Warranty Coverages........................ 427
Authorized Manuals......................... 429
Customer Service Information......... 430
Gracenote
® End User License
Agreement................................... 431
Page 421 of 441

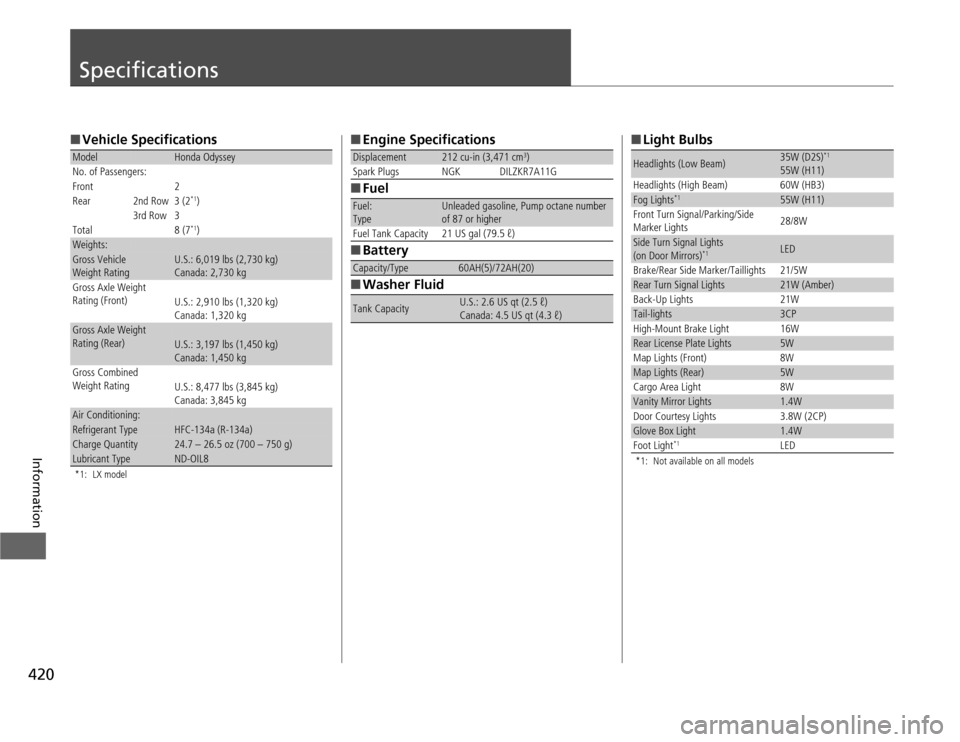
420Information
Specifications■Vehicle Specifications*1: LX modelModel
Honda Odyssey
No. of Passengers:
Front 2
Rear 2nd Row 3 (2
*1)
3rd Row 3
Total 8 (7*1)
Weights:Gross Vehicle
Weight Rating
U.S.: 6,019 lbs (2,730 kg)
Canada: 2,730 kg
Gross Axle Weight
Rating (Front)
U.S.: 2,910 lbs (1,320 kg)
Canada: 1,320 kg
Gross Axle Weight
Rating (Rear)
U.S.: 3,197 lbs (1,450 kg)
Canada: 1,450 kg
Gross Combined
Weight Rating
U.S.: 8,477 lbs (3,845 kg)
Canada: 3,845 kg
Air Conditioning:Refrigerant Type
HFC-134a (R-134a)
Charge Quantity
24.7 – 26.5 oz (700 – 750 g)
Lubricant Type
ND-OIL8
■Engine Specifications
■Fuel
■Battery
■Washer FluidDisplacement
212 cu-in (3,471 cm
3)
Spark Plugs NGK DILZKR7A11G
Fuel:
Type
Unleaded gasoline, Pump octane number
of 87 or higher
Fuel Tank Capacity 21 US gal (79.5 ℓ)
Capacity/Type
60AH(5)/72AH(20)
Tank Capacity
U.S.: 2.6 US qt (2.5 ℓ)
Canada: 4.5 US qt (4.3 ℓ)
■Light Bulbs*1: Not available on all modelsHeadlights (Low Beam)
35W (D2S)
*1
55W (H11)
Headlights (High Beam) 60W (HB3)
Fog Lights
*1
55W (H11)
Front Turn Signal/Parking/Side
Marker Lights28/8W
Side Turn Signal Lights
(on Door Mirrors)
*1
LED
Brake/Rear Side Marker/Taillights 21/5W
Rear Turn Signal Lights
21W (Amber)
Back-Up Lights 21W
Tail-lights
3CP
High-Mount Brake Light 16W
Rear License Plate Lights
5W
Map Lights (Front) 8W
Map Lights (Rear)
5W
Cargo Area Light 8W
Vanity Mirror Lights
1.4W
Door Courtesy Lights 3.8W (2CP)
Glove Box Light
1.4W
Foot Light
*1
LED
Page 422 of 441
421
uuSpecificationsu
Information
■Brake Fluid
■Automatic Transmission Fluid*1: Touring modelsSpecified
Honda Heavy Duty Brake Fluid DOT 3
Specified
Honda ATF DW-1
(automatic transmission fluid)
Capacity Change3.3 US qt (3.1 ℓ)
3.6 US qt (3.4 ℓ)
*1
■Engine Oil
■Engine CoolantRecommended
·Genuine Honda Motor Oil 0W-20
·API Premium-grade 0W-20 detergent oil
CapacityChange 4.2 US qt (4.0 ℓ)
Change
including
filter4.5 US qt (4.3 ℓ)
Specified
Honda Long-Life Antifreeze/Coolant Type2
Ratio 50/50 with distilled water
Capacity
1.93 US gal (7.3 ℓ)
(change including the remaining
0.225 US gal (0.85 ℓ) in the reserve tank)
■Tire*1: Touring modelsRegular
Size
P235/65R17 103T
P235/60R18 102T
*1
Pressure
psi(kPa[kgf/cm
2])
33 (230 [2.3])
35 (240 [2.4])
*1
Compact
SpareSize T135/80D17 103M
Pressure
psi(kPa[kgf/cm
2])60 (420 [4.2])
Wheel Size
Regular
17 x 7J
18 x 7J
*1
Compact Spare
17 x 4T
Page 423 of 441
422Information
Identification NumbersVehicle Identification Number (VIN)Your vehicle has a 17-digit vehicle identification number (VIN) used to register your
vehicle for warranty purposes, and for licensing and insuring your vehicle. See the
image below for the VIN locations.Engine Number and Transmission NumberSee the image below for the locations of your vehicle's engine number and
transmission number.
Vehicle Identification Number
Engine Number
Certification Label/
Vehicle Identification
Number Transmission Number
Touring modelsEngine Number
Transmission Number
Page 426 of 441

425
Continued
Information
Emissions TestingTesting of Readiness CodesYour vehicle uses "readiness codes," as part of its onboard self diagnostic system.
Some states refer to these codes during testing to see if your vehicle's emissions
components are working properly.
The codes may not be read if you go through the testing just after the battery has
gone dead or been disconnected.
To check if they are set, turn the ignition switch to ON
(w
, without starting the
engine. The malfunction indicator lamp will come on for several seconds. If it then
goes off, the readiness codes are set. If it blinks five times, the readiness codes are
not set.
If you are required to have your vehicle tested before the readiness codes are ready,
prepare the vehicle for retesting by doing the following:
1.Fill the gas tank to approximately 3/4 full.
2.Park the vehicle and leave the engine off for 6 hours or more.
3.Make sure the ambient temperature is between 40°F and 95°F (4°C and 35°C).
4.Start the engine without touching the accelerator pedal, and let it idle for 20
seconds.
5.Keep the vehicle in
(P
. Increase the engine speed to 2,000 rpm, and hold it there
until the temperature gauge rises to at least 1/4 of the scale (about 3 minutes).
6.Let the engine idle with your foot off the accelerator for 20 seconds.
1Testing of Readiness Codes
The readiness codes are erased when the battery is
disconnected, and set again only after several days of
driving under a variety of conditions.
If a testing facility determines that the readiness
codes are not set, you may be requested to return at
a later date to complete the test.
If the testing facility determines the readiness codes
are still not set, see a dealer.
Page 427 of 441
426
uuEmissions TestinguTesting of Readiness Codes
Information
7.Select a nearby, lightly traveled major highway where you can maintain a speed
of 50 to 60 mph (80 to 97 km/h) for at least 20 minutes. Drive on the highway in
(D
. Do not use cruise control. When traffic allows, drive for 90 seconds without
moving the accelerator pedal. (Vehicle speed may vary slightly; this is okay.) If you
cannot do this for a continuous 90 seconds because of traffic conditions, drive for
at least 30 seconds, then repeat it two more times (for a total of 90 seconds).
8.Drive in city/suburban traffic for at least 10 minutes. When traffic conditions
allow, let the vehicle coast for several seconds without using the accelerator pedal
or the brake pedal.
9.Park the vehicle and leave the engine off for 30 minutes.
Page 430 of 441

429
Information
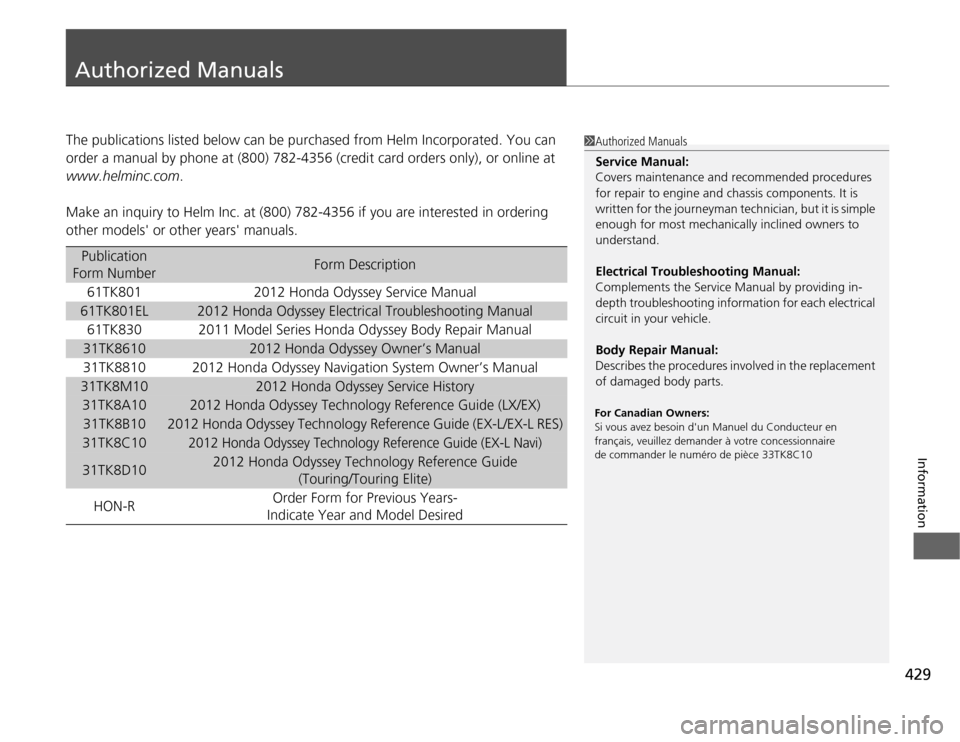
Authorized ManualsThe publications listed below can be purchased from Helm Incorporated. You can
order a manual by phone at (800) 782-4356 (credit card orders only), or online at
www.helminc.com.
Make an inquiry to Helm Inc. at (800) 782-4356 if you are interested in ordering
other models' or other years' manuals.
Publication
Form Number
Form Description
61TK801
2012 Honda Odyssey Service Manual
61TK801EL
2012 Honda Odyssey Electrical Troubleshooting Manual
61TK830
2011 Model Series Honda Odyssey Body Repair Manual
31TK8610
2012 Honda Odyssey Owner’s Manual
31TK8810
2012 Honda Odyssey Navigation System Owner’s Manual
31TK8M10
2012 Honda Odyssey Service History
31TK8A10
2012 Honda Odyssey Technology Reference Guide (LX/EX)
31TK8B10
2012 Honda Odyssey Technology Reference Guide (EX-L/EX-L RES)
31TK8C10
2012 Honda Odyssey Technology Reference Guide (EX-L Navi)
31TK8D10
2012 Honda Odyssey Technology Reference Guide
(Touring/Touring Elite)
HON-ROrder Form for Previous Years-
Indicate Year and Model Desired
1Authorized Manuals
Service Manual:
Covers maintenance and recommended procedures
for repair to engine and chassis components. It is
written for the journeyman technician, but it is simple
enough for most mechanically inclined owners to
understand.
Electrical Troubleshooting Manual:
Complements the Service Manual by providing in-
depth troubleshooting information for each electrical
circuit in your vehicle.
Body Repair Manual:
Describes the procedures involved in the replacement
of damaged body parts.For Canadian Owners:
Si vous avez besoin d'un Manuel du Conducteur en
français, veuillez demander à votre concessionnaire
de commander le numéro de pièce 33TK8C10