Page 1 of 441

ContentsThis owner’s manual should be considered a permanent part of the
vehicle and should remain with the vehicle when it is sold.
This owner’s manual covers all models of your vehicle. You may find
descriptions of equipment and features that are not on your
particular model.
Images throughout this owner’s manual (including the front cover)
represent features and equipment that are available on some, but
not all, models. Your particular model may not have some of these
features.
This owner’s manual is for vehicles sold in the United States and
Canada.
The information and specifications included in this publication were
in effect at the time of approval for printing. Honda Motor Co., Ltd.
reserves the right, however, to discontinue or change specifications
or design at any time without notice and without incurring any
obligation.
2Safe Driving P. 25For Safe Driving P. 26 Seat Belts P. 30 Airbags P. 392Instrument Panel P. 71Indicators P. 72 Gauges and Displays P. 862Controls P. 107Setting the Clock P. 108 Locking and Unlocking the Doors P. 110
Security System P. 134 Opening and Closing the Windows P. 137
Adjusting the Mirrors P. 152
Heating and Cooling
* P. 183
2Features P. 193Audio System P. 194 Audio System Basic Operation P. 197
Rear Entertainment System
* P. 241 HomeLink
® Universal Transceiver
* P. 257
2Driving P. 285Before Driving P. 286 Towing a Trailer P. 291
Rearview Camera
* P. 323 Refueling P. 325
2Maintenance P. 331Before Performing Maintenance P. 332 Maintenance Minder™ P. 335
Checking and Maintaining Wiper Blades P. 366
Remote Control and Wireless Headphone Care
* P. 382
2Handling the Unexpected P. 389Tools P. 390 If a Tire Goes Flat P. 391
Overheating P. 404 Indicator, Coming On/Blinking P. 406
When You Cannot Open or Close the Tailgate P. 4182Information P. 419Specifications P. 420 Identification Numbers P. 422
Warranty Coverages P. 427 Authorized Manuals P. 429
Page 3 of 441
2Quick Reference Guide
Quick Reference GuideVisual Index
❙
(Vehicle Stability Assist (VSA
®) System OFF) Button
(P306)
❙
(Blind Spot Information (BSI) System) OFF Button
* (P312)
❙Power Sliding Door Switch
* (P128)
❙Power Tailgate Switch
* (P122)
❙Parking Sensor System Switch
* (P319)
❙System Indicators
(P72)
❙Gauges
(P86)
❙Information Display
* (P87)
❙Multi-Information Display
* (P98)
❙Rear Window Defogger
(P148)
❙Heated Mirror Button
* (P148)
❙Hazard Warning Button❙Heating and Cooling System
* (P183)
❙Climate Control System
* (P187)
❙Seat Heater Switches
* (P181)
❙Audio System
(P194)
❙Rear Entertainment System
* (P241)
❙Navigation System
*
() See Navigation System Manual❙Accessory Power Sockets
(P176)
❙Cool Box Switch
* (P173)
❙Center Pocket
(P173)
❙Driving Position Memory System
Buttons
* (P149)
❙Auxiliary Input Jack
(P195)
Page 16 of 441
15Quick Reference Guide
Models with audio/information screen
Models without rear entertainment system
(XM
®)
Button
*
AM/FM Button
VOL/ (Power/
Volume) Knob
(CD Eject)
Button
TITLE Button
Selector KnobPreset Buttons USB/AUX ButtonCD/CDL ButtonCD Slot
SCAN Button
SKIP Bar
RETURN ButtonCATEGORY
(FOLDER) Bar
SETUP Button
(XM
®)
Button
*
AM/FM Button
VOL/ (Power/
Volume) Knob
(CD Eject)
Button
TITLE Button
Selector KnobPreset ButtonsDVD Button USB/AUX ButtonCD/CDL Button
SCAN ButtonSKIP Bar
REAR POWER
ButtonCATEGORY
(FOLDER) Bar
SETUP Button
Models with rear entertainment system
Button
RETURN ButtonPHONE Button
CD Slot
DISPLAY Button
REAR SOURCE
Button
(DVD Eject) Button
DVD Slot
DISPLAY Button
PHONE Button
* Not available on all models
Page 110 of 441
109
uuSetting the ClockuClock
Controls
You can adjust the time in the clock display, using the CLOCK button with the
ignition switch in ON
(w
.
1.Press the CLOCK button to access the clock
adjustment mode screen.
2.Press to select the item you want to
adjust (12/24 hour mode, hour, minute).
3.Rotate to make the adjustment.
4.Press to enter your selection. Repeat
steps 2 to 4 to adjust other items.
5.To enter the selection, press and select
EXIT, then press .
Models with audio/information screen
1Clock
These indications are used to show how to operate
the selector knob.
Rotate to select.
Press to enter.
You can also press the SETUP button to access the
clock adjustment mode screen.
1. Press the SETUP button.
2. Rotate to select CLOCK ADJUST on the
screen.
3. Press , CLOCK ADJUST appears.
Models without rear
entertainment system
Models with rear
entertainment system
CLOCK
ButtonCLOCK
Button
Page 194 of 441

193
Features
This chapter describes how to operate technology features on models without the navigation system.
Audio System
About Your Audio System ................ 194
USB Adapter Cable
*........................ 195
Auxiliary Input Jack .......................... 195
Audio System Theft Protection
*....... 196
Audio System Basic Operation....... 197
Adjusting the Sound ........................ 197
Playing the AM/FM Radio ................. 198
Playing a CD .................................... 200
Models without audio/information screen
Audio System Basic Operation...... 202
Audio Remote Controls.................... 203
Adjusting the Sound ........................ 204
Playing the AM/FM Radio ................. 205
Playing the XM
® Radio ..................... 209
Playing a CD .................................... 212
Playing CD Library ............................ 216
Playing an iPod®............................... 222
Playing a USB Flash Drive ................. 226
Playing Bluetooth® Audio................. 230
Audio Error Messages
CD Player ......................................... 235
Models with audio/information screen
iPod
®/USB Flash Drive
*..................... 236
General Information on the Audio
System
XM
® Radio Service
*......................... 237
Recommended CDs ......................... 238
Compatible iPod
®* and USB Flash Drives
*........ 240
Rear Entertainment System
*........... 241
HomeLink
® Universal Transceiver
*.. 257
Bluetooth
® HandsFreeLink
®*
Using HFL ........................................ 259
HFL Menus ...................................... 261
Compass
*.......................................... 282
* Not available on all models
Page 206 of 441

205
uuAudio System Basic OperationuPlaying the AM/FM Radio
Continued
Features
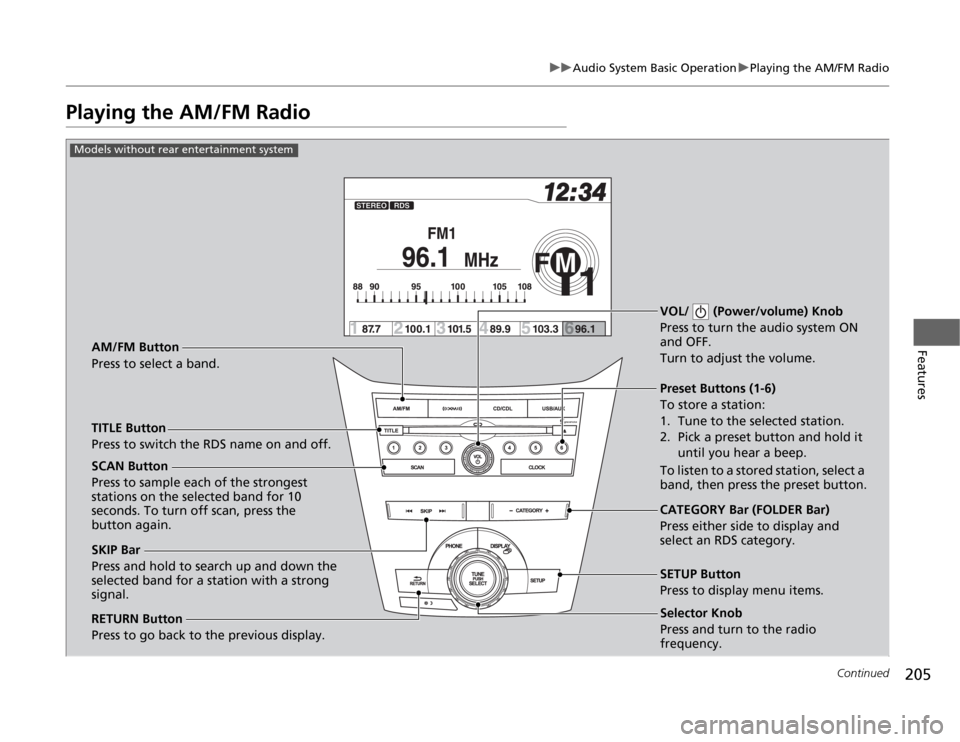
Playing the AM/FM Radio
Selector Knob
Press and turn to tune the radio
frequency.
SCAN Button
Press to sample each of the strongest
stations on the selected band for 10
seconds. To turn off scan, press the
button again.VOL/ (Power/volume) Knob
Press to turn the audio system ON
and OFF.
Turn to adjust the volume.
Preset Buttons (1-6)
To store a station:
1. Tune to the selected station.
2. Pick a preset button and hold it
until you hear a beep.
To listen to a stored station, select a
band, then press the preset button.
SKIP Bar
Press and hold to search up and down the
selected band for a station with a strong
signal.CATEGORY Bar (FOLDER Bar)
Press either side to display and
select an RDS category. TITLE Button
Press to switch the RDS name on and off. AM/FM Button
Press to select a band.
RETURN Button
Press to go back to the previous display.SETUP Button
Press to display menu items.
Models without rear entertainment system
Selector Knob
Press and turn to the radio
frequency.
Page 207 of 441

206
uuAudio System Basic OperationuPlaying the AM/FM Radio
Features
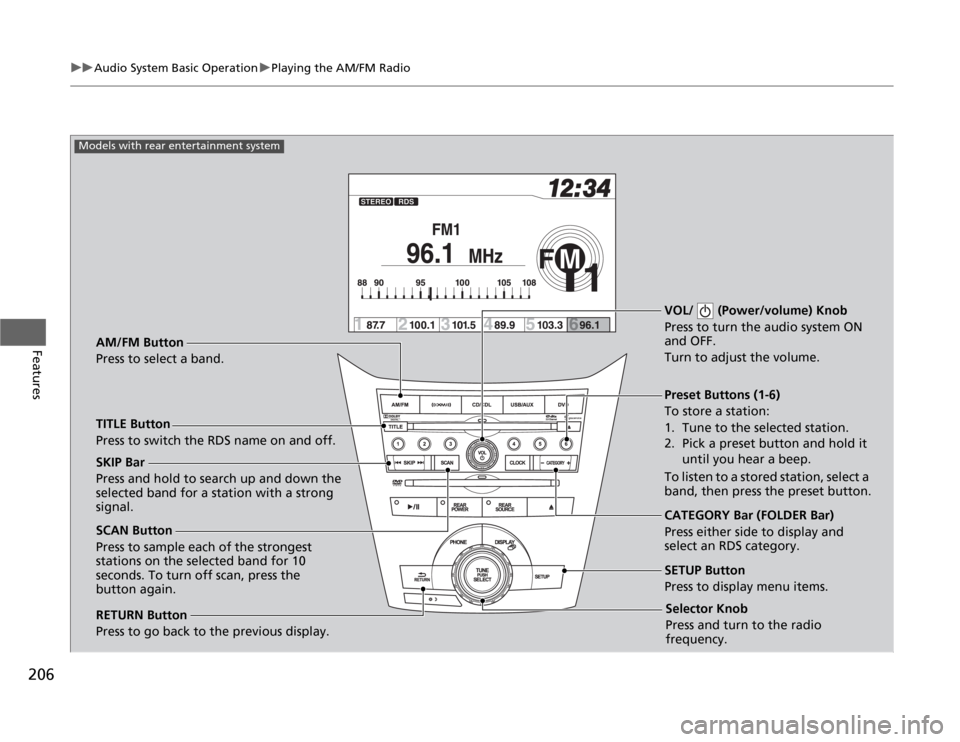
Selector Knob
Press and turn to tune the radio
frequency.
SCAN Button
Press to sample each of the strongest
stations on the selected band for 10
seconds. To turn off scan, press the
button again.VOL/ (Power/volume) Knob
Press to turn the audio system ON
and OFF.
Turn to adjust the volume.
Preset Buttons (1-6)
To store a station:
1. Tune to the selected station.
2. Pick a preset button and hold it
until you hear a beep.
To listen to a stored station, select a
band, then press the preset button. SKIP Bar
Press and hold to search up and down the
selected band for a station with a strong
signal.
CATEGORY Bar (FOLDER Bar)
Press either side to display and
select an RDS category. TITLE Button
Press to switch the RDS name on and off. AM/FM Button
Press to select a band.
RETURN Button
Press to go back to the previous display.SETUP Button
Press to display menu items.
Models with rear entertainment system
Selector Knob
Press and turn to the radio
frequency.
Page 210 of 441

209
uuAudio System Basic OperationuPlaying the XM
® Radio
Continued
Features
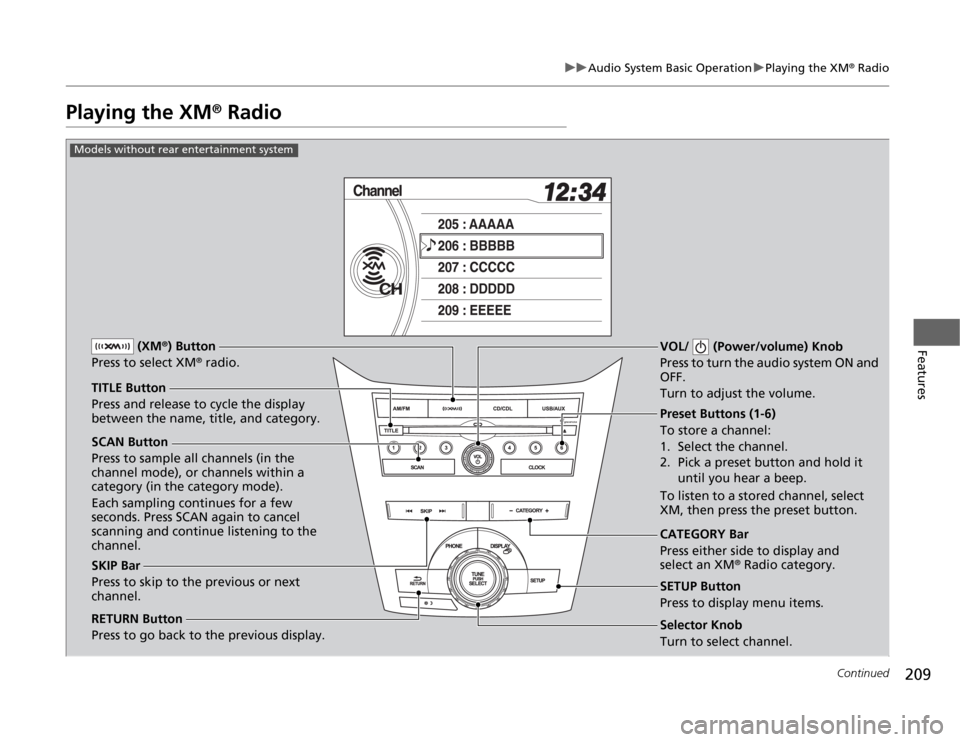
Playing the XM
® Radio
SCAN Button
Press to sample all channels (in the
channel mode), or channels within a
category (in the category mode).
Each sampling continues for a few
seconds. Press SCAN again to cancel
scanning and continue listening to the
channel.VOL/ (Power/volume) Knob
Press to turn the audio system ON and
OFF.
Turn to adjust the volume.
Preset Buttons (1-6)
To store a channel:
1. Select the channel.
2. Pick a preset button and hold it
until you hear a beep.
To listen to a stored channel, select
XM, then press the preset button.
SKIP Bar
Press to skip to the previous or next
channel.CATEGORY Bar
Press either side to display and
select an XM
® Radio category. TITLE Button
Press and release to cycle the display
between the name, title, and category. (XM
®) Button
Press to select XM
® radio.
RETURN Button
Press to go back to the previous display.
Selector Knob
Turn to select channel. SETUP Button
Press to display menu items.
Models without rear entertainment system